background image

Page 10

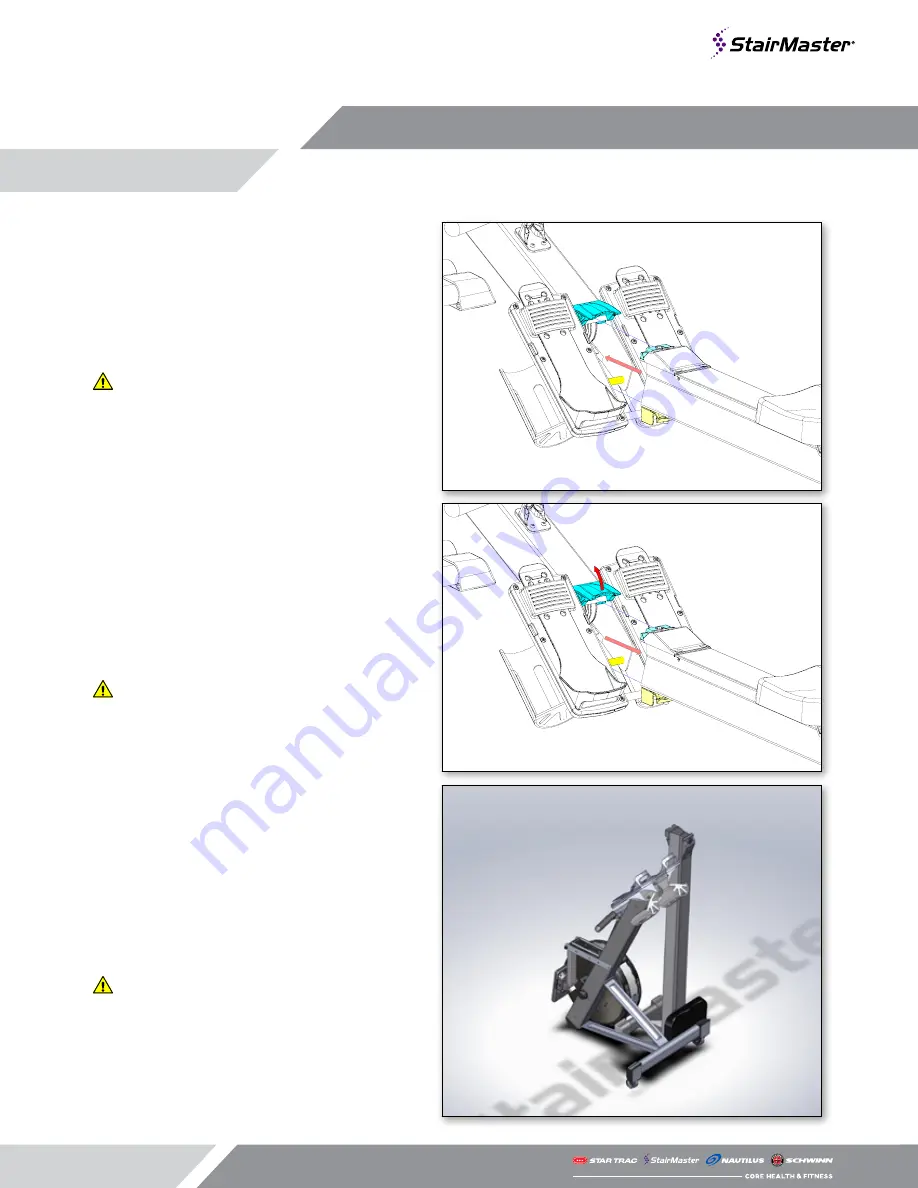
Attaching the Monorail

Lift up on the center lock lever and insert the back 

half of the HIIT Rower into the front half ensuring that 

the two halves of the rower body lock together.

 CAUTION: Ensure that the center lever fully locks 

into place once the back half of the HIIT Rower is con-

nected to the front half. If the lever does not lock into 

place, the two halves could separate during use.

Detaching the Monorail

Lift up on the center lock lever to unlock the back 

half of the HIIT Rower from the front half. Lift up on 

the back rail to raise the back half off the locking pin. 

Separate the two halves. 

 CAUTION: Ensure that fingers are clear of the joint 

to prevent pinching.

Storing the HIIT Rower

The StairMaster HIIT Rower can be easily stored on 

end by disconnecting at the center point.

 CAUTION: Do not store the rower fully assembled 

in the vertical position as it may tip over.

OPERATIONS

Summary of Contents for Core Health & Fitness HIIT ROWER

Page 1: ...OWNER S MANUAL HIIT ROWER Core Health Fitness...

Page 2: ...CT SPOTLIGHT 2 IMPORTANT SAFETY INSTRUCTIONS 3 IMPORTANT LABEL LOCATIONS 9 OPERATIONS 10 HIIT QUICK START 11 USING THE HIIT ROWER 13 SUPPORT AND SERVICE 14 MAINTENANCE 15 BUNGEE INSTALLATION 17 TABLE...

Page 3: ...Page 2 9 4690 HIIT Rower Overall Weight Width Length Height Max User Weight 74 lbs 33 5 kg 26 in 67 cm 95 in 242 cm 32 5 in 82 cm 0 350 lbs 0 158 kg PRODUCT SPOTLIGHT...

Page 4: ...ns are the recommended minimum distances The actual area for access and passage is the responsibility of the facility and should take into account this training envelope and any other national or loca...

Page 5: ...uipment or that may restrict or prevent movement 10 Do not let handle fly into chain guide 11 Pull straight back with both hands Do not row with one hand only Abuse of the chain can result in injury 1...

Page 6: ...recommand es La zone d acc s et de passage est la responsabilit du club et doit prendre en compte cette structure d entra nement ainsi que les codes et r glementations nationales et locales 24 in 0 6...

Page 7: ...votre libert de mouvement 10 Ne laissez pas la poign e taper le chemin de cha ne 11 Tirez avec les deux mains dans l axe Ne ramez pas avec une seule main Une mauvaise utilisation de la cha ne pourrai...

Page 8: ...n 3 Montieren und nutzen Sie das Ger t auf einer soliden ebenen Oberfl che Stellen Sie das Ger t so auf dass auf allen Seiten um das Ger t ein Freiraum von mindestens 0 6 m besteht damit der Benutzer...

Page 9: ...e Kinder in der N he der Maschine nicht unbeaufsichtigt 9 Tragen Sie w hrend der Nutzung des Ger tes angemessene Kleidung Tragen Sie immer Sportschuhe und vermeiden Sie lose h ngende Kleidungsst cke d...

Page 10: ...Page 9 IMPORTANT LABEL LOCATIONS 731 0512 CAUTION Pinch Point Keep hands and fingers clear during machine operation...

Page 11: ...o place the two halves could separate during use Detaching the Monorail Lift up on the center lock lever to unlock the back half of the HIIT Rower from the front half Lift up on the back rail to raise...

Page 12: ...tance Press ENTER to set Press ENTER to start program Press INTERVAL program button Use up down arrows to select desired WORK time ENTER to set Use up down arrows to select desired REST time ENTER to...

Page 13: ...UTTON TO CHANGE UNITS screen5 selectunits FOR THE HIITMILL ONLY PRESS RESISTANCE LEVER TO THE FORWARD MOST POSITION PRESS TIME BUTTON TO SET ANGLE TO ZERO screen7 HIITMILLCALIBRATION ONLY IF RECOMMEND...

Page 14: ...ith your arms extended 2 In the effort or power phase you are pressing forward with your legs while keeping the back upright and the arms extended pulling the handle into your upper abdomen As your le...

Page 15: ...r information https support corehandf com HIITROWER Warranty information is available at https corehandf com warranty Contact Information CORE HEALTH FITNESS 4400 NE 77th Avenue Suite 300 Vancouver WA...

Page 16: ...we recommend having the tools listed available when performing maintenance Tool Socket Set SAE Screwdriver Set Phillips Socket Set Metric Rubber Mallet Socket driver USB Flash Drive Open end wrenches...

Page 17: ...ral Maintenance Oil Chain1 X Inspect Chain X Tighten Slack Cord if Needed2 X Check Handle Connection X Check Screws for Tightness X Check Console Arm Joints loosen or tighten as needed X Cleaning Wipe...

Page 18: ...om the pulley axle to aid in attaching the bungee 2 Once one end of the bungee is secured to the termination clip pass it over then underneath the first pulley P1 on the opposite side P2 P3 P4 P1 3 Pa...

Page 19: ...aining end of the bungee cord through the eye of the termination clip then push the bungee into the tapered slot below the eye Pass the remaining length of the bungee through the open eyelet then back...

Page 20: ...2018 CORE HEALTH FITNESS LLC PART NUMBER 620 8675 REV A...

Reviews: