background image

Page | 29 


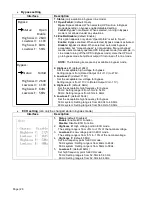
Output setting

 (can only be changed while in bypass mode)


Interface 

Description 

Output:                 

Volt:              208V

Freq:              Auto

CVCF:        Disable


1.  Volt: 

(default: 208V*) 

200: 

Presenting the rated output voltage with 200Vac 

208: 

Presenting the rated output voltage with 208Vac 

220:

 Presenting the rated output voltage with 220Vac 

230:

 Presenting the rated output voltage with 230Vac 

240: 

Presenting the rated output voltage with 240Vac 

*

NOTE: Units ending “-240” has defaut set to 240V 

2.  Freq: 

(default: Auto)


50Hz: 

The output frequency is set for 50Hz. 


60Hz:

 The output frequency is set for 60Hz.


Auto:

 If selected, output frequency will be decided according to the 

latest normal utility frequency.  
46Hz to 54Hz, the output frequency will be 50.0Hz.  
56Hz to 64Hz, the output frequency will be 60.0Hz.  

3.  CVCF:

 (default: Disabled)


To decide whether or not converter mode is activated. 

Enable: 

The output frequency will be fixed at 50Hz or 60Hz according 

to setting of “Freq”. The input frequency could be from 46Hz to 64Hz.


Disable: 

The output frequency will synchronize with the input 

frequency within 46~54 Hz for 50Hz system or within 56~64 Hz for 
60Hz system.


NOTE: CVCF means Constant Voltage and Constant Frequency, it 
represents converter mode.


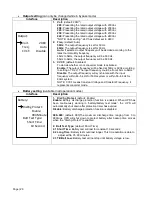
Battery setting

 (available in all operation modes)


Interface 

Description 

Battery:                 

    DisChg Protect:

                Enable:

                990 Minute

    Batt Test Type:

          Short Time:

               10 Second


1.  DisChg Protect:

 (default: Enable)


Enable:

  Battery discharge protection function is enabled. When UPS has 

been continuously working  in “battery/battery test mode”, the  UPS will 
automatically shut down after protection timer has expired 

Disable:

 Battery discharge protection function is disabled. 

 
000~999:

  (default:  990)The maximum discharge time  ranging  from 0 to 

999mins. UPS will shut down to protect battery after backup time arrives 
when the “Dischg Protect” is enabled.  

 
2.  Batt Test Type: 

(default: Short Time)


2.1 Short Time: 

Battery test will last for constant 10 seconds; 


2.2 Long Time: 

Battery test could last longer. This time duration is able to 

adjust within 01~99 minutes. 

2.3 Till Batt Low:

 Battery test will not stop until battery voltage is low.  


Summary of Contents for Unistar VP

Page 1: ...003 2520 REV G UNISTAR VP 120 230V 50 60Hz 6 and 10kVA USER MANUAL...

Page 2: ...oducts Company The Staco Energy Products Company reserves the right to modify the product described herein in order to improve it at any time and without notice 301 Gaddis Boulevard Dayton Ohio 45403...

Page 3: ...t should be installed where it will not readily be subjected to tampering by unauthorized personnel f The use of accessory equipment not recommended by the manufacturer may cause an unsafe condition g...

Page 4: ...tions Keep unauthorized personnel away from batteries There is a risk of explosion if batteries are replaced by an incorrect type Replace with same type and rating only Proper disposal of batteries is...

Page 5: ...he Personal Protective Equipment PPE described below Personnel involved in the installation or maintenance of the unit must be properly clothed The following signs show the protective equipment that s...

Page 6: ...S Installation 9 2 6 1 UPS Input Output Wiring 9 2 6 2 Battery Pack Installation 10 2 7 ISO Pack Installation 11 2 7 1 ISO Pack Input 11 2 7 2 ISO Pack Output 12 2 7 3 120V 120V Output 12 2 7 4 208V O...

Page 7: ...y Pack Rear Panel 5 Figure 4 ISO Pack Rear Panel 5 Figure 5 3U Tower Installation 7 Figure 6 6U Tower Installation 7 Figure 7 Rack Mount Installation 8 Figure 8 Terminal block wiring diagram of UPS 9...

Page 8: ...ectiveness is not recommended Do not use this equipment in the presence of a flammable anesthetic mixture with air oxygen or nitrous oxide The UPS is connected to a DC energy source battery The output...

Page 9: ...attery is inadvertently grounded If inadvertently grounded remove source from ground Contact with any part of a grounded battery can result in electrical shock The batteries are recyclable The batteri...

Page 10: ...he shipping package contains 1 UPS 1 user manual 1 monitoring software CD 1 RS 232 cable option 1 USB cable 1 battery cable Tower type installation supporters Rack type installation ears Battery cable...

Page 11: ...control in parallel operation P modules only 5 Parallel port UPS communication in parallel operation P modules only 6 Intelligent slot Optional accessories to remotely control and monitor your UPS sy...

Page 12: ...ery Pack Rear Panel 1 External Battery Connector 2 Battery pack output circuit breaker 2 3 ISO Pack Cabinet Rear Panel View Figure 4 ISO Pack Rear Panel 1 Input ground 2 Input terminals 3 Output termi...

Page 13: ...em Single Line Diagram 2 4 1 UPS Single Line Diagram 2 4 2 ISO Pack Single Line diagram 240V X1 N X3 N L1 L2 X2 Output 208V N 240V 208V 120V 120V Note 1 Note1 Field installed jumper required for 208V...

Page 14: ...n same method 2 For the UPS and matching Battery Pack a Assemble the two feet and two long extensions together to make one support with 10 25in 26cm width The other support can be copied in same metho...

Page 15: ...the ears should face forward 2 Lift the UPS module and slide it onto the mounting shelves 3 Attach the UPS module to the rack by passing the screws nuts and washers user provided through mounting ears...

Page 16: ...rear panel of UPS Then connect the input and output wires according to Figure 8 NOTE Connect the earth ground wire first when making wire connection Disconnect the earth ground wire last when making...

Page 17: ...used For standard matching battery pack there is one DC breaker to disconnect the battery pack and the UPS But for other external battery packs contact your Staco Representative For the 10KVA model i...

Page 18: ...of the UPS will be connected to the input terminals of the ISO Pack 240V X1 N X3 N L1 L2 X2 Input 208V N Figure 10 ISO Pack Input 1 line 240V System Figure 11 Wiring UPS output to ISO Pack 240V 208V...

Page 19: ...re are 2 sets of 120V Each set can carry of the total UPS capacity Connect one load to X1 N and the other load to X3 N 120V 120V X1 N X3 N L1 L2 X2 Output N 120V 120V Figure 13 Output wiring of ISO Pa...

Page 20: ...ut Jumper must be added between N and X3 as shown in Figure 15 Connect the load to X1 N Note 1 240V X1 N X3 N L1 L2 X2 Output N 240V Note 1 Note 1 Full rated jumper must be installed Figure 15 Output...

Page 21: ...ernal Panel Furnished by Others 120V X1 N X3 N L1 L2 X2 Output N 208V 120V Note 1 Note 1 Full rated jumper must be installed Figure 16 Output wiring of ISO Pack 208V 120V 2 7 8 120V and 240V Output 12...

Page 22: ...PO function open the terminals Figure 18 EPO connections on UPS WARNING The EPO RS 232 and USB circuits are an IEC 60950 safety extra low voltage SELV circuit This circuit must be separated from any h...

Page 23: ...forbidden h frequency auto detect enable or disable i inverter short clear enable or disable 3 Turn on each UPS into the line mode or battery mode respectively see 3 5 1 Turn on the UPS with utility...

Page 24: ...Page 17 2 9 2 Parallel Operation 1 Wire UPS parallel cables and Power cables as shown in below pictures Figure 20 Wiring of two UPS s in parallel Figure 21 Wiring of three UPS s in parallel...

Page 25: ...to turn on the power supply UPS will enter power on mode After initialization UPS will enter No Output mode c Within 15 seconds press ON button again to turn on UPS d A few seconds later after UPS is...

Page 26: ...de When input voltage is within acceptable range and bypass is enabled and the UPS inverter is not turned on or the inverter can t take the load the UPS will supply power to the load through bypass Ba...

Page 27: ...supply power to the load NOTE When UPS is in Bypass mode the load is not protected by UPS 3 Press the ON ENTER button while LCD is on default home screen LCD will show a prompt page of Turn On 4 Move...

Page 28: ...r to the section of changing battery quantity is consistent with actual connection 3 5 5 Battery Mode operation 1 When the UPS is in Battery mode the buzzer will beep according to different battery ca...

Page 29: ...till be working if bypass status has been set to enable the output voltage of the UPS will still exist 3 To fully cut off the output please switch off the external input breaker A few seconds later th...

Page 30: ...Page 23 3 6 LCD Operation...

Page 31: ...nt Information Setting Alarm for selection 2 Press UP or DOWN button to select item 3 Press ON ENTER button to confirm the selection 4 Press OFF ESC button to exit to home page 3 6 2 2 Control items N...

Page 32: ...e OFF ESC button in home page it is not necessary to enter into this control menu 2 Battery Test This item can be shown in all modes However battery test will not work in Battery Fault Eco mode 3 Mute...

Page 33: ...to startup the UPS this instruction must be executed NOTE Before executing this instruction you must check if the system cables and connections are in correct and safe condition Please read the relate...

Page 34: ...3 6 2 5 Setting Menu This menu is used to adjust the parameters or do calibration NOTE Not all settings will be available in every operation mode If the setting is not available in present mode the L...

Page 35: ...s V default 264V Set the acceptable high voltage for bypass Setting range is from Rated Output Volt 11V to 276V 3 LowLoss V default 110V Set the acceptable low voltage for bypass Setting range is from...

Page 36: ...cy could be from 46Hz to 64Hz Disable The output frequency will synchronize with the input frequency within 46 54 Hz for 50Hz system or within 56 64 Hz for 60Hz system NOTE CVCF means Constant Voltage...

Page 37: ...justment should be suitable to battery specifications Other settings available in all operation modes Interface Description Other Setting Hot Standby Backup Time Hot Standby Status Disable Backup Time...

Page 38: ...ED illuminates and the buzzer beeps continuously it means that there is a fatal error Users can get the fault code from the LCD panel Please refer to the trouble shooting table to check what problems...

Page 39: ...lation is blocked by the wall or other goods 4 Load is too heavy 1 Make sure the ambient temperature is not over 40 C 2 Make sure the fan is OK 3 Make sure the ventilation is OK 4 Remove some loads if...

Page 40: ...negative It means there is energy feedback into the internal of UPS from output It may be caused by regenerative load or caused by the current control failure in the parallel system Contact the facto...

Page 41: ...me 7 hours recover to 90 capacity 9 hours recover to 90 capacity Float Charging Voltage 273 VDC Charge Current max 4 Amps PHYSICAL UPS Dimension in 17 24 x 5 15 x 23 85 WxHxD 17 24 x 5 15 x 27 00 WxHx...

Page 42: ...nforced insulation or double insulated wire 5 4 Agency Listings Safety Safety Conformance IEC EN 62040 1 UL1778 4th Edition Safety Markings UL CE EMI Conducted Emission IEC EN 62040 2 FCC Part 15 Clas...

Reviews: