background image

-19-

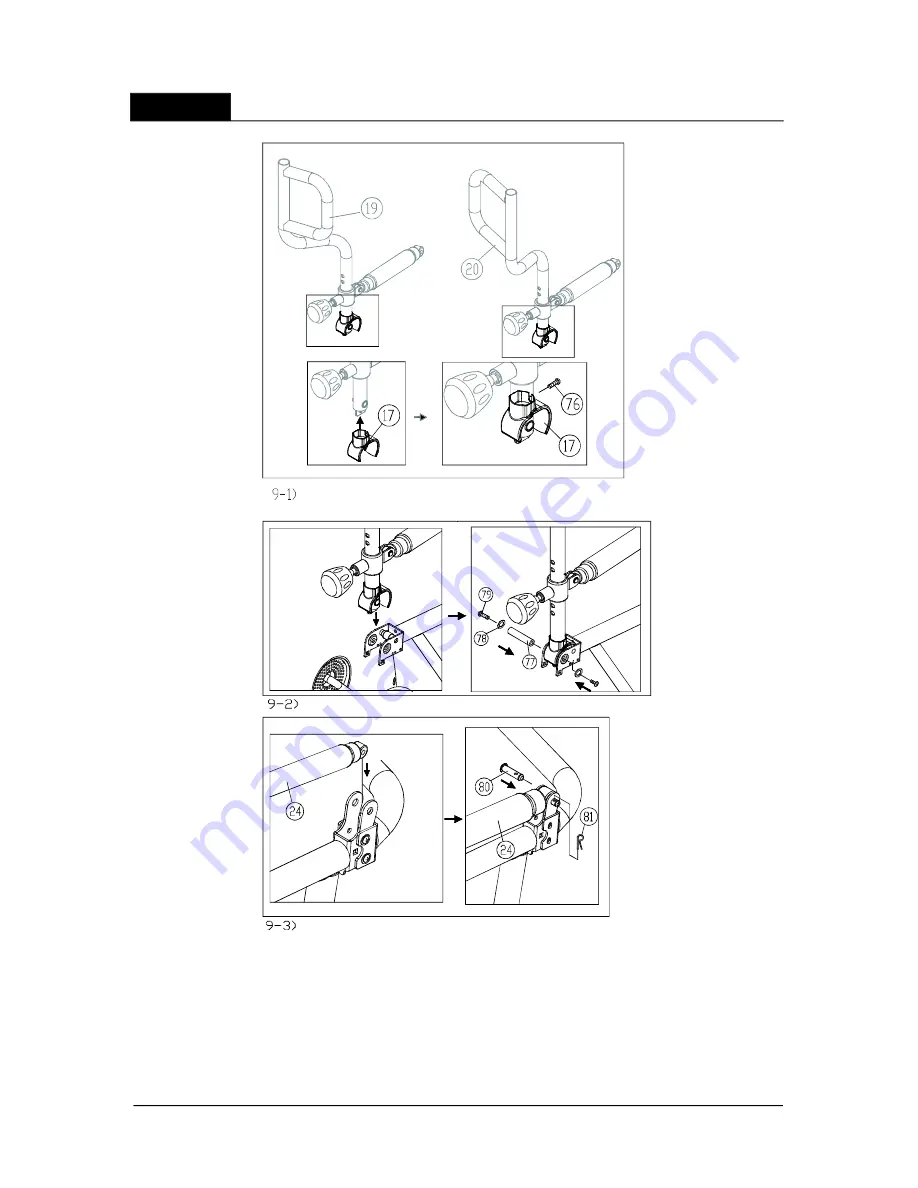
STEP 9

Install Handles

9-1. Insert covers (17) onto left and right handles (19)(20) and secure them with screws

(76).

9-2. Place the right handle arm (20) into the mount on the right support. Then insert the

bushing (77) and secure the screws and washers (79)(80).

9-3. Put the gas spring (shock) (24) onto the right support tube and use the clevis pin

(80) and R-shaped cotter (or hitch) pin (81) to secure it.

Summary of Contents for XT50

Page 1: ...eight Adjustment 4 1 3 Swivel Seat Adjustment 4 1 4 Arm Resistance Adjustments Chapter 5 The XT50 Cross Trainer Display 5 1 Display Features 5 1 1 Display Zones 5 1 2 Display Specifications 5 1 3 Display Key Overview 5 2 Getting Started 5 2 1 Start Up Screen 5 2 2 Quick Start 5 2 3 Start 5 2 4 Establishing a User ID 5 3 Operating Workout Programs 5 3 1 Workout Programs 5 3 2 Workout Program Comple...

Page 2: ...Troubleshooting 39 7 1 Maintenance 39 7 1 1 Cleaning 39 7 1 2 Inspection 39 7 1 3 Clearing User Settings 39 7 1 4 Seeing Internal Settings 40 7 2 Troubleshooting 40 7 2 1 Error Messages 40 7 2 2 Inspecting and Replacing the Fuse 41 7 3 Wiring Schematic 42 ...

Page 3: ... your workout Consult your physician immediately Consult a physician before undergoing any rigorous exercise program This appliance is not intended for use by persons with reduced physical sensory or mental capabilities or by people whose experience or product knowledge does not allow them to safely operate the device Assemble and operate the equipment on a solid level surface Disconnected the pow...

Page 4: ...shocks If in doubt as to the quality of your electric power supply or grounding check with a qualified electrician Do not modify the plug or cord provided with this equipment Any modification to the electrical plug or other aspects of this product will void the warranty This manual provides instructions for the assembly installation and operation of the SportsArt XT50 Cross Trainer Please study th...

Page 5: ...anufactured to become an integral part of your fitness regimen This product is a unique tool made to help you obtain your fitness goals But like every tool it must be used properly Please read and abide by instructions in this manual Understanding the correct use of this equipment will help you achieve your exercise goals safely and effectively CHAPTER 2 UNPACKING THE CROSS TRAINER 2 1 INTRODUCTIO...

Page 6: ...at Left 45 degrees right 45 degrees Display Blue backlit LCD Product dimensions 1825 x 693 x 1426 mm 71 8 x 27 3 x 56 1 inches L x W x H Carton 1 main unit 1720 x 475 x 780 mm 67 7 x 18 7 x 30 7 inches Carton 2 arm assembly 950 x 530 x 320 mm 37 4 x 20 9 x 12 6 inches Net Weight 80 kgs total 67 kgs main unit 13 kgs arm assembly 176 lbs total 147 lbs main unit 29 lbs arm assembly Maximum user weigh...

Page 7: ...2 3 COMPONENTS The following diagram shows large parts used in the assembly of the SportsArt XT50 Cross Trainer All of these parts are packed inside the shipping carton 5 ...

Page 8: ...ort Left arm support Gas spring shock Arm front support 2 4 COMPONENETS IN THE HARDWARE KIT 6 A hardware kit is provided in the packaging of this product Please inspect the hardware kit for the following items No Qty Description Specification 1 2 3 4 5 6 7 8 9 10 11 12 Screw socket Beveled head inner hex screw Flat washer Lock nut External tooth lock washer Mushroom top Philips head screw Open end...

Page 9: ...m top inner hex screw M8 Serrated washer D18 d8 5 t2 0 19T Cushion Mushroom top Philips head screw M5 Mushroom top inner hex screw M8 Spring washer 5 16 17 t1 5 Flat washer 5 16 t2 0 Flat washer 5 16 D17 t1 5 Spring washer 5 16 t2 0 Mushroom top inner hex screw M8 Round top inner hex screw M8 Seat adjustment lever Gas spring shock Crank Seat shock adjustment Swivel bracket Power cord in carton Pow...

Page 10: ...safe operation Before moving this equipment removing covers or accessing electronic components make sure the power switch is off and the product is disconnected from the power outlet Beware that some electronic components retain an electric charge for a few seconds after power supply is disconnected Be cautious during the installation and assembly of this equipment Think about the installation sit...

Page 11: ...ws 41 and remove left and right seat support covers 11 12 Note the front seat support cover 11 has a hole for the gas spring The rear seat support cover 12 does not have a hole for the gas spring Remove Left Right Seat Support Covers ...

Page 12: ...ector 2 as shown Then tuck the remaining visible part of the data cable into the pedestal 2 2 Secure screws 43 to connect the display 2 to the pedestal 4 2 3 Snap display left and right covers 3 into place then secure them with screws 44 45 Install the Display ...

Page 13: ...o the pedestal 4 3 2 Connect the upper and lower data cables 42 46 as shown 3 3 Put the pedestal in place on the unit frame 1 Then loosely secure screws and washers 47 48 49 in the following order C D then E Tighten all these screws Finally set the pedestal collar 5 into place ...

Page 14: ...tachment holes 4 2 Pull the seat swivel lock handle 70 on the swivel bracket 16 as shown This unlocks the swivel mechanism Twist the swivel bracket plates so they are at a 45 degree angle from each other Note this position exposes screw holes in the bottom plate of the swivel bracket 4 3 Set the swivel bracket onto the seat mount on the product frame 1 with the swivel lock handle 70 on the right s...

Page 15: ...dle 70 to unlock the seat Then rotate the seat to the right about 45 degrees exposing two screw holes Then secure screws 56 into holes G on the seat bracket Press the swivel lock handle again if necessary to make space in which to work Please refer to Figure 4 1 for the placement of holes G 4 6 Press the swivel lock handle 70 and rotate the seat to the original position in line with the frame ...

Page 16: ... and washers 51 52 53 to secure the seat back support 7 in place on the seat support 5 2 Hold the cup holder 15 in place and secure it with screws 50 at the top 5 3 Insert the screwdriver through holes in the cup holder to secure screws in the side ...

Page 17: ...upplying power locate the voltage specification sticker on the product Make sure that product voltage specifications match the power supply in your area 6 Use screws and washers 54 55 56 to secure the seat back cushion 8 onto the seat back support 7 ...

Page 18: ...st be installed on cranks 59 according to side Pedals are marked L for left or R for right The and sides of the product equal the left and right sides respectively of someone exercising on it Note the left pedal screws in counterclockwise The right pedal screws in clockwise Insert pedals and thread them properly by hand Then use the wrench to secure them into place left right ...

Page 19: ...t this arm onto the right support mount 73 on the product frame Loosely secure screws and washers 71 72 in place Next insert assembly arm I into the left arm support tube 23 Then put this arm onto the left arm support mount Then loosely secure screws 71 72 Note do not tighten these screws firmly yet only secure these screws after the front support has been put in place ...

Page 20: ... Then loosely secure screws and washers 71 72 at area J Do not tighten these screws yet Then secure screws and washers 74 75 in both left 22 and right 23 support tubes Finally fully secure screws in the center area J and on both sides areas K and L ...

Page 21: ...e them with screws 76 9 2 Place the right handle arm 20 into the mount on the right support Then insert the bushing 77 and secure the screws and washers 79 80 9 3 Put the gas spring shock 24 onto the right support tube and use the clevis pin 80 and R shaped cotter or hitch pin 81 to secure it ...

Page 22: ...overs 21 in place on the right support and secure them with screws 41 9 5 Put covers 18 near the arm resistance adjustment knob in place and secure them with screws 41 Follow the same process 9 2 through 9 5 to assemble the left side as well ...

Page 23: ...s Screw sockets hold cover screws in place Inspect them to ensure an easy installation of covers 10 Inspect screw sockets 25 by pushing them into the bike frame 1 There are a total of 16 screw sockets placed symmetrically on the frame ...

Page 24: ...allows you to install rear leg covers 11 1 Pull and hold the seat adjustment lever 57 to activate the gas spring 11 2 The seat adjustment gas spring will move the seat up and back to its highest position Release the lever when the seat is in its highest position ...

Page 25: ... rear leg cover 9 in place on the frame 1 11 4 Secure screws and washers 41 29 30 loosely at first When all screws are in place tighten the screws Important avoid over tightening screws and cracking the plastic covers ...

Page 26: ... 24 STEP 12 Install Horizontal Covers 12 1 Put left right horizontal covers 10 in place on the frame 1 12 2 Loosely secure screws 41 After all screws are in place secure them firmly ...

Page 27: ... 25 STEP 13 Install Seat Support Covers 13 1 Put seat support covers front 11 and back 12 in place as shown 13 2 Secure these covers with screws 41 Make sure all screws on the unit are fastened securely ...

Page 28: ...r nut 61 down making room for adjustments 14 2 Adjust the rubber leveler feet 60 up or down until the cross trainer is level and does not rock 14 3 Secure this position by rotating the leveler nut 61 against the frame Noises and other issues often result from products that are not leveled Important properly Avoid issues in the future by leveling the product properly during assembly ...

Page 29: ...the other end of the cord into an electric outlet with the appropriate power supply An on off rocker switch is located near the power cord connector On one side of the on off rocker switch is a circle On the other side is a line Press the line side of the switch to turn the unit on Press the circle side of the switch to turn the unit off When turned on the switch lights up and the display lights u...

Page 30: ...sary and is best completed during assembly The following explains often used instant adjustments along with the more involved manual seat height adjustment 4 1 1 Automatic Seat Adjustment The seat position of the SportsArt XT50 Cross Trainer can be adjusted automatically to suit people of different physical sizes To adjust the seat position simply lift the seat adjustment lever 57 The gas spring a...

Page 31: ...as spring attaches to the frame Note that the picture below shows two positions O and P Position O is the standard setting used at the factory Position P is an optional setting Moving the connection of the gas spring to the forward position P will make the seat lower Follow instructions below to move the gas spring connection point Step 1 Prop up the rear part of the frame with an eight by 12 inch...

Page 32: ...shing 68 B4 2 Use tool 39 to push out the clevis pin 67 B4 3 Move the shock connector hole to align with the other hole either O or P in the frame Insert the clevis pin 67 into hole H and bushing 68 Secure the hardware with screw 69 ...

Page 33: ...s Trainer swivels to allow easy entrance The following explains how to operate this function Pull the seat swivel lock handle 70 to allow the seat to rotate Rotate the seat 45 degrees as shown At the 0 and 45 degree positions the seat clicks and stays in place ...

Page 34: ...uctions below D 1 Twist the arm resistance knob counterclockwise to loosen it D 2 Pull the knob toward yourself and adjust the handle arm attachment position up or down as shown above The higher the knob s position is the higher the resistance The lower the knob s position is the lower the resistance D 3 When the resistance suits you rotate the adjustment knob clockwise to secure this position ...

Page 35: ...ONE4 ZONE5 ZONE 1 ZONE 2 ZONE 3 ZONE 4 ZONE 5 Zone 1 the workout illustration area shows exercise programs illustrations user settings prompts user ID age weight and KG or LB units of measure Zone 2 the feedback area shows workout information including WORKOUT LEVEL HEART RATE TIME RPM DISTANCE and CALORIES LEDs light to indicate active workout programs RANDOM TRACK INTERVAL and HILL Main control ...

Page 36: ...workout programs including TRACK RANDOM INTERVAL and HILL along with helpful feedback including Setting indicators such as flash when activated Basic function keys include the following WORKOUT LEVEL to increase resistance Press WORKOUT LEVEL to decrease resistance Resistance settings range from WORKOUT LEVEL keys are also used to set up user age weight and workout duration In an exercise program ...

Page 37: ... ID Using a user ID provides personal workout statistics such as total calorie expenditure time and distance While the start up screen appears press the key The 1 for USER 1 Press the key to toggle as follows USER 1 USER 2 USER 3 USER 4 USER 1 USER 2 USER 3 Press the key to toggle as follows USER 4 USER 3 USER 2 USER 1 USER 4 USER 3 USER 2 Press the ENTER key to confirm your choice and proceed to ...

Page 38: ... INTERVAL RANDOM TRACK and HILL Choose a workout program by pressing the associated key while the workout program indicator flashes If you stop pedaling in any workout program PAUSE scrolls across the screen Continue pedaling or press START to resume your workout One lap is 400 meters 0 25 mile The preset resistance level is level one Press WORKOUT LEVEL to adjust resistance After leaving the trac...

Page 39: ...age heart rate appear along with ACCU DATA If you entered the exercise program through QUICK START the start up screen appears If you entered through START SELECT PROGRAM OR PRESS START scrolls across the screen In general QUICK START mode does not allow the accumulation of personal workout statistics But there is a process by which you can obtain accumulated workout statistics and operate in QUIC...

Page 40: ...our fitness level increases you will be able to maintain your heart rate in the training zone for longer periods usually between 20 and 30 minutes To achieve the greatest benefits aerobic exercise should be performed three to five times per week Allow sufficient time at least 24 hours for your body to recover after exercise CHAPTER 6 GUIDELINES FOR EXERCISE 6 1 HOW LONG SHOULD I EXERCISE 6 2 HOW O...

Page 41: ...eration After each use wipe perspiration off the equipment Perspiration is corrosive and can damage the performance of this product Like periodic cleaning a regular inspection routine can help keep this product in optimum performance Look and listen for slipping belts loose fasteners and bearing wear Contact the SportsArt Service Department for repairs Disconnect power before removing covers or ac...

Page 42: ...e seconds Time and distance windows show total distance as eight digits Units appear as MILE or KM Press the ENTER key to proceed 3 Time and distance windows show total time as four digits HOUR appears in the workout profile window Press the ENTER key to proceed 4 Press WORKOUT LEVEL or WORKOUT LEVEL to toggle between LB representing US standard units and KG metric units Press the ENTER key to ret...

Page 43: ... in toward the unit Then turn the fuse holder counterclockwise Remove the fuse and fuse holder 16 3 Inspect the fuse If it is broken it makes an electrical open the on off switch on the product will not light up the product cannot operate If the fuse is not broken it has continuity inspect your wall power supply 16 4 Install a good fuse into the fuse holder Insert the fuse and fuse holder M into t...

Page 44: ...7 3 Wiring Schematic 42 XT50 J2 J6 Receiver board Resistance VR motor Speed Sensor XT50DRV Board CN3 CN2 CN1 Power Transformer 1 2 3 4 CN4 CN5 XT50 CTL Board Your Authorized SPORTS ART Distributor ...

Reviews: