
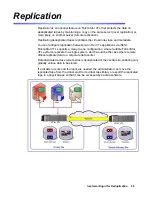


Replication
Implementing nTier Deduplication
71
Continuous=...
ConFailTimeout=...
4. Locate the file $ISHOME/etc/hostname/sircluster.conf.
Search for SIRReplicator tags that match the replication source name.
Delete any line that contains this tag. For example, if the replication source
server h124-128 is to be removed, delete this line:
<SIRReplicator guid="ac1e8037-0000-47db-5a50-4229cd56cde8"
name="guigroup_h124-182"/>
Removing
replication
configuration
from a virtual
tape
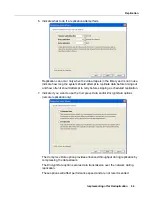
This procedure removes replication configuration from the primary virtual tape and
at the same time deletes the replica resource (FVIT) on the target server. The
replica tape in the target server’s virtual vault is
not
deleted.
There are two ways to do this:
1. Navigate to the primary virtual tape.
2. Right-click the tape and select
Replication --> Remove
.
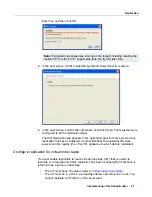
3. Click
OK
to confirm the configuration changes.
The confirmation screen displays the names of the primary virtual tape on the
primary server and the virtual tape replica (FVIT) on the target server.
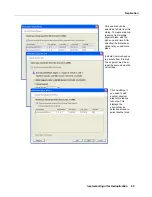
Or,
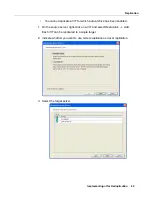
1. Navigate to the
Replica Resources
object on the target server.
2. Right-click the FVIT and select
Delete
.
3. Click
OK
to confirm the configuration changes.
The confirmation screen displays the names of the primary virtual tape on the
primary server and the virtual tape replica (FVIT) on the target server.
Removing
replication
configuration
from a virtual
tape
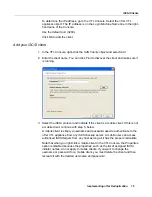
Note:
Always use the console for the primary (nTier VTL) server for this procedure.
This procedure removes replication configuration from the primary virtual tape and
at the same time deletes the replica resource (FVIT) on the target server. The
replica tape in the target server’s virtual vault is
not
deleted.
There are two ways to do this:
1. In the VTL console, navigate to the primary virtual tape.
2. Right-click the tape and select
Replication --> Remove
.
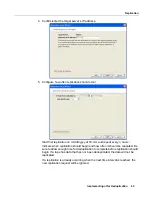
3. Click
OK
to confirm the configuration changes.
The confirmation screen displays the names of the primary virtual tape on the
primary server and the virtual tape replica (FVIT) on the target server.


