background image

Using the Wireless Remote Commander

21

P

repa

ra

ti

ons

Before use

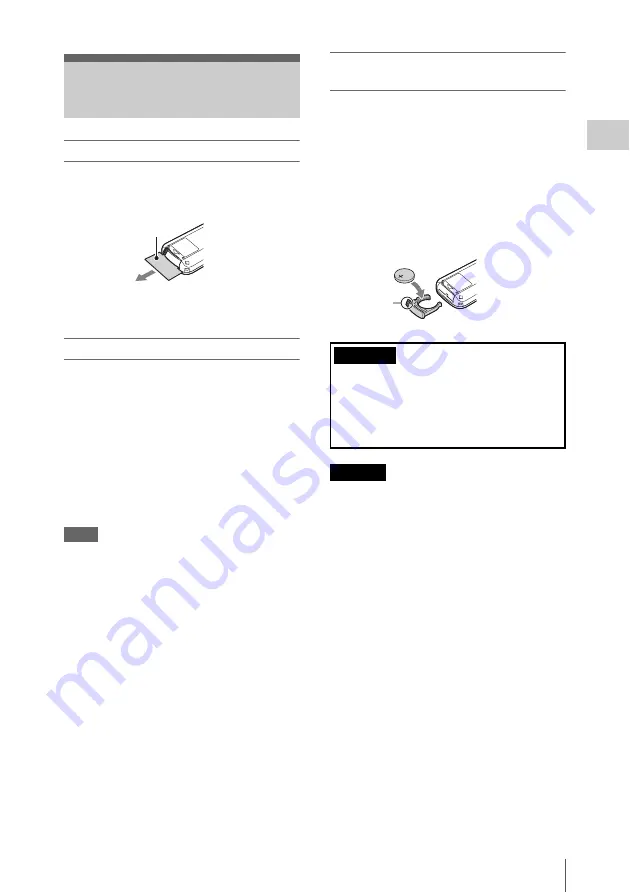
Before you use the supplied Wireless Remote 
Commander for the first time, pull out the 
insulation sheet from the battery holder.

A CR2025 lithium battery is set in the holder at 
the factory.

Using the Wireless Remote Commander

For controlling the camcorder from the Wireless 
Remote Commander, activate the remote control 
function of the camcorder after turning the power 
on.
Activating/deactivating the remote control 
function can be achieved using the Setup menu.

To activate using the menu

Press the MENU button to set the camcorder to 
Menu mode, then set “IR Remote” 

(page 86)

 of 

the System menu to “On.”

Notes

• Aim the Wireless Remote Commander towards the 

remote sensor to operate your camcorder.

• Point the remote sensor away from strong light sources 

such as direct sunlight or overhead lighting. Otherwise, 
the Wireless Remote Commander may not function 
properly.

• When you are operating with the Wireless Remote 

Commander supplied with your camcorder, your video 
device may also operate. In that case, select a 
commander mode other than DVD2 for your video 
device, or cover the sensor of your video device with 
black paper.

Replacing the battery in the Wireless 
Remote Commander

Use a commercially available CR2025 lithium 
battery. Do not use any battery other than a 
CR2025.

1.

While pressing on the tab, inset your 
fingernail into the slit to pull out the battery 
case.

2.

Place a new battery with the + side facing up.

3.

Insert the battery case back into the Wireless 
Remote Commander until it clicks.

• Danger of explosion if battery is incorrectly 

replaced. Replace only with the same or 
equivalent type recommended by the 
manufacturer.
When you dispose of the battery, you must obey 
the law in the relative area or country.

• When the lithium battery becomes weak, the 

operating distance of the Wireless Remote 
Commander may shorten, or the Wireless 
Remote Commander may not function properly. 
In this case, replace the battery with a Sony 
CR2025 lithium battery. Use of another battery 
may present a risk of fire or explosion.

Using the Wireless 
Remote Commander

Insulation sheet

CAUTION

Tab

• Battery may explode if mistreated.

Do not recharge, disassemble, or dispose of in 
fire.

• Batteries shall not be exposed to excessive 

heat such as sunshine, fire or the like.

WARNING

Summary of Contents for PXW-X160

Page 1: ...4 542 447 12 1 Solid State Memory Camcorder PXW X180 PXW X160 Operating Guide Before operating the unit please read this manual thoroughly and retain it for future reference 2014 Sony Corporation ...

Page 2: ...the Wireless Remote Commander 21 Using SxS Memory Cards 22 About SxS memory cards 22 Inserting an SxS memory card 22 Removing an SxS memory card 22 Switching between SxS memory cards 22 Formatting an SxS memory card 23 Checking the remaining time available for recording 23 Using Other Media 24 XQD memory cards 24 Memory Stick media SD cards 24 Using a UTILITY SD card 25 Usable SD cards 25 Insertin...

Page 3: ...W X180 only 40 Proxy Recording PXW X180 only 41 Usable SD cards 41 Formatting an SD card 41 Checking the remaining time 41 Performing proxy recording 41 Changing the proxy recording setting 41 About the recorded file 41 Storage destination of the recorded file 42 About the file name 42 Connecting to Other Device via Wireless LAN PXW X180 only 42 Attaching the IFU WLM3 43 Connecting with the wirele...

Page 4: ...isplaying the detailed information of a clip 58 Deleting clips 59 Changing information on the thumbnail screen 59 Thumbnail Menu 60 Menu Configuration and Detailed Settings Overview of the Setup menus 61 Setup menu layers 61 Setup Menu Operations 62 Setup Menu List 64 Camera menu 64 Paint menu 67 Audio menu 73 Video menu 74 LCD VF menu 75 TC UB menu 78 Recording menu 79 Media menu 80 File menu 82 ...

Page 5: ...cations 101 Warning Indications 101 Caution and Operation Confirmation Indications 102 Licenses 103 MPEG 2 Video 103 MPEG 4 AVC 103 END USER LICENSE AGREEMENT 103 On Accessing Software to which the GPL LGPL Applies 108 Open Software Licenses 108 Specifications 109 General 109 Lens 111 Camera Block 111 Inputs Outputs 112 Displays 112 Internal Microphone 113 Media Slot Block 113 AC adaptor ACDP 060S...

Page 6: ... 5 Accessory shoe mount 6 Microphone fixing clamper 35 7 Microphone holder 35 8 Multi Interface Shoe For details about the compatible accessories with the Multi Interface Shoe contact your dealer 9 Remote sensor 10 Power zoom lever 28 11 IRIS PUSH AUTO button 12 Air inlet Do not cover the air inlet 13 ZOOM switch To mount the accessory shoe Mount the accessory shoe on the accessory shoe mount as i...

Page 7: ... mount with four screws 3 Insert the accessory shoe plate in the direction of the arrow on the plate surface until the end of the plate engages the end of the shoe To remove the accessory shoe Remove the shoe plate in the same way as step 1 of To mount the accessory shoe Loosen the 4 screws and remove the accessory shoe from the accessory shoe mount ...

Page 8: ...utton 10 FOCUS switch 29 11 FULL AUTO button 12 CH 1 INT MIC EXT MI SHOE switch 34 13 AUTO MAN CH 1 switch 34 14 AUDIO LEVEL CH 1 dial 34 15 AUDIO LEVEL CH 2 dial 34 16 AUTO MAN CH 2 switch 34 17 CH 2 INT MIC EXT MI SHOE switch 34 18 STATUS CHECK button 11 19 MENU button 62 20 SHUTTER switch 21 PUSH AUTO button 29 22 WB SET button 23 ASSIGN 5 PEAKING button The ASSIGN 5 PEAKING button and the ASSI...

Page 9: ... operable 11 AUDIO INPUT1 connector 34 12 AUDIO INPUT2 connector 13 Cable holder Provided for securing a microphone cable etc 14 INPUT1 switch 34 15 INPUT2 switch 34 16 Grip belt 17 ON STANDBY switch 27 ON 1 STANDBY 18 Record button 27 19 Power Lamp 20 Air outlet Areas around the air outlet may become hot Do not cover the air outlet 21 USB wireless LAN module retracting part PXW X180 only 43 Conne...

Page 10: ... UTILITY SD slot access lamp Used for storing and loading the settings File function To be supported by a future upgrade software update 14 SLOT SELECT button 15 SxS memory card A slot access lamp 22 16 EJECT button 17 SxS memory card B slot access lamp 22 18 USB connector mini B type 89 19 USB connector A type To be supported by a future upgrade 20 CANCEL BACK button 62 21 SEL SET dial 62 22 WHT ...

Page 11: ... U BIT button 35 15 CANCEL BACK button 62 16 V v B b SET buttons 62 17 MENU button 62 VOLUME button and PLAY PAUSE button have raised tactile dots for your convenience in locating the buttons Bottom 1 Tripod receptacle 1 4 inch This receptacle is compatible with 1 4 20UNC screws Attach a tripod sold separately to the tripod receptacle using a tripod screw sold separately the length of the screw mu...

Page 12: ...r for the microphone input to CH 1 CH 2 level meter Level meter for CH 2 CH 2 Source Input source for CH 2 CH 2 Ref Sens Sensitivity of the internal microphone input to CH 2 or the reference level of audio input CH 2 Wind Filter Setting status of the wind filter for the microphone input to CH 2 Audio Format Audio format setting Headphone Out Headphone output setting Country Setting status of the r...

Page 13: ...ssed with a bar indicator Remaining time of Media B Estimated remaining time in minutes of the recording media inserted in slot B with the same condition Remaining life of Media B Remaining life in percent of the media inserted in slot B when the media has its remaining life data Media information of the proxy recording media PXW X180 only Media icon displayed when recording media is inserted in t...

Page 14: ... This button does not work on the camcorder 4 PREV NEXT buttons 5 PLAY button 6 STOP button 7 DISPLAY button 8 Transmitter 9 START STOP button 10 Power zoom lever 11 PAUSE button 12 MODE button This button does not work on the camcorder 13 b B v V ENTER buttons Rec Button Displays the slot for the recording target of the record button Handle Rec Button Displays the slot for the recording target of...

Page 15: ...mperature indication page 32 8 S Q motion frame rate indication page 79 9 Battery remaining indication page 17 10 Focus position indication Displays focus position 11 Zoom position indication Displays zoom position in the range of 0 wide end to 99 tele end 12 Iris position indication Displays iris position 13 Focus macro indication 14 Focus assist indication 15 SteadyShot indication 16 Focus mode ...

Page 16: ...e 33 Gamma indication page 68 Displays the gamma setting value 34 Recording format codec indication page 31 Displays the format that is recorded on an SxS memory card 35 System frequency and scan method indication 36 Recording format picture size indication page 31 Displays the picture size that is recorded on an SxS memory card Information displayed on the playback screen The following informatio...

Page 17: ...ommends attaching the camcorder to a tripod for convenience Checking battery charge remaining When recording or playback is in progress on the battery pack an icon to show the current battery charge level and usage time remaining are displayed on the LCD viewfinder screen page 15 The camcorder indicates the remaining usage time in minutes by calculating the available time with the battery pack if ...

Page 18: ...AC Adaptor from the wall outlet wall socket immediately if any malfunction occurs while using your camcorder Do not use the AC Adaptor placed in a narrow space such as between a wall and furniture Do not short circuit the plug of the AC Adaptor with any metallic objects This may cause a malfunction Even if your camcorder is turned off AC power house current is still supplied to it while connected ...

Page 19: ...r was supplied no battery pack and no DC IN connection the Initial Setting display will be displayed when you next turn the camcorder on While the Initial Setting display is shown no other operation except turning the power off is permitted until you finish the setting for this display Align the marks on the lens hood to those on the camcorder and turn the lens hood in the direction of the arrow 2...

Page 20: ...the LCD BRIGHT button page 11 Viewfinder Look through the viewfinder with the LCD screen closed when using the viewfinder If the viewfinder screen display is not clear adjust by using the lens adjustment lever below the viewfinder You can switch the brightness of the viewfinder with Brightness in VF Setting of the LCD VF menu page 75 Adjusting the LCD screen and viewfinder 1Open 180 degrees 2180 d...

Page 21: ...se select a commander mode other than DVD2 for your video device or cover the sensor of your video device with black paper Replacing the battery in the Wireless Remote Commander Use a commercially available CR2025 lithium battery Do not use any battery other than a CR2025 1 While pressing on the tab inset your fingernail into the slit to pull out the battery case 2 Place a new battery with the sid...

Page 22: ...age 10 lights in red then changes to green once the memory card is ready for use 3 Close the cover Notes If you insert a memory card into the slot in the wrong direction the memory card the memory card slot or image data may be damaged 1 Open the cover of the card slot block then pull the EJECT button out by pressing it 2 Press the EJECT button to remove the SxS memory card Notes Data integrity is...

Page 23: ...standing by to record you can check the remaining space for the SxS memory cards loaded in the card slots on the A B slot media status remaining space indication of the LCD viewfinder screen page 15 The available time for recording with the current video format recording bit rate is calculated according to the remaining space of each card and displayed in time units of minutes Notes A icon appears...

Page 24: ...red When formatting is completed a completion message is displayed for three seconds Notes When formatting all data in an XQD memory card including protected images is erased and cannot be restored To use media formatted with this camcorder in the slots of other devices Make a backup of the media then format it using the other device Use of the MEAD MS01 Media Adaptor sold separately or MEAD SD02 ...

Page 25: ...an store the setting value file of the camera on an SD card sold separately The stored file can be loaded from the SD card SDHC memory card Speed Class 4 to 10 UHS is not compatible Capacity 2 GB to 32 GB SD memory card Capacity up to 2 GB Indicated as SD card in this Operating Guide 1 Open the cover of the UTILITY SD slot page 10 2 Insert the UTILITY SD card into the slot with the UTILITY SD labe...

Page 26: ...ss message and status bar are displayed and the access lamp lights in red When formatting is complete a completion message is displayed Press the SEL SET dial to hide the message Notes All the data is erased when a memory card is formatted and the data cannot be restored The remaining time can be checked on the media status screen page 13 Notes A icon appears if the memory card is write protected ...

Page 27: ...ches automatically to the other card if the selected card becomes full during recording Notes Do not remove the memory card that is recording Remove only the memory card in the slot whose access lamp is turned off during recording If the recordable memory card is loaded into the other slot when the remaining time of the memory card that is recording is less than 1 minute the message Will Switch Sl...

Page 28: ... move your finger off the power zoom lever D the operation sound of the power zoom lever D may also be recorded You can change the zoom speed normal fast of the power zoom lever D or the handle zoom lever A on Setting in Speed Zoom of the Camera menu page 66 To use the handle zoom 1 Set the handle zoom switch B to VAR or FIX When you set the handle zoom switch B to VAR you can zoom in or out at a ...

Page 29: ...ull MF mode the auto focus and push auto focus function does not work While in Full MF mode macro is set to off regardless of the Focus Macro setting in Focus of the Camera menu Adjusting focus manually in AF MF mode In mode B you can use the automatic adjustment functions during manual focus adjustment Set the focus ring to the AF MF mode position and do the following steps 1 Set the FOCUS switch...

Page 30: ...ontrol buttons page 11 You can cue to the top of a desired clip by pressing either button repeatedly When two memory cards are loaded press the SLOT SELECT button page 10 to switch memory cards Notes You cannot switch SxS memory cards during playback Continuous playback of cards in slots A and B is not possible Monitoring audio Cueing up Switching the SxS memory cards Clip recording data When you ...

Page 31: ...mode are adjusted in synchronization To adjust the target level with the Setup menu Set Level in Auto Exposure page 65 of the Camera menu Adjusting the iris Manual mode If Full Auto mode is set to off set the IRIS switch F to MANUAL The Manual Iris mode is set Rotate the iris ring D for the desired iris opening Adjusting the gain You can adjust the gain manually when you do not want to use the AGC...

Page 32: ... menu to On Adjusting the volume of light ND filter You can record a subject with the proper brightness by using the ND FILTER switch B when the recording environment is too bright The camcorder has two ND filter modes You can switch the mode by using the ND FILTER mode switch A Preset mode Set the ND FILTER mode switch A to PRESET then set the ND FILTER switch B to the following CLEAR ND filter i...

Page 33: ...n inadequate effect execute the Auto White Balance function Using the switch Make a selection with the WHT BAL switch B B ATW mode or Memory B mode A Memory A mode PRESET Preset mode The B position of the WHT BAL switch is assigned to ATW mode at the factory The setting can be changed with White Switch B in White page 67 of the Paint menu to select Memory B mode Setting the camcorder to Full Auto ...

Page 34: ...et the AUTO MAN CH 1 switch F of the channel to be adjusted to MAN appears on the screen 3 Adjust the microphone volume by turning the AUDIO LEVEL CH 1 dial G of the channel to be adjusted during recording or standby To return to auto level adjusting Set the AUTO MAN CH 1 switch F of the channel that is adjusted manually to AUTO If the recording level is low set INT MIC Sensitivity in Audio Input ...

Page 35: ... Set the INPUT1 INPUT2 switch 6 Set the input level of the microphone Set the input level of the microphone with INPUT1 Reference INPUT2 Reference in Audio Input of the Audio menu page 73 Adjust according to the sensitivity of the microphone When you use a stereo microphone 2 XLR plugs connect the L left channel plug to the AUDIO INPUT1 connector and the R right channel plug to the AUDIO INPUT2 co...

Page 36: ...hen the video format page 31 is set to the following settings you can set the recording frame rate and playback frame rate to different values XAVC L 1920 1080 59 94p 29 97p 23 98p 50p 25p 1280 720 59 94p 50p XAVC I 1920 1080 29 97p 23 98p 25p 1280 720 59 94p 50p MPEG HD422 1920 1080 29 97p 23 98p 25p 1280 720 59 94p 29 97p 23 98p 50p 25p Notes Slow Quick Motion mode cannot be used while recording...

Page 37: ...ing menu in advance The Clip Continuous Rec function is enabled and Cont appears on the screen page 15 by setting Setting to On Notes The Clip Continuous Rec function cannot be used at the same time as the Slow Quick Motion function When you set Clip Continuous Rec to on the Slow Quick Motion function is disabled The Clip Continuous Rec function cannot be set to on during recording To shoot in Cli...

Page 38: ...ing Metadata page 82 of the File menu XDROOT General Sony Planning Confirming the detailed information in planning metadata After loading a planning metadata file into memory of the camcorder you can check the details of the file such as the filename time and date of file creation and the titles specified in the file Select Properties in Planning Metadata page 82 of the File menu then select Execu...

Page 39: ... Notes If the serial number reaches 99999 it returns to 00001 upon the next recording When you load another planning metadata file the 5 digit serial number returns to 00001 Defining Shot Mark names in Planning Metadata When you record shot mark 1 or shot mark 2 you can apply a name to the shot mark using a string defined in planning metadata Example of shot mark name strings Use a text editor to ...

Page 40: ...e with a clear view of the sky If recording starts in that status positioning information cannot be recorded The GPS signal may not be received well indoors or near a tall building Move to a place with a clear view of the sky Even though the icon indicates positioning the GPS information recording may cut off depending on the signal reception status Acquiring positioning information GPS PXW X180 o...

Page 41: ...vice 1 Set Setting in Proxy Recording Mode of the Recording menu to On 2 Open the cover of the PROXY SD page 9 3 Insert the SD card into the slot with the label facing right The access lamp page 9 lights in red then turns off when the memory card is ready for use 4 Close the cover 5 Start recording When the recording on an SxS memory card is stopped proxy recording is also stopped Notes Data integ...

Page 42: ...ol the camcorder from a smartphone tablet or computer that is connected to the camcorder via the wireless LAN File transferring via a wireless LAN You can transfer a proxy file low resolution that is recorded on an SD card in the camcorder or original file high resolution that is recorded by the camcorder to the server via the wireless LAN Video audio streaming via a wireless LAN You can create a ...

Page 43: ...ce with one touch operation You can connect the camcorder to an NFC compatible device with one touch operation by using the NFC function 1 Start Settings on the device select Other Settings then mark the NFC checkbox 2 Turn the camcorder on 3 Activate the NFC function Set the camcorder to the NFC connection mode by pressing and holding the ASSIGN 3 NFC button for 3 seconds or activate NFC in Wi Fi...

Page 44: ...n the device then set Wi Fi to on 4 Select the camcorder s SSID from the SSID list in Wi Fi Network on the device then select WPS Push Button in Option on the device Notes The operation method differs depending on the device 5 Start the browser on the device then access http 192 168 1 1 8080 index html The screen for inputting User Name and Password appears 6 Input the user name and password then ...

Page 45: ... LAN operation mode to the station mode by setting Setting in Wi Fi of the System menu to Station Notes It may take a time for 30 to 60 seconds until the camcorder is in the station mode Wait until the flashing signal status indication for the wireless LAN connection status on the LCD viewfinder screen page 16 is turned on 4 Activate WPS in Wi Fi of the System menu 5 Press the WPS button of the ac...

Page 46: ...ation check BasicAuthentication of the System menu page 85 You can connect the camcorder to the Internet via an optional 3G 4G LTE access point or by tethering to a device Connecting to the Internet in the wireless LAN station mode You can connect the camcorder to the Internet in the station mode via the optional 3G 4G LTE access point or by tethering to a smartphone or tablet Connecting to the In...

Page 47: ...LTE line or access point To connect to the Internet Connect the camcorder to the Internet by following the procedure of Connecting to the Internet PXW X180 only page 46 To register the server for uploading Register the server for uploading in advance For details about registering the server see Register the server for uploading page 54 Upload the file that is recorded on an SD card or the original...

Page 48: ...t the file Perform File Transfer in File Transfer of the System menu to change the camcorder to the dedicated mode for uploading the original file Touch Media Info Slot A for a memory card in the slot A or Slot B for a memory card in the slot B The SD Card Slot A or Slot B screen appears Example SD Card screen 3 Select the file Select the file by touching the file To cancel touch the file again Yo...

Page 49: ...ting the camcorder in a remote place such as the top of a crane etc Wi Fi remote commander displays Smartphone Main screen Playback screen Cursor screen Assign screen Using the Wi Fi Remote Commander PXW X180 only Recording settings indication S Q FPS Shutter Preset White Gamma Auto Iris Auto Shutter AGC ATW Color Bars Auto White Status indication Playback operation button F Rev Play Pause F Fwd P...

Page 50: ...te commander The display size of the Wi Fi remote commander changes according to the device screen size automatically 1 Make a wireless LAN connection between the device and camcorder page 43 2 Launch the browser and input http camcorder s IP address System menu Wi Fi IP Address rm html in the address bar Example When the IP address is 192 168 1 1 input http 192 168 1 1 rm html in the address bar ...

Page 51: ...i signal is poor the Wi Fi remote commander may not work properly The Web menu of the camcorder appears by accessing the camcorder from the browser of a device that is connected to the camcorder via a wireless LAN You can perform the settings for the wireless function or the operation of the file transfer Initial screen When connecting the camcorder and device and accessing the camcorder from the ...

Page 52: ...Bit rate 128 kbps for Stereo Size Streaming Set the size and bit rate of the video for the stream 640 360 3 Mbps VBR 480 270 1 Mbps VBR 480 270 0 5 Mbps VBR Size Proxy File recording Set the size and bit rate of the video for the proxy file 1280 720 9 Mbps VBR 640 360 3 Mbps VBR 480 270 1 Mbps VBR 480 270 0 5 Mbps VBR Notes This bit rate is the average value The actual bit rate may be more than th...

Page 53: ...ubmit Confirms the wireless LAN settings To connect to the access point in the station mode without the WPS function 1 Connect the device to the camcorder in the access point mode page 43 2 Set the items on the Station Settings screen Perform settings in accordance with the access point settings For details about the access point settings see the operating instructions of the access point 3 Touch ...

Page 54: ...or more details please visit www SonyMCS com wireless 3 Touch Link After a few moments the completion message appears Notes Link is the operation to associate the user with the camcorder To perform Link you need to connect the camcorder to the Internet 4 Touch OK Notes After registering with Sony Ci Unlink will appear on the setting screen If you touch Unlink the current user account will be unlin...

Page 55: ...r is deleted and the display returns to the previous screen You can check the list of the files to be uploaded the file that is being uploaded cancel or start the file upload and delete the file from the file list The camcorder is compatible with the FTP resume function re upload function for a file whose transfer was suspended Notes The FTP resume function is available for the compatible server o...

Page 56: ...f the screen 1 Thumbnail The thumbnail image for each clip is an index frame from the clip When recording the first frame of a clip is automatically set as the index frame Below each thumbnail the clip frame information is displayed You can change the displayed item on Thumbnail Caption in Customize View page 57 of the Thumbnail menu 2 Clip name The clip name of the selected clip is displayed 3 Re...

Page 57: ... playback once after starting it press the PREV button of the playback control buttons to return to the top of the clip then restart playback On the thumbnail screen you can operate the clips or confirm the subsidiary data for clips using the thumbnail menu The thumbnail menu appears when you press the OPTION button page 11 on the thumbnail screen Turn the SEL SET dial page 10 to select a menu ite...

Page 58: ...the recording starting point End Timecode at the recording ending point Duration Duration of the clip 3 Date of recording modifying 4 Currently selected memory card 5 Media protect icon 6 Clip number Total number of clips 7 Battery icon 8 Clip information Clip name Title name Recording format Special recording information Recording device name Displaying the detailed information of a clip ...

Page 59: ...ON button page 11 after selecting the clip to be deleted You can change information of the clip frame that is displayed under the thumbnail Select the displayed item from Thumbnail Caption in Customize View on the thumbnail menu Date Time Creation date or modified time Time Code Timecode Duration Duration Sequential Number Thumbnail number Deleting clips Changing information on the thumbnail scree...

Page 60: ...ds Shot Mark1 Delete Shot Mark1 Deletes Shot Mark1 Add Shot Mark2 Adds Shot Mark2 Delete Shot Mark2 Deletes Shot Mark2 Set Clip Flag Editing for the clip flag Add OK Adds an OK flag Add NG Adds a NG flag Add KEEP Adds a Keep flag Delete Clip Flag Deletes all the flags Lock Unlock Clip Protect settings for a clip Select Clip Protects cancels protection of selected clip Lock All Clips Protects all c...

Page 61: ... File menu For setting items related to files System menu For setting items related to the system Menu Configuration and Detailed Settings Overview of the Setup menus Setup menu layers MENU Camera Gain ND Filter Auto Exposure Focus Shutter Color Bars Flicker Reduce SteadyShot Handle Zoom Speed Zoom Auto Black Balance Video Light Set Paint White Offset White Black Gamma Black Gamma Knee White Clip ...

Page 62: ...ction permitting you to select menu items or setting values Press the SET button to enter the highlighted item Note In Focus Magnifier mode page 30 the setup menu cannot be used Setting the Setup menus Turn the SEL SET dial to set the cursor to the item of the menu you wish to set then press the SEL SET dial to select that item The menu item selection area can show up to 9 lines When all the selec...

Page 63: ...such as a filename is to be specified the character input screen appears 1 Select character type by turning the SEL SET dial then press the SEL SET dial to enter ABC Uppercase alphabetical abc Lowercase alphabetical 123 Numerical Special 2 Select a character from the selected character type The cursor moves to the next column Space Inputs a space on the position of the cursor B b Moves the cursor ...

Page 64: ...B 15dB 18dB Sets the preset value H of the gain Gain M 3dB 0dB 3dB 6dB 9dB 12dB 15dB 18dB Sets the preset value M of the gain Gain L 3dB 0dB 3dB 6dB 9dB 12dB 15dB 18dB Sets the preset value L of the gain Shockless Gain On Off Turns the shockless gain function on off ND Filter Settings for the ND filter Preset1 1 4 1 8 1 16 1 32 1 64 1 128 Sets the preset value 1 of the ND filter Preset2 1 4 1 8 1 ...

Page 65: ...to Shutter On Off Turns the Auto Shutter control function on off A SHT Limit Off 1 100 1 150 1 200 1 250 Sets the fastest shutter speed for the auto shutter function Clip High light On Off Turns the function dulls the response to high luminance on off by ignoring detection of high luminance Detect Window 1 2 3 4 5 6 Selects the photometric range that adjusts exposure automatically according to bri...

Page 66: ...hutter angle when Angle mode is selected ECS Frequency 25 02 to 8000 NTSC Area 60 00 PAL Area 50 00 Set the ECS frequency when ECS mode is selected The available setting values vary depending on the frame frequency of the video format selected SLS Frame 2 3 4 5 6 7 8 16 Selects the number of accumulated frames in SLS mode Color Bars Settings for the color bars Setting Off On Turns the color bars o...

Page 67: ...nt Menu items Sub items and setting values Contents White Settings for white balance Preset White 2100K to 10000K 3200K Performs the preset color temperature adjustment when preset is selected in the white balance mode Notes You cannot check the change on the screen even if the Preset White setting is changed when a setting other than preset is selected in the white balance mode Shockless White Of...

Page 68: ... STD HG Select from among STD standard gamma HG Gamma Select When Gamma Category is set to STD STD1 DVW STD2 4 5 STD3 3 5 STD4 240M STD5 R709 STD6 5 0 When Gamma Category is set to HG HG1 3250G36 HG2 4600G30 HG3 3259G40 HG4 4609G33 Selects the gamma table that is used for the gamma compensation Black Gamma Settings for the black gamma level Setting On Off Turns the black gamma compensation functio...

Page 69: ...nee saturation adjustment level for the area over the knee point Notes The black gamma compensation function and the Knee Saturation function of Knee cannot be used at same time Knee Saturation Level 99 to 99 0 Adjust the knee saturation level for the area over the knee point White Clip Settings for the white clipping adjustment Setting On Off Turns white clipping adjustment on off Level When sett...

Page 70: ...for details thickness of details Larger values give thinner details smaller values give thicker details Knee Aperture On Off Turns the knee aperture function on or off Knee Aperture Level 99 to 99 0 Specifies the knee aperture level Master Limit 99 to 99 0 Specifies the detail limiter values for both the white side and black side directions White Limit 99 to 99 0 Adjusts the white detail limiter B...

Page 71: ...side directions White Limit 99 to 99 0 Adjusts the white detail limiter Black Limit 99 to 99 0 Adjusts the black detail limiter V Black Limit 99 to 99 0 Adjusts the V black detail limiter V Detail Creation NAM Y G G R Selects the source signal used to generate the V detail signal from among NAM G or R whichever is the signal with the highest level Y G and G R Skin Detail Settings for the skin deta...

Page 72: ...ase 99 to 99 0 Adjusts the color phase for the entire picture area User Matrix R G 99 to 99 0 Specifies a freely defined R G user matrix User Matrix R B 99 to 99 0 Specifies a freely defined R B user matrix User Matrix G R 99 to 99 0 Specifies a freely defined G R user matrix User Matrix G B 99 to 99 0 Specifies a freely defined G B user matrix User Matrix B R 99 to 99 0 Specifies a freely defined...

Page 73: ... for CH1 on off INPUT2 Wind Filter On Off Turns the wind filter for CH2 on off INT MIC Wind Filter On Off Turns the wind filter for the internal stereo microphone on off SHOE MIC Wind Filter On Off Turns the wind filter for the shoe microphone on off Limiter Mode On Off Turns the limiter on off when a loud signal is input while setting audio input level manually AGC Mode Mono Stereo Selects the cr...

Page 74: ...splays the resolution and scan method Display only Output Display Settings for the output signal SDI HDMI On Off Selects whether to add the menu or status on the SDI HDMI output signal VIDEO On Off Selects whether to add the menu or status on the video output signal Down Converter Selection for the operation mode of the down converter Squeeze Letter Box Edge Crop Set the output mode aspect for SD ...

Page 75: ...Level 0 to 99 50 Sets the normal peaking level Color B W Red Yellow Blue Selects the signal color of the color peaking Color Peaking Level 0 to 99 50 Sets the color peaking level Marker Settings for the marker indications Setting On Off Turns all marker indications on off Center Marker 1 2 3 4 Off Turns on off the center marker Safety Zone On Off Turns the safety zone marker on off Safety Area 80 ...

Page 76: ... 100 Sets the display level of zebra 2 Display On Off Settings for the items to be displayed Shutter Setting On Off Selects the items to be displayed on the LCD viewfinder screen ND Filter Position On Off Gain Setting On Off Rec Play Status On Off Color Temp On Off Frame Rate On Off Battery Remain On Off Timecode On Off Audio Manual On Off Audio Level Meter On Off Media Status On Off Focus Positio...

Page 77: ...imecode Lock On Off Audio Format On Off Wi Fi Condition PXW X180 only On Off Video Signal Monitor Off Waveform Vector Histogram Clip Name On Off Focus Assist Bar On Off Focus Area Marker On Off Video Level Warning On Off Clip Number On Off GPS PXW X180 only On Off Proxy Status PXW X180 only On Off Lens Info Meter Feet Off LCD VF Menu items Sub items and setting values Contents ...

Page 78: ...timecode during recording only Free Run The timecode keeps advancing regardless of the state of recording Setting Sets the timecode to a desired value SET Sets the value Reset Execute Cancel Resets the timecode to 00 00 00 00 Execute Execute this function TC Format DF NDF Selects the timecode format DF Drop frame NDF Non drop frame Users Bit Settings for the users bit Mode Fix Time Sets the users ...

Page 79: ...ndle Rec Button Rec Button Handle Rec Button Rec Button Handle Rec Button Assigns the record button to perform the recording operation for each media Clip Continuous Rec Settings for the Clip Continuous Recording function Setting On Off Turns the Clip Continuous Recording function on off Proxy Recording Mode PXW X180 only Settings for the proxy recording mode Setting On Off Turns the proxy recordi...

Page 80: ...S memory card in slot A Media B Execute Cancel Updates the managerial file on the SxS memory card in slot B Format Media Formatting media Media A Execute Cancel Formats the SxS memory card in slot A Execute Executes format Media B Execute Cancel Formats the SxS memory card in slot B Execute Executes format SD card Execute Cancel Formats the UTILITY SD card Execute Executes format Proxy PXW X180 on...

Page 81: ...PQRSTUVWXYZ Cursor operation area 1 line Space Changes the character in the cursor position to a space INS Inserts a space in the cursor position DEL Deletes a character in the cursor position T Moves the cursor to the left t Moves the cursor to the right ESC Cancels the changes and exits the Character Set screen END Validates the changes and exits the Character Set screen Title Prefix area 1 line...

Page 82: ...he SxS memory card in slot A or B Selecting Execute displays the list of the planning metadata files stored on the SxS memory card in slot A or B Specify a file select Load then Execute for loading Notes The file list displays up to 64 files Even if the total number of planning metadata files is 64 or less all of the planning metadata files may not appear if the directory where they are located in...

Page 83: ...0 59 94P 50 1280 720 29 97P 50 1280 720 23 98P 50 When Select in Codec is set to MPEG HD420 1920 1080 59 94i HQ 1920 1080 29 97P HQ 1920 1080 23 98P HQ 1440 1080 59 94i HQ 1280 720 59 94P HQ When Select in Codec is set to DVCAM 720 480 59 94i When Select in Codec is set to AVCHD 1920 1080 59 94P 1920 1080 59 94i 1920 1080 29 97P 1920 1080 23 98P 1280 720 59 94P PAL Area When Select in Codec is set...

Page 84: ...magnifier function on off Focus Macro Turns the focus macro function on off VF Mode Switches between color and mono display on the viewfinder Auto Exposure Level Turns the auto exposure level function on off Spotlight Switches to Spotlight of AE Mode Backlight Switches to Backlight of AE Mode ATW Turns the ATW function on off ATW Hold Holds the ATW operation temporarily SteadyShot Turns the Steady...

Page 85: ... User Name admin Sets a desired user name 1 to 16 alphanumeric characters SET Sets the user name Password pxw x180 Sets the password 1 to 16 alphanumeric characters SET Execute this function Wi Fi PXW X180 only Settings for wireless LAN connection and respective display items NFC Execute Cancel Selects whether to enable the NFC function or not When Execute is selected the NFC function turns on and...

Page 86: ...Set the DC IN voltage at which the warning for the shortage of the voltage is generated All Reset Resetting to the factory status Reset Execute Cancel Resets the camcorder to the factory status Execute Executes resetting Network Reset PXW X180 only Resetting of the network settings Reset Execute Cancel Resets the network settings Version Display of the version of this camcorder Number Vx xx Displa...

Page 87: ...hm coaxial cable to the external device To start synchronized recording on an external device With SDI signal output selected synchronized recording is possible by feeding a REC trigger signal to an external recording device connected via the SDI OUT connector To enable synchronized recording set SDI HDMI Rec Control page 79 of the Recording menu to On Notes When a connected external device does n...

Page 88: ... displayed on the screen About 10 seconds after locking even if the reference timecode from the external device is disconnected the external lock will be kept Notes Check that the reference timecode and the reference video signal are in a phase relation that complies the SMPTE timecode standards When you finish the above procedure the timecode is immediately synchronized with the external timecode...

Page 89: ...order A message prompting you to confirm that you wish to enable the USB connection is displayed on the LCD viewfinder screen This message will not be displayed while another confirmation message or an in progress message e g for formatting or restoring an SxS memory card is shown on the screen It appears when formatting or restoration has completed The message is also not displayed while the scre...

Page 90: ...hen removing an SxS memory card from a Macintosh do not select Card Power Off from the SxS memory card icon displayed on the menu bar Operation is not guaranteed with all computers Using a nonlinear editing system For a nonlinear editing system an editing software that corresponds to the recording formats used with this camcorder sold separately is required Store the clips to be edited on the HDD ...

Page 91: ...ony SxS operation may not be guaranteed If you are using memory cards other than XQD memory cards S series N series H series operation may not be guaranteed Appendices Important Notes on Operation About Recording Media SxS Pro SxS Pro SxS 1 XQD SDXC SDHC Memory Stick XAVC I a a a a XAVC L a a a a a 1 MPEG HD422 a a a a a 1 MPEG HD420 a a a a a 1 DVCAM a a a a a 1 AVCHD a 1 a 1 a 1 SxS Pro SxS Pro ...

Page 92: ...ording and Compatible Formats XAVC I XAVC L MPEG HD422 MPEG HD420 AVCHD DVCAM Normal recording a a a a a a S Q Motion a a a Clip Continuous Rec a a a Maximum Recording Time for a Clip Recording format Maximum recording time approx XAVC I 6 XAVC L 6 MPEG HD422 6 MPEG HD420 6 AVCHD 13 DVCAM 6 ...

Page 93: ...ring the unit for a long period Remove the battery pack Do not leave the camcorder with the lenses facing the sun Direct sunlight can enter through the lenses be focused in the camcorder and cause fire Shipping Remove the memory cards before transporting the unit If sending the unit by truck ship air or other transportation service pack it in the shipping carton of the unit Care of the unit If the...

Page 94: ...attery is damaged If the charge lamp is slow flashing the Charger is in standby mode and charging is suspended When the ambient temperature is out of the appropriate temperature range for charging the Charger suspends charging automatically and enters standby mode When the ambient temperature returns to an appropriate temperature the Charger restarts charging and the charge lamp lights up We recom...

Page 95: ... a hot place outside When you use your camcorder after a squall or a shower When you use your camcorder in a hot and humid place How to avoid moisture condensation When you bring your camcorder from a cold place into a warm place put your camcorder in a plastic bag and seal it tightly Remove the bag when the air temperature inside the plastic bag has reached the ambient temperature after about 1 h...

Page 96: ... fitted to this unit is manufactured with high precision technology giving a functioning pixel ratio of at least 99 99 Thus a very small proportion of pixels may be stuck either always off black always on red green or blue or flashing In addition over a long period of use because of the physical characteristics of the liquid crystal display or organic EL panel such stuck pixels may appear spontane...

Page 97: ...ted bridge or in locations where magnetic fields are generated such as near high voltage cables Near devices that generate radio signals of the same frequency band as the camcorder near 1 5 GHz band mobile telephones etc If you upload and share the images which are recorded with the setting GPS is On the record location may be exposed on the internet even if you do not intend to do so If you do no...

Page 98: ... 1080 23 98PsF 1920 1080i 2 3PD 1920 1080 59 94i 2 3PD 720 486i 2 3PD 720 486 59 94i 2 3PD 1440 1080 59 94i 1920 1080i 1920 1080 59 94i 720 486i 720 486 59 94i 1280 720 59 94P 1280 720P 1280 720 59 94P 720 486i 720 486 59 94i 1280 720 29 97P 1280 720P 1280 720 59 94P 2 2RP 720 486i 720 486 59 94i PsF 1280 720 23 98P 1280 720P 2 3PD 1280 720 59 94P 2 3PD 720 486i 2 3PD 720 486 59 94i 2 3PD 720 480 ...

Page 99: ...D 720 480 59 94i 2 3PD 1440 1080 59 94i 1920 1080i 1920 1080 59 94i 720 480i 720 480 59 94i 1280 720 59 94P 1280 720P 1280 720 59 94P 720 480i 720 480 59 94i 1280 720 29 97P 1280 720P 1280 720 59 94P 2 2RP 720 480i 720 480 59 94i PsF 1280 720 23 98P 1280 720P 2 3PD 1280 720 59 94P 2 3PD 720 480i 2 3PD 720 480 59 94i 720 480 59 94i 720 480i 720 480 59 94i 720 480P 720 480 59 94P PAL Area 1920 1080 ...

Page 100: ...recording format of a playback clip is smaller than that set in SDI or HDMI in Output Format of the Video menu video signals are not output from the SDI or HDMI connector respectively Setting for the region where the camcorder is used VIDEO output NTSC PAL Area in Country of System menu NTSC Area 720 486 59 94i PAL Area 720 576 50i ...

Page 101: ...tch to STANDBY remove the battery pack and or the DC IN source Warning Indications Warning indication on LCD viewfinder Buzzer Recording tally lamp Cause and measures Media Near Full Intermittent Flashing Free space on the SxS memory card has become insufficient Replace it with another at the earliest opportunity Media Full Continuous Rapidly flashing No space is left on the SxS memory card Record...

Page 102: ...e memory card is defective Because playback may be possible it is recommended to replace it with another card after copying the clips as required Media Error Cannot Use Media A 1 Neither recording nor playback can be done because the memory card is defective It cannot be operated with this camcorder Replace it with another card Media A Error1 Recording Halted Playback Halted Recording or playback ...

Page 103: ...her with any updates upgrades provided by SONY any printed on line or other electronic documentation for such software and any data files created by operation of such software collectively the SOFTWARE Notwithstanding the foregoing any software in the SOFTWARE having a separate end user license agreement including but not limited to GNU General Public license and Lesser Library General Public Lice...

Page 104: ...ed in the SOFTWARE from time to time and the applicable terms and conditions governing its use Such terms and conditions may be changed by the applicable third party at any time without liability to you To the extent required by the licenses covering EXCLUDED SOFTWARE the terms of such licenses will apply in lieu of the terms of this EULA To the extent the terms of the licenses applicable to EXCLU...

Page 105: ...WARRANTY ON SOFTWARE You acknowledge and agree that use of the SOFTWARE is at your sole risk and that you are responsible for use of the SOFTWARE The SOFTWARE is provided AS IS without warranty duty or condition of any kind SONY AND EACH OF THE THIRD PARTY SUPPLIERS for purposes of this Section SONY and each of the THIRD PARTY SUPPLIERS shall be collectively referred to as SONY EXPRESSLY DISCLAIM ...

Page 106: ... not limited to a administering the functionalities of the SOFTWARE b to improve service update or upgrade the SOFTWARE c improving developing and enhancing the current and future products and services of SONY and other parties d to provide you with information about the products and services offered by SONY and other parties e complying with applicable laws or regulations and f to the extent offe...

Page 107: ...lict of laws provisions Any dispute arising out of this EULA shall be subject to the exclusive venue of the Tokyo District Court in Japan and the parties hereby consent to the venue and jurisdiction of such courts EQUITABLE REMEDIES Notwithstanding anything contained in this EULA to the contrary you acknowledge and agree that any violation of or non compliance with this EULA by you will cause irre...

Page 108: ...grams under the conditions of the GPL LGPL The source code is provided on the internet Use the following URL and follow the download instructions http www sony net Products Linux common search html We would prefer that you do not contact us about the contents of the source code For the content of these licenses see License1 pdf in the License folder of the supplied CD ROM Adobe Reader must be inst...

Page 109: ...ing HD SDI HDMI and external device Operating temperature 0 C to 40 C 32 F to 104 F Storage temperature 20 C to 60 C 4 F to 140 F Continuous operation time While recording with LCD screen off viewfinder on not using external device With battery pack BP U90 approx 4 hours With battery pack BP U60 approx 2 hours 35 minutes With battery pack BP U30 approx 1 hours 15 minutes Recording Format Video XAV...

Page 110: ...inutes When using SBP 64B SBS 64G1A 64 GB Approx 60 minutes When using SBS 32G1A 32 GB Approx 30 minutes XAVC Long XAVC L 50 mode When using SBP 128B 128 GB Approx 240 minutes When using SBP 64B SBS 64G1A 64 GB Approx 120 minutes When using SBS 32G1A 32 GB Approx 60 minutes XAVC L 35 mode When using SBP 128B 128 GB Approx 340 minutes When using SBP 64B SBS 64G1A 64 GB Approx 170 minutes When using...

Page 111: ...stabilizing function On Off possible shift lens system Filter thread M 82 mm 3 1 4 in pitch 0 75 mm Macro On Off possible Pickup device 1 3 type Exmor 3 CMOS image sensor Effective picture elements 1920 H 1080 V Optical system F1 6 prism system Built in filters ND filters CLEAR Clear 1 1 4ND 2 1 16ND 3 1 64ND Linear variable ND Approx 1 4 ND to 1 128 ND Sensitivity 2 000 lx 89 9 reflectance F9 typ...

Page 112: ...r 47 kΩ load reference level Video output BNC type 1 switchable with GENLOCK IN connector HD Y HD SYNC composite signal 1 0 Vp p 75 Ω SDI output BNC type 1 switchable with 3G SDI HD SDI SD SDI SMPTE292M 259M 424M 425M Timecode input BNC type 1 switchable with TC OUT connector SMPTE 12M 2 2008 0 5 V to 18 Vp p 3 3 kΩ Timecode output BNC type 1 switchable with TC IN connector SMPTE 12M 2 2008 2 0 Vp...

Page 113: ...ubject to change without notice Manufactured under license from Dolby Laboratories SD card adaptor MEAD SD02 1 except for PXW X180 NTSC model XQD card adaptor XDA EX1 1 PXW X180 NTSC model only Charger 1 BC U1 Rechargeable battery pack BP U30 1 AC Adaptor 1 ACDP 060S01 Power cord mains lead 2 Audio connecting cable 1 USB cable 1 Lens hood 1 Large eyecup 1 Accessory shoe kit accessory shoe 1 access...

Page 114: ...d specifications are subject to change without notice On trademarks XDCAM is a trademark of Sony Corporation XAVC and are trademarks of Sony Corporation XQD and are trademarks of Sony Corporation Microsoft Windows Windows Vista and Windows Media are trademarks or registered trademarks of U S Microsoft Corporation in the U S and other countries Mac and Mac OS are registered trademarks of Apple Inc ...

Page 115: ...Charger 17 Clip 30 57 89 Clip Continuous Rec 79 Clip name 30 Clock 19 Clock Set 85 Color Bars 66 Country 85 Cueing up 30 Customize View 60 D Delete Clip 60 Detail HD mode 70 Detail SD mode 71 Display Clip Properties 58 60 Display On Off 76 Down Converter 74 E Error Indications 101 External Monitor 87 External Synchronization 88 F File menu 82 File Transfer 84 Filter Clips 60 Flicker Reduce 66 Focu...

Page 116: ...ON STANDBY switch 9 OPTION button 57 Output Display 74 Output Format 74 Output On Off 74 Output signal 98 P Paint menu 67 Peaking 75 Planning Metadata 82 Planning metadata 38 Power zoom lever 28 Pre installed rechargeable battery 96 Preset mode 32 Proxy Recording Mode 79 PUSH lens hood release button 19 PUSH AUTO button 29 Push auto focus 29 R Rec Format 83 Rec Lamp 84 Rec Review 37 Record button ...

Page 117: ...g your camcorder abroad 93 UTC 19 V Version 86 VF Setting 75 Video format 98 Video Light Set 67 Video menu 74 Viewfinder 15 20 Viewfinder lens adjustment lever 20 W Wall outlet wall socket 18 Warning Indications 101 WB SET button 33 White 67 White balance 32 White Clip 69 WHT BAL switch 32 Wide angle 28 Wi Fi 85 Wi Fi remote commander 49 Wireless Remote Commander 21 X XQD Memory Cards 24 Z Zebra 7...

Page 118: ...Index 118 Appendices ...

Page 119: ...Index 119 Appendices ...

Page 120: ...Printed in China ...

Reviews: