background image

102

Chapter 3   Meetings With the Multi Points Function

Chapter 3

Verifying the Picture Shot by the
Local Camera

You can display the local picture only on your screen
without changing the mode in Voice Activated or user
control mode.

Press the FAR/NEAR button on the Remote
Commander. The Display Control menu appears.
Select Near from Display with the joystick on the
Remote Commander, then press the joystick. The local
picture is displayed only on your screen.

To return to the Voice Activated or user
control mode

Press the FAR/NEAR button on the Remote
Commander. The Display Control menu appears.
Select Far from Display with the joystick on the
Remote Commander, then press the joystick.

Receiving the Broadcast
Request

When you receive the command “MCV”* from the
connected terminal, the picture of that terminal is
automatically broadcast. If the meeting is held in
Voice mode, the mode is canceled, and the picture is
broadcast at full-size.
When you receive the command “MCV CANCEL,”
the system returns to the previous mode.

* One of the commands that is sent to the MCU from

the slave terminal.

Notes

• If you have received the command “MCV” from

other terminal, or you have manually selected the
picture to be broadcast, the command “MCV” is
rejected.

• This function is not available when the meeting is

being held over a LAN.

Operating Chair Controls

Summary of Contents for PCS-6000

Page 1: ...000 Sony Corporation PCS 6000 6000P MultimediaTerminal 3 205 382 17 1 Operating Instructions Before operating the unit please read this manual thoroughly and retain it for future reference PCS 6000 6000P ...

Page 2: ... This equipment complies with Part 68 of the FCC Rules On the bottom of this equipment is a label that contains among other information the FCC registration number for this equipment If requested this information must be provided to the telephone company 2 If this terminal equipment causes harm to the telephone network the telephone company will notify you in advance that temporary discontinuance ...

Page 3: ...tisfaction Before installing this equipment users should ensure that it is permissible to be connected to the facilities of the local telecommunications company The equipment must also be installed using an acceptable method of connection The customer should be aware that compliance with the above conditions may not prevent degradation of service in some situations Repairs to certified equipment s...

Page 4: ...Off 20 Turning On 20 When the Multimedia Terminal is turned on for the first time 21 Setting the System Multimedia Terminal to be on Standby 24 Turning Off 25 SPID Registration for Customers in the USA 26 Menu Items in the Setup Menu 32 Dial Setup Menu 32 Answer Setup Menu 36 Multipoint Setup Menu 38 Audio Setup Menu 39 General Setup Menu 39 Administrator Setup Menu 43 ISDN Setup Menu 43 LAN Setup...

Page 5: ...Volume 69 Muting Local Conversations Mute Function 69 Synchronizing Voice and Motion Lip Synchronization 69 On the Echo canceler 70 Adjusting the Camera 71 Adjusting the Camera Angle and Zoom 72 Adjusting Focus and Brightness 72 Presetting Angle and Zoom Settings 73 Tracking a Subject Automatically Automatic Target Tracking Function 75 Selecting the Picture and Sound 77 Monitoring Yourself in the ...

Page 6: ...Calling unregistered remote parties 97 Receiving a call 99 Notes on Point to Multipoint Meeting 99 Operating Chair Controls 99 Switching the Broadcast Mode 99 Verifying the Picture Shot by the Local Camera 102 Receiving the Broadcast Request 102 Ending a Point to Multipoint Meeting 103 Notes on Using Secondary Terminals 104 Notes on secondary terminals during an ISDN Multipoint Meeting 104 Notes o...

Page 7: ...126 Specifications 127 Videomeeting Room Layout 134 Placing the Camera Unit 135 Glossary 136 Memory Stick and are trademarks of Sony Corporation Windows NetMeeting PowerPoint Excel and Word are either registered trademarks or trademarks of Microsoft Corporation in the U S A and or other countries Bonding Bandwidth on Demand Interoperability Group is a trademark of THE BONDING CONSORTIUM Adobe and ...

Page 8: ...rds Then contact the place of purchase or an authorized Sony representative ISDN Never install telephone wiring during a lightning storm Never install telephone jacks in wet locations unless the jack is specifically designed for wet locations Never touch uninsulated telephone wires or terminals unless the telephone line has been disconnected at the network interface Use caution when installing or ...

Page 9: ... interface board for connection with V 35 interface or RS 449 interface And if you upgrade the Multimedia Terminal using the PCS UC601 Upgrade Kit you can connect a remote party via a LAN In addition you can connect up to a maximum of six terminals via a LAN using the unit as an MCU Multipoint Control Unit 1 The optional board is required for connecting with an ISDN line Up to three PCS I600 BRI B...

Page 10: ...s as still pictures with a remote site PowerPoint Word Excel and Acrobat Reader Therefore advanced meetings can be held using documents tables or graphics Equips with the RGB connector You can hold a meeting using an RGB monitor with the XGA resolution Automatic tracking function In addition to pan tilt action the automatic target tracking feature allows you to track a subject having the memorized...

Page 11: ...minal Processor PCS C160 C160P Camera Unit PCS TM600 Desktop Terminal PCS A300 Microphone PCS R160 Remote Commander System Configuration Contains the video codec audio codec echo canceler network interfaces and system controller This camera is equipped with the pan tilt and auto tracking functions Allows you to connect three microphones and equips with three USB interface jacks and single Memory S...

Page 12: ...f you use a Sony TV you can operate it with the Remote Commander supplied with the Multimedia Terminal Two monitors are required for a dual monitor system An RGB monitor or LCD projection monitor can provide high quality picture using the XGA resolution Allows you to accommodate extra two or three participants You can add two microphones Captures still objects and documents in color for transmissi...

Page 13: ...stalled Provides single PRI jack The connection via the PRI interface is available Provides the V 35 connector The connection via the V 35 interface is available Provides the RS 449 connector The connection via the RS 449 interface is available Connects one end to the V 35 connector on the PCS I602 V 35 Board and the other end to the terminal adaptor 1 m 3 3 ft Connects one end to the RS 449 conne...

Page 14: ...and audio cables 2 Connect the DESKTOP TERMINAL jack on the Multimedia Terminal Processor and the PROCESSOR jack on the Desktop Terminal using the supplied Desktop Terminal cable 3 Connect the supplied microphone to the 1 jack on the Desktop Terminal using the supplied Desktop Terminal cable 4 Connect the CAMERA IN connector on the Multimedia Terminal Processor and the PROCESSOR connector on the C...

Page 15: ...to audio input to S video input TV monitor S video cord not supplied Audio cord not supplied to VIDEO OUT MON1 to AUDIO OUT MON L to AC IN to ISDN to BRI A ISDN modular cable not supplied Set the BACKUP switch to ON to a wall outlet to AUDIO OUT MON R Desktop Terminal to DESKTOP TERMINAL to CAMERA IN to PROCESSOR to PROCESSOR Camera Unit to BRI B to BRI C to BRI D Install the optional PCS I600 BRI...

Page 16: ...input to RGB input RGB monitor or LCD projection monitorr RGB cable not supplied Audio cord not supplied to RGB OUT MONITOR to AUDIO OUT MON L to AC IN to ISDN to BRI A ISDN modular cable not supplied Set the BACKUP switch to ON to a wall outlet to AUDIO OUT MON R Desktop Terminal to DESKTOP TERMINAL to CAMERA IN to PROCESSOR to PROCESSOR Camera Unit to BRI B to BRI C to BRI D Install the optional...

Page 17: ...ulated film covering the battery and creating a short circuit 3 Replace the cover Battery life When the Remote Commander no longer functions properly replace both the batteries Notes on batteries To avoid possible damage from battery leakage or corrosion observe the following Be sure to insert the batteries in the correct direction Do not mix old and new batteries or different types of batteries D...

Page 18: ...the Monitor Mode setting see General Setup Menu on page 39 When using a Sony TV monitor The TV monitor can be operated from the Remote Commander For details on operating the Remote Commander see To operate a Sony TV monitor on page 123 To adjust the TV monitor screen Use the controls on the TV monitor to adjust the screen picture hue contrast brightness and sharpness For details on adjusting the s...

Page 19: ...adjust the volume use the VOLUME DOC BRIGHT buttons on the Remote Commander 1 Set the volume level to the middle position by pressing the VOLUME DOC BRIGHT buttons on the Remote Commander 2 Adjust the volume with the monitor s control Set it to the proper level for listening to a remote party ...

Page 20: ...on monitor Turn on the RGB monitor or LCD projection monitor 2 Turn on the power of any other equipment to be used during the meeting 3 Press the I 1 switch on the Multimedia Terminal Processor Soon the Multimedia Terminal Processor Camera Unit Desktop Terminal and the TV monitor are turned on The power lamps green on the Multimedia Terminal Processor and Desktop Terminal light up and the POWER la...

Page 21: ...es with the joystick on the Remote Commander then press the joystick English Displays messages in English French Displays messages in French German Displays messages in German Japanese Displays messages in Japanese Spanish Displays messages in Spanish Italian Displays messages in Italian Chinese Displays messages in Chinese 2 Select the resolution of the monitor with the joystick on the Remote Com...

Page 22: ... the Area Code boxes A1 to D2 Do not enter the first zero number of your area code e g enter only 408 for California 8 Enter your telephone number and sub address if you set your sub address in the Local Number boxes A1 to D2 Enter the asterisk after the telephone number then enter the sub address You cannot use the alphabet in a sub address Note Register information to the next page or downward i...

Page 23: ...Next with the joystick on the Remote Commander then press the joystick The message for verification appears 14Select Save with the joystick on the Remote Commander then press the joystick The setting is saved Also set up other menus pages 32 to 46 To cancel the setup Select Cancel with the joystick on the Remote Commander then press the joystick Or press the RETURN button on the Remote Commander T...

Page 24: ...e I 1 button on the Remote Commander or Desktop Terminal The Multimedia Terminal Processor Desktop Terminal Camera Unit and the TV monitor are turned into standby The standby lamps orange on the Multimedia Terminal Processor and Desktop Terminal light up To cancel turning into standby Select Cancel using the joystick on the Remote Commander in step 2 then press the joystick To release the standby ...

Page 25: ...dia Terminal Processor for two seconds The power lamp will blink for about one minute then the power shuts off 2 Turn off the power of any other equipment to be used during the meeting Notes If you are not going to use the system for an extended period set the I 1 switch to off You cannot receive any calls from remote parties if the I 1 switch is set to off ...

Page 26: ...0 Network switch software version BCS34 or later for Custom ISDN In these cases you shall register the LDN Local Directory Number seven digit local phone number Follow the steps below to register the LDN s 1 Open the ISDN Setup menu 2 Select USA in the Country Region box Select the suitable Protocol in the Protocol box 3 Open the ISDN Setup menu Page 2 4 Enter your LDN s and sub address in the Loc...

Page 27: ...ustom ISDN Each LDN is given for four channels CH A1 and A2 CH B1 and B2 CH C1 and C2 CH D1 and D2 The following shows the use of four ISDN lines for AT T 5ESS Multipoint Custom ISDN ISDN Setup Cancel Save 408 Area Code A1 Page 2 3 408 A2 408 B1 408 B2 408 C1 408 C2 Local Number 9876532 9876532 9871356 9871356 9852464 9852464 408 D1 408 D2 9853141 9853141 ISDN Setup Cancel Save 408 Area Code A1 Pa...

Page 28: ...in pairs and should not be crossed with BRI channels as each has its own LDN Be sure to enter each number in pairs If it is crossed you must correct the SPID LDN pairs ISDN Setup Cancel Save 408 Area Code A1 Page 2 3 408 A2 408 B1 408 B2 408 C1 408 C2 Local Number 9876543 9876544 9871234 9871235 9852468 9852469 408 D1 408 D2 9853245 9853246 ISDN Setup Cancel Save 408 Area Code A1 Page 2 3 408 A2 4...

Page 29: ...56001 B1 B2 019852464001 C1 C2 019853141001 D1 D2 019876532001 ISDN Setup Cancel Save 408 Area Code A1 Page 2 3 408 A2 408 B1 408 B2 408 C1 408 C2 Local Number 9876543 9876544 9871234 9871235 9852468 9852469 408 D1 408 D2 9853245 9853246 ISDN Setup Cancel Save SPID A1 Page 3 3 019876544001 A2 019871234001 B1 019871235001 B2 019852468001 C1 019852469001 C2 019853245001 D1 019853246001 D2 0198765430...

Page 30: ...ve 408 Area Code A1 Page 2 3 408 A2 408 B1 408 B2 408 C1 408 C2 Local Number 9876532 9876532 9871356 9871356 9852464 9852464 408 D1 408 D2 9853141 9853141 ISDN Setup Cancel Save SPID A1 Page 3 3 A2 B1 B2 C1 C2 D1 D2 ISDN Setup Cancel Save 408 Area Code A1 Page 2 3 408 A2 408 B1 408 B2 408 C1 408 C2 Local Number 9876543 9876544 9871234 9871235 9852468 9852469 408 D1 408 D2 9853245 9853246 ISDN Setu...

Page 31: ...ion Page 1 3 1 11 Country Region Code Northern Telecom Protocol ISDN Setup Cancel Save 408 Area Code A1 Page 2 3 408 A2 408 B1 408 B2 408 C1 408 C2 Local Number 9876543 9876544 9871234 9871235 9852468 9852469 408 D1 408 D2 9853245 9853246 ISDN Setup Cancel Save SPID A1 Page 3 3 019876544001 A2 019871234001 B1 019871235001 B2 019852468001 C1 019852469001 C2 019853245001 D1 019853246001 D2 019876543...

Page 32: ...RI Board is not installed you cannot select BRI from Line I F When the optional PRI Board is not installed you cannot select PRI from Line I F When the optional V 35 Board is not installed you cannot select V 35 from Line I F When the optional RS 449 Board is not installed you cannot select RS 449 from Line I F When the system is not upgraded using the optional PCS UC601 Upgrade Kit you cannot sel...

Page 33: ...ge 34 Restrict Selects the transfer rate via the ISDN line Auto Normally select this setting 56K Selects this setting when you call a region or country via the 56 Kbps transfer rate Page 2 Video Mode Selects the protocol for the video encoding H 261 Sends pictures based on Recommendation H 261 When sending pictures using Annex D H 263 Sends pictures based on Recommendation H 263 Video Frame Select...

Page 34: ...ects whether to control the far end camera or not On Operates the far end camera Off Does not operate the far end camera T 120 Data Selects whether to have a T 120 data meeting On Holds a T 120 data meeting Off Does not hold a T 120 data meeting Page 3 Enter 9 when you have to dial nine to reach an outside line Prefix A Sets up a prefix number that will be registered for Prefix A in the Dial Setup...

Page 35: ... Mode on the More Options menu of the Dial List V 35 RS 366 Selects whether to specify the telephone number when connecting via the V 35 interface On When specifying the telephone number Off When not specifying the telephone number Note If an optional V 35 board has not been installed you cannot select V 35 RS 366 PCS 5000 Series Mode Selects whether or not to use the drawing tools or the pointer ...

Page 36: ... value from 1 Kbps to 1920 Kbps ISDN MSN Selects whether you are using the Multiple Subscriber Number On When you are using the Multiple Subscriber Number Off When you are not using the Multiple Subscriber Number PCS 5000 Series Mode Selects whether or not to use the drawing tools or the pointer when connecting with the PCS 5000 5000P 5100 5100P On When using the pointer or the drawing function Of...

Page 37: ...arrow but the picture quality is better 3 4 kHz G 722 The audio bandwidth is wider for better sound quality 7 kHz Audio Mode Threshold Selects the setup of the Auto setting of Audio Mode up to 64K G 728 Sets the Auto setting of Audio Mode to G 728 when the used line is 1B channel and sets to G 722 when it is 2B channels or more up to 128K G 728 Sets the Auto setting of Audio Mode to G 728 when the...

Page 38: ...ith a normal ISDN line 56K Selects this setting when you call a region or country via the 56 Kbps transfer rate LAN Bandwidth Selects the bandwidth to be used when communicating over a LAN If you select Other you can enter a value from 1 Kbps to 1920 Kbps Video Mode Selects the protocol for the video encoding H 261 When connecting with the protocol based on H 261 H 263 When connecting with the pro...

Page 39: ... using the echo canceler equipped with the external equipment Off Deactivates the echo canceler Beep Sound Selects whether to sound the beep when you press the buttons on the Remote Commander On Activates the beep sound Off Deactivates the beep sound Recording Mute Selects whether to output the audio from the AUDIO OUT AUX jack On When Input Select is set to AUX or MIC AUX does not output the Audi...

Page 40: ...ear sight Near sight After sending a still image Still image PinP Far sight Far sight After receiving a still image Still image PinP Far sight Far sight Data Conference Data Conference Far sight VIDEO OUT MON1 When not in communication Top menu Near sight Video communication Far sight PinP Near sight After sending a still image Still image PinP Far sight After receiving a still image Still image P...

Page 41: ...hinese Note When you change the setting and save it the computer is re booted If you upgrade from software versions earlier than version 5 0 you cannot select Chinese as the language for messages Monitor Mode Selects the remote control mode of the IR repeater Normally set it to MODE1 PCS 6000 or to MODE3 PCS 6000P MODE1 Sets it to mode 1 MODE2 Sets it to mode 2 MODE3 Sets it to mode 3 MODE4 Sets i...

Page 42: ... you use the Data Conference function High Color 16 bit Your monitor displays 16 bit color but when file sharing is enable the other party s screen displays 256 colors True Color 24 bit Both your monitor and the other party s screen display full 24 bit color when file sharing is enabled Note You cannot change this setting during a meeting so be sure to make the desired setting before the Data Conf...

Page 43: ...e Web You can also gain access using an Administrator Password or Superuser Password Web Monitor Enables disables monitoring updates JPEG images a conference from the web ON Enables monitoring OFF Disables monitoring ISDN Setup Menu Sets up the ISDN attribute This menu is the same as the setup wizard See page 21 for details However if you have selected Japanese as the message language page 21 the ...

Page 44: ... Address Enter your DNS Domain Name System server address Note If the LAN settings are changed the computer re boots automatically Page 2 Gatekeeper Mode Sets up whether you use the gatekeeper or not On Uses the gatekeeper Off Does not use the gatekeeper Auto Automatically detects the gatekeeper and use it Gatekeeper Address Enter your gatekeeper address User Alias Enter your user alias address H ...

Page 45: ...this item Description Enter the description of the unit Videoconference Device has been entered as the default You cannot change this item Location Enter the location you install this unit Contact Enter information on your administrator who manages this unit Machine Information Menu Displays the version and installed option of the Multimedia Terminal Processor Host Version Displays the software ve...

Page 46: ... Board Displays the optional board installed into the unit None The optional board has not been installed BRI The PCS I600 BRI Board has been installed PRI The PCS I601 PRI Board has been installed V 35 The PCS I602 V 35 Board has been installed RS 449 The PCS I603 RS 449 Board has been installed Host Name Displays the host name IP Address Displays the IP address MAC Address Displays the MAC addre...

Page 47: ... using the joystick on the Remote Commander the screen border turns yellow and press it down you can then adjust the camera angle up down left or right with the joystick In addition if you press the T button on the Remote Commander ZOOM TV CH button the picture is enlarged if you press the W button it is reduced in size Once you have the picture you want pressing the joystick on the Remote Command...

Page 48: ... to ON For more details see page 38 3 Dual monitor This icon is displayed when the Dual monitor item in the General Setup menu is set to TV Monitor Dual For more details see page 39 4 Audio input This icon is displayed to show the audio input To enable switching of the input set the Audio Switching item in the Audio settings For more details see page 77 5 Video input This icon is displayed when vi...

Page 49: ... a still image Pressing the STILL IMAGE button on the Remote Commander accesses the Still Image menu directly For details on the Still Image menu see pages 79 to 83 Camera Angle menu This is used to control the angle and zoom of the camera Pressing the CAMERA button on the Remote Commander accesses the Camera Angle menu directly For details on the Camera Angle menu see pages 71 to 76 Recent 0 9 A ...

Page 50: ...to 46 Note If a BRI board a PRI board a V 35 board an RS 449 board or a LAN software upgrade has not been installed the Phone Book menu the Manual Dial menu and the Setup menu cannot be opened Specification jpg Messages jpg Messages2 jpg T120demo ppt AGENDA with CMS DSC00000 jpg TMP5000EMU jpg data File Access Whiteboard Whiteboard WHT Data Conference D user Dial Answer Multipoint Audio General Ad...

Page 51: ...nu directly For details on the Still Image menu see pages 79 to 83 Camera menu This is used to control the camera Pressing the CAMERA button on the Remote Commander accesses the Camera menu directly For details on the Camera menu see pages 71 to 76 Still Image Send Continuous Send Clear Save Load Pointer Send Object Select these tabs with the joystick to access the desired menu Select to return to...

Page 52: ...am sharing and whiteboard functions For details on the Data Conference Menu see pages 84 to 89 Setup menu This is used to register or modify the setup of the system For details on the Setup menu see pages 21 to 23 and 32 to 46 Recent 0 9 A I J S T Z Phone Book New Entry Specification jpg Messages jpg Messages2 jpg T120demo ppt AGENDA with CMS DSC00000 jpg TMP5000EMU jpg data File Access Whiteboard...

Page 53: ...he Remote Commander moved up or down then press the joystick 4 Select Save with the Remote Commander then press the joystick The modification is complete To page up or down the menu Move the joystick on the Remote Commander to the right or left To return to the previous level hierarchy of the menu Press the RETURN button on the Remote Commander Dial Setup ISDN Line I F Page 1 4 Cancel Save Auto Bo...

Page 54: ...Press the FAR NEAR ALPHA NUM button on the Remote Commander repeatedly to switch the input mode To enter characters Press the number buttons on the Remote Commander to enter the desired character Each time you press the button the character is input from among the alphabets on each button or the numbers on each To enter special characters symbols press the PHONE BOOK SYMBOL button repeatedly to se...

Page 55: ...timedia Terminal before starting a meeting Notes Meetings using the V 35 interface are available when the optional PCS I602 V 35 board has been installed Meetings using the RS 449 interface are available when the optional PCS I603 RS 449 board has been installed Meetings on a LAN are available when the system has been upgraded with the optional PCS UC601 Upgrade Kit Calling an Unregistered Remote ...

Page 56: ...esired setting by moving the joystick up or down then press the joystick BRI Connects to a TV conferencing system via the BRI interface PRI Connects to a TV conferencing system via the PRI interface PRI S Connects to a TV conferencing system using H0 H11 for North America H12 for European countries of the PRI interface Telephone Connects to a phone to have a voice meeting via the normal ISDN line ...

Page 57: ... IP address press the STILL IMAGE CLEAR button on the Remote Commander The number or IP address entered is deleted To copy a telephone number press the CAMERA LINE COPY button The number entered are copied to the next box To delete the last number press the PinP BACK SPACE button on the Remote Commander The last number is deleted 4 Select the prefix setting Select Prefix with the joystick on the R...

Page 58: ...monitor screen When the connection is completed the indication MEETING STARTS appears on the monitor screen To cancel dialing before the connection is completed Select Cancel with the joystick on the Remote Commander then press the joystick or press the CONNECT DISCONNECT button on the Remote Commander To set up other items than the items above When More Options Enable is set to On in the Dial Set...

Page 59: ...a Registered Remote Party 1 Press the PHONE BOOK button on the Remote Commander The Phone Book menu appears on the monitor screen If a BRI board a PRI board a V 35 board an RS 449 board or a LAN software upgrade hasn t been installed the Phone Book menu cannot be opened 2 Select the remote party with the joystick on the Remote Commander then press the joystick The sub menu is opened on the monitor...

Page 60: ...itor screen To cancel dialing before the call is connected Select Cancel with the joystick on the Remote Commander then press the joystick or press the CONNECT DISCONNECT button on the Remote Commander To sort the list on the Phone Book menu You can sort the list on the Phone Book menu The list on the Phone Book menu will be sorted by selecting the buttons at the right on the menu When you select ...

Page 61: ...graded with the optional PCS UC601 Upgrade Kit A meeting can only be held over ISDN if a BRI or a PRI board has been installed Making an Entry 1 Press the PHONE BOOK button on the Remote Commander The Phone Book menu appears on the monitor screen 2 Select New Entry with the joystick on the Remote Commander then press the joystick The List Edit menu appears on the monitor screen 3 Register the name...

Page 62: ...the remote party set a sub address in the A1 and A2 boxes If the remote party is using multiple lines enter the telephone numbers in the B1 B2 and subsequent boxes Enter the asterisk after the telephone number then enter the sub address You cannot use the alphabet in a sub address When selecting PRI S in step 4 only the A1 box is displayed Enter the telephone number in the A1 box When connecting o...

Page 63: ... item below cannot be set up Restrict To set up other items than the items above When More Options Enable is set to On in the Dial Setup menu the More Options button is displayed at the lower part of the menu Select More Options with the joystick on the Remote Commander then press the joystick The Dial Setup menu appears and you can set up the other items Notes More Options has a higher priority t...

Page 64: ...etting has been duplicated you can use it with a little modification Notes on Registration General note If the Restrict setting of the remote party is set to 56K in the Answer Setup menu the connection will be made at 56 Kbps even if you set Restrict to Auto in the Dial Setup menu Note on the optional PCS I600 BRI Board If you have installed the multiple PCS I600 BRI Boards you can use twelve ISDN...

Page 65: ...mbers When not using RS 366 set V 35 RS 366 to Off in the Dial Setup menu Do not enter the telephone numbers You do not need to set up Restrict To change the ISDN transfer rate temporarily The Multimedia Terminal is set to 64 Kbps for an ISDN line at factory However some countries e g the USA or regions may have 64 Kbps and 56 Kbps ISDN transfer rates If the remote party has set its transfer rate ...

Page 66: ...ion data monitor Setting the Answer Mode When you select the auto answer mode set Auto Answer to On in the Answer Setup menu When you select the manual answer mode set it to Off For details on the Auto Answer item see Answer Setup Menu on page 36 Answering Calls in Auto Answer Mode The system automatically receives a call when it is on standby or in sleep mode When a call comes in the Multimedia T...

Page 67: ... you receive the call Select OK with the joystick on the Remote Commander then press the joystick If you cannot receive the call according to your current operations Select Cancel with the joystick on the Remote Commander then press the joystick When the system fails to make a connection The indication CANNOT COMPLETE CONNECTION appears along with an ISDN cause code and a message on the monitor sc...

Page 68: ...e rate of the motion picture LSD Rate Displays the LSD Low Speed Data rate MLP Rate Displays the MLP Multi Layer Protocol rate HMLP Rate Displays the HMLP High speed Multi Layer Protocol rate To close the Status menu Select End with the joystick on the Remote Commander then press the joystick The menu returns to the Setup menu On elapsed time When you set Time Display to On in the General Setup me...

Page 69: ...uted the mute indication MIC OFF is displayed on the monitor screen To cancel muting Press the MIC DOC DARK button on the Remote Commander again The mute indication MIC OFF disappears from the monitor screen Synchronizing Voice and Motion Lip Synchronization During the meeting voice and motion may lose synchronization The automatic lip synchronization function built into the system solves this pro...

Page 70: ... you use the echo canceler of equipment connected to AUDIO IN AUX set it to External Normally it should be set to Internal Echo canceler Input setting Internal echo canceler Mic off Internal MIC Enabled Valid External AUX Disabled bypass Invalid Off MIC Disabled bypass Valid For details on the Echo Canceler setting see Audio Setup Menu on page 39 Notes When Input setting is set to MIC MIC IN and A...

Page 71: ...ote Commander The picture will be displayed on the whole screen To return to the previous screen press the joystick the RETURN button or the PinP button on the Remote Commander To select the camera to be adjusted Before adjusting the camera you must select the local or remote camera to be controlled 1 Press the FAR NEAR button on the Remote Commander The Display Control menu appears 2 Select the f...

Page 72: ...communication To adjust zoom Press the ZOOM TV CH T button on the Remote Commander to zoom in or the ZOOM TV CH W button to zoom out Adjust zoom to display the desired picture Adjusting Focus and Brightness Focus and brightness are automatically adjusted We recommend that you do not use the manual adjustments since the camera automatically adjust itself for the best focus and brightness Select Adj...

Page 73: ... the 7 button on the Remote Commander repeatedly to make the picture darker To shoot with the backlight function When you shoot a subject with the light source behind the subject use the backlight function Each time you press the 8 button or the MIC DOC DARK button on the Remote Commander the backlight function toggles on and off Presetting Angle and Zoom Settings You can store the camera settings...

Page 74: ... any of the buttons from 1 through 6 on the Remote Commander during a communication session or if you continue to press the and any button from 1 to 6 you can store that number as the preset value To recall a preset 1 Select Preset Load with the joystick on the Remote Commander then press the joystick 2 Select the number button 1 to 6 with the joystick on the Remote Commander then press the joysti...

Page 75: ...or almost 12 weeks the battery is completely discharged To retain the memories of the settings you should recharge the battery To recharge the battery connect the Camera Unit to the Multimedia Terminal Processor and leave it for approximate 48 hours with the I 1 switch set to on Tracking a Subject Automatically Automatic Target Tracking Function You can have the camera memorize a particular color ...

Page 76: ...tion Select Auto Track Stop with the joystick on the Remote Commander then press the joystick If the frame is repeatedly extended to the full screen The camera does not recognize the subject Repeat steps 2 to 4 again If the lamp at the side of the lens lights up The camera is not capturing the memorized subject correctly In this case perform the pan tilt operation so that the subject comes into th...

Page 77: ...d AUX1 The equipment connected to the VIDEO IN AUX 1 jack is selected AUX2 The equipment connected to the VIDEO IN AUX 2 jack is selected To switch the video sent from the remote terminal Press the VIDEO INPUT SELECT button on the Remote Commander then select Main Object AUX1 AUX2 from Far Note You cannot control the remote camera during a meeting if H 281 is not selected as the far end camera con...

Page 78: ...d the inset window appears on the monitor screen When it is already displayed each time you press the PinP button the inset window moves as follows Notes The inset window is displayed at the same position as it was displayed last If the inset window is not displayed last it is not displayed The inset window does not appear when your system is not connected to a remote party Monitoring Yourself in ...

Page 79: ...Set up the angle and zoom if you readjust them For details on the angle and zoom settings see Adjusting the Camera Angle and Zoom on page 72 4 Press the joystick on the Remote Commander The moving picture on the monitor screen is frozen and the still picture is sent After the transmission the message Transmission of the still picture is sent appears If Far End Camera Control is set to On at both t...

Page 80: ...cation speed Sending an Image from an Object Camera 1 Press the STILL IMAGE button on the Remote Commander the Still Image menu appears 2 Select Send Object with the joystick on the Remote Commander then press the joystick The image from the object camera is sent to the remote party When the system finishes sending the picture the system displays the original input image Sending a File Stored in t...

Page 81: ... Memory Stick Storing the Still Picture Sent From the Remote Party As the JPEG format 1 Open the Still Image menu after receiving a still picture 2 Select Save with the joystick on the Remote Commander then press the joystick 3 Select the desired location where the still picture will be stored with the joystick on the Remote Commander then press the joystick The still picture is stored Notes The f...

Page 82: ...the Still Image menu 2 Select the Pointer with the joystick on the Remote Commander then press the joystick The camera picture is frozen and the picture is sent to the remote party Then the following menu appears If the remote party s screen is selected using the FAR NEAR button on the Remote Commander the still picture of the remote party is sent to the near side 3 Select the pointer icon with th...

Page 83: ...ines drawn with the mouse will be erased To store the still picture modified with the mouse Select Save with the mouse The modified still picture will be stored The file is stored in the following directory D user data To end a drawing or pointing Select Exit with the mouse The modified still picture will be automatically stored To recall a saved image Select Exit with the mouse then display the S...

Page 84: ...B mouse should be required as follows For Windows 2000 professional The total current of the connected USB devices is less than 0 5 A including rush current Except the external power supply devices When using the PCS E600 Extention Hub the USB device should allow to access via 2 stage hub For details on the T 120 Data setting see Dial Setup Menu on page 32 and Answer Setup Menu on page 36 Opening ...

Page 85: ...ser available folder is only user data Be careful not to access another folder or file 1 Display the Data Conference menu 2 Select File Access with the joystick on the Remote Commander then press the joystick The following menu appears 3 Select the desired still picture with the joystick on the Remote Commander then press the joystick The following sub menu appears T120demo ppt AGENDA with CMS DSC...

Page 86: ... 3 to 6 To switch the file displayed on the screen Select the file extension indication of the desired file in the task bar with the joystick on the Remote Commander then press the joystick To return to the Data Conference menu Select Return with the joystick on the Remote Commander then press the joystick Note You can open files up to seven at the same time however you can open only one file on t...

Page 87: ...press the joystick to close the file Editing the File Using the file copy function you can copy files created on a PC to the hard disk of the control unit using a floppy disk inserted in the USB floppy disc drive or a Memory Stick 1 Display the Data Conference menu 2 Select File Access with the joystick on the Remote Commander then press the joystick 3 Select the desired file with the joystick on ...

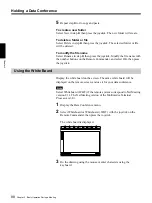
Page 88: ...umber buttons on the Remote Commander and select OK then press the joystick Using the White Board Display the white board on the screen The same white board will be displayed on the remote screen and use it for your data conference Note Select Whiteboard WHT if the remote system correspond to NetMeeting version 2 11 The NetMeeting version of the Multimedia Terminal Processor is 3 01 1 Display the ...

Page 89: ...n selecting Whiteboard the file will be stored as the nmw file format and when selecting Whiteboard WHT the file will be stored as the wht file format Specify D PCS 6000 user data as the destination folder To exit the white board Select Return with the joystick on the Remote Commander then press the joystick The Data Conference menu appears again ...

Page 90: ... assigned to the 0 9 and buttons on the Remote Commander to control the remote system 1 Press the button on the Remote Commander The DTMF screen appears on the monitor screen 2 Press one of the number buttons 0 9 and that will be sent to the remote system 3 Press the joystick on the Remote Commander The DTMF screen disappears from the monitor screen ...

Page 91: ... monitor screen To disconnect the call Select OK with the joystick on the Remote Commander then press the joystick Or press the CONNECT DISCONNECT button on the Remote Commander again Note The Multimedia Terminal remains on even if the connection is broken To continue your meeting Select Cancel with the joystick on the Remote Commander then press the joystick ...

Page 92: ...ou cannot set up one teleconference using both technologies at the same time Notes You can hold a multipoint conference among six terminals using ISDN If you install the PCS UC601 Upgrade Kit you can connect a remote party via a LAN In addition you can hold a multipoint conference among six terminals via a LAN When installing the PCS I601 PRI Board and using the unit as the multipoint in the ISDN ...

Page 93: ...enu of Manual Dial or the Phone Book menu The data transfer speed per remote party may change based on the number of remote parties involved in the meeting If during a multipoint meeting a far end terminal loses power or a LAN cable is cut etc and the audio or picture data is not received the unit waits approximately 90 seconds for this data During that time screen image may experience some interf...

Page 94: ... value on the Multipoint Setup menu is 6B Enter the first remote party telephone number in text boxes A1 through A6 the telephone number of the second remote party in text boxes B1 through B6 and the telephone number of the third remote party in text boxes C1 through C6 When the number of lines value on the Multipoint Setup menu is 8B Enter the first remote party telephone number in text box A the...

Page 95: ...Commander Note You cannot append a mark to remote parties mixing BRI PRI and LAN together 4 Select a remote party with a mark or select a remote party to whom you want to add a mark and press the joystick A submenu appears 5 Select Edit and press the joystick The List Edit menu appears Numbers marked with the mark of the list are entered in the Telephone number item 6 Enter the name of the remote ...

Page 96: ...menu and press the joystick A submenu appears 3 Select On and press the joystick A mark appears in the upper left of the remote party list You can append a mark to up to five remote parties using the same process You can check how many marks have been added by checking the menu To remove a mark select a remote party to whom a mark has been added select Off from the submenu and press the joystick H...

Page 97: ... telephone number of the second remote party in text box B the telephone number of the third remote party in text box C the telephone number of the fourth remote party in text box D and the telephone number of the fifth remote party in text box E When the number of lines value on the Multipoint Setup menu is 2B Enter the first remote party telephone number in text boxes A1 and A2 the telephone num...

Page 98: ... in step 3 starts and based upon the type of line selected Dialing BRI Dialing PRI or Dialing LAN is displayed on the screen When the connection is established with the far end MEETING STARTS is displayed You can call remote parties one by one by repeating steps 1 through 3 for each one If one or more of the remote parties in a Multipoint connection fails to connect The following Dialog box is dis...

Page 99: ...on Picture from terminal connected to A B and C jacks of slot 5 8B connection Picture from terminal connected to A B C and D jacks of slot 5 Operating Chair Controls Picture A Picture from this terminal Picture B Picture C Continued Receiving a call Receiving a call from a remote party is same as a normal meeting For details see Receiving a Call on page 66 Notes on Point to Multipoint Meeting Mult...

Page 100: ...ictures will be displayed in the following manner With a BRI connection When using PRI or over a LAN After the connections are completed whenever someone at one of the terminals speaks the picture of the speaker will move to the large screen at the top left replacing the picture previously occupying that screen Operating Chair Controls Picture from this terminal Picture from this terminal Picture ...

Page 101: ...lay Control menu appears 2 Select Split or Voice Activated from Broadcast Mode with the joystick on the Remote Commander then press the joystick Each time you select the setting the mode is switched between the Split mode and the Voice Activated mode User control mode You can manually select the picture to be broadcast Once you select the picture both the broadcast modes are canceled and the selec...

Page 102: ...e Display Control menu appears Select Far from Display with the joystick on the Remote Commander then press the joystick Receiving the Broadcast Request When you receive the command MCV from the connected terminal the picture of that terminal is automatically broadcast If the meeting is held in Voice mode the mode is canceled and the picture is broadcast at full size When you receive the command M...

Page 103: ...Remote Commander then press the joystick The following menu appears on the monitor screen 3 To disconnect a selected terminal Select the number to be disconnected with the joystick on the Remote Commander then press the joystick The selected terminal is disconnected To disconnect all the terminals Select Disconnect All with the joystick on the Remote Commander then press the joystick Or press the ...

Page 104: ... the terminal has the lowest video rate The slave terminal that cannot change the audio mode becomes the secondary terminal The meeting with the secondary terminal is as follows The secondary terminal sends and receives the audio The secondary terminal sends video but cannot receive video When a lower video rate terminal is connected The system broadcasts the picture to all the terminals with the ...

Page 105: ...oosing Selected Comm Mode SCM 11 Can deal with secondary terminals 12 Call set up provision s 13 Control capabilities 13 1 Numbering of terminals Simple chair control using BAS 13 2 MLP facilities refer to ITU T T series 13 3 H 224 simplex data 14 Cascading 14 1 Fixed rates simple 14 2 Master Slave 15 Terminal identification 16 MBE capability Register necessary information such as the telephone nu...

Page 106: ...or 9 Encryption 10 Method of choosing Selected Comm Mode SCM 11 Can deal with secondary terminals 12 Call set up provision s 13 Control capabilities 13 1 Numbering of terminals 13 2 T 120 facilities 14 Cascading 14 1 Fixed rates simple 14 2 Master Slave 15 Terminal identification Value 5 6 when including this terminal 1 0 10BASE T 100BASE TX 1024 kbp s Direct connection 512 kbps s 3 terminal conne...

Page 107: ... the Remote Commander Note When you do an incapable operation the indication Command is rejected by MCU appears on the monitor screen To see a picture of the selected terminal 1 Select Receive from Broadcast Mode with the joystick on the Remote Commander 2 Select the terminal number by moving the joystick up or down then press the joystick The picture of the selected terminal appears on the local ...

Page 108: ...ave upgraded the system using the optional PCS UC601 Upgrade Kit and using a LAN you cannot do the voice meeting Voice only teleconferences cannot be held using PRI rate ISDN lines To start a voice meeting with unregistered remote parties Set Line I F to Telephone in the Manual Dial menu For details on the setting see Calling an Unregistered Remote Party on page 55 The indication Voice Only appear...

Page 109: ...installation of optional Boards consult your Sony dealer Board Function PCS I600 BRI Board Connects via the BRI interface Single board is equipped with four BRI jacks Up to three boards can be installed When installing three boards the connection uses 12 BRI lines PCS I601 PRI Board Connects via the PRI interface PCS I602 V 35 Board Connects via the V 35 interface Up to two boards can be installed...

Page 110: ...board slots 5 6 and 7 RUNHD ERR LNK100ACT RST INT COM1 MOUSE KEYBOARD 10 100BASE T AUDIO IN AUDIO OUT AUX BRI A B C D BRI A B C D AUX MON L MON R VIDEO IN VIDEO OUT AUX2 AUX1 OBJECT MON2 MON1 AUX RGB OUT MONITOR BRI A B C D SLOT NUMBER 6 7 4 3 2 2 1 to BRI A to BRI B to BRI C to BRI D to an ISDN BRI line ISDN modular cable 12 not supplied To use the PRI interface You need to install the optional P...

Page 111: ...UX2 AUX1 OBJECT SLOT NUMBER 6 7 4 3 2 2 1 Using the V 35 Interface You need to install the optional PCS I602 V 35 Board You can connect via the V 35 interface Note For 56 Kbps 2 or 64 Kbps 2 connect to Channels A and B For 56 to 1920 Kbps connect to Channel A to V 35 to a digital line Terminal adaptor PCS K32 V 35 cable not supplied to V 35 PCS K32 V 35 cable not supplied Terminal adaptor to a dig...

Page 112: ...DEO OUT AUX2 AUX1 OBJECT MON2 MON1 AUX RGB OUT MONITOR BRI A B C D SLOT NUMBER 6 7 4 3 2 2 1 Follow the procedure below to upgrade the software 1 Turn on the power The top menu appears on the monitor screen 2 Open the CD ROM Hard disk drive cover 3 Press the EJECT switch The CD ROM tray slides out 4 Place the CD ROM for upgrade on the tray then press the EJECT switch Upgrading starts After the upg...

Page 113: ...SSOR ACCESS 1 2 3 1 2 3 The Multimedia Terminal is designed to accommodate three participants at one terminal You can add the optional PCS A300 Microphones to allow for more participants Connecting the Microphone You can add two microphones Power for the microphone is provided from the Multimedia Terminal Notes on installing the PCS A300 Microphone Install the microphone at a half meter apart from...

Page 114: ...Video Input select If you are sending audio select AUX or MIC AUX in the Audio Setup To Video or S video output To VIDEO IN AUX 1 or VIDEO IN AUX 2 To AUDIO IN AUX To Audio output Using the Document Stand When the document stand is connected you can use it to transmit images of documents or images of a computer screen To transmit an image using the document stand select Object with the Video Input...

Page 115: ...C D SLOT NUMBER 6 7 4 3 2 2 1 Recording the Meeting You can record a meeting A consumer VCR can be used as a recording VCR Connect it to the Multimedia Terminal Note Based on the Dual Monitor setting see page 39 the video output will be different When the setting is TV Monitor Dual your own image will be output Keep this in mind To AUDIO OUT AUX To audio input To Video or S video input VCR etc To ...

Page 116: ...this message appears press the eject switch remove the first RECOVERY CD ROM RECOVERY CD ROM 1 2 insert the second RECOVERY CD ROM RECOVERY CD ROM 2 2 press the Eject switch again and when the CD ROM drive lamp stops blinking press the ENTER key Copying of data from the second CD ROM begins When copying of data from the second CD ROM is complete a prompt E appears on the screen 8 Press the EJECT s...

Page 117: ...timedia Terminal Processor is turned on or in standby press and hold the switch about one second the Multimedia Terminal Processor saves the current status to the hard disk then turned off If you press and hold the switch about six seconds the Multimedia Terminal Processor is immediately turned off without saving the status 2 CD ROM Hard disk drive cover Equips with a CD ROM drive and retachable H...

Page 118: ...in modular Connect to the PROCESSOR jack on the Desktop Terminal using the Desktop Terminal cable If you use any other cable than the supplied cable the USB function does not function 6 CAMERA IN connector D sub 25 pin female Connect to the PROCESSOR connector on the Camera Unit using the Camera Unit cable 7 CTRL S input jack minijack Connect to the external equipment such as RM PJ10 that has the ...

Page 119: ...ni DIN 4 pin Connect to the video output jack of external equipment ws VIDEO IN AUX2 jack phono jack Connect to the video output jack of video equipment wd COM1 connector D sub 9 pin male Connect to the external equipment to control this unit wf AUDIO OUT MON R jack phonojack Connect to the audio input jack right of the TV monitor wg AUDIO OUT MON L jack phonojack Connect to the audio input jack l...

Page 120: ... the lamp remains lit 3 POWER lamp green When you set the I 1 switch to on this lamp lights up This lamp goes off when the system is on standby 4 Remote sensor When operating the Multimedia Terminal point it toward this sensor 5 PROCESSOR connector Connect to the CAMERA IN connector on the Multimedia Terminal Processor using the Camera Unit cable 1 2 4 3 6 5 7 Front Rear 6 VISCA OUT connector This...

Page 121: ... to this jack 4 2 3 jacks minijack Connect the PCS A300 Microphone s to these jacks 5 USB 1 2 3 jacks USB 1 1 type A Connect to a USB compatible device Note The USB compatible devices should be the following conditions Conform to Windows 2000 Professional The total current consumption of all the connected USB devices except external power device including their rush current is 0 5 A or less When u...

Page 122: ... to CONF 1 CONF DOC TV selector Selects the equipment to operate CONF Operates the Multimedia Terminal DOC Operates the optional PCS DS150 DS150P Document Stand TV Operates a Sony TV 2 CONNECT DISCONNECT button Press this button to connect or disconnect a remote party CONF DOC TV CONNECT DISCONNECT 1 2ABC 3DEF 5JKL 4GHI 6MNO 8TUV 7PQRS 10 0 9WXYZ 0 HELP VIDEO INPUT SELECT DISPLAY PUSH ENTER MIC DO...

Page 123: ... Press again to cancel the muting Note The name of the button has the word DARK however this does not function in this system qd Battery compartment Insert two size AA R6 batteries qf ZOOM TV CH T W buttons These buttons control the zoom of the camera T press to zoom in the picture W press to zoom out the picture qg MENU button Displays the menu on the monitor screen qh PHONE BOOK SYMBOL button Pr...

Page 124: ...ESTABLISH ALL CONNECTIONS Remedy Make sure the selected entry is correctly registered Try again later Check the number and try again Try again later The line has been disconnected normally Try again later Check if the remote system is connected Check if the remote system is connected Check the number and try again Try again later Check if the remote system is operational Check the number and try a...

Page 125: ... not proper The MAC address is not proper The IP address and netmask cannot be got The setting of the Gatekeeper is not proper The setting of the Gatekeeper is not proper The setting of the SNMP is not proper The setup in the LAN Setup menu is not proper The format of the Memory Stick is wrong Message Remedy The following messages indicate the state of the system No action is required Message MEET...

Page 126: ... an optional interface board The remote party has not been registered in the system yet The write protect tab on the Memory Stick is set to LOCK The Memory Stick has already been recorded to its full capacity This may occur when turning off the power while the unit runs or disconnect the Desktop Terminal cable This may occur when turning off the power while the unit runs or disconnect the Desktop ...

Page 127: ...dation 16 Kbps G 728 ITU T Recommendation 6 4 Kbps G 723 1 ITU T Recommendation when upgrading with the PCS UC601 and connecting on a LAN Network Multiplexing Video audio data Frame format H 221 ITU T Recommendation Interface ISDN BRI up to 12 lines when installing three PCS I600s ISDN PRI B channel 24 or H0 H11 when installing the PCS I601 for North America B channel 30 or H0 H12 when installing ...

Page 128: ...C color EIA standards PCS 6000 PAL colour CCIR standards PCS 6000P Image device 1 3 inch CCD Charge Coupled Device Approx 410 000 pixels Effective approx 380 000 pixels PCS 6000 Approx 470 000 pixels Effective approx 440 000 pixels PCS 6000P Lens f 5 4 to 64 8 mm F 1 8 to 2 7 Horizontal angle 4 4 to 48 8 Focal distance 10 to 800 mm Minimum illumination 7 lux at F 1 8 50 IRE Illumination range 7 lu...

Page 129: ... Y Brightness signal 4 C Chrominance signal CAMERA IN connector female D sub 15 pin connector Pin Signal Description 1 Y Brightness signal 2 Y GND Brightness signal ground 3 C Chrominance signal 4 C GND Chrominance signal ground 5 GND Ground 6 GND Ground 7 TxD Transmit data 8 RxD Receive data 9 12V 12V 10 12V 12V 11 GND Ground 12 SIRCS Remote control data 13 DTR Data terminal ready 14 Lock Lock 15...

Page 130: ...ack Mini DIN 6 pin jack Pin Signal Description 1 KDATA Keyboard data 2 NC 3 GND Ground 4 5V 5V 5 KCLK Keyboard clock 6 NC MOUSE jack Mini DIN 6 pin jack Pin Signal Description 1 MDATA Mouse data 2 NC 3 GND Ground 4 5V 5V 5 MCLK Mouse clock 6 NC USB jack Type A Pin Signal Description 1 5V 5V 2 USBD USB data 3 USBD USB data 4 GND Ground DESKTOP TERMINAL jack Modular jack Pin Signal Description 1 MIC...

Page 131: ...ransmit 4 RA Receive 5 RB Receive 6 TB Transmit 7 NC 8 NC PRI jack PCS I601 Modular jack Pin Signal Description 1 RA Receive 2 RB Receive 3 NC 4 TA Transmit 5 TB Transmit 6 NC 7 NC 8 NC V 35 connector female PCS I602 Half pitch 36 pin connector Pin Signal Description 1 SGND Signal ground 2 SGND Signal ground 3 CABLE1 Cable1 4 V35SD Send data 5 V35SD Send data 6 V35RD Receive data 7 V35RD Receive d...

Page 132: ...35DR Data ready H V35ER Data terminal ready J V35RI Call display P V35SD Send data R V35RD Receive data S V35SD Send data T V35RD Receive data U V35TT Transmit timing V V35RT Receive timing W V35TT Transmit timing X V35RT Receive timing Y V35ST Send timing AA V35ST Send timing D sub 25 pin connector cable side Pin Signal Description 1 SGND Signal ground 2 366DPR Number display 3 366ACR Abandon cal...

Page 133: ...ransmit timing 23 NC 24 RSCS Clear to send 25 RSRR Receive ready D sub 37 pin connector Pin Signal Description 1 NC 2 NC 3 NC 4 RSSD Send data 5 RSST Send timing 6 RSRD Receive data 7 RSRS Request to send 8 RSRT Receive timing 9 RSCS Clear to send 10 NC 11 RSDM Data mode 12 RSTR Terminal ready 13 RSRR Receive ready 14 NC 15 RSIC Incoming call 16 NC Pin Signal Description 17 RSTT Transmit timing 18...

Page 134: ...cially people behind the participants the quality of the local transmission will deteriorate Do not seat participants with fine line patterns in front of a wall Choose a place which is echo free Do not install the system near noise sources such as air conditioners or copy machines Avoid placing the system in a room where there are speakers used for an in house broadcasting system Lighting Consider...

Page 135: ...Appendix 135 Appendix Placing the Camera Unit 1 Stick the supplied Velcro to the bottom of the Camera Unit 2 Attach the Camera Unit to the monitor 1 1 1 2 ...

Page 136: ...lity of Service LAN Interface A device that goes between two different devices so that they can communicate with each other I MUX An abbreviation for Inverse Multiplexer This protocol allows you to transmit the data at 384 Kbps via 6B channel ISDN An acronym for Integrated Services Digital Network This is a communications protocol by CCITT on transmission of integrated voice video and data Bandwid...

Reviews: