139
Control of VTRs, Extended VTRs, and Disk Recorders
Chapt
er
1
0
Ex
ter
nal
De
vic
es
The status area shows the device number, register
number, status information, current time, start point,
stop point, and start delay time.
2
Select the device.
3
Carry out any of the following operations as required.
• To set the start point, press [Set] in the <Start TC>
group.
• To set the stop point, press [Set] in the <Stop TC>
group.
• To set the start delay time, press [Set] in the <Delay>
group.
4
Set the timecode value for the start point, stop point, or
start delay time.
You can enter a start delay time in the range that
depends on the signal format as follows:
00:00 to 59:nn, where nn = (number of frames per
second) – 1 frame.
5
Press [Enter].
To clear the start point, stop point, and start delay
time settings in a menu
Select the device, then press [Clear] in the <Start TC>
group, <Stop TC> group, <Delay> group, as required.
Selecting Loop or Recue as the playback
mode
You can set the device operation mode to loop or recue.
Loop:
Plays from the start point of a file to the stop point,
then repeats playback from the start point.
Recue:
Plays from the start point of a file to the stop point,
then returns to the start point and stops.
• Loop and recue functions are only available when using
the video disk communications protocol.
• To use the loop or recue function, it is necessary to
enable the function in the Setup menu.
For details,
“Serial Port Settings” (p. 232)
and
“Making Detailed Settings on the External Device
Connected to the Serial Port” (p. 232)
1
Open the Device >DDR/VTR >Cueup & Play menu
(5331).
The status area shows the device number, register
number, status information, current time, start point,
stop point, start delay time, and playback mode.
2
Select the device.
3
In the <Mode> group, press [Loop] or [Recue], turning
it on.
VTR/Disk Recorder/Extended VTR
Timeline
For a keyframe effect controlled from the control panel,
the timeline allows you to set a VTR, disk recorder or
Extended VTR action at a keyframe point on the timeline.
Timeline actions
• Start
• Stop
• Cue up
• Variable speed
• The timeline does not support loop and recue.
• For a disk recorder, the maximum number of files for a
single register is eight.
You can save the data set in the Device menu in keyframe
effect registers. When you recall this register and start
execution of the keyframe effect, and advance the effect to
the keyframe point for which the action is set, an action
command is output to the external device through the 9-pin
serial port assigned to the VTR, disk recorder or Extended
VTR.
When executing a timeline using a disk recorder or
Extended VTR, note the following points.
• It is not possible to use loop and recue on the timeline.
• When carrying out keyframe settings, be sure to recall
the file for operation first.
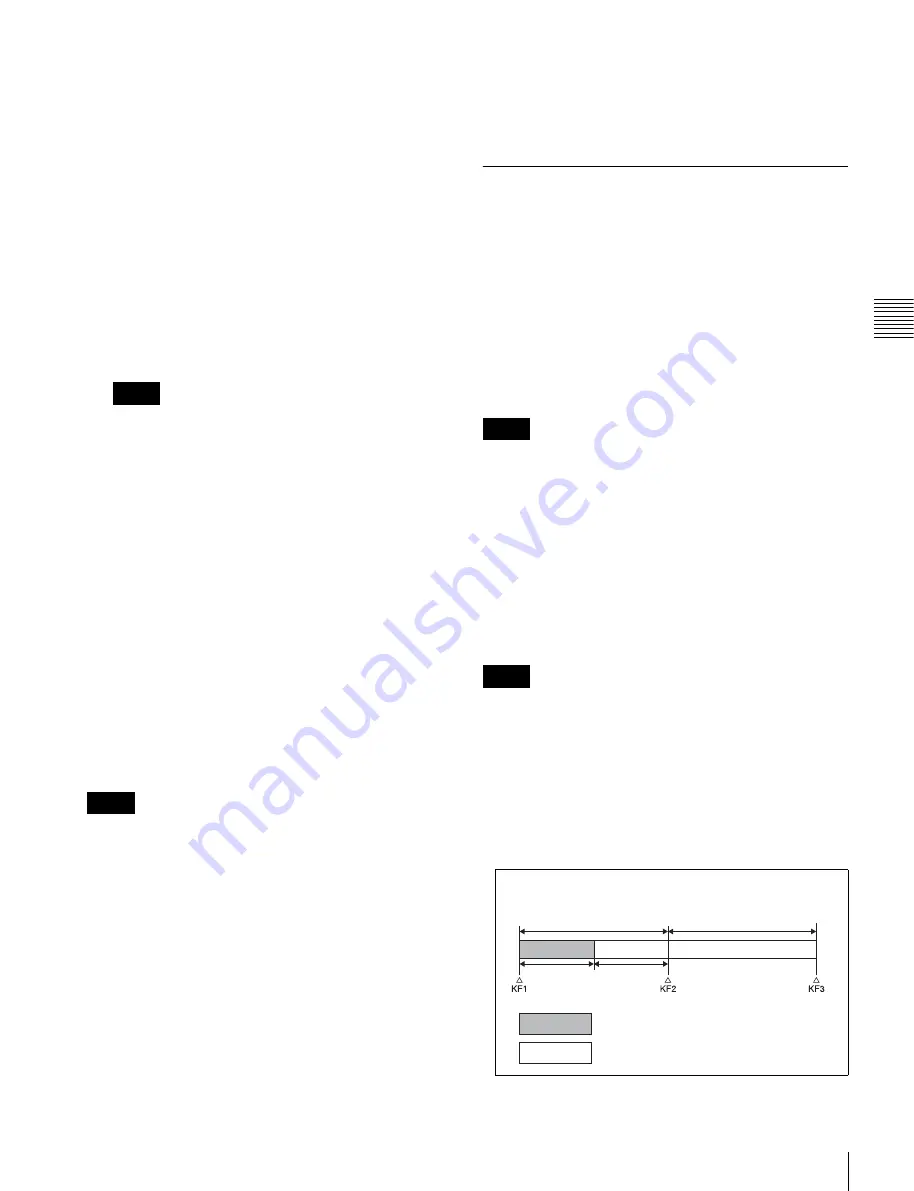
• If the duration of the recorded video clip is less than the
keyframe duration, after playback to the end of the clip,
the remainder of the keyframe duration is filled with a
still of the last frame of the clip (see figure below).
Notes
Notes
Notes
Notes
Example: When the recorded clip for keyframe 1 has a duration
of 15 frames
30 frames
30 frames
15
frames
15
frames
: Interval for which clip is recorded
: Interval in which still frame is displayed


