background image

000

Chapter 8: Appendix

67

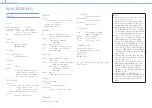
Specifications

Main Unit

General

Power requirements 

12 V DC

Power consumption 

Approx. 23 W

Dimensions 

Approx. 362 × 43.5 × 206 mm  
(14 

3

/

8

 × 1 

3

/

4

 × 8 

1

/

8

 in.) (W×H×D)

Mass 

Approx. 2.1 kg (4 lb. 10 oz.) 

System

Video format


1080/59.94i Hz (60i)


1080/50i Hz (50i)

Streaming

Codec Format / Protocol


AVC/RTMP (Ustream)

Recording

Format
  

AVCHD

Media


SD, SDHC, and SDXC memory cards 

(Class 4 or higher), Memory Stick 
PRO Duo, Memory Stick PRO-HG 
Duo, Memory Stick XC-HG Duo

Video switching

Function
 

 Input: 8 video inputs (4 channels can be used 

at the same time) + Title


1 M/E + 2 keyers (PinP ×1, Title ×1)


  Output: PGM output, multi-viewer output

Key type


Chroma key, luminance key

Audio mixer

Function
 

  Input: Analog stereo (1) / stereo embedded 

audio input (4)


  Mixing: Stereo mixing (5)


  Output: PGM (stereo) (1)

Video input

SDI  

BNC (4), 75 Ω, 3G SDI/HD/SD


SMPTE 292M/259M/424M/425M

HDMI 

Type A (2)


(720×480/576, 1280×720,  

1920×1080)

VIDEO 

BNC (2), NTSC/PAL


VIDEO: 1.0 Vp-p 75 Ω, negative sync

TITLE 

D-Sub Shrink 15-pin (1) (female)


RGB (1600×1200)

Video output

HD SDI 

BNC (1) (PGM) 75 Ω, 1.5 Gbps


SMPTE 292M

HDMI 

HDMI (Type A) (1) (PGM) (720×480/576, 

1280×720, 1920×1080)


HDMI (Type A) (1) (multi-viewer) 

(720×480/576, 1280×720, 
1920×1080)

VIDEO 

BNC (1)


VIDEO: 1.0 Vp-p 75 Ω, negative sync

Audio input

Embedded audio input
 SDI/HDMI


16-bit, sampling: 48 kHz

Analog input


XLR/TRS combo type (CH-1, CH-2)

Audio output

Embedded audio output

 SDI/HDMI


16-bit, sampling: 48 kHz

Analog output


Phono jack (CH-1, CH-2)

Headphones


Stereo mini jack (1)

Other interfaces

LAN 

RJ-45 (2) (PC UI, Streaming)


100BASE-TX, 1000BASE-T

USB 2.0 

USB Type-Mini-B (1)

Option 

φ3.5 mm jack (1)

TALLY 

D-Sub 9-pin (1) (male)

Supplied accessories

Before Using This Unit (1)
CD-ROM (Operating Instructions) (1)
AC adapter (1)
USB cable (1)
OPTION cable (1)

Design and specifications are subject to change 
without notice.

Notes

ˎ

ˎ

Always make a test recording, and verify that it 
was recorded successfully.  
SONY WILL NOT BE LIABLE FOR DAMAGES 
OF ANY KIND INCLUDING, BUT NOT LIMITED 
TO, COMPENSATION OR REIMBURSEMENT 
ON ACCOUNT OF FAILURE OF THIS UNIT OR 
ITS RECORDING MEDIA, EXTERNAL STORAGE 
SYSTEMS OR ANY OTHER MEDIA OR STORAGE 
SYSTEMS TO RECORD CONTENT OF ANY TYPE.

ˎ

ˎ

Always verify that the unit is operating 
properly before use. SONY WILL NOT BE LIABLE 
FOR DAMAGES OF ANY KIND INCLUDING, 
BUT NOT LIMITED TO, COMPENSATION OR 
REIMBURSEMENT ON ACCOUNT OF THE LOSS 
OF PRESENT OR PROSPECTIVE PROFITS DUE 
TO FAILURE OF THIS UNIT, EITHER DURING THE 
WARRANTY PERIOD OR AFTER EXPIRATION OF 
THE WARRANTY, OR FOR ANY OTHER REASON 
WHATSOEVER.

ˎ

ˎ

SONY WILL NOT BE LIABLE FOR CLAIMS OF 
ANY KIND MADE BY USERS OF THIS UNIT OR 
MADE BY THIRD PARTIES.

ˎ

ˎ

SONY WILL NOT BE LIABLE FOR THE LOSS, 
REPAIR, OR REPRODUCTION OF ANY DATA 
RECORDED ON THE INTERNAL STORAGE 
SYSTEM, RECORDING MEDIA, EXTERNAL 
STORAGE SYSTEMS OR ANY OTHER MEDIA OR 
STORAGE SYSTEMS.

ˎ

ˎ

SONY WILL NOT BE LIABLE FOR THE 
TERMINATION OR DISCONTINUATION OF ANY 
SERVICES RELATED TO THIS UNIT THAT MAY 
RESULT DUE TO CIRCUMSTANCES OF ANY 
KIND.

Summary of Contents for MCX-500

Page 1: ... 2016 Sony Corporation Multi Camera Live Producer Operating Instructions MCX 500 Ver 1 0 4 689 392 11 1 GB ...

Page 2: ...WARRANTY WITH REGARD TO THIS MANUAL THE SOFTWARE OR OTHER INFORMATION CONTAINED HEREIN AND HEREBY EXPRESSLY DISCLAIMS ANY IMPLIED WARRANTIES OF MERCHANTABILITY OR FITNESS FOR ANY PARTICULAR PURPOSE WITH REGARD TO THIS MANUAL THE SOFTWARE OR SUCH OTHER INFORMATION IN NO EVENT SHALL SONY CORPORATION BE LIABLE FOR ANY INCIDENTAL CONSEQUENTIAL OR SPECIAL DAMAGES WHETHER BASED ON TORT CONTRACT OR OTHER...

Page 3: ...pear spontaneously These problems are not a malfunction Note that any such problems have no effect on recorded data Consumable parts ˎ ˎ The fan is a consumable part that will need periodic replacement When operating at room temperature a normal replacement cycle will be about 5 years However this replacement cycle represents only a general guideline and does not imply that the life expectancy of ...

Page 4: ...ion Record program PGM outputs to memory cards Recording to Memory Stick Duo and SD cards is supported The videos assigned to the inputs the program PGM output video the unit status and other information is displayed on an external monitor Preparations such as key composite and audio adjustments can also be performed while viewing the multi viewer Multi Viewer page 12 Multi viewer Simultaneous rec...

Page 5: ...of composite patterns allows you to produce dynamic videos with high visual impact Three lines of output HD SDI VIDEO HDMI are available for the PGM video Five lines of audio input HD SD SDI HDMI LINE are also available for mixing Menu customization for effect patterns You can register up to eight patterns each for the transition and composite effect patterns displayed in the touch panel Example f...

Page 6: ...ansmission Input Output Input output Ustream server Projector Computer used for presentation PC UI computer Headphones Memory card for recording MCX 500 Remote Commander Use at Live Musical Performances You can switch between live video inputs from cameras and record them By linking with a commercially available tally box you can light the tally of the camera being used for the PGM output The file...

Page 7: ... used for PGM output the corresponding button lights Unlit Not being used as PGM output Lit Output as PGM in progress For details see Live Adjustments page 37 3 RECORDING button Displays the menu for performing recording operations in the menu panel Pressing the button again hides the menu The lit status of the button indicates the recording status Unlit Recording is stopped Lit Recording is in pr...

Page 8: ...tput as PGM in progress Lit Selected as the NEXT output Unlit Not selected Completely unlit The button is disabled and cannot be pressed ASSIGN button Allows you to change the video input connectors assigned to inputs 1 to 4 Pressing the button displays the menu for the button selected in row B in the menu panel When the button is lit the menu displayed will differ depending on the selected row B ...

Page 9: ...ack standard stereo phone When monitoring audio connect headphones here For details on adjusting the volume see Adjusting the Headphone Volume page 37 4 memory card slot When recording PGM outputs insert a memory card here The unit supports Memory Stick Duo and SD cards ˎ ˎ Insert Memory Stick media with their front sides facing up ˎ ˎ Insert SD cards with their reverse terminal sides facing up SD...

Page 10: ... video as an HD SDI signal For details on aspect ratio settings for SD signals see Output Screen page 61 in the Configuring the System Settings section PGM HDMI output connector Type A Outputs the finished video processed internally on the unit i e PGM video as an HDMI signal For details on signal format settings for HDMI see Output Screen page 61 in the Configuring the System Settings section Not...

Page 11: ...I which allows settings configuration and control of the unit here For details see Connecting a Computer for Settings Configuration page 22 9 STREAMING network connector RJ 45 modular jack When using the Ustream service to stream connect to the network via this connector For details see Chapter 5 Streaming page 54 CAUTION For safety do not connect connectors for peripheral device wiring that may h...

Page 12: ...t key compositions unit status and other information INT material is not displayed 1 2 3 4 5 6 7 1 NEXT viewer Displays the video selected from among the row B buttons as the NEXT output 2 PGM viewer Displays the video currently being output as the PGM output 3 INPUT viewer Displays the materials assigned to inputs 1 to 4 and the TITLE material signal being input from a computer Input number 1 to ...

Page 13: ...and is always lit green Over level indicator Lights red at 0 dB Lights green up to the current level 5 STREAMING status Displays the streaming status using an icon Streaming is not possible Streaming is ready to start Streaming is in progress 6 RECORDING information Displays the following information concerning recording Recording status Recording is not possible Recording is ready to start Record...

Page 14: ...en page 61 Output Configure settings related to the PGM output and multi viewer For details see Output Screen page 61 System Configure the system settings for the unit For details see System Screen page 61 Network Configure the network settings necessary for streaming transmissions For details see Configuring the Network Settings for Streaming Transmission page 60 Streaming Configure the user acco...

Page 15: ...ustments for Inserting People onto Backgrounds Chroma Key page 44 and Using HDMI Input Signals to Insert Text EFFECT Mode page 47 4 Communication status Indicates the status of communication between the unit and the computer Communication with the unit is enabled Communication with the unit has been severed and the system is attempting to reconnect Controls via the PC UI will be disabled 5 Display...

Page 16: ...e that serves as the background To differentiate between the cutout image and the removed parts of the image a cutout signal key signal is created There are various methods for creating key signals but the following describes the methods available on the unit chroma keying and luminance keying Chroma keying When using this method create a key signal that uses color to differentiate between the cut...

Page 17: ...pe A A B B 9 INPUT TERMINALS VIDEO SDI VIDEO SDI HDMI SDI HDMI SDI TITLE INPUT TALLY MULTI VIEWER PGM LINE OUTPUT BKGD button A A B B Composite EFFECT mode Use this mode to insert image B onto image A i e for compositing The following composite patterns are available in EFFECT mode In EFFECT mode the following items light green along with the EFFECT button ˎ ˎ Row B buttons ˎ ˎ TRANSITION RATE but...

Page 18: ...When linking with a Remote Commander Use the OPTION cable supplied with the unit to connect the Remote Commander to the unit Connect the cameras to the Remote Commander and the unit as follows OPTION cable supplied Camera 3 Camera 2 Camera 1 For details on connections refer to the operating instructions for the Remote Commander and the connected cameras For details on necessary settings see Linkin...

Page 19: ...used for the multi viewer See MULTI VIEWER HDMI output connector page 69 and connect a supported monitor HDMI Large display For details on aspect ratio settings for SD signals and format settings for HDMI signals see Output Screen page 61 in the Configuring the System Settings section If there is a discrepancy between the video and the audio see PGM Output Delay page 61 in the Output Screen sectio...

Page 20: ...gs for Streaming Transmission page 60 Network hub Internet PC UI computer Ustream service Connecting the Power Supply Connect the DC output plug of the supplied AC adapter to the DC IN 12V connector on the rear of the unit and connect the AC adapter to a power supply to power supply AC adapter CAUTION For safety do not connect connectors for peripheral device wiring that may have excessive voltage...

Page 21: ...he unit is ready for operations Tips Controls from a computer connected to the unit will be possible after the initial settings are complete SecondandSubsequentStartup Press the power switch on the front of the unit to turn on the unit A menu screen will appear on the menu panel touch panel after startup and the unit will be ready for operations Auto Power Off Function The unit is equipped with an...

Page 22: ...ction modes are available ˎ ˎ LAN mode A DHCP connection is used in this mode The unit and computer are connected using IP addresses assigned by an external DHCP server ˎ ˎ Direct mode The unit s IP address is fixed 192 168 0 1 in this mode Configure the computer s network settings as follows before connection IP address 192 168 0 XXX Subnet mask 255 255 255 0 Tips If connection in LAN mode is not...

Page 23: ...mproving Security Use HTTPS connections with encrypted communications to improve security After accessing the unit download the CA certificate and install it on your web browser 1 Start your computer s web browser and enter http IP address displayed in the NETWORK PC UI menu RootCA crt in the address bar When connection is successful the CA certificate for the switcher appears 2 Download the CA ce...

Page 24: ...s to configure the name resolution between the unit s IP address and the CA certificate issue location ˎ ˎ Register to the hosts file 7 After finishing configurations enter https Sony MCX 500 serial number in the address bar to access the unit When access is successful the Live screen of the PC UI appears ...

Page 25: ...etails see Linking embedded audio to its video page 28 Default conditions Video input VIDEO INPUT SELECT Audio input AUDIO ACCESS Connector number Input signal Status ENABLE DISABLE 1 1 1 SDI ENABLE 2 2 2 SDI ENABLE 3 3 3 SDI ENABLE 4 4 4 SDI ENABLE INT BLACK ENABLE LINE LINE LINE input audio signals ENABLE Assigning Video Inputs Under default conditions videos from the devices connected to the SD...

Page 26: ...hting DISABLE disables the VIDEO INPUT SELECT button for that number This prevents accidental pressing of buttons that do not have video inputs Tips When VIDEO is selected for inputs 1 and 2 the respectively numbered audio inputs will be disabled Button Option Description 1 and 2 SDI Assigns the materials input to the SDI input connectors The embedded audio is also assigned to the respectively num...

Page 27: ... PGM LINE OUTPUT Select the target audio input button Set to the 0 dB position Adjust or configure settings for each input here Tips Decrease the volume before connecting or disconnecting input devices input signals Determining whether to use each channel Specify whether to use or disable each channel Press an AUDIO ACCESS button to display the AUDIO menu and select use or deselect CH ON When CH O...

Page 28: ...dicator Lights red at 0 dB Lights green up to the current level 4 Repeat the procedure to adjust each audio input Tips If adjustments via the unit are not sufficient perform adjustment on the input device as well Linking embedded audio to its video To automatically enable or disable embedded audio in response to PGM output link the embedded audio to its video When a video for which the embedded au...

Page 29: ... PGM output 9 INPUT TERMINALS VIDEO SDI VIDEO SDI HDMI SDI HDMI SDI TITLE INPUT TALLY MULTI VIEWER PGM LINE OUTPUT 1 Check the assigned videos in the INPUT viewer of the multi viewer For details on changing the assigned videos see Assigning Inputs page 25 2 Press the button for the video you want to output as the PGM output The selected button lights red and the video is output as the PGM output T...

Page 30: ... this button to switch the video 9 INPUT TERMINALS VIDEO SDI VIDEO SDI HDMI SDI HDMI SDI TITLE INPUT TALLY MULTI VIEWER PGM LINE OUTPUT 1 Check the assigned videos in the INPUT viewer of the multi viewer For details on changing the assigned videos see Assigning Inputs page 25 2 Press the button for the video you want to output next as the PGM output Video to be output next as the PGM output The se...

Page 31: ...ideo A A B B A A B B 9 INPUT TERMINALS VIDEO SDI VIDEO SDI HDMI SDI HDMI SDI TITLE INPUT TALLY MULTI VIEWER PGM LINE OUTPUT Use the buttons in rows A and B The buttons in row B are used to select the video to output next as the PGM output Select the transition pattern here Press this button to execute the transition Light the BKGD button 1 Check the assigned videos in the INPUT viewer of the multi...

Page 32: ...er of the multi viewer A frame indicating selection as the NEXT output appears around the video selected in row B 4 Tap and select a pattern icon Mix Wipe Tips Eight wipe patterns are available on the unit For details on the patterns available on the unit see Transition and Composite Patterns List page 62 5 Select a transition rate with the TRANSITION RATE buttons Under default conditions transiti...

Page 33: ...sition starts and the videos switch When a link is configured between the video and its embedded audio the enabling and disabling of the embedded audio is determined by whether the video is being output as the PGM video For details on settings see Linking embedded audio to its video page 28 ...

Page 34: ...ent PGM output video Overlay video The selected video appears in the NEXT viewer of the multi viewer A frame indicating selection as the NEXT output appears around the video selected in row B 4 Tap and select a pattern icon PinP Chroma key Pre adjustment may be necessary depending on the pattern For details see Adjustments for Inserting People onto Backgrounds Chroma Key page 44 5 Select a transit...

Page 35: ...PGM output video via a cut Input signal from the computer Canceling composites Press the TITLE button The composite will be enabled disabled with each press Using HDMI Input Signals to Insert Text EFFECT Mode Perform the following to use EFFECT mode to overlay the text signal that is input from a computer connected to an HDMI input connector on the rear of the unit This method cannot be used in co...

Page 36: ...Luminance key 5 Select a transition rate with the TRANSITION RATE buttons For details on changing the rates assigned to the buttons see Changing the Transition Rates page 49 6 Press the AUTO TRANS button The transition starts and the text is composited When a link is configured between the video and its embedded audio the enabling and disabling of the embedded audio is determined by whether the vi...

Page 37: ...t the volume Tips ˎ ˎ Audio is not completely disabled at level 1 ˎ ˎ When using earphones or headphones be careful not to raise the volume too high Prolonged exposure to high volumes that stimulate the ears may cause adverse effects to hearing ˎ ˎ Decrease the volume before connecting or disconnecting input devices input signals and headphones Adjusting the Overall Audio Level Use the PGM master ...

Page 38: ... the Audio Tone Signal with the PGM Output Display the UTILITY 1 3 menu and output the 1 kHz tone signal with the PGM output using TONE 1kHz Select lit Outputs the 1 kHz tone signal fixed level1 with the PGM output Deselect unlit Does not output the tone signal 1 System format Level 50i 18 dB 60i 20 dB Adjusting the Menu Panel Brightness Display the UTILITY 1 3 menu tap and select light DISPLAY BR...

Page 39: ...icons cannot be edited unless the BKGD or EFFECT menu is displayed on the menu panel of the unit and the PC UI s Live screen Replacing the Pattern Icons in the BKGD Menu Select the transition patterns you want to display from among the templates 1 Display the Pattern screen of the PC UI in BKGD mode You can also switch to BKGD mode using the BKGD button after displaying the Pattern screen 2 Replac...

Page 40: ... you want to replace Select Template in the Property area menu Pattern icons appear in the editing area on the right Select the effect type and then select the pattern icon you want displayed in the menu Pattern icons for each effect type appear in the editing area When you select a pattern icon in this area it replaces the other icon immediately Select the AUTO TRANS or CUT button to execute the ...

Page 41: ...ps ˎ ˎ The Empty icon will not appear on menu panel of the unit and the PC UI s Live screen ˎ ˎ Performing controls on the unit exits Move mode Rearranging Pattern Icons 1 Enable Move mode and then drag and drop the pattern icon to the desired position 2 After finishing configurations select Done The arrangement of the pattern icons displayed in the menu is changed ...

Page 42: ...ve operation and check the video composition 1 Display the Pattern screen of the PC UI in EFFECT mode 2 Select the button for the background video in row A of the video selection buttons and select the overlay video in row B Background video Overlay video The background video selected in row A appears in the PGM viewer of the multi viewer and the overlay video selected in row B appears in the NEXT...

Page 43: ...r an HD angle of view Page 2 2 3 Pattern icons for an HD angle of view Select these when you want to shift the row A material to the right or left Page 3 3 3 Pattern icons for an SD angle of view Press the CUT or AUTO TRANS button and check the composition You can view the composition in the multi viewer Useful tip If you want to display the PinP insert image video B in full screen select the foll...

Page 44: ...A Five chroma key patterns are available on the unit As preparation select the pattern icons that will be used during live operation and adjust the key composition Composite adjustment values can also be configured for the pattern icon 1 Display the Pattern screen of the PC UI in EFFECT mode 2 Select the button for the background video in row A of the video selection buttons and select the overlay...

Page 45: ... will be used as the basis for color removal Perform adjustments while viewing the results in the multi viewer 6 Select Crop to crop unnecessary areas of the overlay video Select On to crop unnecessary areas When you select On operation of the Position sliders is enabled Drag each slider to specify the area you want to use Areas of the video that are outside of the specified area will be cropped P...

Page 46: ...tor on the rear of the unit Text inserted via the TITLE function Tips Only 1600 1200 60p signals are supported for input Use a computer that supports this output resolution As preparation create the text on the computer and adjust the composition Creating the text on the computer As shown in the example create text on a black background of a color that differs greatly in brightness from the backgr...

Page 47: ...chnique that involves removing components in the overly video B signal based on brightness luminance differences and overlaying the video on the background video A Typically bright colored text is created on a black background to be used as a key Luminance keying is supported for HDMI input signals assigned to inputs 3 and 4 World Tour World Tour A A B key B key Only one luminance key pattern is a...

Page 48: ...e videos are composited Select Key Adjust Drag each slider to adjust the level of key removal Perform adjustments while viewing the results in the PGM viewer of the multi viewer Clip Adjusts the brightness level of the key color to be removed as a value between 0 to 100 Default setting 10 Gain Adjusts the sensitivity of the key i e smoothness of the key edges as a value between 100 to 100 Default ...

Page 49: ...I HDMI SDI HDMI SDI TITLE INPUT TALLY MULTI VIEWER PGM LINE OUTPUT Change the transition rates assigned to these buttons The settings are performed via the PC UI on a computer 1 Select Transition Rate in the Setup screen of the PC UI Setup tab Transition Rate 2 Change the transition rates assigned to buttons 1 to 3 Use or to change the values You can specify a value between 0 0 to 9 9 seconds incr...

Page 50: ... 0 or later PGM NEXT tally control For details on connecting the Remote Commander and cameras to the unit see When linking with a Remote Commander page 18 in the Connecting the Video and Audio Input Devices section Configuring the link settings Up to three cameras can be connected via linking with the Remote Commander Select Camera Remote in the Setup screen of the PC UI and configure the settings...

Page 51: ... cameras also starts When you stop recording via STOP recording on the cameras also stops Remote Commander REC REC REC Timecode settings must be configured to perform simultaneous recording controls Make sure the following settings on the unit and each camera match ˎ ˎ TC FORMAT DF NDF ˎ ˎ TC RUN REC RUN FREE RUN When you execute TC RESET from the unit timecode resetting is performed simultaneousl...

Page 52: ...ge 58 in the Recording the PGM Output section For details on network settings see Connecting a Computer for Settings Configuration page 22 Page 3 3 3 Displays the following information ˎ ˎ Current date and time ˎ ˎ System format ˎ ˎ Unit version Formatting Memory Cards Format the memory card that will be used for recording the PGM output Notes ˎ ˎ Always use memory cards that were formatted on the...

Page 53: ...atically After the unit restarts the initial settings screen appears as it did during first time startup For details on initial settings see Configuring the Initial Settings First Time Startup page 21 Changing the Display Language Select the display language for the unit s menus and messages with LANGUAGE For details on changing the display language for the PC UI see Display language page 15 in th...

Page 54: ...erifies whether Ustream login is possible with the specified user name email address and password When login is successful the dialog box closes and the user name appears in the User field of the Streaming screen 3 Configure the following items Video Size Specifies the video size ˎ ˎ 640 360 ˎ ˎ 1280 720 Recording to Ustream Server Specifies whether to save recorded data to the Ustream server ˎ ˎ ...

Page 55: ... is entered and appears in the multi viewer 3 Check the channel to be transmitted The channel specified as the default will be selected in the STREAMING menu If you want to change the channel tap the desired channel Connection to the Ustream server is reestablished and the screen appears Tips Up to three channels will be displayed 4 Tap START Streaming transmission starts The STREAMING button ligh...

Page 56: ...ge 52 Configuring settings for linking with the Remote Commander Configure the following settings beforehand to enable recording start stop controls for cameras via the Remote Commander ˎ ˎ Remote settings for cameras For details on settings see Linking to Cameras page 50 ˎ ˎ Timecode settings Make sure the following settings on the unit and each camera match TC FORMAT DF NDF TC RUN REC RUN FREE R...

Page 57: ...ˎ The unit uses VBR variable bit rate to automatically adjust the bit rate volume of data recorded within a specified period according to the scene Therefore recording times for memory cards may vary For example a video with fast moving images will take up a larger amount of space on a memory card to record the images clearly thereby reducing the total recording time for the card 3 Configure the t...

Page 58: ... in damaged video data ˎ ˎ When a video file size reaches 2 GB while recording in AVCHD format file splitting will occur automatically and a new file will be created Tips The videos will be recorded into the 16 9 aspect ratio only Using Recorded Files Sony PlayMemories Home is required to play back or edit files recorded with the unit Use Sony PlayMemories Home to load the recorded files onto a co...

Page 59: ...enabled Operation of the memory card inserted in the unit as a drive is now possible Notes Video and audio output may be interrupted during USB connection mode After use 1 Perform safe USB device removal on the computer 2 Tap EXIT A confirmation message appears 3 Tap YES USB connection mode is exited 4 Disconnect the computer that is connected via the USB cable ...

Page 60: ...ct Network in the Setup screen of the PC UI 2 Select Manual for Mode to enable manual configuration of the settings and enter the IP address subnet mask default gateway and DNS server addresses 3 Select Set Tips PGM outputs from the HDMI output connector will stop during the few seconds before settings are applied after selecting Set When the settings are successfully applied a messages appears 4 ...

Page 61: ... HD SDI only VIDEO Displays the signal format to be used when the VIDEO output connector is used for the PGM output This cannot be changed SD Aspect Specifies the output method for SD signals Letter Box Outputs with black bars on the top and bottom Squeeze Outputs with the image squeezed to the 4 3 aspect ratio Edge Crop Outputs with the left and right sides of the image cropped MULTI VIEWER Speci...

Page 62: ...P16 P17 P18 P19 P20 P21 P22 P23 P24 P25 Pattern icons for SD angle of view P26 P27 P28 P29 P30 P31 P32 P33 Chroma key 5 patterns C1 C2 C3 C4 C5 Luminance key 1 pattern L1 Chapter 8 Appendix Transition and Composite Patterns List Transition patterns BKGD mode Composite patterns EFFECT mode Register transition patterns and composite patterns to the BKGD menu and EFFECT menu respectively to enable us...

Page 63: ...it back on For details see Auto Power Off Function page 21 Videos cannot be input or videos do not appear in the multi viewer The cables are not connected properly Connect the cables properly The video input signals are not assigned properly Assign the video input signals properly For details see Assigning Inputs page 25 Signals that are not supported by the unit are being input Check the input si...

Page 64: ...nts page 37 The audio output level is low Use the channel fader in the AUDIO menu to increase the audio level For details see Live Adjustments page 37 The PGM master fader is lowered Raise the PGM master fader For details see Live Adjustments page 37 Inputs are not assigned For embedded audio the audio will not be output if the video input is not assigned The headphone output level is low Raise th...

Page 65: ...f any kind Removing a memory card or turning off the unit while video files are being read or while data is being written to the memory card i e while the access indicator is lit or blinking Use in environments exposed to static electricity or electrical noise ˎ ˎ We recommend backing up important data to your computer s hard disk for example ˎ ˎ Do not affix labels for example onto memory cards ˎ...

Page 66: ... modify Memory Sticks ˎ ˎ Do not wet Memory Sticks ˎ ˎ Avoid use and storage in the following environments High temperature locations such as the inside of an automobile parked in the sun Locations exposed to direct sunlight Locations with excessive humidity or corrosive materials present ˎ ˎ When the access indicator is lit or blinking data is being read from or written to the Memory Stick Do not...

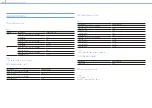
Page 67: ...ampling 48 kHz Analog output Phono jack CH 1 CH 2 Headphones Stereo mini jack 1 Other interfaces LAN RJ 45 2 PC UI Streaming 100BASE TX 1000BASE T USB 2 0 USB Type Mini B 1 Option φ3 5 mm jack 1 TALLY D Sub 9 pin 1 male Supplied accessories Before Using This Unit 1 CD ROM Operating Instructions 1 AC adapter 1 USB cable 1 OPTION cable 1 Design and specifications are subject to change without notice...

Page 68: ... VIDEO input connectors 1 and 2 Resolution Frequency ip When the system format is 1080 50i 720 576 PAL 50i When the system format is 1080 60i 720 480 NTSC 59 94i HDMI input connectors 3 and 4 Video Resolution Frequency ip When the system format is 1080 50i 720 576 SD 50p 1280 720 HD 50p 1920 1080 HD 50i 1920 1080 HD 50p When the system format is 1080 60i 720 480 SD 59 94p 1280 720 HD 59 94p 1920 1...

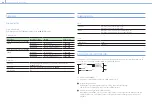
Page 69: ... When the system format is 1080 50i 720 5761 50p 1280 720 HD 50p 1920 1080 HD 50i 1920 1080 HD 50p When the system format is 1080 60i 720 4801 59 94p 1280 720 HD 59 94p Resolution Frequency ip 1920 1080 HD 59 94i 1920 1080 HD 59 94p 1 Edge Crop Audio 16 bit 48 kHz 2 ch fixed MULTI VIEWER HDMI output connector Resolution Frequency ip When the system format is 1080 50i 720 5761 50p 1280 720 HD 50p 1...

Page 70: ...ing function Video Frame rate When the system format is 50i 25 fps When the system format is 60i 30 fps Bit rate When the streaming video size is 640 360 1 Mbps When the streaming video size is 1280 720 3 Mbps Audio Sampling rate 48 kHz Bit rate 128 kbps Directory Structure on Memory Cards The unit uses the following directory structure for files and folders on memory cards Generally you do not ne...

Page 71: ...DI On SHORT Off OPEN 2 OUT PGM OUT TALLY INPUT2 SDI On SHORT Off OPEN 3 OUT PGM OUT TALLY INPUT3 SDI On SHORT Off OPEN 4 OUT PGM OUT TALLY INPUT4 SDI On SHORT Off OPEN 5 OUT PGM OUT TALLY INPUT1 VIDEO On SHORT Off OPEN 6 OUT PGM OUT TALLY INPUT2 VIDEO On SHORT Off OPEN 7 OUT PGM OUT TALLY INPUT3 HDMI On SHORT Off OPEN 8 OUT PGM OUT TALLY INPUT4 HDMI On SHORT Off OPEN 9 GND ...

Page 72: ...ligation to inform you of the following Licenses in English are recorded in the internal memory of the unit Connect a computer to the USB port on the right side of the unit and read the files in the PMHOME LICENSE folder GNU GPL LGPL applied software The software that is eligible for the following GNU General Public License hereinafter referred to as GPL or GNU Lesser General Public License herein...

Page 73: ...tent HDMI High Definition Multimedia Interface A transmission interface standard for transferring video and audio as a digital signal Luminance keying A method of compositing images that removes components in the foreground image based on brightness luminance differences Typically this is used to composite text by placing bright colored text on a black background Material Video and audio data that...

Page 74: ... screen 60 Network settings 22 PC UI computer 22 Streaming transmissions 60 NEXT viewer 12 O OPTION connector 10 Output format support 69 Output screen 61 P Parts identification 7 Pattern icons 39 Pattern screen 39 40 PC UI 14 PC UI computer 22 23 PC UI network connector 11 PFL 38 PGM HDMI output connector 10 PGM master fader 7 37 PGM NEXT tallies 50 PGM SDI output connector 10 PGM VIDEO output co...

Page 75: ...000 Chapter 8 Appendix Index 75 V VIDEO input connectors 10 VIDEO INPUT SELECT 8 Video selection buttons 8 W Wipe 31 ...

Reviews: