000
22
Chapter 2: Preparation
Connecting a Computer for Settings Configuration
This section describes how to connect the unit
to a PC UI computer that can perform settings
configurations and composite adjustments, and
how to access the unit from a web browser to
display the PC UI.
[Tips]
The PC UI computer should not be the same as the
computers used for video inputs and streaming.
Recommended Computer
Use a computer that meets the following system
requirements.
Recommended OS: Windows 10
Web browser: Google Chrome
Recommended monitor size: 10 to 12 in.
[Tips]
ˎ
ˎ
The PC UI supports both mouse and touch panel
operations.
ˎ
ˎ
Use the 100% display settings for the computer display
and browser display.
Connecting the Computer to the Unit
The following connection modes are available.
ˎ
ˎ
LAN mode
A DHCP connection is used in this mode.
The unit and computer are connected using IP
addresses assigned by an external DHCP server.
ˎ
ˎ
Direct mode
The unit's IP address is fixed (192.168.0.1) in this
mode.
Configure the computer's network settings as
follows before connection.
IP address: 192.168.0.XXX
Subnet mask: 255.255.255.0
[Tips]
If connection in LAN mode is not possible, connect in direct
mode.
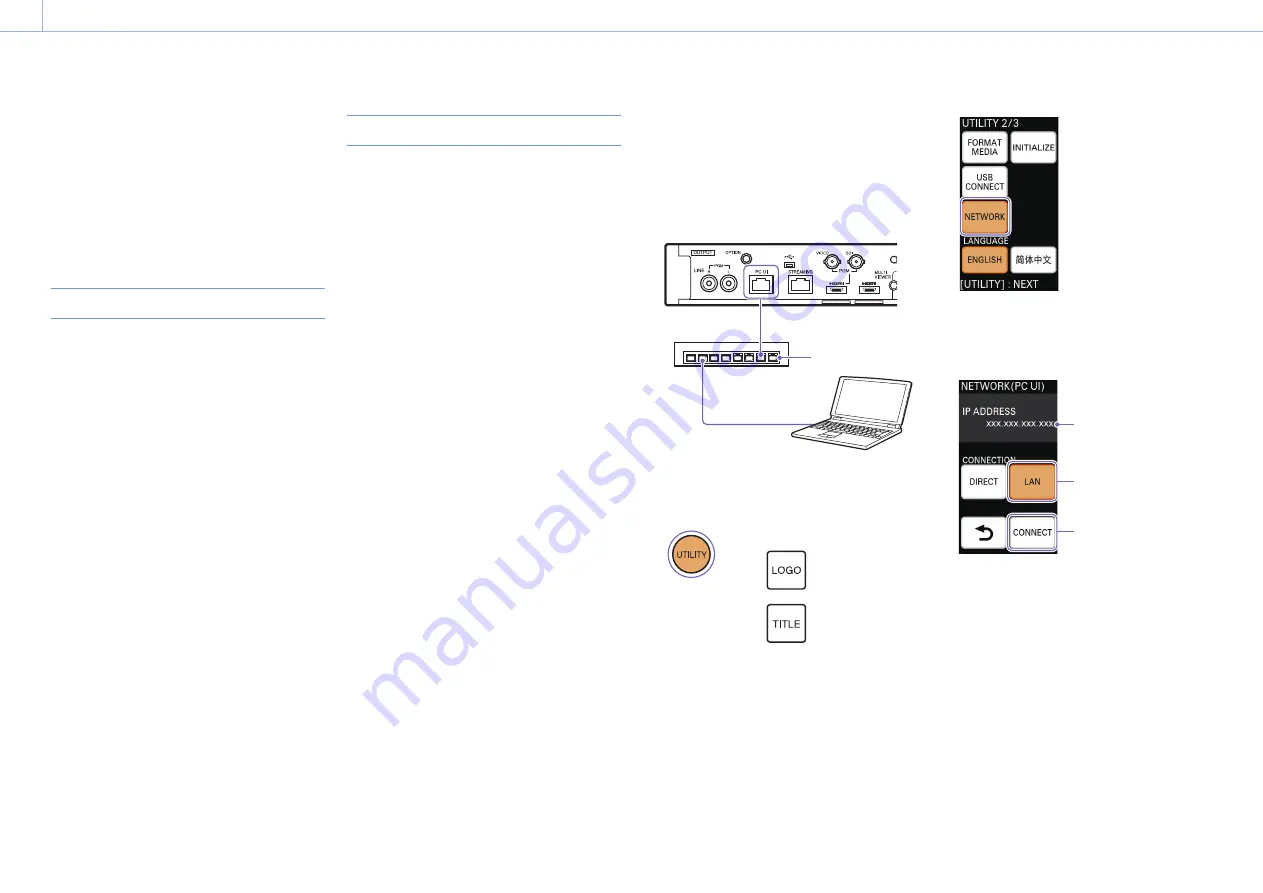
Connecting in LAN mode
Set the computer's network settings to DHCP
beforehand.
1
Use a LAN cable to connect to the LAN via the
PC UI network connector on the rear of the
unit.
Network hub
to LAN
2
Press UTILITY button on the control panel to
display the [UTILITY 2/3] menu.
3
Tap [NETWORK].
The [NETWORK (PC UI)] menu appears.
4
Tap [LAN] (
) to enable it, and tap [CONNECT]
(
).
IP address
The acquired IP address is displayed.
Use this IP address to access the unit via a web
browser.
[Tips]
The IP address is assigned by an external DHCP server.


