33
Using Optional Equipment
Optional Connections
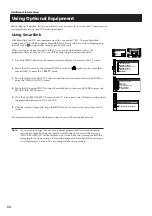
AV2 Output
VIDEO CONNECTION
TV Screen
[TV - - - - - ]
[TV - - - - - ]
TV
TV
Screen Position
SCREEN MODE
Screen Mode
[zoom ]
[ 0 ]
Strobe
Auto 16:9
Correction
[on]
[off]
Screen Position
SCREEN MODE
Screen Mode
[zoom ]
[ 0 ]
Strobe
Auto 16:9
Correction
[on]
[off]
8mm/Hi8
Front of TV
L/G/S/I
R/D/D/D
S
3
3
3
MONO
A
B
C
D
L/G/S/I
R/D/D/D
S
3
3
3
MONO
S-VHS/Hi8
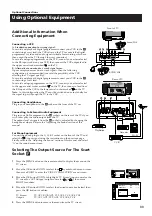
Selecting The Output Source For The Scart
Socket
F
1
Press the MENU button on the remote control to display the menu on the
TV screen.
2
Move the OK button DOWN to select the
symbol on the menu screen
then move RIGHT to enter the ‘VIDEO CONNECTION’ menu screen.
3
Move the OK button DOWN to highlight ‘TV Screen’ (input source for the
TV screen) or ‘AV2 Output’ (output source for
2
/
s
2
) then move
RIGHT to confirm.
4
Move the OK button DOWN to select the desired source (see below) then
press the OK button to confirm:
TV Screen:
TV, AV1, RGB, AV2, YC2, AV3, YC3, AV4, YC4
Output:
TV, AV1, AV2, YC2, AV3, YC3, AV4, YC4
5
Press the MENU button to remove the menu from the TV screen.
Additional Information When
Connecting Equipment
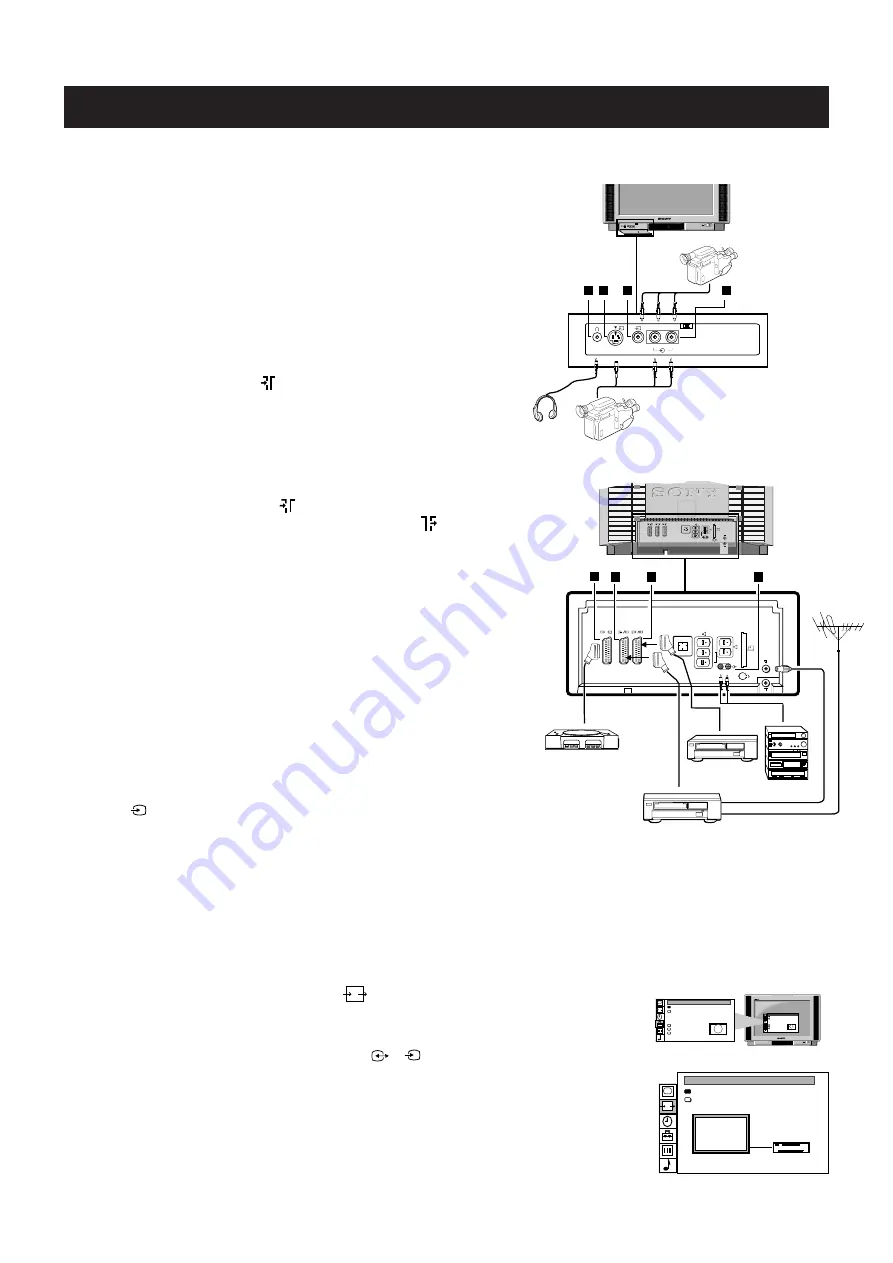
Connecting a VCR
A.
Standard connection for strong signal:
To record and playback digital programmes connect your VCR to the
F
socket using a scart lead (the VCR relies on the TV to convert the digital
programmes to video and audio signals suitable for recording, which are
then output from the TV through the scart connector).
To record analogue programmes on the VCR, connect your external aerial
to the RF input socket on your VCR, then connect the VCR output lead to
the upper aerial socket marked
on the TV.
B. Alternative connection for weak signal areas:
If poor reception occurs due to weak signals, then the following
configuration is recommended (to avoid the possibility of the VCR
affecting the TV signal quality):
To record and playback digital programmes connect your VCR to the
F
socket using a scart lead.
To record analogue programmes on the VCR, connect your external aerial
to the upper aerial socket marked
on the TV, then connect a lead from
the RF input of the VCR to the lower aerial socket marked
on the TV.
Note:
In this configuration, the TV must be switched on or in standby for
the signal to pass through the TV to the VCR.
Connecting Headphones
Plug in your headphones to the
A
socket on the front of the TV set.
Connecting to External Audio Equipment
Plug in your Hi-Fi equipment to the
H
sockets on the rear of the TV if you
wish to amplify the audio output from the TV.
The output level of signals from the
H
socket is adjusted by changing the
headphone volume. Refer to the ‘Adjusting the Sound’ section of this
manual.
For Mono Equipment
Connect the phono plug to the L/G/S/I socket on the front of the TV and
select the
3
input signal using the instructions on the previous page.
Finally, refer to the ‘Adjusting the Sound’ section of this manual and select
‘A’ on the sound menu screen.
Rear of TV
R/D/D/D
L/G/S/I
2
S
2
1
4
S
4
1/
DVD
VHS
1
2
R/D/
D/D
L/G/
S/I
C
S
S
MODEM
....
E
F
H
R/D/D/D
L/G/S/I
S
1
4
S
4
1/
R/D/
D/D
L/G/
S/I
C
S
S
MODEM
2
2
....
G
VCR
PlayStation
Hi-Fi
Decoder


