1-9
DCR-TRV240/TRV340
38
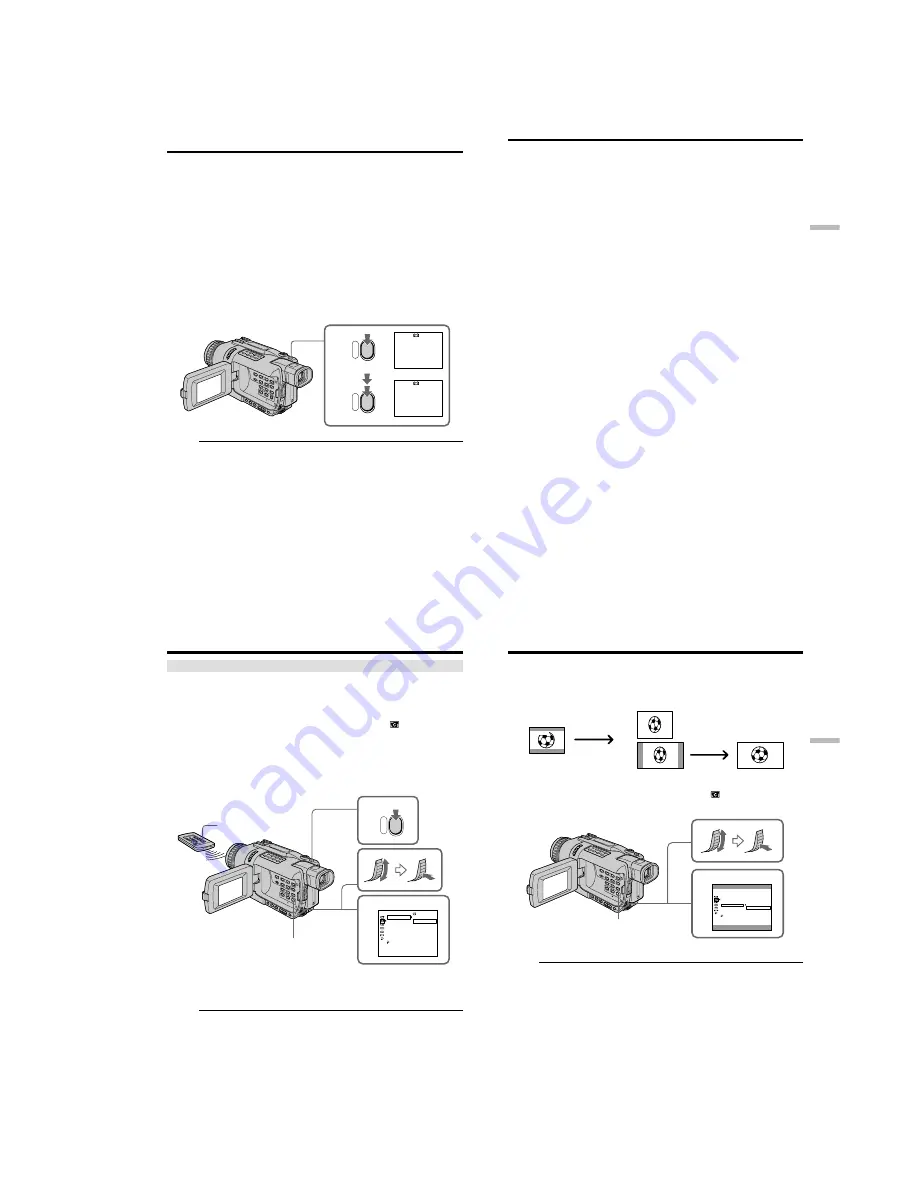
You can record still images such as photographs.
You can record about 510 images in the SP mode and about 765 images in the LP mode
on a tape which can record for 60 minutes in the SP mode.
Besides the operation described here, your camcorder can record still images on
“Memory Stick”s (DCR-TRV340 only) (p. 122).
Before operation
Set PHOTO REC to TAPE in the menu settings. (The default setting is MEMORY.)
(DCR-TRV340 only) (p. 104)
(
1
)
In the standby mode, keep pressing PHOTO lightly until a still image appears.
The CAPTURE indicator appears. Recording does not start yet.
To change the still image, release PHOTO, select a still image again, and then
press and hold PHOTO lightly.
(
2
)
Press PHOTO deeper.
The still image on the screen is recorded for about seven seconds. The sound
during those seven seconds is also recorded.
The still image is displayed on the screen until recording is completed.
Notes
•During Tape Photo recording, you cannot change the mode or setting.
•You cannot use PHOTO during the following operations:
– Fader
– Digital effects
•When recording a still image, do not shake your camcorder. The image may fluctuate.
If you record a moving subject with tape photo recording function
The image may fluctuate when you play back the still image on other equipment.
This is not a malfunction.
To use tape photo recording function using the Remote Commander
Press PHOTO on the Remote Commander. Your camcorder records an image on the
screen immediately.
— Advanced Recording Operations —
Recording still images on a tape
– Tape Photo recording
1
•••••••
CAPTURE
2
PHOTO
PHOTO
39
Advanced Recording Operations
To use the tape photo recording function during normal CAMERA recording
You cannot check an image on the screen by pressing PHOTO lightly. Press PHOTO
deeper. The still image is then recorded for about seven seconds, and your camcorder
returns to the standby mode.
To record clear and less fluctuated still images
We recommend that you record on “Memory Stick”s.
You can record still images on “Memory Stick”s even in CAMERA mode. (P.122)
(DCR-TRV340 only)
Recording still images on a tape – Tape Photo recording
40
Self-timer recording
– DCR-TRV340 only
You can record still images on tapes with the self-timer.
You can also use the Remote Commander for this operation.
(
1
)
In the standby mode, press MENU to display the menu settings.
(
2
)
Turn the SEL/PUSH EXEC dial to select SELFTIMER in
, then press the
dial.
(
3
)
Turn the SEL/PUSH EXEC dial to select ON, then press the dial.
(
4
)
Press MENU to make the menu settings disappear.
(
5
)
Press PHOTO deeper.
The self-timer starts counting down from 10 with a beep sound. In the last two
seconds of the countdown, the beep gets faster, then recording starts
automatically.
To cancel self-timer recording
In the standby mode, set SELFTIMER to OFF in the menu settings.
You cannot cancel self-timer recording using the Remote Commander.
Note
The self-timer recording mode is automatically canceled when:
– Self-timer recording is finished.
– The POWER switch is set to OFF (CHG) or VCR.
Recording still images on a tape – Tape Photo recording
1,4
MENU
PHOTO
5
PHOTO
3
CAMERA SET
SELFTIMER
D ZOOM
PHOTO REC
16 : 9WIDE
STEADYSHOT
FRAME REC
INT. REC
RETURN
[MENU] : END
OFF
ON
41
Advanced Recording Operations
You can record a 16:9 wide picture to watch on a 16:9 wide-screen TV (16:9WIDE).
Black bands appear on the screen during recording in 16:9 WIDE mode
[
a
]
. The picture
during playing back on a normal TV
[
b
]
or a wide-screen TV
[
c
]
are compressed in the
widthwise direction. If you set the screen mode of the wide-screen TV to the full mode,
you can watch pictures of normal images
[
d
]
.
(
1
)
In the standby mode, press MENU to display the menu settings.
(
2
)
Turn the SEL/PUSH EXEC to select 16:9 WIDE in
, then press the dial.
(
3
)
Turn the SEL/PUSH EXEC to select ON, then press the dial.
To cancel the wide mode
Set 16:9WIDE to OFF in the menu settings.
In the wide mode
You cannot operate the following functions:
– OLD MOVIE
– BOUNCE
– Memory Photo recording
During recording
You cannot select or cancel the wide mode.
When you cancel the wide mode, set your camcorder to the standby mode and then set
16:9WIDE to OFF in the menu settings.
Connection for a TV
Pictures recorded in the 16:9WIDE mode automatically appear on the TV screen at full
size when:
– You connect your camcorder to a TV that is compatible with the video ID (ID-1/ID-2)
system.
– You connect your camcorder to the S video jack on the TV.
Using the wide mode
[a]
[c]
[b]
16:9WIDE
[d]
MENU
2
CAMERA SET
SELFTIMER
D ZOOM
PHOTO REC
16:9 WIDE
STEADYSHOT
FRAME REC
INT. REC
RETURN
[MENU] : END
OFF
ON


