background image

31

Enjoying Surr

ound Sound

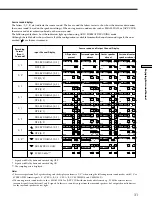
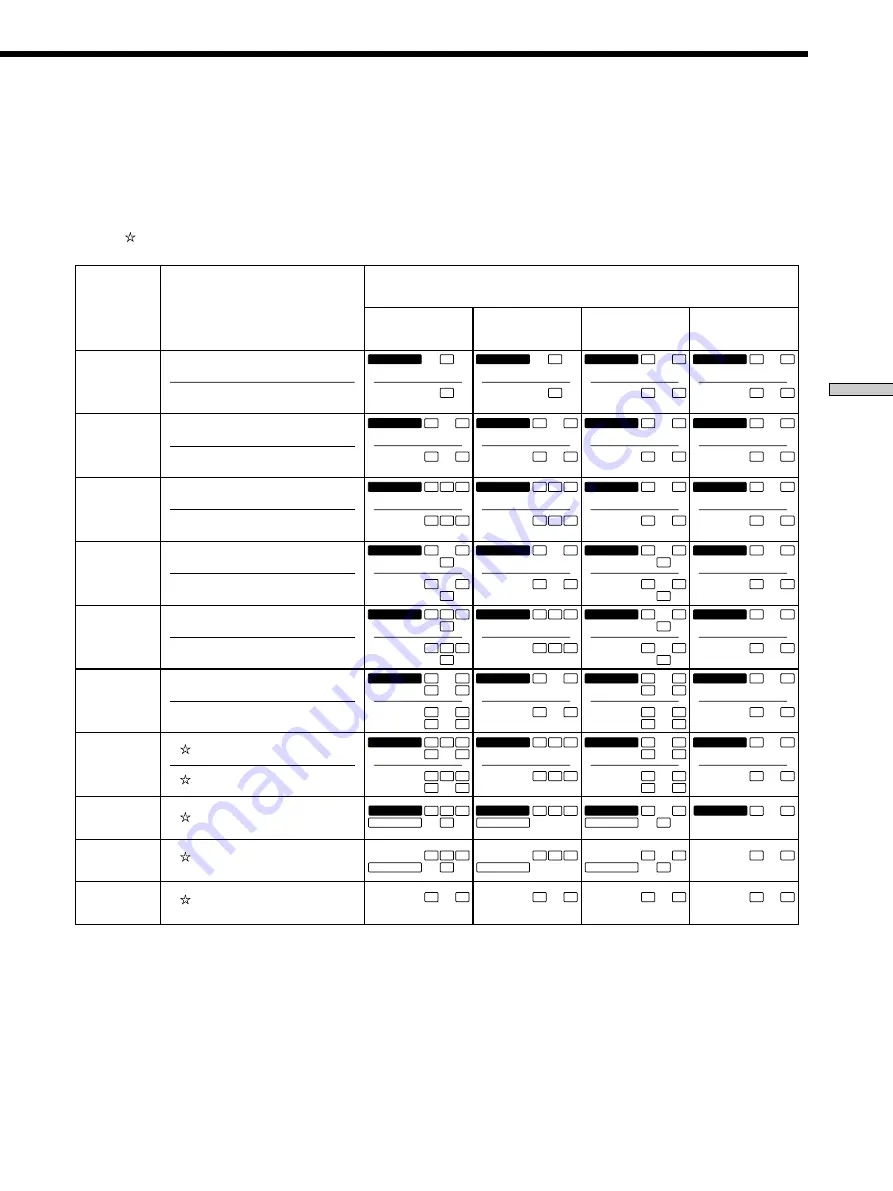
Source sound displays

The letters (L, C, R, etc.) indicate the source sound. The box around the letters varies to show how the receiver downmixes
the source sound (based on the speakers settings). When using music sound modes such as SMALL HALL or JAZZ CLUB,
the receiver adds reverberation based on the source sound.
The following table shows how the indicators light up when using AUTO FORMAT DECODING mode.
Although the table below shows almost all of the configurations available from multi channel surround signals, the ones
marked “ ” are the most common.

*

Signals with Dolby Surround encoded flag OFF

** Signals with Dolby Surround encoded flag ON
*** The sampling rate is displayed.

Notes

• The receiver performs Pro Logic decoding and the display conforms to 2/0** when using the following movie sound modes with 2/0* or

STEREO PCM format signals. (C. ST. EX A, B, C, S. C. EX A, B, C, V.M.DIMENS. and V. SEMI M.D.)

• When using music sound modes such as SMALL HALL or JAZZ CLUB with standard audio formats e.g., PCM, the receiver creates

surround signals from the front L and R signals. In this case, sound is output from the surround speakers, but output channel indicators
for the surround speakers do not light.

1/0

2/0*

3/0

2/1

3/1

2/2

3/2

2/0**


DOLBY DIGITAL [1/0]

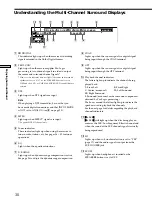
DTS [1/0]

DOLBY PRO LOGIC

PCM XX kHz***

DIGITAL

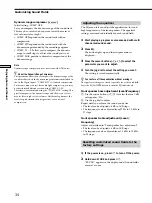
a

DIGITAL

a

DIGITAL

a

DIGITAL

a

DIGITAL

a

DIGITAL

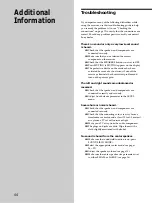
a

DIGITAL

a

DIGITAL

a

DIGITAL

a

C

C

DOLBY DIGITAL [2/0]

DTS [2/0]

DOLBY DIGITAL [3/0]

DTS [3/0]

DOLBY DIGITAL [2/1]

DTS [2/1]

DOLBY DIGITAL [3/1]

DTS [3/1]

DOLBY DIGITAL [2/2]

DTS [2/2]

DOLBY DIGITAL [3/2]

DTS [3/2]

DOLBY DIGITAL [2/0]

DIGITAL

a

C

dts

C

DIGITAL

a

C

dts

C

DIGITAL

a

C

dts

C

DIGITAL

a

L

C

R

L

C

R

DIGITAL

a

L

C

R

L

C

R

DIGITAL

a

L

C

R

L

C

R

DIGITAL

a

L

C

R

L

C

R

L

R

L

R

L

R

dts

L

R

DIGITAL

a

L

S

R

L

S

R

DIGITAL

a

L

S

R

L

S

R

DIGITAL

a

L

S

R

L

S

R

DIGITAL

a

L

S

R

L

S

R

DIGITAL

a

L

C

S

R

L

C

S

R

DIGITAL

a

L

C

S

R

L

C

S

R

DIGITAL

a

L

C

S

R

L

C

S

R

DIGITAL

a

L

C

S

R

L

C

S

R

DIGITAL

a

L

SL

R

SR

L

SL

R

SR

DIGITAL

a

L

SL

R

SR

L

SL

R

SR

DIGITAL

a

L

SL

R

SR

L

SL

R

SR

DIGITAL

a

L

SL

R

SR

L

SL

R

SR

DIGITAL

a

L

SL

C

R

SR

L

SL

C

R

SR

DIGITAL

a

L

SL

C

R

SR

L

SL

C

R

SR

DIGITAL

a

L

SL

C

R

SR

L

SL

C

R

SR

DIGITAL

a

L

SL

C

R

SR

L

SL

C

R

SR

PRO LOGIC

L

C

S

R

PRO LOGIC

L

C

S

R

PRO LOGIC

L

C

S

R

PRO LOGIC

L

C

S

R

PRO LOGIC

L

C

S

R

PRO LOGIC

L

C

S

R

PRO LOGIC

L

C

S

R

PRO LOGIC

L

C

S

R

L

R

L

R

L

R

L

R

L

R

L

R

L

R

L

R

dts

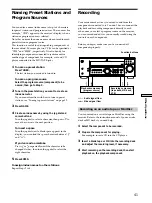
Recording 

Format 

(Front/

Surround)

Input Channel Display

Source sound and Output Channel Display

All speakers 

present

Surround speakers 

absent

Center speaker 

absent

Surround/center

speakers absent

dts

dts

dts

dts

dts

dts

dts

dts

dts

dts

dts

dts

dts

dts

dts

dts

dts

dts

dts

dts

dts

dts

dts

Summary of Contents for DAV-L8100 - Micro Satellite System

Page 1: ...4 235 739 12 1 FM Stereo FM AM Receiver Operating Instructions 2001 Sony Corporation STR DE575 STR K502 ...

Page 2: ...EPTACLE OR OTHER OUTLET UNLESS THE BLADES CAN BE FULLY INSERTED TO PREVENT BLADE EXPOSURE For customers in the United States and Canada ENERGY STAR is a U S registered mark As an ENERGY STAR partner Sony Corporation has determined that this product meets the ENERGY STAR guidelines for energy efficiency Don t throw a battery dispose it as the injurious wastes Precautions On safety Should any solid ...

Page 3: ...unpublished Works 1992 1997 Dolby Laboratories All rights reserved Manufactured under license from Digital Theater Systems Inc US Pat No 5 451 942 5 956 674 5 974 380 5 978 762 and other world wide patents issued and pending DTS and DTS Digital Surround are registered trademarks of Digital Theater Systems Inc Copyright 1996 2000 Digital Theater Systems Inc All Rights Reserved FRONT CENTER R L R L ...

Page 4: ... conditions the batteries should last for about 6 months When the remote no longer operates the receiver replace all batteries with new ones Notes Do not leave the remote in an extremely hot or humid place Do not use a new battery with an old one Do not expose the remote sensor to direct sunlight or lighting apparatuses Doing so may cause a malfunction If you don t use the remote for an extended p...

Page 5: ...ect the To the AM loop antenna AM terminals FM wire antenna FM 75Ω COAXIAL terminal Antenna Hookups ANTENNA AM FM 75Ω COAXIAL Important If you connect the receiver to an outdoor antenna ground it against lightning To prevent a gas explosion do not connect the ground wire to a gas pipe Notes on antenna hookups To prevent noise pickup keep the AM loop antenna away from the receiver and other compone...

Page 6: ...N VIDEO IN VIDEO IN VIDEO OUT VIDEO OUT VIDEO IN AUDIO IN AUDIO OUT OUT IN IN AUDIO OUT AM R L R L R L R L FM 75Ω COAXIAL IN OUT L R ç ç LINE L R OUTPUT LINE LINE INPUT OUTPUT Jacks for connecting audio components Connect a To the CD player CD jacks MD deck or Tape deck MD TAPE jacks Required cords Audio cords not supplied When connecting a cord be sure to match the color coded pins to the appropr...

Page 7: ... s video output jack to the TV SAT VIDEO IN jack on the receiver If you are connecting a separate TV tuner or satellite tuner connect both the audio and video output jacks to the receiver as shown above z When using the S video jacks instead of the video jacks Your monitor must also be connected via an S video jack S video signals are on a separate bus from the video signals and will not be output...

Page 8: ...your home To enjoy full effect of multi channel surround sound five speakers two front speakers two surround speakers and a center speaker and a sub woofer are required You can also connect an LD player with an RF OUT jack via an RF demodulator such as the Sony MOD RF1 not supplied Digital Component Hookups Example of LD player connected via an RF demodulator Please note that you cannot connect an...

Page 9: ...ck Black Video cord not supplied One for the DVD LD VIDEO IN jacks etc Yellow Yellow Note When using the connections described below adjust the level of your surround speakers and sub woofer from the DVD player or multichannel decoder Although this receiver incorporates a multi channel decoder it is also equipped with MULTI CH IN jacks These connections allow you to enjoy multichannel software enc...

Page 10: ... AUDIO IN VIDEO IN VIDEO IN VIDEO OUT VIDEO OUT VIDEO IN AUDIO IN AUDIO OUT OUT IN IN AUDIO OUT AM R L R L R L R L FM 75Ω COAXIAL LINE OUTPUT AC power cord Required cords Audio cords not supplied When connecting a cord be sure to match the color coded pins to the appropriate jacks on the components To a wall outlet Other Hookups White L White L Red R Red R CD player tape deck MD deck etc Connectin...

Page 11: ...UP Hooking Up and Setting Up the Speaker System This chapter describes how to hook up your speaker system to the receiver how to position each speaker and how to set up your speakers to enjoy multi channel surround sound Brief descriptions of buttons and control used to set up the speaker system SET UP button Press to enter the setup mode when specifying speaker types and distances Cursor buttons ...

Page 12: ...r cord to the appropriate terminal on the components to and to If the cords are reversed the sound will be distorted and will lack bass If you use speakers with low maximum input rating adjust the volume carefully to avoid excessive output on the speakers Terminals for connecting the speakers Connect the To the Front speakers 8 ohm SPEAKERS FRONT terminals Surround speakers 8 ohm SPEAKERS SURROUND...

Page 13: ...uching each other due to excessive removal of insulation After connecting all the components speakers and AC power cord output a test tone to check that all the speakers are connected correctly For details on outputting a test tone see page 18 If no sound is heard from a speaker while outputting a test tone or a test tone is output from a speaker other than the one whose name is currently displaye...

Page 14: ...ee the page in parentheses Speaker size and placement page 15 Speaker distance page 17 Select the MULTI CH IN video signal page 43 Whether the display turns off or not when you press DIMMER page 43 1 u MULTI CHANNEL DECODING INPUT MODE MUTING VIDEO MD TAPE DVD LD CD TV SAT TUNER AUX DISPLAY DIMMER PHONES SPEAKERS 1 MEMORY SHIFT FM MODE FM AM EQ SURR LEVEL SET UP NAME A ENTER A F D SOUND FIELD MULT...

Page 15: ...ize and sub woofer selection The setting for Micro Satellite speaker MICRO SP has been programmed to optimize the sound balance If you use Sony s Micro Satellite speakers select MICRO SP When you use Micro Satellite speaker and the speaker size is set to LARGE you may not obtain the correct soundstage The speaker may also be damaged at high volume position For STR DE575 the speaker size and sub wo...

Page 16: ... will effectively reproduce bass frequencies select LARGE Normally select LARGE If the sound is distorted or you feel a lack of surround effects when using multi channel surround sound select SMALL to activate the bass redirection circuitry and output the front channel bass frequencies from the sub woofer When the front speaker is set to SMALL the center and surround speakers are also automaticall...

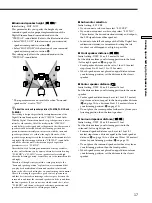
Page 17: ...W This parameter lets you specify the height of your surround speakers for proper implementation of the Digital Cinema Sound surround modes in the VIRTUAL sound fields Refer to the illustration below Select HGT LOW if the location of your surround speakers corresponds to section A Select HGT HIGH if the location of your surround speakers corresponds to section B This setting only affects the surro...

Page 18: ...t the volume level of all speakers at the same time Rotate MASTER VOLUME on the receiver or press MASTER VOL on the remote z About speaker distances This receiver allows you to input the speaker position in terms of distance However it is not possible to set the center speaker farther away than the front speakers Also the center speaker can not be set more that 5 feet 1 5 meters closer than the fr...

Page 19: ... tone is output the receiver switches to the LEVEL menu automatically we recommend you follow the procedure previously described in this section and adjust the speaker levels from your listening position using the remote control z When setting the volume levels for each speaker Let s assume that you have matched the sound levels of all the speakers using the test tone Although this lays the founda...

Page 20: ...erify that sound is output from the headphones see qf SPEAKERS button and PHONES jack on page 23 If only one channel is output from the headphones the component may not be connected to the receiver correctly Check that all the cords are fully inserted into the jacks on both the receiver and the component If both channels are output from the headphones the front speaker may not be connected to the ...

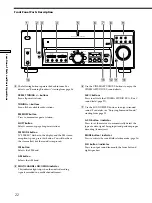
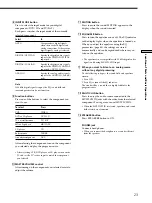
Page 21: ...play window as follows Index name of the component or the preset station v FUNCTION button indication or frequency v Sound field applied to the program source Index name appears only when you have assigned one to the component or preset station see page 41 Index name does not appear when only blank spaces have been entered or it is the same as the function button Frequency appears only when the tu...

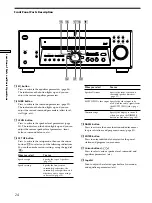
Page 22: ...O flashes in the display and the FM stereo reception is poor press this button You will not have the stereo effect but the sound is improved FM button Selects the FM band AM button Selects the AM band 5 MULTI CHANNEL DECODING indicator This indicator lights up when the unit is decoding signals recorded in a multi channel format 6 Use the CINEMA STUDIO EX buttons to enjoy the CINEMA STUDIO EX sound...

Page 23: ...s When you connect the headphones no sound will come from the speakers 8 INPUT MODE button Press to select the input mode for your digital components DVD LD and TV SAT Each press switches the input mode of the currently selected component Select To AUTO Give priority to digital signals when there are both digital and analog connections If there are no digital signals analog is selected DIGITAL OPT...

Page 24: ... UP button Press to activate the setup mode then use the cursor buttons wa to select any of the following indications You can then make various settings using the jog dial ws When you select You can Speaker type Specify the type of speakers page 15 Speaker setup Specify the front center surround speaker sizes the surround speaker position and whether or not you are using a sub woofer page 15 When ...

Page 25: ...odes also provide sound effects commonly found in movie theaters The virtual sound modes contain compelling applications of the Sony Digital Cinema Sound digital signal processing technology They shift the sound away from the actual speaker locations to simulate the presence of several virtual speakers The music etc sound modes are designed for use with standard audio sources and TV broadcasts The...

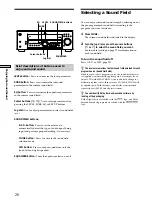
Page 26: ...beled with the logo and Dolby Surround encoded programs are labeled with the A logo Brief descriptions of buttons used to enjoy surround sound LEVEL button Press to customize the level parameters SURR button Press to customize the surround parameters in the current sound field EQ button Press to customize the equalizer parameters in the current sound field Cursor buttons Use to select parameters a...

Page 27: ...llywood The 3D sound imaging of V M DIMENS page 28 is used to create 5 sets of virtual speakers surrounding the listener from a single pair of actual surround speakers Reproduces the sound characteristics of Sony Pictures Entertainment s BGM recording studio by using the 3D sound imaging of V M DIMENS page 28 to create 5 sets of virtual speakers surrounding the listener from a single pair of actua...

Page 28: ... to create an array of virtual surround speakers positioned higher than the listener from a single pair of actual surround speakers This mode creates four sets of virtual speakers surrounding the listener at approximately a 30 angle of elevation Uses 3D sound imaging to create virtual surround speakers from the sound of the front speakers without using actual surround speakers This mode creates fi...

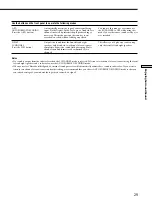
Page 29: ...e of audio signal being input Dolby Digital Dolby Pro Logic or standard two channel stereo and performs the proper decoding if necessary This mode presents the sound as it was recorded encoded without adding any effects Outputs the sound from the front left and right speakers only Standard two channel stereo sources completely bypass the sound field processing Multi channel surround formats are do...

Page 30: ...tations etc See pages 36 39 for tuner operations 6 EQ Lights when the equalizer functions 7 D RANGE Lights up when dynamic range compression is active See page 34 to adjust the dynamic range compression 8 COAX Lights up when the source signal is a digital signal being input through the COAX terminal 9 OPT Lights up when the source signal is a digital signal being input through the OPT terminal 0 P...

Page 31: ...3 1 2 2 3 2 2 0 DOLBY DIGITAL 1 0 DTS 1 0 DOLBY PRO LOGIC PCM XX kHz DIGITAL a DIGITAL a DIGITAL a DIGITAL a DIGITAL a DIGITAL a DIGITAL a DIGITAL a DIGITAL a C C DOLBY DIGITAL 2 0 DTS 2 0 DOLBY DIGITAL 3 0 DTS 3 0 DOLBY DIGITAL 2 1 DTS 2 1 DOLBY DIGITAL 3 1 DTS 3 1 DOLBY DIGITAL 2 2 DTS 2 2 DOLBY DIGITAL 3 2 DTS 3 2 DOLBY DIGITAL 2 0 DIGITAL a C dts C DIGITAL a C dts C DIGITAL a C dts C DIGITAL a...

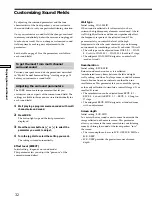
Page 32: ...e of the current surround effect Wall type Initial setting WALL MID When sound is reflected off soft material such as a curtain the high frequency elements are reduced A hard wall is highly reflective and does not significantly affect the frequency response of the reflected sound This parameter lets you control the level of the high frequencies to alter the sonic character of your listening enviro...

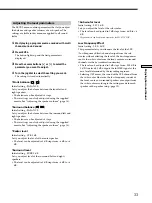
Page 33: ...e page 18 Center level Initial setting CTR 0 dB Lets you adjust the level of the center speaker The level can be adjusted in 1 dB steps from 6 dB to 6 dB Surround level Initial setting SURR 0 dB Lets you adjust level of the surround left and right speakers The level can be adjusted in 1 dB steps from 6 dB to 6 dB Sub woofer level Initial setting S W 0 dB Lets you adjust the level of the sub woofer...

Page 34: ...ed from 1 0 kHz to 10 kHz in 23 steps Resetting customized sound fields to the factory settings 1 If the power is on press 1 to turn off the power 2 Hold down MODE and press 1 SF CLR appears in the display and all sound fields are reset at once Dynamic range compressor D RANGE Initial setting COMP OFF Lets you compress the dynamic range of the sound track This may be useful when you want to watch ...

Page 35: ...EX B r r r r r r SEMI CINEMA STUDIO EX C r r r r r r V MULTI DIMENSION r r r r r r V SEMI M DIMENSION r r r r SMALL HALL r r r r r r r r r LARGE HALL r r r r r r r r r JAZZ CLUB r r r r r r r r r LIVE HOUSE r r r r r r r r r GAME r r r r r r r r r MULTI CH IN r r r r r D RANGE EQ COMP 2CH r r A F D r r NORMAL SURROUND r r CINEMA STUDIO EX A r r CINEMA STUDIO EX B r r CINEMA STUDIO EX C r r SEMI CI...

Page 36: ...t Tuning After you have tuned in stations using Direct Tuning or Automatic Tuning you can preset them to the receiver see page 39 Then you can tune in any of the stations directly by entering its 2 character code see page 39 Up to 30 FM or AM stations can be preset The receiver will also scan all the stations that you have preset see page 39 Before you begin make sure you have Connected an FM and ...

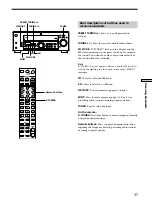
Page 37: ...e D TUNING Press this button to enter a frequency directly using the numeric buttons Numeric buttons Press to enter a numeric value when inputting the frequency directly presetting radio stations or tuning to preset stations MULTI CHANNEL DECODING INPUT MODE MUTING VIDEO MD TAPE DVD LD CD TV SAT TUNER AUX DISPLAY DIMMER PHONES SPEAKERS 1 MEMORY SHIFT FM MODE FM AM EQ SURR LEVEL SET UP NAME A ENTER...

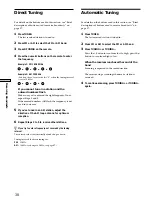
Page 38: ...uned in an AM station adjust the direction of the AM loop antenna for optimum reception 6 Repeat Steps 2 to 5 to receive other stations z If you try to enter a frequency not covered by the tuning interval The entered value is automatically rounded up or down Tuning intervals for direct tuning are FM 50 kHz AM 10 kHz to change to 9 kHz see page 47 Automatic Tuning For details on the buttons used in...

Page 39: ...Y again to store the station If MEMORY goes out before you can store the station start again from Step 3 7 Repeat Steps 2 to 6 to preset another station To change a preset number to another station Do Steps 1 to 6 to preset the new station to the number Note If the AC power cord is disconnected for about one week all the preset stations will be cleared from the receiver s memory and you will have ...

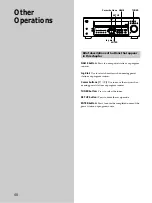
Page 40: ... ENTER Cursor buttons Jog dial Other Operations Brief descriptions of buttons that appear in this chapter NAME button Press to name preset stations or program sources Jog dial Use to select characters when naming preset stations or program sources Cursor buttons Use to move the cursor when naming preset stations or program sources TUNER button Press to select the tuner SET UP button Press to enter...

Page 41: ...iar with how to tune in preset stations see Tuning to preset stations on page 39 3 Press NAME 4 Create an index name by using the jog dial and cursor buttons Turn the jog dial to select a character then press to move the cursor to the next position To insert a space Turn the jog dial until a blank space appears in the display you can find the space character between and A If you ve made a mistake ...

Page 42: ...ion manual if you need help 1 Select the program source to be recorded 2 Prepare the component for playing For example insert the laser disc you want to record into the LD player 3 Insert a blank video tape into the VCR for recording 4 Start recording on the recording VCR then start playing the laser disc you want to record z You can record the sound from any audio source onto a video tape while r...

Page 43: ...o select MULTI CH IN VISUAL 3 Turn the jog dial to select the video input you want Set the display to turn off This parameter lets you specify whether or not the display turns off when you press the DIMMER button several times When WIDE is selected you can set the display to turn off but when NARROW is selected you cannot set the display to turn off The default setting is set to NARROW 1 Press SET...

Page 44: ...nate the short circuit problem and turn on the power again The left and right sounds are unbalanced or reversed Check that the speakers and components are connected correctly and securely Adjust front balance parameter in the LEVEL menu Severe hum or noise is heard Check that the speakers and components are connected securely Check that the connecting cords are away from a transformer or motor and...

Page 45: ... 38 and 47 No stations have been preset or the preset stations have been cleared when tuning by scanning preset stations Preset the stations see page 39 Press DISPLAY so that the frequency appears in the display The surround effect cannot be obtained Make sure the sound field function is on press SOUND FIELD MODE PCM kHz appears on the display The sampling frequency is more than 48 kHz Change the ...

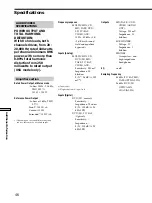
Page 46: ...d sources there may be no sound output Frequency response MULTI CH IN CD MD TAPE DVD LD TV SAT VIDEO AUX 10 Hz 50 kHz 0 5 2 dB with sound field and equalizer bypassed Inputs Analog MULTI CH IN CD DVD LD MD TAPE TV SAT VIDEO AUX Sensitivity 250 mV Impedance 50 kilohms S Na 96 dB A 250 mVb a Input short b Weighted network input level Inputs Digital DVD LD coaxial Sensitivity Impedance 75 ohms S N 10...

Page 47: ...ion PLL quartz locked digital synthesizer system Preamplifier section Low noise NF type equalizer Power amplifier section Pure complementary SEPP Power requirements 120 V AC 60 Hz Power consumption Models of area code U STR DE575 K502 220W In standby condition 1 W Models of area code CA STR DE575 315 VA In standby condition 1 W Dimensions 430 296 157 5 mm 16 7 8 11 5 8 6 2 8 in including projectin...

Page 48: ...enter speaker The surround speakers output monaural sound Dolby Digital This sound format for movie theaters is more advanced than Dolby Pro Logic Surround In this format the surround speakers output stereo sound with an expanded frequency range and a sub woofer channel for deep bass is independently provided This format is also called 5 1 because the sub woofer channel is counted as 0 1 channel s...

Page 49: ...21 steps LEVEL button CENTER LEVEL between 6 dB to 6 dB in 1 dB steps 33 DYNAMIC RANGE COMP OFF 0 1 to 0 9 in 0 1 dB steps STD or MAX FRONT TREBLE GAIN between 6 dB to 6 dB in 1 dB steps FRONT TREBLE FREQUENCY between 1 0 kHz and 10 kHz in 23 steps L R FRONT LARGE or SMALL 15 C CENTER LARGE SMALL or NO SL SR SURR LARGE SMALL or NO SL SR SURR PL XX X PL SIDE PL MID or PL BEHD SL SR SURR HGT XX X HG...

Page 50: ... 10 VCD player LD player DAT deck TV VCR SAT Selects channel numbers 10 CD player Selects tracks numbers MD deck over 10 Tape deck LD player VCD player Remote Button Operations Function ENTER TV VCR SAT After selecting a channel Tape deck disc or track using the LD player numeric buttons press VCD player to enter the value MD deck DAT deck SHIFT Receiver Press repeatedly to select a memory page fo...

Page 51: ...yer Pauses play or record MD deck Tape Also starts recording deck VCR with components in DVD player record standby VCD player LD player DAT deck x CD player Stops play MD deck Tape deck VCR DVD player VCD player LD player DAT deck POSITION TV Changes the position of the small picture SWAP TV Swaps the small and the large picture DISC CD player Select discs Mega storage CD player only SUB CH TV Sel...

Page 52: ...ur tape deck Note that the settings of the TUNER and FN SHIFT functions VIDEO 1 VIDEO 2 VIDEO 3 PHONO and MD TAPE button cannot be changed 1 Hold down the Function button whose function you want to change for example CD SACD 2 Press the corresponding button of the component you want to assign to the Function button for example 4 Tape deck The following buttons are assigned to select the functions ...

Page 53: ...player VCD player 10 11 12 TV Select channel 10 11 or 12 Remote Button Operations Function ENTER TV VCR SAT After selectig a channel Tape deck disc or track using the LD player numeric buttons press VCD player to enter the value MD deck DAT deck SHIFT Receiver Press repeatedly to select a memory page for presetting radio stations or tuning to preset stations D TUNING Receiver Tuner station direct ...

Page 54: ...PHONO AV1 AV2 3RD NIGHT MODE ON SCREEN 2ND ROOM and AUDIO SPLIT functions are not available for set operation Remote Button Operations Function D SKIP CH Receiver Scans and selects preset PRESET stations TV VCR SAT Selects preset channels CD player Skips discs CD player with multi disc changer only MONITOR TV Press to activate TV control buttons Press again to restore original category TV VIDEO TV...

Page 55: ...slowly flashes twice and the remote automatically exits the programming mode 5 Repeat steps 1 to 4 to control other components To cancel programming Press USE MODE during any step The remote automatically exits the programming mode z To activate the function after programming Press the programmed button to activate the function you want z If programming is unsuccessful check the following If the i...

Page 56: ... below to control non Sony conponents and also Sony components that the remote is normally unable to control Since the remote signal that a component accepts differs depending on the model and year of the component more than one numeric code may be assigned to a component If you fail to program your remote using one of the codes try using other codes Notes The numeric codes are based on the latest...

Page 57: ...5 756 ZENITH 754 To control a DVD player Maker Code s SONY 401 PANASONIC 402 406 PHILIPS 407 PIONEER 403 TOSHIBA 404 DENON 405 To control a TV Maker Code s SONY 501 DAEWOO 504 505 506 507 515 544 FISHER 508 GOLDSTAR 503 511 512 515 534 544 GRUNDIG 517 534 HITACHI 513 514 515 544 ITT NOKIA 521 522 JVC 516 MAGNAVOX 503 518 544 MITSUBISHI MGA 503 519 544 NEC 503 520 544 PANASONIC 509 524 PHILIPS 515 ...

Page 58: ...8 speaker system 12 video components 7 I J K Indexing See Naming L M Labeling See Naming N O Naming preset stations 41 program sources 41 P Q Parameter 32 34 Preset stations how to preset 39 how to tune 38 Preset tuning 39 R Receiving broadcasts automatically 38 directly 38 preset stations 39 Recording on an audio tape or MD 41 on a video tape 42 S Scanning preset stations See Preset tuning radio ...

Page 59: ...Sony Corporation Printed in Indonesia http www world sony com ...

Reviews: