background image

6


3.

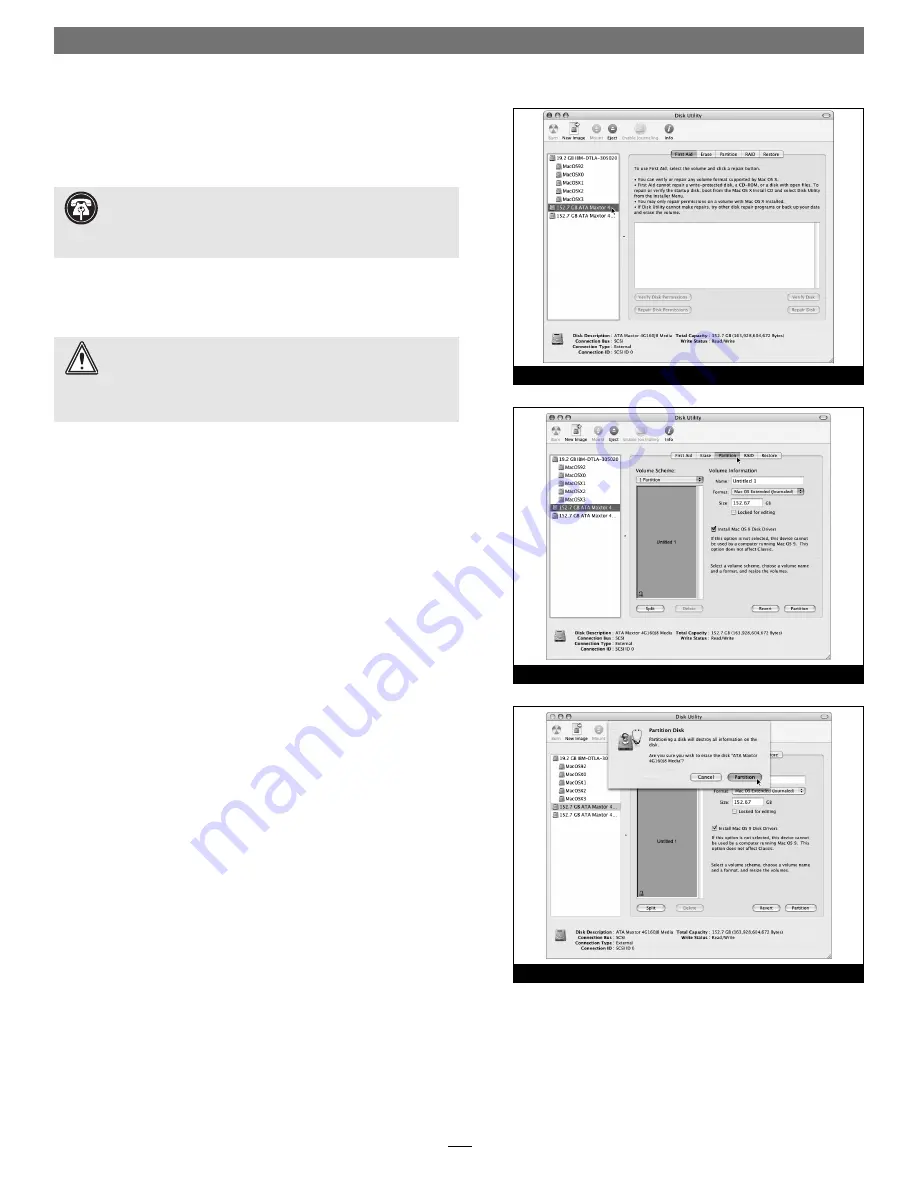
 If you have not already done so, open Disk Utility 

(Figure 12)

Note that all attached drives appear in the Information window, 
regardless of being formatted or not.


4.

 Select the fi rst drive you will format by single-clicking the drive 

symbol or the “name” of the drive 

(Figure 12)


5.

 Click on the Partition button 

(Figure 13)

. When the Partition 

window appears, click on the drop down menu beneath 
“Volume Scheme:” and select “1 Partition”. Make sure that the 
“Install Mac OS 9 Disk Drivers” option is checked, and then click 
the Partition button at the bottom of the window.


6.

 When the Warning window appears, click the Partition button 

(Figure 14)

. When partitioning and formatting are complete, 

repeat steps 4–6 until every drive connected to the Tempo 
RAID133 has been formatted. 


7.

 Shut down the computer.

Quick Start Guide for Tempo RAID133


 WARNING:

 Do not use the built-in RAID option in Disk Utility 

(accessed by clicking the RAID tab). Using this feature creates 

software-based RAID volumes that are available for use only under 
Mac OS X. Also, the option to create bootable volumes is not avail-
able with this feature. 

Figure 12

Figure 14

Figure 13


 Support Note:

 IDE hard drives attached to the Tempo 

RAID133 will register as a SCSI devices to the computer. For 

example, in 

Figure 12

 the newly installed hard drives show up as SCSI 

under Connection Bus.

Summary of Contents for TEMPO RAID133

Page 1: ...ttech com Sonnet Technologies Customer Service hours are Mon Fri 7 a m 5 p m Pacific Time Customer Service Phone 1 949 472 2772 E mail support sonnettech com Sonnet Technologies Inc California 92618 2808 USA Tel 1 949 587 3500 Fax 1 949 457 6350 2002 SonnetTechnologies Inc Revised 2003 All rights reserved Sonnet the Sonnet logotype Simply Fast the Simply Fast logotype andTempo are trademarks of So...

Page 2: ...onfigure the hard drives jumpers Be sure the jumpers are con figured properly otherwise your computer may not boot or your new drives may not be recognized Support Note Technical knowledge may be required to gain access to the drive expansion bays in certain computers we recommend you first consult your computer s user manual If you feel you are unable to install the computer hardware contact a qu...

Page 3: ...adapter If you are installing only two additional hard drives connect the Y adapter to the new hard drives Otherwise connect additional Y adapters sold separately as necessary to power all four hard drives Verify the connectors are plugged in securely 7 Remove the Tempo RAID133 card from its packaging 8 Locate an available PCI slot close to the drive bays inside your computer and remove its port a...

Page 4: ...apacity 3 Shut down the computer 4 Move DIP switch 2 on the Tempo RAID133 to ON to select the striping mode Figure 8 5 If you removed the card to move the DIP switches verify the card is seated firmly in the slot Support Note Power Macintosh G3 Desktop users must remove the access panel on the main chassis to route the Ultra ATA cables from the drives to the Tempo RAID133 card You may need tools t...

Page 5: ...lumes or virtual drives once they have been initialized each volume will appear on the desktop as vir tual drives Figure 10 Your drives are now ready for use Drive Formatting Mac OS X This section describes the process of formatting initializing hard drives connected to the Tempo RAID133 using Disk Utility under Mac OS X Version 10 3 the process under Version 10 2 and 10 1 is very similar The driv...

Page 6: ...n the Warning window appears click the Partition button Figure 14 When partitioning and formatting are complete repeat steps 4 6 until every drive connected to the Tempo RAID133 has been formatted 7 Shut down the computer Quick Start Guide for Tempo RAID133 WARNING Do not use the built in RAID option in Disk Utility accessed by clicking the RAID tab Using this feature creates software based RAID v...

Page 7: ... connected to the Tempo RAID133 now appear as single volumes 14 Select the first volume you will format as a RAID volume by single clicking the drive symbol Figure 16 15 Click the Partition button Figure 17 When the Partition win dow appears click on the drop down menu beneath Volume Scheme and select a number of partitions for the volume you may optionally choose to partition each RAID volume to ...

Page 8: ...o RAID133 17 When the Warning window appears click the Partition button Figure 18 If necessary repeat steps 14 16 to partition another volume connected to the Tempo RAID133 Close Disk Utility your drives are ready to use Figure 18 ...

Reviews: