3
Quick Start Guide for Tempo RAID133
3.
Confi gure your hard drives’ jumpers as follows:
• When installing
one pair of drives
to
create one striped vol-
ume
, you must set the jumpers on both drives to the single set-
ting when available, or the master setting if not.
• When connecting
two pairs of drives
to
create two striped vol-
umes
, set the jumpers on one pair to the master setting, and on
the other pair to the slave setting.
4.
Install the hard drives into expansion bays. (Depending on
your computer model, drive mounting brackets/carriers or drive
mounting sleds may be required to install your hard drives. Refer
to your computer’s user manual).
5.
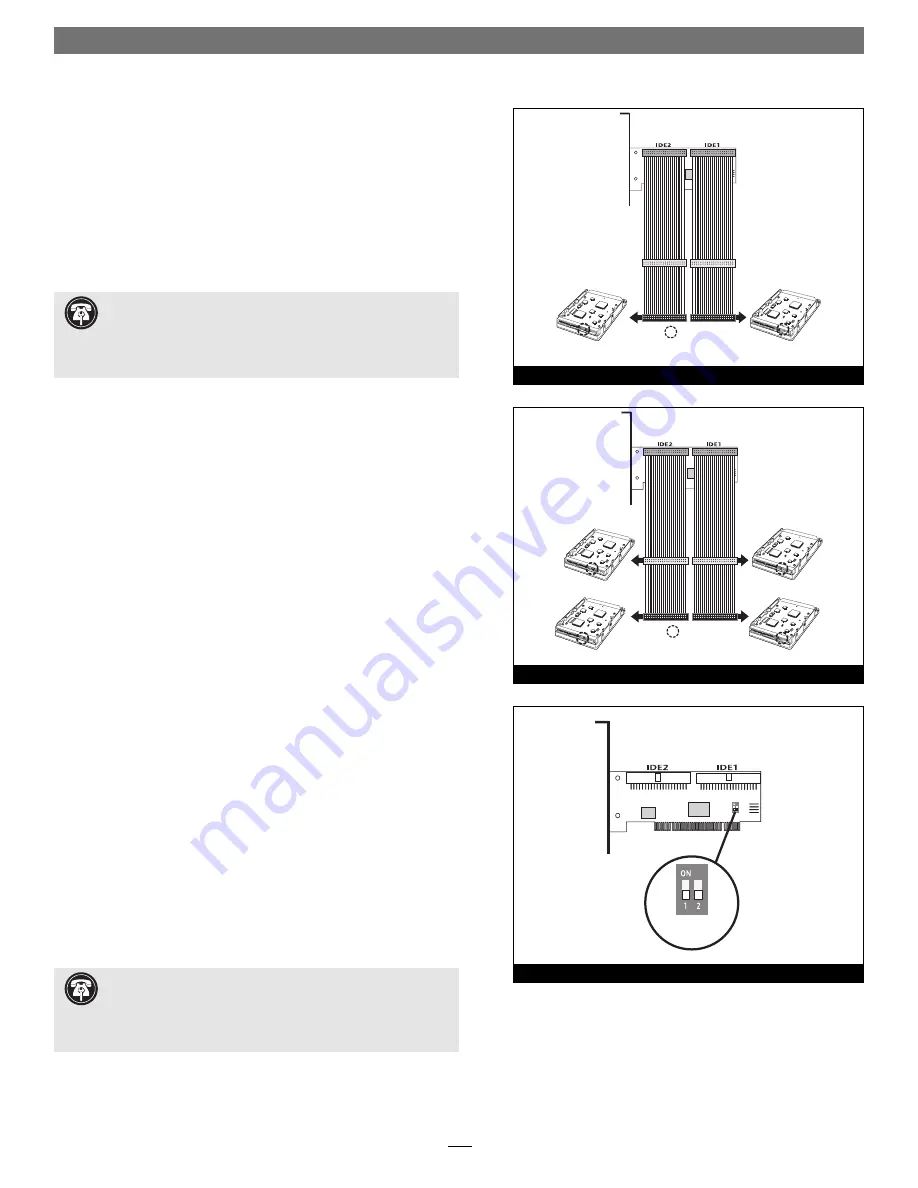
Connect the Ultra ATA cables to the hard drives as follows:
• When connecting
one pair of drives
, connect the master
(black) connector on each cable to each drive
(Figure 3)
;
verify
the connectors are plugged in securely
.
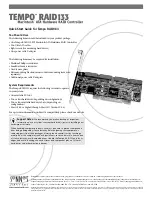
• When connecting
two pairs of drives
, connect the cables’
master (black) connectors to the drives with jumpers set in the
master setting; connect the slave (gray) connectors to the drives
with jumpers confi gured in the slave setting
(Figure 4)
;
verify
the connectors are plugged in securely
.
6.
Locate the existing hard drive in your computer and fi nd the
4-pin power connector plugged into it. You should fi nd at least
one extra power connector near the existing drive; connect it
to the supplied power connector Y-adapter. If you are installing
only two additional hard drives, connect the Y-adapter to the
new hard drives. Otherwise, connect additional Y-adapters (sold
separately) as necessary to power all four hard drives. Verify the
connectors are plugged in securely.
7.
Remove the Tempo RAID133 card from its packaging.
8.
Locate an available PCI slot close to the drive bays inside your
computer and remove its port access cover (if present) from the
rear of the computer.
9.
Install the Tempo card into the PCI slot;
make sure the card is
firmly seated in the slot
. Leave the DIP switches in the normal
mode (default) setting for now
(Figure 5)
.
Support Note:
When you first install the Tempo RAID133,
leave the DIP switches set in the normal mode setting (both DIP
switches off/down). You must first initialize (format) each of the hard
drives connected to the Tempo RAID133 individually, before initializ-
ing the striped volumes.
Support Note:
A pair of drives consists of two drives con-
nected at the same position (connector) on each of the two
Ultra ATA cables, such as master, or slave + slave. Two drives
connected on the same cable ( slave) are not recognized as a
pair by the Tempo RAID133.
Tempo RAID133 Macintosh
ATA Hardware RAID Controller
Ultra ATA cable
drive 2
(single or master)
drive 0
(single or master)
Ultra ATA cable
- jumpers
Figure 3
Tempo RAID133 Macintosh
ATA Hardware RAID Controller
normal
mode
Figure 5
Tempo RAID133 Macintosh
ATA Hardware RAID Controller
Ultra ATA cable
drive 3 (slave)
drive 2 (master)
drive 1 (slave)
drive 0 (master)
Ultra ATA cable
- jumpers
Figure 4


