


Software Installation Steps
Mac OS X Driver and Software Installation
This section describes the installation of drivers and software
to support the Sonnet RAID controller in systems running Mac
OS X Version 10.4 and later.
1.
Insert the Sonnet RAID Controller
Installer CD into the
CD-ROM drive. Double-click the Sonnet RAID CD icon.
When the
Sonnet RAID x.xx
window appears, double-click
the Drivers folder.
2.
Double-click the ATTOExpressSASRAID2_xxx.pkg icon to
launch the installer (xxx is the version).
3.
When the
Welcome to the ATTO ExpressSAS RAID Driver
Installer
window appears, click Continue.
4.
When the
Software License Agreement
window appears, read
the agreement, click Continue, and then click Agree.
5.
When the
Standard Install
window appears, accept the
default location or choose a different one, and then click
Install.
6.
When asked to do so, enter the Administrator password, and
then click OK; the software is installed.
7.
When the next window appears, click Restart to restart your
system and finish the driver installation.
8.
If necessary, double-click the Sonnet RAID CD icon. In the
Sonnet RAID x.xx
window, double-click the Configuration
Tool folder.
9.
Double-click the ConfigTool icon to launch the
Configuration Tool installer.
10.
When asked to do so, enter the Administrator password, and
then click OK.
11.
When the
Introduction
window appears, click Next.
12.
When the
License Agreement
window appears, read the
agreement, click the I accept the terms of the License
Agreement radio button, and then click Next.
13.
When the
Choose Install Folder
window appears, accept the
default location or choose a different one, and then click
Next.
14.
When the
Choose Install Set
window appears, click the icon
next to Full Installation, and then click Next.
15.
When the
Pre-Installation Summary
window appears, click
Install; the software is installed.
16.
When the
Install Complete
window appears, click Done to
quit the installer.
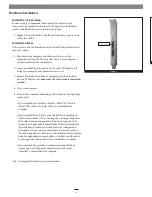
17.
Shut down your computer, and proceed to Hardware
Installation on page 6.
2


