background image

9

Hardware Installation—G3 Minitower/Server G3


3.

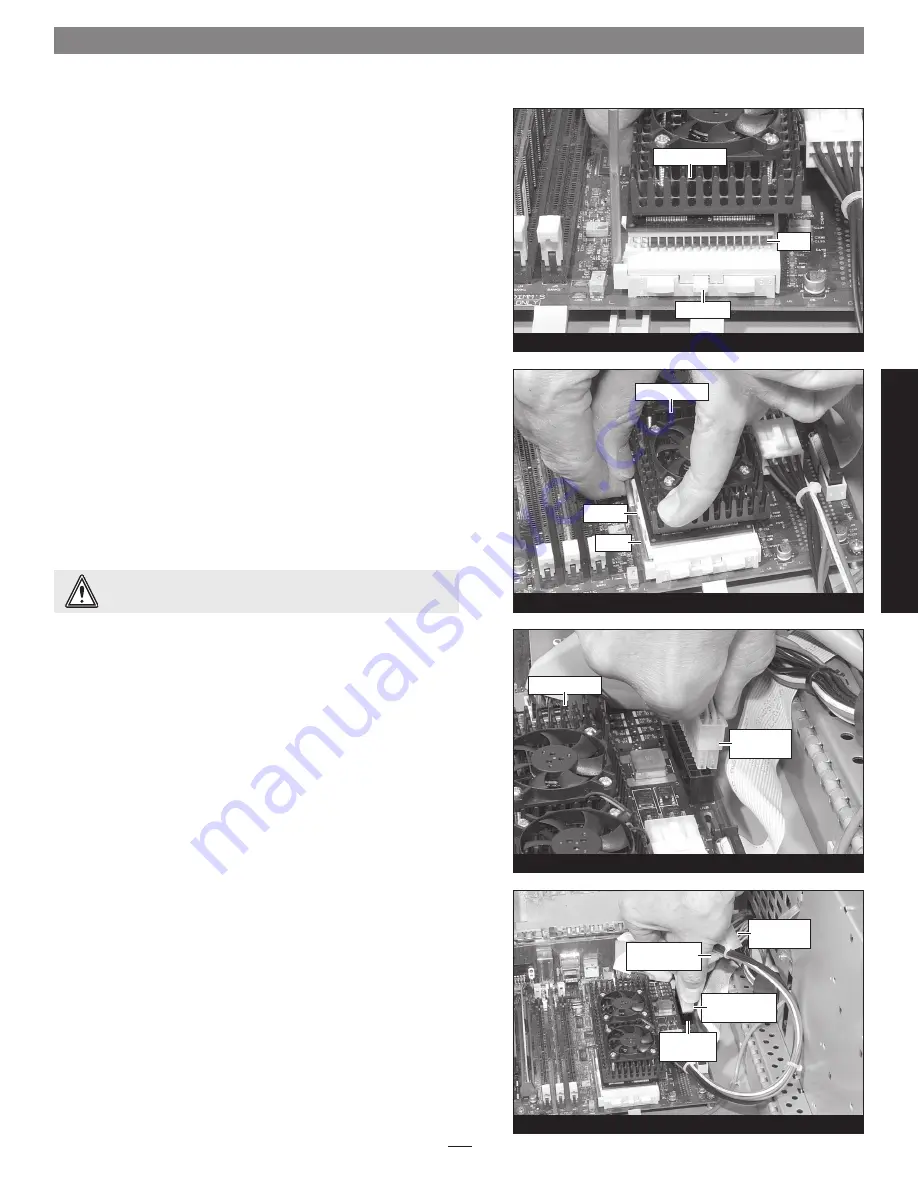
 Grasp the Encore/ZIF card so that the narrow end of the card is 

pointing toward you 

(Figure 28)

. Holding it level with the logic 

board, align the Encore/ZIF card’s pins over the ZIF socket’s holes, 
and then carefully lower the Encore/ZIF card into the ZIF socket; 
with all the pins aligned, the card will be easy to push into the 
socket. If you encounter any resistance, raise the card and check 
for bent pins, if none are bent, realign the card’s pins with the 
socket and gently lower it again. 

Be very careful! Broken pins 

are not covered under warranty

.  


4.

 While applying moderate pressure on top of the Encore/ZIF 

card’s heat sink above the ZIF socket, secure the card in place by 
pressing down on the ZIF socket lever until it latches under the 
socket’s side tab 

(Figure 29)

.

Install Power Adapter Cable Between Computer and 

Encore/ZIF Card


1.

 Locate the logic board power cable plugged in next to the 

Encore/ZIF card 

(Figure 30)

. Unplug the connector by pulling it 

straight up while squeezing its locking tab. 


2.

 Plug in the provided power adapter cable between the connector 

on the logic board and the logic board power cable 

(Figure 31)

verify that all the connectors are plugged in securely

.

Figure 28

Figure 29

Figure 30

Encore/ZIF card

lever

ZIF socket

Encore/ZIF card

pins

side tab

Encore/ZIF card

logic board 

power cable


 WARNING:

 When disconnecting cables from the logic board, 

do not pull on the wires; always pull on the connectors.

Figure 31 

power adapter 

cable connector

logic board 

connector

logic board 

power cable

power adapter 

cable connector

G3

 M

in

it

ow

er

/S

er

ve

G3

Summary of Contents for ENCORE/ZIF G4

Page 1: ... before proceeding to the next Remember to register your product online at http registration sonnettech com to be informed of future upgrades and product releases Software updates and links are available from the Sonnet web site at www sonnettech com Online support form available at http supportform sonnettech com Sonnet Technologies Customer Service hours are Mon Fri 7 a m 5 p m Pacific Time Cust...

Page 2: ...This page left intentionally blank ...

Page 3: ...ftware 3 Insert the Sonnet Installer CD into the CD ROM drive Double click the Mac OS 7 9 ONLY not Classic folder and then double click the Crescendo Encore Install icon By default with Easy Install selected from the pop up menu the required software will be installed into the active System Folder on the boot drive If this is okay click the Install but ton otherwise select Custom Install from the ...

Page 4: ... With the front of the computer facing you locate the two tabs on the underside of the front cover Figure 1 Press them in and then slide the cover forward and off the computer 4 Touch the power supply case Figure 2 to discharge any poten tially damaging static electricity then disconnect the power and peripheral cables from the back of the computer 5 Rotate the expansion card cover up and to the l...

Page 5: ...e top of the clip with your finger gently twist the screwdriver until you see the clip unhook from the ZIF socket tab Unhook the clip from the other side of the heat sink remove the clip and heat sink from the processor and then set them aside Remove Processor Card Push down and out on the ZIF socket lever Figure 8 to disengage it from the side tab on the socket Once the lever is clear of the side...

Page 6: ... so that the narrow end of the card is pointing toward you Figure 11 Holding it level with the logic board align the Encore ZIF card s pins over the ZIF socket s holes and then carefully lower the Encore ZIF card into the ZIF socket with all the pins aligned the card will be easy to push into the socket If you encounter any resistance raise the card and check for bent pins if none are bent realign...

Page 7: ...he computer so that noth ing which may block airflow through the cooling fans runs across the top of the Encore ZIF card and so that nothing will be pinched when you close the internal assembly Figure 15 2 Disengage the support arm from the bottom of the computer s case Figure 16 Hardware Installation G3 Desktop Figure 13 Figure 14 Figure 15 WARNING When disconnecting cables from the logic board d...

Page 8: ...computer 7 Affix the Powered by Sonnet label to the front of your computer 8 Return the computer to your computing area and reconnect the power and peripheral cables to the computer Turn On Computer 1 Turn on your Power Macintosh your accelerated machine should boot normally 2 If your system is running Mac OS 8 6 9 1 x or 9 2 x your instal lation is complete If your system is running Mac OS 9 0 x ...

Page 9: ...de access panel from your Power Macintosh Figure 20 4 Carefully lay the computer on its side Touch the power supply case Figure 21 to discharge any potentially damaging static electricity then disconnect the power and peripheral cables from the back of the computer 5 Locate the two latches securing the internal assembly in place and flip them up Figure 21 6 Using its built in handle rotate the int...

Page 10: ...rade Card 1 Remove the Encore ZIF card from its anti static package making sure to handle the card by its edges Figure 26 your card may differ from what is pictured Gently peel the pin protection foam off the Encore card and then transfer it to the processor card you removed from the computer With the foam attached place the processor card into the anti static package and store it and the heat sin...

Page 11: ...card in place by pressing down on the ZIF socket lever until it latches under the socket s side tab Figure 29 Install Power Adapter Cable Between Computer and Encore ZIF Card 1 Locate the logic board power cable plugged in next to the Encore ZIF card Figure 30 Unplug the connector by pulling it straight up while squeezing its locking tab 2 Plug in the provided power adapter cable between the conne...

Page 12: ...ssembly Figure 33 unhook and remove it from the assembly do not reinstall the spring clip 3 Rotate and carefully lower the internal assembly back into the computer s case Figure 34 making sure that no wires or cables are getting pinched 4 Lock the internal assembly latches into their original positions Figure 35 Encore ZIF card internal assembly WARNING You must remove the spring clip from the int...

Page 13: ...computer to your computing area and reconnect the power and peripheral cables to the computer Turn On Computer 1 Turn on your Power Macintosh your accelerated machine should boot normally 2 If your system is running Mac OS 8 6 9 1 x or 9 2 x your instal lation is complete If your system is running Mac OS 9 0 x or Mac OS X any version see page 24 Installing Additional Software Figure 36 side access...

Page 14: ...3 With the rear of the computer facing you touch a port access cover Figure 37 to discharge any potentially damaging static electricity then disconnect the power and peripheral cables from the back of the computer 4 Remove the four screws securing the chassis carrier to the com puter case Figure 37 5 Without completely removing it slide the chassis carrier out of the case as far as it will go Figu...

Page 15: ...cessor upgrade card and its included power adapter cable you will need to disconnect various connectors and unplug cables from the logic board first Figure 44 identifies the cables and the order in which they should be disconnected Internal drives power cable connectors A Main SCSI cable B Secondary SCSI cable C Logic board power cable D WARNING When disconnecting cables from the logic board do no...

Page 16: ...onnect the main SCSI cable connectors from the logic board Figure 46 3 Disconnect the secondary SCSI cable from the logic board Figure 47 4 Move the SCSI cables out of the way to expose the logic board power connector Figure 48 internal drives power cable main SCSI cable secondary SCSI cable logic board power cable pull tab logic board power connector ...

Page 17: ...de screwdriver between the clip and the socket While pressing down on the top of the clip with your finger gently twist the screwdriver until you see the clip unhook from the ZIF socket tab Unhook the clip from the other side of the heat sink remove the clip and heat sink from the processor and then set them aside Remove Processor Card Push down and out on the ZIF socket lever Figure 52 to disenga...

Page 18: ...rify the con nector is plugged in securely 3 Turn the Encore ZIF card so that the narrow end of the card is pointing away from you Figure 55 Holding it level with the logic board align the Encore ZIF card s pins over the ZIF socket s holes and then carefully lower the Encore ZIF card into the ZIF socket with all the pins aligned the card will be easy to push into the socket If you encounter any re...

Page 19: ...57 verify the con nector is plugged in securely 2 Reconnect the main SCSI cable Figure 58 verify the connec tors are plugged in securely 3 Reconnect the internal drives power cable connectors Figure 59 verify the connectors are plugged in securely 4 Plug in the provided power adapter cable between the connector on the logic board and the logic board power cable Figure 60 verify that all the connec...

Page 20: ...rier back into the computer case Figure 63 If you encounter excessive resistance stop pull the chassis car rier back out make sure all the wires cables and connectors are secure and try again 3 Replace the four screws you removed previously to secure the chassis carrier to the computer case Figure 64 4 Affix the Powered by Sonnet label to the front of your computer 5 Return the computer to your co...

Page 21: ...f the computer Figure 65 If it is not already pressed in do so now 4 With the right side of the case facing you open your Power Mac by lifting the release latch and lowering the side panel away from the computer s case Figure 66 5 Touch the power supply case Figure 67 to discharge any poten tially damaging static electricity then disconnect the power and peripheral cables from the back of the comp...

Page 22: ...Locate the clip securing the processor heat sink to the ZIF socket Figure 70 Remove the screw securing the heat sink clip to the logic board and set the screw aside 2 Carefully insert a small flat blade screwdriver between the heat sink clip and the ZIF socket Figure 71 While pressing down on the top of the clip with your finger gently twist the screwdriver until you see the clip unhook from the Z...

Page 23: ...ZIF card Figure 75 verify the con nector is plugged in securely 3 Grasp the Encore ZIF card so that the narrow end of the card is on the left Figure 76 Holding the Encore ZIF card level with the logic board and its long edges parallel to the video card align the card s pins over the ZIF socket s holes and then care fully lower the Encore ZIF card into the ZIF socket With all the pins aligned the c...

Page 24: ...l Power Adapter Cable Between Computer and Encore ZIF Card 1 Locate the logic board power cable plugged in next to the PCI slots Figure 79 Unplug the connector by pulling it straight up while squeezing its locking tab 2 Plug in the provided power adapter cable between the connector on the logic board and the logic board power cable Figure 80 verify that all the connectors are plugged in securely W...

Page 25: ...curely Figure 82 3 Affix the Powered by Sonnet label to the front of your computer 4 Return the computer to your computing area and reconnect the power and peripheral cables to the computer Turn On Computer 1 Turn on your Power Macintosh your accelerated machine should boot normally 2 If your system is running Mac OS 8 6 9 1 x or 9 2 x your instal lation is complete If your system is running Mac O...

Page 26: ...enables L2 and L3 cache support for the Encore ZIF G4 card under OS X see page 25 Also unless you are using a Power Mac G4 PCI Graphics system you must install a bootable Mac OS 9 1 x or 9 2 x System Folder selectable from System Preferences if your system does not have one Enable AltiVec Existing OS 9 0 x installation This section describes how to update an existing Mac OS 9 0 x installation to e...

Page 27: ...stallation After the software is installed quit the Mac OS Install application and restart your computer your system is ready to use and your instal lation is complete Install SonnetCache pkg Installing SonnetCache pkg is necessary only when Mac OS X any version is installed on your system Remember to install this software when you upgrade to Mac OS X For complete information on SonnetCache please...

Page 28: ...c OS 9 1 x or 9 2 x System Folder in which the Startup Disk X control panel installed by Sonnet X Tune Up is present 3 Click Restart to boot your system into Mac OS 9 1 x or 9 2 x 4 Insert the Mac OS X CD into your CD drive 5 From the Apple Menu select Control Panels Startup Disk X 6 Choose the Mac OS X CD and then click Restart Without a bootable Mac OS 9 1 x or 9 2 x System Folder present on a d...

Reviews: