Hardware Installation—G3 All-in-one
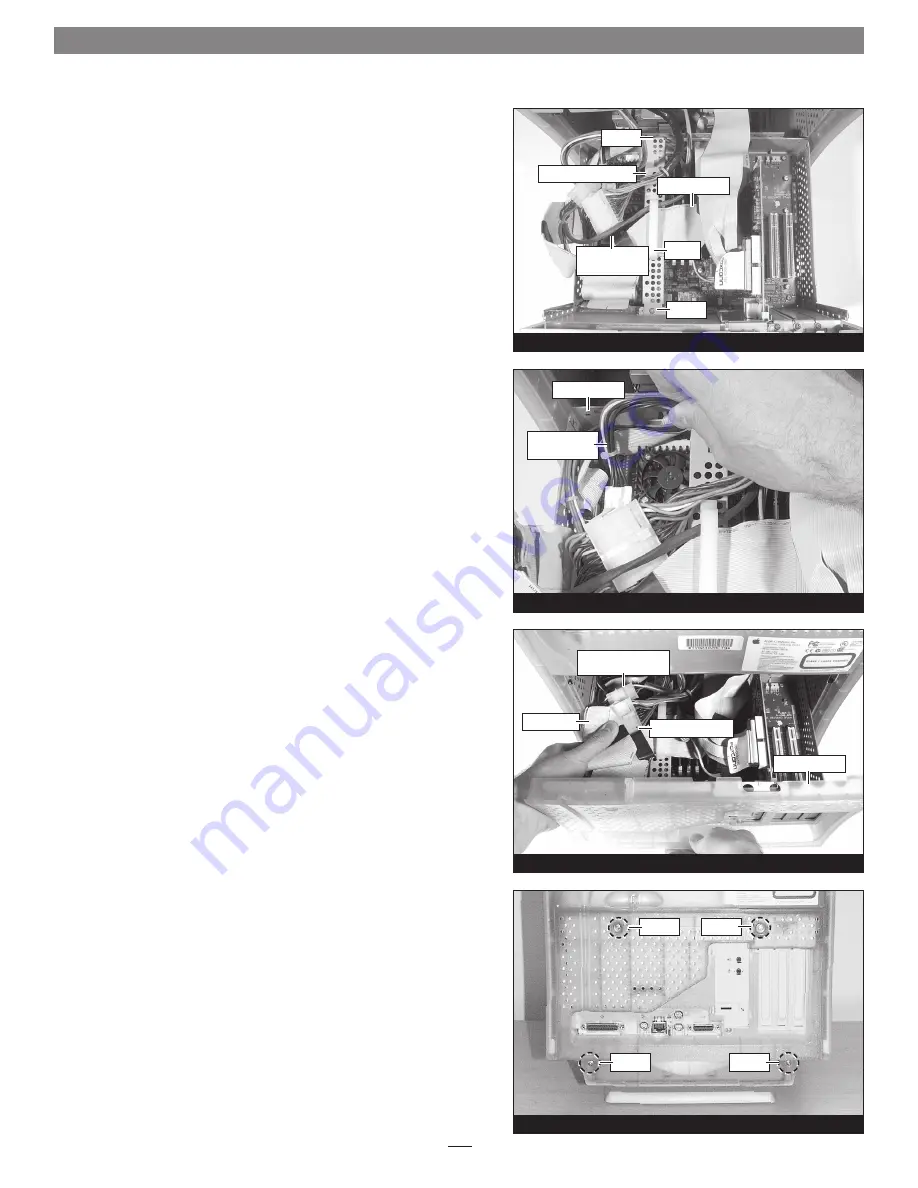
Figure 63
Figure 62
Figure 61
Replace Cable Support Bracket
1.
Insert the cable support bracket underneath the logic board
cables and back into place in the chassis carrier
(Figure 61)
.
Secure the bracket in place using the two screws you removed
previously.
2.
Secure the main SCSI cable and the internal drives power cable
to the cable support bracket, clamping them in place
(Figure 61)
.
Close Computer
1.
Tuck the power adapter cable against the chassis carrier, so that
it rests below the cable support bracket
(Figure 62)
. Verify the
power adapter cable’s connectors are not making contact with
Encore/ZIF card’s fan(s).
2.
While holding down the internal drives power cable connectors,
the secondary SCSI cable, and the power connectors, carefully
slide the chassis carrier back into the computer case
(Figure 63)
.
If you encounter excessive resistance, stop
; pull the chassis car-
rier back out, make sure all the wires, cables and connectors are
secure, and try again.
3.
Replace the four screws you removed previously to secure the
chassis carrier to the computer case
(Figure 64)
.
4.
Affix the
Powered by Sonnet
label to the front of your computer.
5.
Return the computer to your computing area and reconnect the
power and peripheral cables to the computer.
Turn On Computer
1.
Turn on your Power Macintosh; your accelerated machine
should boot normally.
2.
If your system is running Mac OS 8.6, 9.1.x or 9.2.x, your instal-
lation is complete. If your system is running Mac OS 9.0.x, or Mac
OS X (any version), see page 24, “Installing Additional Software”.
screw
main SCSI cable
cable support bracket
screw
internal drives
power cable
power adapter
cable
chassis carrier
chassis carrier
internal drives power
cable connectors
SCSI cable
clamp
Figure 64
screw
screw
screw
screw
power connectors


