2
Hardware Installation—G3 All-in-one
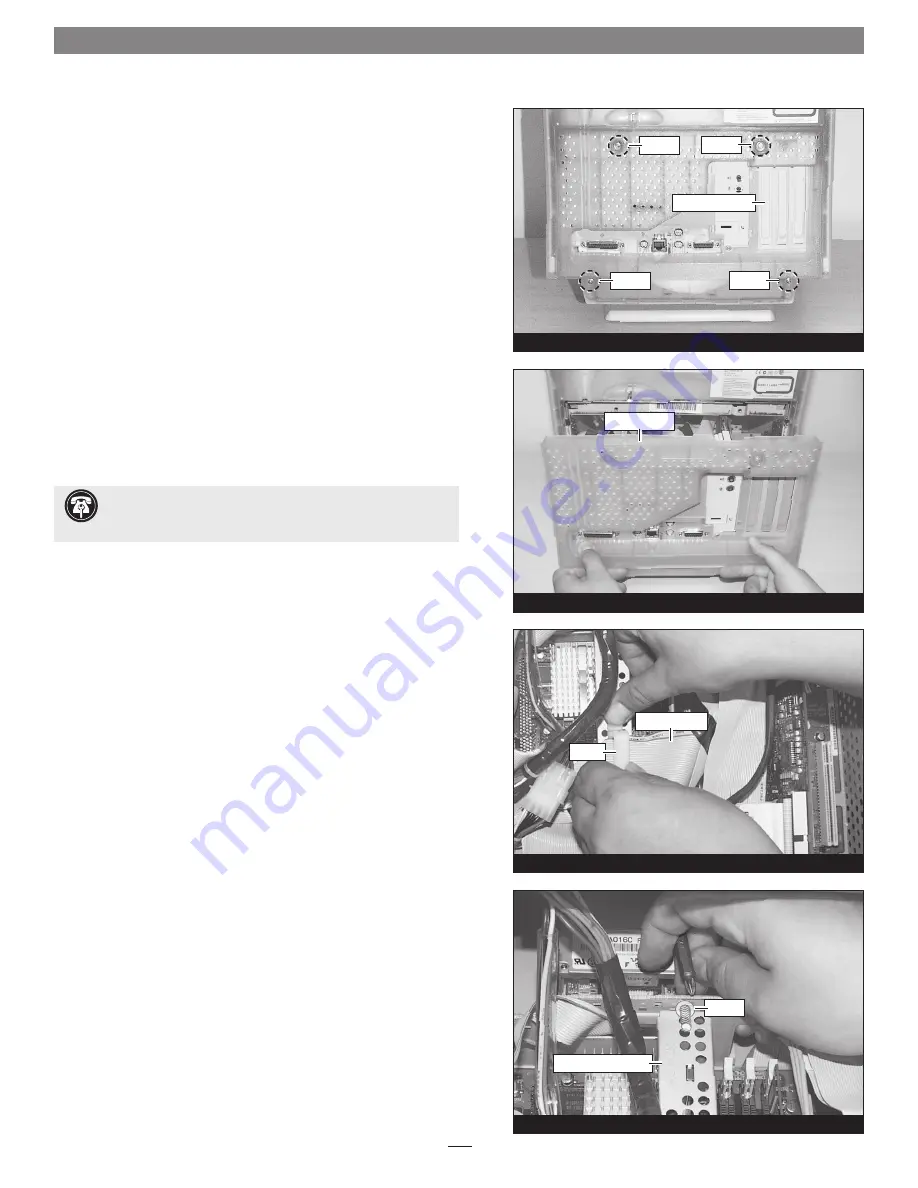
Figure 40
Figure 39
Figure 38
Figure 37
This section covers the installation of the Encore/ZIF G4 processor
upgrade card into Power Macintosh G3 All-in-one computers. If you
have a Power Macintosh G3 Desktop computer, go back to page 2. If
you have a Power Macintosh G3 Minitower or Macintosh Server G3
system, go back to page 7. If you have a Power Macintosh G3 Blue &
White or Power Mac G4 (PCI Graphics) system, skip to page 19.
Shut Down and Open Computer
1.
Shut down your Power Macintosh. If the computer has been on
for any length of time, wait a few minutes for it to cool before
beginning the installation.
2.
If you need to move the computer to a different area where you
can work freely, disconnect any connected cables, move the com-
puter, then reconnect the power cord and plug it in to an outlet.
3.
With the rear of the computer facing you, touch a port access
cover
(Figure 37)
to discharge any potentially damaging static
electricity, then disconnect the power and peripheral cables from
the back of the computer.
4.
Remove the four screws securing the chassis carrier to the com-
puter case
(Figure 37)
.
5.
Without completely removing it, slide the chassis carrier out of
the case as far as it will go
(Figure 38)
.
Remove Cable Support Bracket
1.
Unlock the clamp securing the main SCSI cable to the cable sup-
port bracket
(Figure 39)
.
2.
Locate the screw securing the cable support bracket to the chas-
sis carrier; it is screwed into the panel next to the drives, between
the bracket’s tabs
(Figure 40)
. Using a short-handled, small
Phillips head screwdriver, remove the screw.
Support Note:
To avoid generating a static charge in your
body, do not walk around the room until after you finish in-
stalling the Encore/ZIF card and close the computer.
screw
screw
screw
screw
chassis carrier
port access cover
clamp
main SCSI cable
screw
cable support bracket


