


WATTrouter Mx - user manual
How to fit and setup the device
Page 28 from 82
WATTrouter Mx optionally integrates up to 6 wirelessly controlled devices which can be purchased as
accessories. Wireless connection solution can be applied in buildings, where installation of wire connections
between controller and devices would be too difficult.
Attention:
Before ordering of this accessory function, assure that wireless devices will be accessible by the
controller. The accessible distance is based on construction of the building and it is possible to extend this range
by the repeaters. Further information can be obtained from technical support.
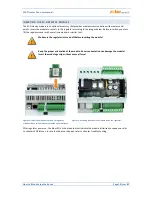
This function requires SC-Gateway module which needs to be inserted into regulator. To install this SC-Gateway
module, refer to the SC-Gateway user manual.
It is also necessary to buy at least one wireless peripheral
(wireless socket or wireless module to be installed on the DIN rail).
How to activate wireless peripherals:
1.
Connect wireless peripheral to electrical network and wait till the device gets registered in wireless
network. SC-Gateway module acts as a coordinator of this wireless network and the controller is being
informed once new device is detected. In such case, WATTconfig software will show the Add wireless
station window. If this dialog does not appear even after longer period (1 minute or longer), the
peripheral is probably out of connection range of regulator – proceed according to chapter
Troubleshooting.
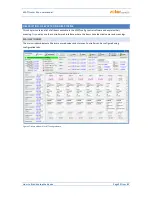
2.
In window "Add wireless station", set the name tag of the station and choose the table line where the
new peripheral should be registered.
3.
Upon closing the Add wireless station dialog (see Fig.
"
Other Settings
"
tab) p
ress the Write button. The
configuration will be saved in the controller.
4.
On the
"
Output settings
"
tab, assign to the logic output WLS the configured wireless peripheral by
using the Station and Device fields. P
ress the Write button. The configuration will be saved in the
controller.
5.
Test with Test button, respective output on the peripheral should respond. If it does not, proceed
according to Chapter
Troubleshooting
.
6.
In case of usage of more wireless peripherals, repeat this procedure from point one for each one. Do
not connect new stations to power line at the same moment, because otherwise the identification of
new station will be impossible.
FINISHING THE CONFIGURATION
After setting up the controller according to previous chapters the controller is fully configured. You may save
the preset configuration by pressing the Save button or you may load it at any time by pressing the Open
button. This way you may create several different configurations and monitor them for some time and
determine which one provides better utilization of energy self-consumption in your facility or household.
After you have completed the settings using the USB port then in case of manipulating within the distribution
box turn off entire distribution box, remove the USB cable and turn on the distribution box again.
Tip:
In order to maintain continuous monitoring the controller can be kept connected either via USB or Ethernet.
If you want to use permanent USB connection, then it is recommended using a suitable USB isolator or USB
connection extender via Ethernet (for example Silex 3000GB). To use permanent Ethernet connection you may
connect the network cable directly to your network router or switch.