background image

Installation

11

EN

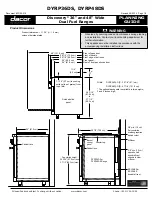
1.4 Wall attachment and anti-tip 

device

Instructions for wall mounting (primary 
system)

The anti-tip brackets are to be attached to 
the rear wall as shown. The height of 
bracket location from the floor is 
determined after the range legs have been 
adjusted to the installation height as shown 
in the installation instructions and the range 
has been leveled.
1. Level the range using the adjustable 

leveling legs.

2. Fasten the plates supplied to the rear of 

the appliance, aligning them with the slits 
on the sides.

Warning

Electrical shock hazard

•  Use extreme caution when drilling holes 

into the wall or floor. There may be 
concealed electrical wiring located 
behind the wall or under the floor.

•  Identify the location of the electrical 

circuits that could be affected by the 
installation of the anti-tip device, then turn 
off power to these circuits.

•  Failure to follow these instructions may 

result in electrical shock or other 
personal injury.

CAUTION

•  Contact a qualified installer or 

contractor to determine the 
proper method for drilling holes 
through the wall or floor material 
(such as ceramic tile, hardwood, 
etc.)

•  Failure to follow these 

instructions may result in damage 
to wall or floor coverings.

Summary of Contents for TRU90X

Page 1: ...r flammable vapors or liquids in the vicinity of this or any other appliance WHAT TO DO IF YOU SMELL GAS Do not try to light any appliance Do not touch any electrical switch Do not use any phone in yo...

Page 2: ...s burns to children or adults READ AND SAVE THESE INSTRUCTIONS Your safety and the safety of others are very important We have provided many important safety messages throughout this manual and on the...

Page 3: ...ange for the first time Keep these operating instructions in a safe place and pass them on to any future user NOTE This range is manufactured for use with natural gas To convert the appliance to LP Pr...

Page 4: ...70 ELECTRICAL CODE latest edition Or the CANADIAN ELECTRICAL CODE C22 11 1 and C22 2 No 01982 or latest edition and all local codes and ordinances IMPORTANT Observe all codes and ordinances in force...

Page 5: ...ppliance All adjustments and servicing must be performed by qualified installers or service technicians Do not leave the packing material around the home Sort the various items of waste and take them...

Page 6: ...15 0 4 mm stainless steel 0 024 0 6 mm aluminum or 0 020 0 5 mm copper 35 889 mm min clearance between the top of the cooking surface and the bottom of an unprotected wood or metal cabinet 5 max upper...

Page 7: ...used in conjunction with the gas range unless the hood and range have been designed tested in accordance with ANSI Z21 1 and listed by an independent testing laboratory for combination use This type...

Page 8: ...nections should be made before the range is placed in its final position Ensure that the burner caps are correctly positioned on the burner bases on the rangetop Legs should be installed near to where...

Page 9: ...he slits on the sides Warning Electrical shock hazard Use extreme caution when drilling holes into the wall or floor There may be concealed electrical wiring located behind the wall or under the floor...

Page 10: ...s to the wall 4 Attach the two anti tip brackets to the wall using an appropriate fastener for example screws appropriate for the type of wall 5 Respect the heights indicated in the figures using the...

Page 11: ...ightening them too much since there will be other adjustments to make 2 After having positioned and leveled the appliance move the bracket close to the rear of the appliance and anchor it to the floor...

Page 12: ...utral conductor in usual manner Do not use an adaptor Do not use an extension cord Check with a qualified electrician if you are not sure whether the range is grounded Turn power supply off before con...

Page 13: ...Copies of the standards listed above may be obtained from National Fire Protection Association One Batterymarch Park Quincy Massachusetts 02169 7471 CSA International 8501 East Pleasant Valley Road Cl...

Page 14: ...or yellow green wires from the white wires that extend out of the end of the appliance cable The ground wire must be connected first Connect the green or yellow green ground wire from the appliance to...

Page 15: ...air supply in accordance with the standards in force The room where the appliance is installed must have enough air flow for the regular combustion of gas and the necessary air change in the room itse...

Page 16: ...nections indicate a leak If a leak appears shut off the gas valve controls and adjust the connections Then check the connections again Remove all the detergent product from the range Replace the parts...

Page 17: ...ting of that system at test pressures greater than 1 2 psig 3 5 kPa Testing below 112 PSI 3 5 kPa with a water column pressure of 14 35 6 cm gauge or lower The range must be isolated from the gas supp...

Page 18: ...ws under the top B to secure the backguard Mounting the kick platet The kick plate must always be positioned and secured correctly on the appliance 1 Place the kick plate in the front bottom part of t...

Reviews: