background image

Page 30

December 2007

Rough Terrain Scissors

TM

Function Tests 

Section 2 - Familiarization

It is the responsibility of the operator to read, completely understand and follow all instructions and warnings 

contained in this operating manual and on the aerial platform.

FAMILIARIZA

TION

FAMILIARIZA

TION

• 

Test Brakes

WARNING

Brakes will engage instantly when you 
release the controller handle, causing 

MEWP to stop immediately.

1.  Ensure path of intended motion is clear.

2.  Activate and hold “

” enable trigger 

switch.

3.  Drive MEWP “ ” forward. Test brake by 

releasing controller handle.


Result:

 MEWP should come to a stop. If 

MEWP pulls to one side while stopping, do 
not operate MEWP until brake adjustments 
have been checked.

4.  Drive MEWP “

” forward. Test brake 

again by releasing “ ” enable trigger 
switch only.


Result:

 MEWP should come to an instant 

and abrupt stop. If MEWP does not stop 
immediately, or if MEWP pulls to one side 
while stopping, do not operate MEWP until 
brake adjustments have been checked.

• 

Test Horn

1.  Push “

” horn pushbutton.

 Result:

 Horn should sound.

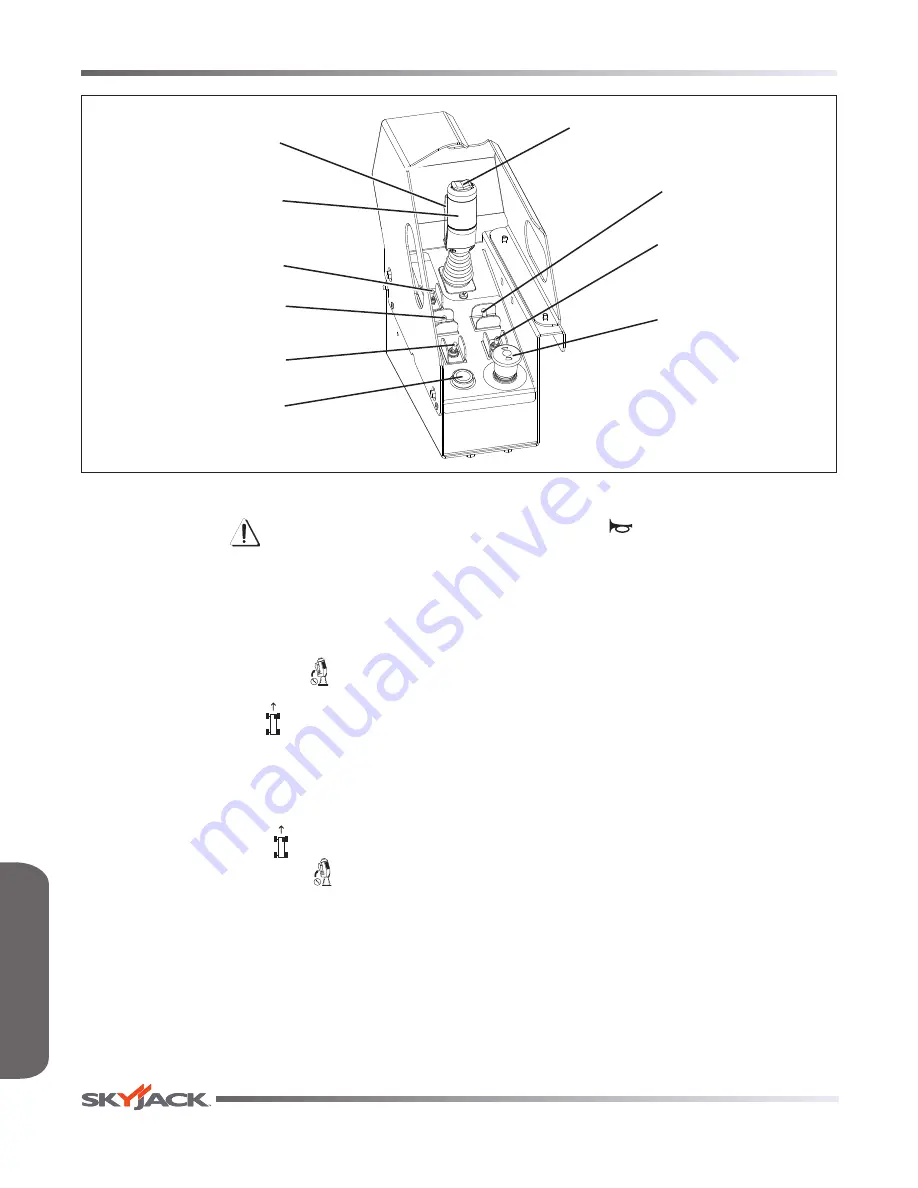
Horn Pushbutton

Choke (Dual Fuel)/
Glow Plug (Diesel) 
Pushbutton

Engine Start

Switch

Emergency Stop 
Button

Torque Switch

Lift/Drive/Steer 

Controller

Low/High Throttle
Switch

Rocker Switch

Lift/Drive/Steer Enable 

Trigger Switch

Lift/Drive Switch

Summary of Contents for SJ6826 RT

Page 1: ...ROUGH TERRAIN SCISSORS MODELS SJ6826 RT SJ6832 RT 159172AA A December 2013 OPERATING MANUAL AS...

Page 2: ...America Toll Free 1 800 965 4626 Toll Free Fax 1 888 782 4825 Email parts skyjack com Parts Service Europe Unit 1 Maes Y Clawdd Maesbury Road Industrial Estate Oswestry Shropshire SY10 8NN UK Phone 4...

Page 3: ...NGER DANGER indicates an imminently hazardous situation which if not avoided will result in death or serious injury WARNING WARNING indicates a potentially hazardous situation which if not avoided cou...

Page 4: ...t Identification 40 3 6 Component Identification Optional Equipment Attachments 42 3 7 Operator s Responsibility 43 3 8 Start Operation 44 3 9 Refueling Procedure 51 3 10 Loading Unloading 53 3 11 Gua...

Page 5: ...operating manual and the safety panel label located on the platform and all other warnings in this manual and on the MEWP Compare the labels on the MEWP with the labels found within this manual If an...

Page 6: ...eyes ears hands feet and body Any modifications from the original design are strictly forbidden without written permission from SKYJACK Electrocution Hazard This MEWP is not electrically insulated Mai...

Page 7: ...ling Stay within the boundaries of the guardrails DO NOT raise the MEWP or operate elevated in windy or gusty conditions that exceed the limits specified in Section 4 Table 4 4 DO NOT increase the lat...

Page 8: ...that exceeds the limits specified in Table 4 4 DO NOT use the MEWP as a crane It is prohibited DO NOT sit stand or climb on the guardrails It is prohibited DO NOT climb on scissor arm assembly It is p...

Page 9: ...disable limit switches or other safety devices DO NOT use the MEWP without guardrails locking pins and the entry gate chain bar in place DO NOT operate if MEWP is not working properly or if any parts...

Page 10: ...means that two hands and one foot or one hand and two feet are in contact with the MEWP or the ground at all times during entering and exiting WARNING An operator should not use any MEWP that does not...

Page 11: ...EWP without proper authorization and training Failure to avoid this hazard could result in death or serious injury It is the responsibility of the operator to read completely understand and follow all...

Page 12: ...es immediately lower the platform completely and ensure that the MEWP is on a firm level surface 2 2 4 Load Sensing System This system is a safety device that prevents any normal movement of the MEWP...

Page 13: ...Brake auto reset valve plunger 2 2 6 Emergency Lowering System The emergency lowering system allows platform lowering in the event of an emergency or an electrical system failure Refer to Section 2 6...

Page 14: ...is pushbutton switch aids in starting a cold dual fuel engine Glow Plug Pushbutton Diesel This pushbutton switch energizes the glow plugs to aid in starting a cold diesel engine 4 Engine Start Pushbut...

Page 15: ...y this button will not work for a few seconds while oil pressure bleeds off 4 Horn Pushbutton This pushbutton sounds an automotive type horn 5 Emergency Stop Button This button when depressed disconne...

Page 16: ...to Section 5 Labels section in this manual and determine that all labels are in place and are legible 2 3 2 Electrical Maintaining the electrical components is essential to good performance and servic...

Page 17: ...cables and connections can result in component damage and hazardous conditions WARNING Explosion hazard Keep flames and sparks away Do not smoke near batteries WARNING Battery acid is extremely corros...

Page 18: ...ing bolts are in place Engine Oil Level Maintaining the engine components is essential to good performance and service life of the MEWP WARNING Beware of hot engine components Check oil level on dipst...

Page 19: ...ed and then visually inspect the sight gauge located on the side of the hydraulic oil tank The hydraulic oil level should be at or slightly above the top mark of the sight glass Hydraulic Return Filte...

Page 20: ...IARIZATION FAMILIARIZATION Main Manifold Ensure all fittings and hoses are properly tightened and there is no evidence of hydraulic leakage Pull and tilt main manifold to check thoroughly Ensure there...

Page 21: ...is in good working order and automatically closes and latches Anchorages Ensure anchorages are secure and have no visible damage AC Outlet on Platform Ensure outlet has no visible damage and free from...

Page 22: ...f deformation in weldments Ensure all pins are properly secured Ensure cables and wires are properly routed and shows no signs of wear and or physical damage Scissor Bumpers Ensure bumpers are secure...

Page 23: ...s and sidewalls for cuts cracks punctures and unusual wear Check each wheel for damage and cracked welds Check each lug nut for proper torque to ensure none are loose Check wheel motor assembly for lo...

Page 24: ...re is no evidence of hydraulic leakage Splitter Manifold Ensure all fittings and hoses are properly tightened and there is no evidence of hydraulic leakage Tie Rod Ensure there are no loose or missing...

Page 25: ...ter repairs are completed operator must perform a pre operation inspection and a series of function tests again before putting MEWP into service Prior to performing function tests be sure to read and...

Page 26: ...t down and MEWP functions should not operate 2 Pull out emergency stop button and restart engine Test Platform Raise Lower Switch 1 Select platform engine base key switch to base position and raise or...

Page 27: ...is clear 2 Release the brake manually refer to Section 2 5 2 3 Turn free wheeling valve knob counterclockwise to a fully opened position and attempt to push pull the MEWP Result MEWP should move 4 Tur...

Page 28: ...e that you maintain three points of contact when using the ladder to mount dismount platform 4 Use the ladder of MEWP to access platform 5 Close the gate 6 Ensure low high throttle switch is in low th...

Page 29: ...nd right Test Driving 1 Ensure path of intended motion is clear 2 On platform control console select lift drive switch to drive position 3 Activate and hold enable trigger switch 4 Slowly move control...

Page 30: ...releasing controller handle Result MEWP should come to a stop If MEWP pulls to one side while stopping do not operate MEWP until brake adjustments have been checked 4 Drive MEWP forward Test brake aga...

Page 31: ...lift platform 1 foot and then lower the platform to stowed position Result Platform will lift and lower 6 With platform at stowed position fully retract all outriggers using auto level Result All four...

Page 32: ...atform Result Lower function will operate 13 Platform at stowed position With Left Front Outrigger partially extended attempt to lift the platform Result Lift function will not operate With Right Fron...

Page 33: ...tact with ground Attempt to lift the platform 1 foot Result Lift function will not operate 17 Platform at stowed position Extend each outrigger until it raises the tires up approximately 2 Retract the...

Page 34: ...t available and lowering is impeded by an obstacle utmost care must be taken to move MEWP far enough to clear obstacle In such cases operation must be extremely smooth with no sudden movements and mus...

Page 35: ...on level ground Chock or block wheels to prevent MEWP from rolling 2 Turn main power disconnect switch to off position 3 Locate brake auto reset valve plunger item 1 and brake hand pump item 2 at the...

Page 36: ...ssors mechanism when using emergency lowering valve 1 Remove any obstructions from a lowering platform 2 Extension platform s may need to be retracted or MEWP may need to be moved to clear obstruction...

Page 37: ...lified person 3 1 2 Operator s Responsibility for Maintenance WARNING Maintenance must be performed by trained and competent personnel who are familiar with mechanical procedures Death or serious inju...

Page 38: ...nts Section 3 Operation 3 2 Major Components Entry Gate Platform Control Console Main Platform Lifting Mechanism Engine Compartment Manual Storage Box Extension Platform Scissor Guard If Equipped Base...

Page 39: ...el or tube sections making up a scissor type assembly The scissor assembly is raised and lowered by single acting hydraulic lift cylinders with holding valves A two section pump driven by an engine pr...

Page 40: ...rmed within the lifting mechanism Refer to Section 3 13 for how to use the maintenance support WARNING The maintenance support must be used when inspection and or maintenance or repairs are to be perf...

Page 41: ...th Lanyard This pin is used to lock the guardrail in place WARNING Before operating this MEWP check the guardrail system for loose or missing locking pins The guardrail system must be upright and all...

Page 42: ...enable switch when in the extend or retract position activates functions on the auto level switch and outrigger extend retract switches 5 Leveling Indicator Light This light illuminates to display th...

Page 43: ...s put into service IMPORTANT The operator must understand and follow the step by step instructions to test all MEWP functions The operator should make a copy of the Operator s Checklist see Table 4 7...

Page 44: ...o perform a jobsite inspection and avoid the following hazardous situations holes or drop offs ditches or soft fills floor obstructions bumps or debris overhead obstructions electrical cords hoses and...

Page 45: ...t pushbutton until engine starts then release Do not overcrank starter Release choke pushbutton after engine starts dual fuel NOTE Choke is only active while button is depressed Occasional use of chok...

Page 46: ...ition 10 Select and hold engine start switch until engine starts then release Do not overcrank starter Release choke switch after engine starts dual fuel 3 8 4 To Raise or Lower Platform Using Platfor...

Page 47: ...handle forward or backward to desired speed and direction of platform travel 5 Return controller to neutral center position to stop Release enable trigger switch WARNING To protect against unintended...

Page 48: ...t surface To activate low torque select torque switch to low torque high speed position WARNING To protect against unintended movement of the MEWP push in the emergency stop button after you have arri...

Page 49: ...indicator light has the following states Off The outriggers are fully retracted Flashing Rapidly The outriggers are extending but the platform is not level Flashing The outriggers are extended but the...

Page 50: ...8 11 Electrical Inverter If Equipped The inverter is operational with alternating current available at all times when the machine is on The emergency stop button will turn the inverter off To check s...

Page 51: ...s use only unleaded gasoline with an octane rating 87 or higher WARNING Do not smoke in an area where MEWPs are stored or refueled 3 9 1 Regular Fuel 1 Ensure engine and all systems are turned off and...

Page 52: ...traps from hooks 6 Remove the propane cylinder Installing a Propane Cylinder 1 Ensure engine and all systems are turned off and emergency stop button is depressed 2 Place propane cylinder on bracket o...

Page 53: ...tform must be fully lowered The main power disconnect switch must be in off position The hydraulic fuel and engine compartments must be closed and securely latched The extension platform must be retra...

Page 54: ...MEWP Ramp or dock capacity should be sufficient to withstand maximum MEWP weight Ramp should be equipped with side guards to prevent inadvertent fall from the ramp Incline should not exceed MEWP grade...

Page 55: ...Rough Terrain Scissors December 2007 Page 55 Notes...

Page 56: ...level ground 2 Ensure extension platform is fully retracted 3 Ensure emergency stop button is depressed 4 Turn main power disconnect switch to off position WARNING Ensure that you maintain three poin...

Page 57: ...of each locking pin is all the way through and each cotter pin fully inserted into the pin hole 6 Raising the guardrails up is done in the following order entrance side left side right side left side...

Page 58: ...f necessary Refer to Section 3 11 for guardrail folding procedure 10 Use the ladder to dismount from platform 11 Connect platform control console to the connection inside the engine cabinet 12 Ensure...

Page 59: ...form 26 Return guardrails to upright position if folded Refer to Section 3 11 for guardrail folding procedure WARNING Before operating this MEWP check the guardrail system for loose or missing locking...

Page 60: ...Proper Use of Maintenance Support 1 Remove all material from platform 2 Raise platform until there is adequate clearance to swing down maintenance support 3 Swing maintenance support down from storage...

Page 61: ...Tilt alarm with drive lift cutout Lanyard attachment points Hinged railing system Operator horn Spring loaded full height gate at rear Forklift pockets tie down lifting lugs Foam filled low profile gr...

Page 62: ...7 m 31 8 ft Platform Lowered 2 37 m 7 8 ft 2 51 m 8 2 ft Drive 7 9 m 25 9 ft 9 7 m 31 8 ft Normal Drive 6 3 km h 4 mph 6 3 km h 4 mph Elevated Drive 0 63 km h 0 39 mph 0 63 km h 0 39 mph Lift Rated L...

Page 63: ...Model Number _________________ Serial Number __________________ This decal is located on the scissor assembly It must be completed after an annual inspection has been completed Do not use the aerial p...

Page 64: ...136 kg 1 400N 12 5 m s 2 5 x 4 5 1 5 x 1 5 2 12 5 m s 4 No Wind 60441AF AS NOTE Refer to capacity label for additional information and for models equipped with options 1 5 x 1 5 Maximum Wind Speed Til...

Page 65: ...ns full capacity The LCP or OUP that an individual surface can withstand varies from structure to structure and is generally determined by the engineer or architect for that particular structure LCP L...

Page 66: ...5 25 15 20 10 WARNING Intermixing tires of different types or using tires of types other than those originally supplied with this equipment can adversely affect stability Therefore replace tires only...

Page 67: ...Fuel Compartment Test Platform Raise Lower Switch A Hydraulic Tank A Test Emergency Lowering A Hydraulic Oil A Test Free wheeling A Hydraulic Return Filter A Platform Control Console Fuel Tank A Test...

Page 68: ...Signature Each item shall be inspected using the appropriate section of the Skyjack operating manual As each item is inspected check the appropriate box PASS DAILY Visual and Daily Maintenance Inspect...

Page 69: ...Legend Label Legend Safety Red Safety Red indicates DANGER Safety Orange Safety Orange indicates WARNING Safety Yellow Safety Yellow indicates CAUTION Safety Green Safety Green indicates emergency lo...

Page 70: ...k platform has received annual inspection prior to operation 3 Keep Clear Keep clear Stay away from MEWP when in operation 4 Caution Tape Stripe Caution stripe 5 Sound Power Level Guaranteed maximum s...

Page 71: ...et pressure and torque 9 Forklift Pocket Insert fork fully into pocket to lift MEWP 10 Model Number Product Identifier Model number will vary may not be as shown 11 EWPA Clearance Requirements Clearan...

Page 72: ...fier Model number will vary may not be as shown 13 Manual Storage Box Indicates location of operating manual 14 Hazard Identification Refer to Section 1 Safety Rules Read and understand the outlined r...

Page 73: ...r Push to stop engine and disable controls Emergency Stop Light indicates controls enabled Push and hold to start engine Push and hold to operate choke dual fuel or glow plugs diesel Select gasoline o...

Page 74: ...74 December 2007 Rough Terrain Scissors TM Labels Section 5 No Label Pictorial Description 3 Battery Fuse Assembly Assemble fuse as shown Torque to value indicated 4 Fuse Fuse location Engine Panel 1...

Page 75: ...ection 5 Labels ZZ 1 3 2 4 2 3 No Label Pictorial Description 1 Skyjack Logo Skyjack 2 Caution Tape Stripe Caution stripe 3 Harness Anchorage Anchor safety belt harness tethers here 4 Maintenance Supp...

Page 76: ...5 ZZ 5 6 5 7 6 5 5 No Label Pictorial Description 5 Forklift Pocket Insert fork fully into pocket to lift MEWP 6 Lift and Tie Down Points Only use these points for lifting or tying down 7 Serial Plate...

Page 77: ...orage bracket into a vertical position Lower platform until the bottom end of maintenance support rests on the lower cross bar 4 Maintenance support is now secured A Turn main power disconnect switch...

Page 78: ...ctorial Description 1 Skyjack Logo Skyjack 2 Keep Clear Keep clear Stay away from MEWP when in operation 3 Caution Tape Stripe Caution stripe 4 Sound Power Level Guaranteed maximum sound power level 5...

Page 79: ...ft MEWP 9 Emergency Lowering Procedure Refer to Operating manual 1 Turn main power disconnect switch to off position 2 To open the lift cylinder holding valves located at the bottom of each cylinder i...

Page 80: ...g manual 1 Block or chalk wheels to prevent MEWP from rolling 2 Turn main power disconnect switch to off position 3 Locate brake valve and pump 4 Push in black knob 5 Pump by pushing red knob in and o...

Page 81: ...iption 12 Connect AC Supply Connect AC supply here 13 Connect Air Supply Connect platform air supply here 14 Model Number Product Identifier Model number will vary may not be as shown 15 Railing Pins...

Page 82: ...P b 1 2 3 No Label Pictorial Description 1 Hydraulic Oil ATF Dexron III Replace hydraulic fluid with ATF Dexron III only 2 Diesel Use diesel fuel only Unleaded Fuel Use unleaded gasoline only 3 No Sm...

Page 83: ...ge 83 Section 5 Labels 1 G L P G L P 1 PROPANE 2 G L P G L P No Label Pictorial Description 1 Liquid Propane Use liquid propane only 2 PROPANE Propane Indicates propane storage location Propane Tank L...

Page 84: ...Connect AC supply here 3 Connect Air Supply Connect platform air supply here 4 Operator s Daily Inspection Refer to the Operating manual Perform visual inspection and function tests at the beginning...

Page 85: ...lly into pocket to lift MEWP 8 Lift and Tie Down Points Only use these points for lifting or tying down 9 Platform Capacity Platform capacity label for 6832RT Rated work load in each configuration is...

Page 86: ...h Terrain Scissors TM Labels Section 5 1 2 1 No Label Pictorial Description 1 Crushing Hazard Danger Crushing hazard 2 Warning Do Not Alter Do not alter or disable limit switches or other safety devic...

Page 87: ...2007 Page 87 Section 5 Labels 1 2 2 2 2 2 2 No Label Pictorial Description 1 Orifice Installed Orifice installation warning 2 Harness Anchorage Anchor safety belt harness tethers here Cylinder Main P...

Page 88: ...rd to drive forward or backward to drive reverse Select either drive mode with low speed high torque or drive mode with high speed low torque Select either lift mode or drive mode Select either low or...

Page 89: ...Off The outriggers are fully retracted Flashing Rapidly The outriggers are extending but the platform is not level Flashing The outriggers are extended but the platform is not yet level Solid The out...

Page 90: ...Page 90 December 2007 Rough Terrain Scissors TM Notes...

Page 91: ......

Page 92: ...www skyjack com P litelig lift l sninger av folk som bryr seg...

Reviews: