38
Base-To-Blade Adjustment
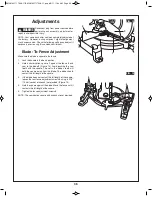
Make sure blade is perpendicular to the base.
1.
While lowering the blade, hold a combination square
1
against the base
2
and next to the blade
3
(Figure 16).
Avoid touching the saw teeth with the square. The set in
the blade’s teeth will hold the square away from the
blade. The blade should contact the full length of the
square.
2.
If the blade does not contact the full length of the square,
adjust the bevel adjustment screw:
Loosen the bevel adjustment locknut
4
(Figure 17).
Hold the square against the base. Rotate the bevel
adjustment screw
5
, up or down, until the full length of the
square is against the blade. Tighten the bevel adjustment
screw locknut
4
.
3.
Make sure the bevel indicator is aligned with the bevel
index 0° mark. If adjustment is necessary, loosen the
bevel indicator screw
6
until the indicator aligns with the
0° mark (Figure 18).
4.
Tighten the bevel indicator screw
6
.
Bevel Stop Adjustment
Make sure the bevel stop screw is adjusted to 45°.
If adjustment is necessary:
1.
Loosen the bevel lock knob
7
.
2.
Loosen the bevel stop locknut
8
(Figure 19).
3.
Rotate the bevel stop adjustment screw
9
, up or down,
until the full length of the 45 square is against the blade
(Figure 20).
4.
Tighten the bevel stop locknut
1
.
Adjustments
FIG. 16
FIG. 17
FIG. 18
FIG. 19
FIG. 20
1
2
3
4
5
8
6
7
9
SM 2610017175 08-11:SM 2610017175 08-11.qxp 8/2/11 11:24 AM Page 38


