background image

Getting Started with Silhouette Portrait

15

Cutting Your Design

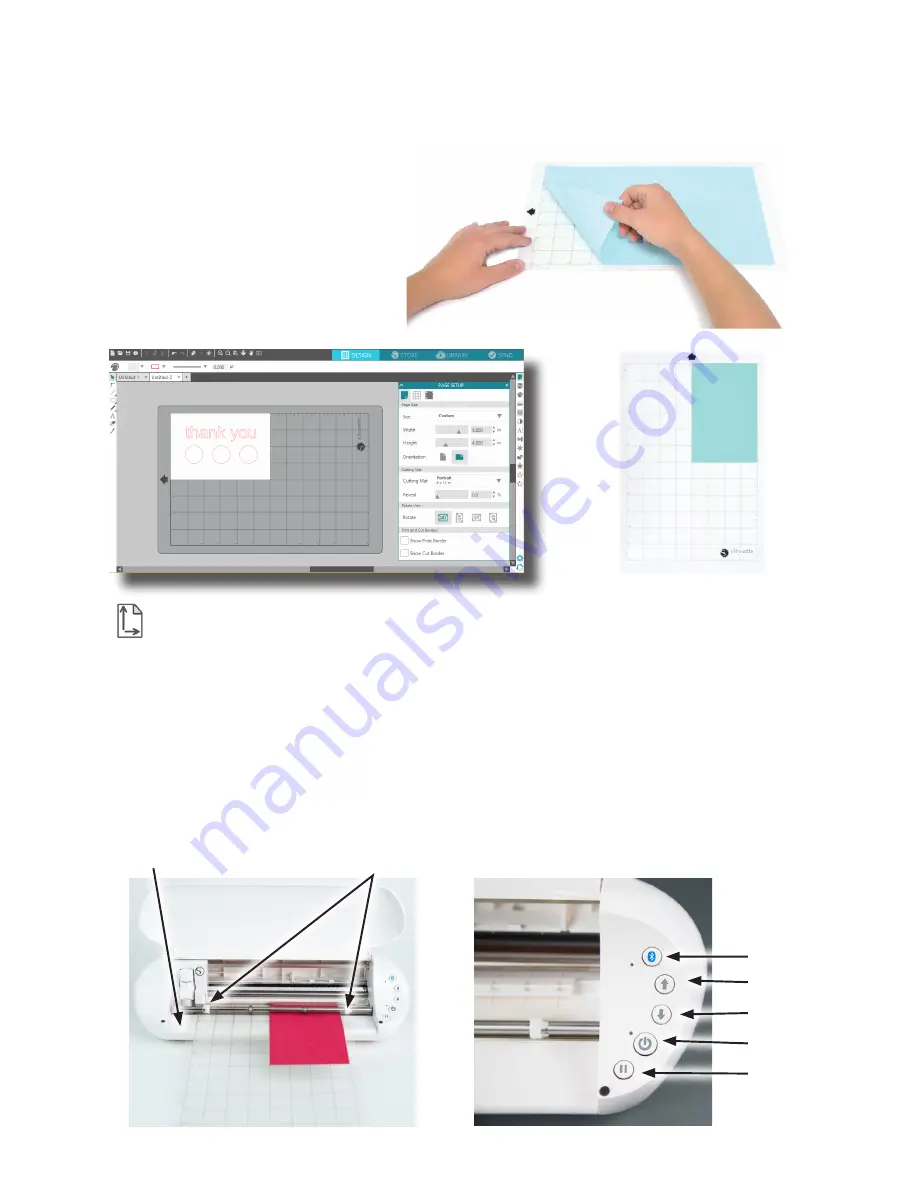
Preparing the Cutting Mat

Remove the nonstick liner from the cutting 
mat.

Position your paper or other media on the 
cutting mat according to the diagram shown 
in Silhouette Studio®. 


If you don’t see an image of the cutting mat under your document on the screen, click the  


Page Setup button in the options toolbar in the upper right-hand corner of the window.

Position your image on the screen where you want it to cut on the mat. 

Be sure to keep your design 

within the red margins on your page.

Preparing the Silhouette to Cut

Turn the Silhouette Portrait® on by pressing the Power button under the lid and waiting for the machine to 
start up. To feed a cutting mat into the Silhouette, center the mat between the white rollers and press the 
Load button.

blade adjustment socket

white rollers

Bluetooth®

Load

Unload

Power

Pause

Summary of Contents for Portrait

Page 1: ...Getting started with your ...

Page 2: ... Check that all the items have been included before starting If you are missing any items listed below please contact support silhouetteamerica com Take the Silhouette Portrait from the box and remove the strips of packing tape and foam as indicated by the following diagram These strips of tape and foam are used to hold the moving parts of the Silhouette in place during shipment remove tape and fo...

Page 3: ...te Studio Connect the Silhouette Portrait Once the Silhouette Studio software is installed connect the Silhouette Portrait to the power supply Then connect the Silhouette to your computer with the included USB cable as shown in the diagram Turn the machine on by pressing the power button If your PC displays a New Hardware Found dialog box follow the recommended instructions to accept your system s...

Page 4: ...n to your design page Store When you are connected to the internet the Store tab takes you to the Silhouette Design Store where you can browse and purchase designs Library You can access your stored designs from the Library tab Sort and organize your designs any way you would like by adding folders and subfolders Designs can be stored on your computer or on the Silhouette Cloud Send The Send tab a...

Page 5: ...ns or images within the active cut area bound inside the red box on the white page will be sent to your Silhouette The gray area can be used to place your extra work Document Tabs Your document tabs are located at the top of your workspace When you open a new document while you already have a document open a new tab will open The document tab highlighted in white shows which document is open in yo...

Page 6: ...n Depending on your project you might want lots of panels open to make adjustments using a wide variety of tools or you might only want a single panel open at a time Panels Housing Multiple Icons Some panels are single icon panels such as PixScan or Offset Other panels consist of a group of related icons These icons are available within the panel via separate tabs For example the Transform panel i...

Page 7: ...his panel you can change the font text size weight justification character spacing and line spacing Use the mouse to highlight your text before making adjustments to the font size weight etc To finish typing your text click anywhere off the page This will end the text editing mode and deselect the text If you need to make a change to the text double click the text on the page using the Select Tool...

Page 8: ...ick once to start a line and click a second time to end the line Hold SHIFT while creating a line to make a perfectly vertical horizontal or 45 line Rectangles Squares To draw a rectangle choose the Rectangle tool from the left hand toolbar Either click and drag with the mouse to draw a rectangle or click once to set one corner and click a second time to set the opposite corner Hold SHIFT while cr...

Page 9: ...imple cutouts to intricate patterns and designs to cut with your Silhouette Most shapes are only 99 Generally a free shape is posted every week as well To access the Silhouette Design Store click the Store tab in the upper right corner of the software The free design of the week will be displayed on the home page that appears ...

Page 10: ...n the home page or searching the Free Design tab Click on the design in the search results to view details about the design Click the Add to Cart button to add this free design to your shopping cart Locate the shopping cart icon in the upper right hand corner of the window and click it to view your shopping cart Your shopping cart total should be 0 00 Click the Checkout button to proceed At this t...

Page 11: ...ilhouette Design Store you may wish to purchase a subscription and download dozens of designs each month In order to create a free account and buy designs one at a time choose the Sign up FREE option You will be asked for your name email address and password in order to create an account Type your information and click the Sign Up button ...

Page 12: ...e came with a trial subscription card you may use it to purchase designs from the Silhouette Design Store After registering your machine at silhouetteamerica com setup you will receive an email with a unique code that entitles you to a one month Basic subscription to the Silhouette Design Store Follow the directions within the email to activate your trial subscription and begin enjoying the Silhou...

Page 13: ...he Show All Designs shortcut in the left panel of My Library to view all 50 designs included with your software Click the icon next to the Library folder to expand the folder and view its contents This folder initially contains the 50 free designs included Use the View as Icons button and View as List button near the top left hand side of the window to change the view of your designs in the right ...

Page 14: ...nc up to five devices with your cloud account If you aren t using multiple devices Silhouette Cloud is useful in backing up your designs and preventing the need for recoveries In Silhouette Cloud there is unlimited storage available for Silhouette Design Store downloads There is 1 GB available for custom content Club Silhouette Members receive 5 GB of storage for custom content To sync your files ...

Page 15: ...operties A window with details about the highlighted shape will appear Shapes downloaded from the Silhouette Design Store will contain several keywords and a description or instructions Using Designs in Library Using the folders in Library navigate to a design that you d like to cut Double click the design to place it on your page in the software This will automatically close the Library tab which...

Page 16: ...tup button in the options toolbar in the upper right hand corner of the window Position your image on the screen where you want it to cut on the mat Be sure to keep your design within the red margins on your page Preparing the Silhouette to Cut Turn the Silhouette Portrait on by pressing the Power button under the lid and waiting for the machine to start up To feed a cutting mat into the Silhouett...

Page 17: ...de up and down into the adjustment socket until the red indicator line points to the desired setting To load a tool into the carriage unlock the tool holder by gently pulling on the tool holder Place the tool into the tool holder and push the extended part back to secure the tool Be sure the tool is pressed completely into the holder Blade setting 1 4 6 7 10 2 3 Material Thin materials such as vin...

Page 18: ...laying your design on the left The panel on the right hand side includes the action tabs as well as the action options When you enter the Send tab cut lines in your design will become thicker and bolder so you can see exactly what your Silhouette is going to cut If you want to make any adjustments to your design you must go back to the Design screen by clicking on the Design tab You can move your ...

Page 19: ...s you can use the Layer panel to choose which layers to cut At the bottom of the send panel there is an icon that looks like a graduation cap Click on it to view brief tutorial steps if you would like a reminder of all of the things you must do before you make a cut Before you make a cut make sure you have done the following steps f f Chose a material in the Material section f f Adjusted any desir...

Page 20: ...o connect your Bluetooth enabled Portrait 2 ensure that Bluetooth is activated by pressing the Bluetooth button on your Portrait The LED light next to the Bluetooth button should illuminate blue In Silhouette Studio go to the Send tab Click on the Bluetooth icon at the bottom of the panel and select Add Bluetooth machine After a few seconds the status of the Portrait will display as Ready in the S...

Page 21: ...es with the Silhouette Portrait Blog Visit the official Silhouette blog at blog silhouetteamerica com for ideas of new projects you can create Many blog posts contain step by step instructions for advanced uses of Silhouette products and software Newsletter Sign up for the Silhouette newsletter at www silhouetteamerica com to receive product updates and special offers via email Customer Service If...

Reviews: