.
c.
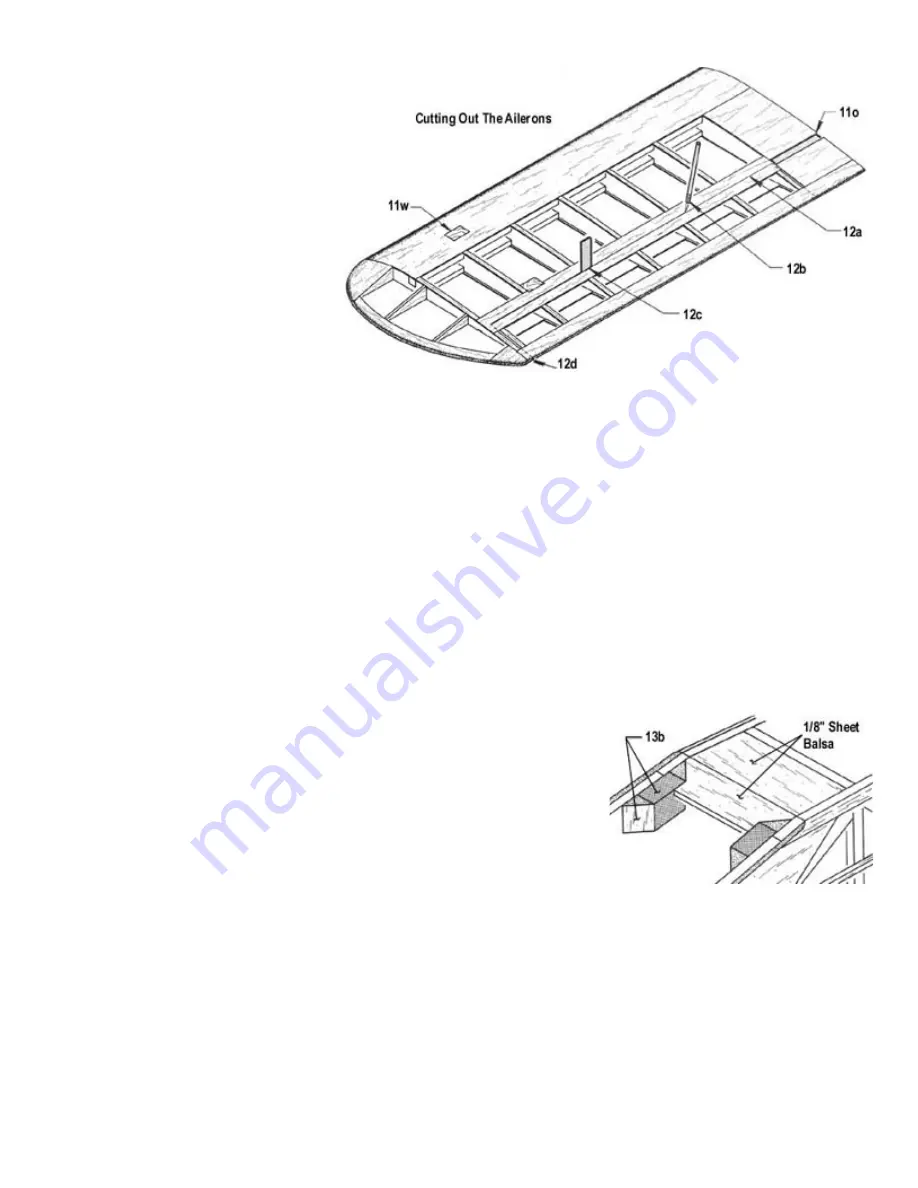
Remove the blade from a X-Acto razor
saw by prying apart the crimped metal
backing with a screw driver. Insert the
blade into the slits just cut into the
planking and saw through each of the
ribs of the aileron.
d.
Saw through the trailing edge and
remove the ailerons.
e.
Trim and sand the back of the wing cut
out so the planking is flush with the back
of the rear spar.
f.
Cut thru the ailerons in line with the die
cut slits in the ribs. Use a sanding block
to straighten the front and ends of the
ailerons.
g.
Glue 1/8"x3/4" balsa to the wing opening and to the aileron front as shown on the plan. Trim and sand the pieces to wing
contour.
h.
Cut slots in the aileron leading edges and notch wing ribs WA, WB, WC and WD to accept the torque rods.
i.
Epoxy the hinges into the ailerons. Check the operation of the ailerons by dry fitting them to the wing to make sure there is
no binding before gluing (1) the hinges into the wing, (2) the torque rods into the ailerons, and (3) the brass bearings to the
ribs.
j.
The torque rod bearings should be just below the surface of the wing. Carefully shape the edges of the 1/16" sheeting to
close the gap over the bearing. Glue the sheeting in place and sand to blend smoothly into the wing contour.
13.
Mating The Bottom Wing To The Fuselage
a.
Sand the fuselage wing cutout to match exactly the contour of the wing. The wing leading edge should fit tightly against Fll.
Hold the bottom wing firmly in place, and check the alignment with the top wing and fuselage. Look from the front and top
views. Measure to see that the distance between the tips of the wings is the same on both sides. If not, sand the wing
saddle on the appropriate side until the bottom wing will line up correctly.
b.
Glue the hardwood wing bolt blocks to the inside of the fuselage. Brace them with
1/2" triangular balsa. To complete the fuselage around the wing cutout, add the
1/8" sheet balsa bottom between the wing blocks and the main frame.
c.
Place the wing in the fuselage against Fll. Mark and drill a 1/4" hole in the center
of the leading edge so that the dowel to be installed in it will hit the approximate
hole shown in the pattern of Fll. Remove a piece of the wing sheeting large
enough to allow easy access to the dowel area. Save the piece so that it can be
glued back on after installation and reinforcement of the dowel.
d.
Push the 1/4"x1-1/4" dowel into the hole until only about 1/16" protrudes. (Note: This is temporary for checking purposes
only. When finally glued in place the dowel should stick out about 1/4".) Hold the wing in place and mark the spot where
the end of the dowel hits Fll. Remove the wing and drill a 1/4" diameter hole in Fll at the marked spot.
e.
Put the wing back on. It is probable that the dowel alignment with the hole isn't perfect. Enlarge the dowel hole in the wing
as required so that the wing will fit snugly against the fuselage. Plug the enlargement with scrap slivers. Epoxy the dowel
into the wing with about 1/4" protruding from the leading edge. Before the epoxy sets up, hold the wing in place on the
fuselage, with the dowel sticking into Fll. Be careful not to let the glue ooze out of the dowel hole into Fll. Use only a small
amount of glue since it can be glued additionally once the alignment is set. When the epoxy sets up, remove the wing and
surround the dowel inside with scrap balsa, bracing it against the bottom sheeting. Replace the top sheeting that was
removed to provide access to the dowel area.


