


❑
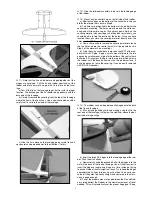
11) Note that the fin and rudder are hinged together, but the
hinges are not glued. Pull the fin and rudder apart and set the
rudder aside for now, while we glue the fin in place on the fuse-
lage.
a) Test fit the fin on the fuselage to get familiar with its proper
location. The back edge of the fin should line up perfectly with the
back end of the fuselage.
b) Carefully remove the covering from the top of the fuselage
where the front of the fin will set. Use a new sharp blade and be
careful not to cut into the wood of the fuselage.
c) Glue the fin in place on the fuselage, being careful to line it
up squarely and perpendicular to the stabilizer. Let dry.
❑
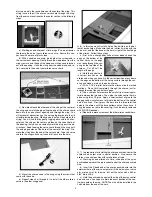
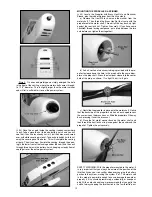
12) Glue the tailwheel assembly in place in the leading edge
of the rudder.
❑
13) Mount a nylon control horn on the left side of the rudder.
a) Shorten the pegs on the bottom of the control horn like you
did for the elevator horn back in Step 8.
b) Two holes are pre-drilled in the bottom of the rudder for the
control horn mounting. The holes are underneath the white cov-
ering and a little hard to see, but if you press down firmly on the
covering material with your finger, and then look very closely, you
should be able to find the location of the holes. Once you have
located them, puncture the covering material directly over the
holes, on the LEFT side of the rudder only.
c) Use a sharp knife to remove the covering material around
the two holes, where the control horn will sit (see photo back in
Step 9 of the elevator horn mounting).
d) Glue the nylon control horn in place on the LEFT of the rud-
der with thick CA glue. Apply a small amount of glue to the two
pegs and a small amount of glue to the bottom of the control horn
base itself. Firmly press the horn into the two pre-drilled holes in
the rudder, until the base bottoms out on the rudder surface. If
any glue oozes out onto the covering, it can be easily removed
with SIG CA Debonder.
❑
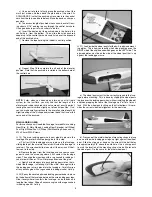
14) The rudder can now be permanently hinged onto the back
of the fin and fuselage.
a) Start by taking a hobby knife and making a single slit in the
rear end of the fuselage, just below the stabilizer, where the bot-
tom rudder hinge will go.
b) Insert the three CA hinges into the leading edge of the rud-
der. Push them in halfway.
c) Now carefully slide the exposed half of the hinges into the
slots in the back of the fin and fuselage. You will find it easiest to
insert the hinges at angle, one hinge at a time, instead of trying
to push all three of them straight in at once. Try to keep the hinges
approximately halfway into each part, but don't be overly con-
cerned if they aren't perfectly straight and centered in the slots -
close is good enough.
d) To set the proper amount of gap between the Fin and Rud-
der, simply deflect the Rudder to the maximum amount of travel
needed. This will automatically set the proper hinge gap! Keep
7