


c) Remove the wheel pants from the axles. Drill .046” dia.
(3/46” or #56 bit) pilot holes completely through the wheel pant
wall and the plywood pad inside, at the marks just made.
❑
22) Assemble the wheel pants and wheels simultaneously onto
their axles, using the M2 x 5.5mm screws provided.
MOUNTING THE MOTOR & SPEED CONTROL
For this section you will need the Fuselage, the Brushless Electric
Motor, the Speed Controller (ESC), (3) M2 x 6mm PWA Screws,
and a portion of the “Hook-&-Loop Tape” (Velcro®).
❑
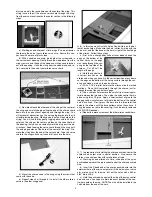
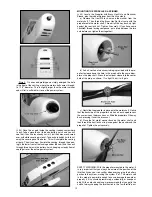
23) Prepare the motor shaft to accept the propeller. In the
small parts bag that came with the Motor and ESC, locate the (2)
M3 Lock Nuts and (1) M3 Flat Metal Washer. Thread one of the
lock nuts onto the motor shaft in reverse direction - plastic insert
first, leaving the hex end pointing forward. Thread this nut all the
way onto the shaft until you run out of threads, as shown. After
that, slip the flat washer onto the motor shaft, and then screw the
remaining lock nut onto the end of the shaft - with it’s hex end
going on first. The propeller will be put on later. The other hard-
ware in the small parts bag is not needed for this installation.
❑
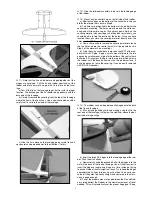
24) There are two small set screws holding the motor mount
on the back of the motor shaft. Use a 1.5mm hex wrench or ball-
driver to loosen the two set screws far enough to allow you to pull
the mount off of the shaft.
❑
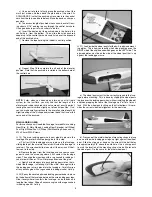
25) Using (3) M2 x 6 mm PWA Screws, mount the aluminum
motor mount to the firewall.
a) First mark the locations for the three mounting screws on
the face of the firewall. Notice that there is a 5/16” dia. hole in the
firewall, which marks the proper thrust line for the motor. Note
that there is also a larger circle etched into the firewall, centered
on the 5/16” hole. The etching represents the outer diameter of
the supplied motor mount. Hole the motor mount in proper loca-
tion on the firewall and mark the screws positions with a pencil.
b) Drill .046” dia. (3/46” or #56 bit) pilot holes completely
through the firewall at the marks just made.
c) Screw the motor mount to the firewall with the three M2 x 6
mm PWA Screws. After running the three screws fully in place
10