


5
b) Drill a 1/8” dia. hole completely through the fuselage right
behind each of the two motor mounting lugs.
c) Scuff up the outside of the brass extension tubes with
medium sandpaper to improve glue adhesion. Then glue
the extension tubes into the holes in the fuselage.
d) Connect the tank’s top and bottom vents to the extension
tubes with a heat-proof silocone fuel line tubing (
not supplied
).
Now that the engine and fuel tank installations are finished, it’s
best to temporarily remove them while you work on the rest of the
airplane. Be sure to fuel proof any exposed wood in the engine
and tank area with Thin CA glue or fuel proof paint.
INSTALL THE WING
The first thing we need is to properly identify the top and bottom
of the wing so that we know which way it goes in the fuselage.
Note that the top of the wing is perfectly smooth with no openings.
Note that the bottom of the wing has a hatch for access to the
bellcrank, and that this hatch will be on the inboard (left) side of
the fuselage. Also note that when looking at wing from the top, the
left (inboard) wing is slightly longer than the right (outboard) wing.
And that the left (inboard) wing also has the leadout wires exiting
from the tip.
PROPER ALIGNMENT of the wing to the fuselage is very critical
to the flight performance of the airplane. It is important to take
extra time to get the alignment as perfect as possible. The goal
is to get the fuselage and the wing perpendicular to each other.
Since the wing of the Primary Force has a triple taper and is
offset from center, verifying the alignment by measuring is not a
simple matter. We will need to create a dependable way to verify
the alignment accurately.
Fortunately, if you look very closely at the surface of the Primary
Force wing you will see that the front edge of the trailing edge
sheeting, where it meets the cap strips over the ribs, is straight
from tip to tip. We can use this line to measure our 90
O
angle.
❑
11) On the top of the wing count out four ribs from center on
each side and make a small mark with a fine tip marking pen
where the trailing edge sheet and the cap strip meet. Then using
a long straightedge, draw a line between these marks as shown.
This gives us a good spanwise reference line.
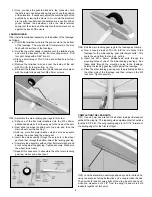
❑
12) Slide the right (outboard) wing into the wing cutout in the
fuselage. Slide it in until the uncovered section at the middle of the
wing is completely under the fuselage. Use a carpenter’s square
or 90
O
triangle to align the wing perpendicular to the fuselage,
using the line you drew in the previous step as the reference.
Double check by using the triangle on both sides of the fuselage.
❑
13) Once you have the wing in position and perfectly aligned,
use a felt-tip pen to mark the exact fuselage location on the
surfaces of the wing. Run the pen tight against the side of the
fuselage, from the leading edge of the wing all the way to the
trailing edge. Mark both sides of the fuselage on both the top and
bottom of the wing. Then remove the wing for the next step.