background image

Mounting and Commissioning

3.4 Final Preparation of the Device

SIPROTEC, 7SC805, Manual

C53000-G1140-C380-1, Release date 05.2014

105

3.4

Final Preparation of the Device 

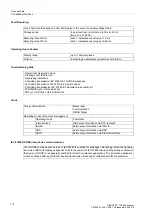
The used terminal screws must be tightened, including all screws that are not used. All plug connectors must 
be inserted correctly.

Caution!

Do not use force!


The permissible tightening torques must not be exceeded as otherwise the threads and terminal chambers may 
be damaged! 

The setting values should be checked again if they were changed during the tests.

 Check in particular 

whether all control and auxiliary functions in the configuration parameters are set correctly (Section 2.1.1, Func-
tional Scope) and that all desired functions have been set to 

ON

. Make sure that a backup copy of all setting 

values is stored on the PC.

Check the internal clock of the device. If necessary, set the clock or synchronize the clock if it is not synchro-
nized automatically. Further details on this subject are described in /1/.

The indication buffers are deleted under 

Main Menu


Annunciations


Set/Reset

 so that they only contain 

information on actual events and states in the future. The counters of the switching statistics should be reset 
to the values prior to the testing.

The counters of the operational measured values (e.g. operation counter, if available) are reset under 

Main 

Menu


Measurement


Reset

.

Press the 

ESC

 key, several times if necessary, to return to the default display. The default display appears in 

the display (e.g. display of operational measured values).

When you press the 

LED

 key, the displays in the Web Monitor are deleted so that these will only show infor-

mation about real events and states in the future. In this context, any memorized output relays are reset. Press-
ing the 

LED

 key also serves as a test for the LEDs on the front panel, because the routable LEDs should all 

light up when the button is pressed. Any LEDs that are lit after the clearing attempt display actual conditions.

The green „RUN“ LED must light up, whereas the red „ERROR“ LED must not light up. 

Close the protective switches. If test switches are available, then these must be in the operating position.

The device is now ready for operation.

Summary of Contents for SIPROTEC 7SC805

Page 1: ...SIPROTEC Merging Unit 7SC805 V4 50 Manual C53000 G1140 C380 1 Preface Contents Introduction 1 Functions 2 Mounting and Commissioning 3 Technical Data 4 Appendix A Literature Glossary Index ...

Page 2: ...tions We appreciate any suggested improvements We reserve the right to make technical improvements without notice Document version Release 4 00 00 Release date 05 2014 Copyright Copyright Siemens AG 2014 All rights reserved Dissemination or reproduction of this document or evaluation and communication of its contents is not authorized except where ex pressly permitted Violations are liable for dam...

Page 3: ...cilities and personnel of electrical facilities and power plants Applicability of this Manual This manual applies to Merging Unit 7SC805 firmware version V4 50 Indication of Conformity This product complies with the directive of the Council of the European Communities on the approximation of the laws of the Member States relating to electromagnetic compatibility EMC Council Directive 2004 108 EC a...

Page 4: ...port Center provides a 24 hour service Phone 49 180 524 8437 Fax 49 180 524 2471 e mail support ic siemens com Training Courses Enquiries regarding individual training courses should be addressed to our Training Center Siemens AG Siemens Power Academy Humboldt Street 59 90459 Nuremberg Telephone 49 911 433 7415 Fax 49 911 433 5482 Internet www siemens com energy power academy e mail poweracademy i...

Page 5: ...nd according to the degree of danger is illustrated as follows DANGER Danger indicates that death severe personal injury or substantial material damage will result if proper precau tions are not taken WARNING indicates that death severe personal injury or substantial property damage may result if proper precautions are not taken Caution indicates that minor personal injury or property damage may r...

Page 6: ... approved by Siemens The successful and safe operation of the device is dependent on proper handling storage installation opera tion and maintenance When operating an electrical equipment certain parts of the device are inevitably subject to dangerous voltage Severe personal injury or property damage may result if the device is not handled properly Before any connections are made the device must b...

Page 7: ...cter style as parameter names Parameter addresses contain the suffix A in the overview tables if the parameter can only be set in DIGSI via the option Display additional set tings Parameter Options Possible settings of text parameters which may appear word for word in the display of the device or on the screen of a personal computer with operation software DIGSI are additionally written in italics...

Page 8: ...Preface SIPROTEC 7SC805 Manual C53000 G1140 C380 1 Release date 05 2014 8 ...

Page 9: ...ystem Data 1 23 2 1 2 1 Description 23 2 1 2 2 Setting Notes 23 2 1 2 3 Settings 25 2 1 3 Oscillographic Fault Records 28 2 1 3 1 Description 28 2 1 3 2 Setting Notes 29 2 1 3 3 Settings 29 2 1 3 4 Information List 29 2 1 4 Power System Data 2 29 2 1 4 1 Description 29 2 1 4 2 Setting Notes 30 2 1 4 3 Settings 30 2 1 4 4 Information List 30 2 1 5 EN100 Module 31 2 1 5 1 Description 31 2 1 5 2 Info...

Page 10: ...ation List 48 2 4 2 Command Types 48 2 4 2 1 Description 48 2 4 3 Command Sequence 49 2 4 3 1 Description 49 2 4 4 Switchgear Interlocking 50 2 4 4 1 Description 50 2 4 5 Command Logging 58 2 4 5 1 Description 58 2 5 Device Operation 60 2 5 1 Web Monitor 60 2 5 2 Operation Panel of the Device 69 3 Mounting and Commissioning 71 3 1 Mounting and Connections 72 3 1 1 Configuration Information 72 3 1 ...

Page 11: ... Communication Interfaces 110 4 1 5 Electrical Tests 111 4 1 6 Mechanical Tests 113 4 1 7 Climatic Stress Tests 114 4 1 8 Service Conditions 114 4 1 9 Constructive Design 115 4 1 10 UL certification conditions 115 4 2 User defined Functions CFC 119 4 3 Additional Functions 116 4 4 Dimensions 125 4 4 1 Merging Unit 7SC805 125 4 4 2 HMI 126 A Appendix 127 A 1 Ordering Information and Accessories 128...

Page 12: ...Contents SIPROTEC 7SC805 Manual C53000 G1140 C380 1 Release date 05 2014 12 A 8 Settins 141 A 9 Information List 144 A 10 Group Alarms 148 Literature 149 Glossary 151 Index 157 ...

Page 13: ...Release date 05 2014 13 Introduction 1 This chapter introduces the SIPROTEC Merging Unit MU 7SC805 and gives an overview of the device appli cation properties and functions 1 1 Overall Operation 14 1 2 Application Scope 16 1 3 Characteristics 17 ...

Page 14: ...05 supports data exchange via GOOSE telegrams with KEMA cer tificated according to IEC 61850 and primary equipment control command functions via GOOSE The MU device 7SC805 complements the SIPROTEC 5 relays with an IEC 61850 9 2 interfaces for building digital bays or full digital substations Analog Inputs The measuring inputs MI convert the currents and voltages which come from the instrument tran...

Page 15: ...s on the front panel indicate whether the device is ready for operation HMI Interface The HMI interface of the device is used to connect the operation panel The operation panel can be permanent ly attached to the 7SC805 or it can be detached The operation panel contains 32 LEDs for displaying operating states or indications and a 6 line field for displaying operational indications and measured val...

Page 16: ...erlocked non interlocked with or without password request Processing of interlocking conditions for switching e g switchgear interlocking can be established with the aid of integrated user configurable logic functions The service interlocking function allows you to block switching operations which can be triggered for the con figured switching devices via the device Indications and Measured Values...

Page 17: ...d direction check status indication of all binary inputs and out puts easy testing of port F and influencing of information at port F during test operation Replacement of conventional wiring between primary and secondary devices through optical cables Support point to point Using of redundant network technology PRP HSR Use of proven SIPROTEC DIGSI4 technology Easy installation and configuration su...

Page 18: ...Introduction 1 3 Characteristics SIPROTEC 7SC805 Manual C53000 G1140 C380 1 Release date 05 2014 18 ...

Page 19: ...le on the SIPROTEC Device Merging Unit 7SC805 It shows the setting possibilities for the function Information with regard to the determination of setting values as well as formulas if required are also provided 2 1 General 20 2 2 Merging Unit 32 2 3 Additional Functions 40 2 4 Command Processing 47 2 5 Device Operation 60 ...

Page 20: ... choice between several alternatives possible as described below Functions configured as Disabled are not processed in the 7SC805 there are no indications and the associated setting parameters functions limiting values are not available Note Available functions and default settings depend on the ordered variant of the relay see A 1 for details 2 1 1 2 Setting Notes Setting the Functional Scope The...

Page 21: ...ion again via a binary input during the operation Under address 357 SMV Stop you can hide the information SMV Stop which controlls the SMV telegram sending function 2 1 1 3 Settings 2 1 1 4 Information List Addr Parameter Setting Options Default Setting Comments 104 OSC FAULT REC Disabled Enabled Disabled Oscillographic Fault Records 357 SMV Stop Yes No No SMV Stop 369 VT Con Type Conventional Cap...

Page 22: ...larm OUT Error with a summary alarm 160 Alarm Sum Event OUT Alarm Summary Event 177 Fail Battery OUT Failure Battery empty 178 I O Board error OUT I O Board Error 191 Error Offset OUT Error Offset 193 Alarm NO calibr OUT Alarm NO calibration data available 320 Warn Mem Data OUT Warn Limit of Memory Data exceeded 321 Warn Mem Para OUT Warn Limit of Memory Parameter exceeded 322 Warn Mem Oper OUT Wa...

Page 23: ...phase or 3 phase system con figuration These two configurations share some common parameters and also have their own parameters General In DIGSI double click Settings to open the corresponding dialog box In doing so a dialog box with tabs opens under P System Data 1 in which individual parameters can be configured The following descriptions are there fore structured according to these tabs Rated F...

Page 24: ...nt to ensure that the rated secondary current of the current transformer matches the rated current of the device otherwise the device will calculate incorrect primary data At addresses 217 Ignd CT PRIM and 218 Ignd CT SEC information is entered regarding the primary and secondary ampere rating of the current transformers In case of a normal connection starpoint current connected to IN transformer ...

Page 25: ... kVRMS means clipping may occur at 14 14 kVPEAK Primary voltages with magnitude above the clipping limit may sat urate analogue circuits and or digital filters within the instrument transformer resulting in highly inaccurate sampled values Nominal Values of Voltage Transformers VTs Only For 1 phase System Currently 4 channels voltage are supported Every channel has its own configuration Address 57...

Page 26: ...AccuClass 0 2 1 P 0 2 S 1 P 0 5 1 P 0 5 S 1 P 1 1 P 0 2 5 P 0 2 S 5 P 0 5 5 P 0 5 S 5 P 1 5 P 0 2 1 P Voltage Acurrency Class Table 4 Settings For 1 phase Ratio Addr Parameter C Setting Options Default Setting Comments 214 Rated Frequency 50 Hz 60 Hz 50Hz Rated Frequency 352 U4 inverting YES NO No U4 inverting 480 ClipC 1 57 20 Clip Current Limit 481 ClipV 1 11 2 Clip Voltage Limit 482 CurAccuClas...

Page 27: ...ry Current 567 Ch3RatedSecCur 1 A 5 A 1 A Channel3 Rated Second Current 568 Ch4RatedPrimCur 10 50000 A 400 A Channel4 Rated Primary Current 569 Ch4RatedSecCur 1 A 5 A 1 A Channel4 Rated Second Current 570 Ch1RatedPrimVol 0 10 800 00 kV 20 00 kV Channel1 Rated Primary Voltage 571 Ch1RatedSecVol 34 400 V 100 V Channel1 Rated Second Voltage 572 Ch2RatedPrimVol 0 10 800 00 kV 20 00 kV Channel2 Rated P...

Page 28: ...The data of a event record can be read out via the device interface and evaluated with the help of the SIGRA 4 graphic analysis software SIGRA 4 graphically represents the data recorded during the event and also cal culates additional information from the measured values Currents and voltages can be presented either as primary or as secondary values Signals are additionally recorded as binary trac...

Page 29: ...fault recording is set in address 406 BinIn CAPT TIME but not longer than MAX LENGTH address 403 Pre fault and post fault times will add to this If the binary input time is set to the length of the record equals the time that the binary input is activated static but not longer than the MAX LENGTH address 403 2 1 3 3 Settings 2 1 3 4 Information List 2 1 4 Power System Data 2 2 1 4 1 Description Th...

Page 30: ...fault settings 2 1 4 4 Information List Addr Parameter C Setting Options Default Setting Comments 1101 FullScaleVolt 0 10 800 00 kV 20 00 kV Measurem FullScaleVolt age Equipm rating 1102 FullScaleCurr 10 50000 A 400 A Measurem FullScaleCur rent Equipm rating No Information Type of Information Comments 356 Manual Close SP Manual close signal 420 Opened Ctrl 2 SP Opened Control device 2 421 Opened C...

Page 31: ... MU therefore provides for open and interoperable operation Parallel to the process control integration of the device this interface can also be used for communication with DIGSI and for inter relay com munication via GOOSE The GOOSE function can be disabled in a device parameter For more information please refer to Section 2 1 1 2 You can use an optical EN100 Module with 2 Ethernet ports for IEC ...

Page 32: ... currents and voltages in IEC61850 9 2 telegram ac cording to IEC61869 9 modi F4000S1I4U4 F4000S2I4U4 F4800S1I4U4 F4800S2I4U4 and distribute tele grams via 2 optical Ethernet Interfaces The device supports the following main functions Acquisition and merging multi channel data Sample Value Synchronization Sample Value Transmission Figure 2 2 Basic Design of 7SC805 ...

Page 33: ...e synchronized via a common synchroni zation signal so the synchronization signals sent to different MUs should keep high synchronization accuracy Synchronization signals must be compatible with the international standard IEC61869 SMV synchronization signals such as PPS GPS or IRIG B signal are supervised and stabilized before they are used for synchro nization of the sample value generation The S...

Page 34: ... signal pulses and the IEC61850 9 2 SV is flagged still as synchronized In this situation 7SC805 ensures an appropriate ac curacy of the SVs better than 10 us If time sync signal occurs again during the Holdover Time 7SC805 stops the timer of the Holdover Time If the holdover time is expired SVs will be flagged as not synchronized A reoccurrence of the sync signal pulse will cause a resynchronizat...

Page 35: ...dity shall be also set to invalid This setting can also be used for test purpose The default value for this parameter should be Set By MU At the address 444A Failure Quality this identifier informs that the supervision function has detected an internal or external failure When VT failure happens or the AD converter has problems or when the PPS comes again but before the PPS synchronized after PPS ...

Page 36: ...r is not known For example 1PPS input does not include the local area clock unique identifier and thus the specific local area clock is in general unknown Destination MAC Address With Parameter 486 487 488 489 490 491 you can configure the destination MAC address of the SMV tele grams respectively Application ID in IEC 61850 At address 492 Application ID you can select sample values messages and d...

Page 37: ...y False False Quality bit Inconsistent 447A Inaccu Quality Set By MU True False Set By MU Quality bit Inaccurate Options True and False for test purpose 448A Test Quality Set By MU True False Set By MU Quality bit Test Options True and False for test purpose 449A OpeBloc Quality False False Quality bit Operator Blocked 450A Source Quality Process Process Quality bit Source 451A Valid Quality Set B...

Page 38: ... 1 Release date 05 2014 38 489 DestMac Addr4 0 255 4 DestMACAddr Byte4 490 DestMac Addr5 0 255 0 DestMACAddr Byte5 491 DestMac Addr6 0 255 0 DestMACAddr Byte6 492 Application ID 16384 32767 16384 Application ID Addr Parameter C Setting Options Default Setting Comments ...

Page 39: ...Indication of voltage fuse failure 31011 SMV global sync OUT SMV global synchronized 31013 PPS lost OUT PPS lost 31014 SMV local sync OUT SMV local synchronized 31015 SMV not sync OUT SMV not synchronized 31026 PPS bad quality OUT PPS bad quality 31027 PPS global sync OUT PPS global synchronized 31028 PPS local sync OUT PPS local synchronized 31029 Holdover runs OUT Holdover time runs ...

Page 40: ...ed differently from the delivery condition The Appendix of this manual deals in detail with the delivery condition and the allocation options The output relays and LEDs may be operated in a latched or unlatched mode each may be set individually The latched conditions are protected against loss of the auxiliary voltage They are reset Using the optional operation panel or the Web Monitor by pressing...

Page 41: ... All functions are associated with an information number FNo There is also an indication of where each message can be sent to If functions are not present in a not fully equipped version of the device or are configured to Disabled then the associated indications cannot appear Operational Messages Buffer Event Log The operational messages contain information that the device generates during operati...

Page 42: ...es the device is able to indicate the primary values and percentages of the measured values A precondition correct display of the primary and percentage values is the complete and correct entry of the nominal values for the instrument transformers and the protected equipment as well as current and voltage transformer ratios in the ground paths when configuring the device Measured values which cann...

Page 43: ... indicated in the operational measured values The ground current IN is either measured directly or calculated from the conductor currents Upon delivery the power and operating values are set in such manner that power in line direction is positive Active components in line direction and inductive reactive components in line direction are also positive The Measured values Secondary Primary IA IB IC ...

Page 44: ...tion List Protocol Transmittable measuring range format IEC 61850 The primary operational measured values are transmitted The measured values as well as their unit format are set out in detail in the PIXIT docu ment of the 7SC805 device The measured values are transmitted in Float format The transmittable measuring range is not limited and corresponds to that of the operational measurement No Info...

Page 45: ...rrectly interpreted as resulting from an actual fault Moreover a transmission block can be set during the test so that no messages are transferred to the control center This can be accomplished via binary inputs or using DIGSI via the USB interface The SIPROTEC 4 System Description 1 states in detail how to activate and deactivate test mode and blocked data transmission Testing the Connection to a...

Page 46: ...OFF After entering password no 6 for hardware test menus the corresponding indica tion is issued and can be read out in the event log of the 7SC805 and in the substation control center The procedure is described in detail in Chapter Mounting and Commissioning Creating Oscillographic Recordings for Tests During commissioning energization sequences should be carried out to check the analog data Osci...

Page 47: ...lso be controlled via the Web Monitor or via a connection to the substation control system Applications Switchgear with single and double busbars Prerequisites The number of switchgear devices to be controlled is limited by the existing binary inputs existing binary outputs 2 4 1 1 Description Operation via the Optional Operation Panel of the Web Monitor The Web Monitor features two buttons below ...

Page 48: ... operate binary outputs They serve to initiate internal functions simulate changes of state or to acknowledge changes of state Manual overriding commands to manually update information on process dependent objects such as an nunciations and switching states e g if the communication with the process is interrupted Manually over ridden objects are flagged as such in the information status and can be...

Page 49: ...g centrally using SCADA system or substation controller Double Operation interlocking against parallel switching operation Fixed Command Checks Internal Process Time software watch dog which checks the time for processing the control action between initiation of the control and final close of the relay contact Setting Modification in Process if setting modification is in process commands are denie...

Page 50: ...he configurable command checks in the SIPROTEC 4 devices are also called standard interlocking These checks can be activated via DIGSI interlocked switching tagging or deactivated non interlocked Deactivated interlock switching means the configured interlocking conditions are not checked in the relay Interlocked switching means that all configured interlocking conditions are checked within the com...

Page 51: ...mmand is transmitted to the central unit with Switching Authority LOCAL A switching device that is subject to system interlocking cannot be switched by DIGSI Zone Controlled Bay Interlocking Logic links in the device which were created via CFC are interrogated and considered during interlocked switching Double Operation Block Parallel switching operations are interlocked against one another while ...

Page 52: ...ndard interlockings Note The merging unit 7SC805 additionally features a service interlocking function for blocking switching commands for selected switches For more details see the following margin heading Service Interlocking The following figure shows the configuration of the interlocking conditions using DIGSI ...

Page 53: ...are marked by letters explained in the following table Table 2 2 Command types and corresponding messages Control Logic using CFC For bay interlocking a release logic can be created using CFC Via specific release conditions the information released or bay interlocked are available e g object Close and Open with the data values ON OFF Interlocking Commands Abbrev Display Switching Authority L L Sys...

Page 54: ...to the current status set in the objects Switching authority and Switching authority DIGSI Configuration Table 2 3 Interlocking Logic 1 also Enabled for Switching Authority LOCAL check for LOCAL status n 2 also Enabled for Switching authority REMOTE check for LOCAL REMOTE or DIGSI commands n 3 CS command source CS Auto Commands that are initiated internally command processing in the CFC are not su...

Page 55: ...tion of the state of other mechanical interlocking in the switchgear bay e g High Voltage compartment doors Interlocking conditions can be programmed separately for each switching device for device control CLOSE and or OPEN The enable information with the data switching device is interlocked OFF NV FLT or enabled ON can be set up directly using a single point or double point indication key switch ...

Page 56: ...for unlocking Unlocking applies for one switching operation only and only for com mands caused by the same source Job order command to object Switching mode REMOTE ON Job order switching command to switching device Derived commands via CFC automatic command CS Auto SICAM Behavior configured in the CFC block BOOL to command Service Interlocking The service interlocking function allows you to block ...

Page 57: ...put You can connect the signals and indications in the routing matrix as desired for example to the LEDs of the operation panel or for transmitting or receiving data over the system interface The following figure shows an example for routing the information Figure 2 7 Service Interlocking Example for Routing to LEDs The service interlocking indications are logged in the operational log ...

Page 58: ... the command types required for tripping and closing of switching devices or for raising and lowering transformer taps are described in the SIPROTEC 4 System Description 2 4 5 1 Description Acknowledgment of Commands to the Device Front All indications with the source of command LOCAL are transformed into a corresponding response and shown in the text field of the Web Monitor Acknowledgment of Com...

Page 59: ...ears and the process is terminated Commands and information feedback are also recorded in the event list Normally the execution of a command is terminated as soon as the feedback information FB of the relevant switchgear arrives or in case of com mands without process feedback information the command output resets and a message is output The plus sign appearing in a feedback information confirms t...

Page 60: ... consists of HTML pages and a Java web start applica tion which are stored in the 7SC805 It forms an integral part of the firmware and does not have to be installed separately To run the Web Monitor the operator PC must be connected to the merging unit 7SC805 via the Ethernet in terface If you want to use the USB interface a data communication connection is required Information on con figuring the...

Page 61: ...h between device operation and control display and to display indications and mea sured values Control and display panel The Information display field shows device information connection states and access rights Via the menu bar you can select all logs and measured values displayed in the navigation tree The menu item Options is used for diagnostic purposes and can be activated by Siemens experts ...

Page 62: ...s When this key is not pressed the function keys work as labeled When this key is pressed the function keys can be used to enter digits The key with the LED icon resets the displays of the LEDs The LOCK PB key locks or unlocks the other keys To do so hold the key down for a short moment The assignment and labeling of the LEDs and function keys corresponds to the allocation made with DIGSI For furt...

Page 63: ...Functions 2 5 Device Operation SIPROTEC 7SC805 Manual C53000 G1140 C380 1 Release date 05 2014 63 Figure 2 9 Web Monitor Control Display ...

Page 64: ...e following The following editing options are available for the displayed content of the selected log Saving via Save The indications are saved in a text file from the selection time of a page on The file name must have the ending TXT If you save another page of the list this page is saved beginning at the selection time Examples of the displaying of a text file can be found in the following Secti...

Page 65: ...Functions 2 5 Device Operation SIPROTEC 7SC805 Manual C53000 G1140 C380 1 Release date 05 2014 65 Figure 2 10 Web Monitor Operational Indications ...

Page 66: ...se date 05 2014 66 Figure 2 11 Web Monitor Fault Indication The Fault Records overview shows all active fault records Click the VIEW key to open the fault record in the SIGRA evaluation program SIGRA must be installed on your system This program is not included in the Web Monitor ...

Page 67: ...dary values Measured values of the secondary side Percent values Percentage indication of the values referred to the nominal values Min max values Minimum and maximum values Count values Limit values The list selected in the navigation tree is shown in the display area Some examples are given in the following Further information on the type and content of the measurement logs can be found in the S...

Page 68: ...1140 C380 1 Release date 05 2014 68 Use the keys Next and Previous to page forward and back Figure 2 13 Web Monitor Primary Measured Values Logging The following screenshot is an example of a measurement log saved as text file The event logs have a similar layout ...

Page 69: ...ation Panel of the Device The merging unit 7SC805 is available with or without operation panel The operation panel can be permanently attached to the 7SC805 or it can be detached All functions described in the previous Web Monitor section can also be executed via the operation panel The Web Monitor is a complete emulation of the device display ...

Page 70: ...Functions 2 5 Device Operation SIPROTEC 7SC805 Manual C53000 G1140 C380 1 Release date 05 2014 70 ...

Page 71: ...ioning of control systems with power systems management and with the relevant safety rules and guidelines Under certain circumstances it may become necessary to adapt parts of the power system hardware Some of the primary tests require the protected line or equipment to carry load 3 1 Mounting and Connections 72 3 2 Checking Connections 89 3 3 Commissioning 94 3 4 Final Preparation of the Device 1...

Page 72: ...tions must be met The rated device data have been checked as recommended in the SIPROTEC 4 System Description 1 It has been verified that these data comply with the power system data General Diagrams Block diagrams for the terminal assignment of the 7SC805 are shown in Appendix A 2 Connection examples for the current and voltage transformer circuits are provided in Appendix A 3 Voltage Connection ...

Page 73: ...e state of the battery Figure 3 1 Battery compartment Replacing the Battery Replace the battery only with a model of the same type Lithium battery CR2032 3 V and 230 mAh Withdraw the battery compartment Remove the battery Insert the new battery in the battery compartment the positive pole facing upward Slide in the battery compartment again Caution Take care during the replacement and the disposal...

Page 74: ...l terminal blocks must be plugged in Caution Mind electrostatic discharges Failure to observe these precautions can result in personal injury or material damage Any electrostatic discharges while working at the electronics block are to be avoided We recommend ESD pro tective equipment grounding strap conductive grounded shoes ESD suitable clothing etc Alternatively an electrostatic charge is to be...

Page 75: ...Connections SIPROTEC 7SC805 Manual C53000 G1140 C380 1 Release date 05 2014 75 Unscrew all screws with which the cover is fixed to the device Remove the protective cap of the GPS antenna if any Now carefully remove the housing Figure 3 2 Housing ...

Page 76: ... technical data into the fuse holder 5 mm x 20 mm 0 20 0 79 in safety fuse T characteristic Rated current 2 0 A for F200 250 V nominal voltage Switching capability 1500 VA 300 VDC Only UL approved fuses may be used The data for F200 apply to all device types 24 V 48 V and 60 V to 250 V Make sure that the defective fuse has not left any obvious damage on the device If the fuse trips again after rec...

Page 77: ...ver When connecting single cables the following cross sections are allowed Note When using current terminals the mounting brackets must be used in the outmost setting to observe the stip ulated bending radius Note In the connection diagrams in the Appendix terminal connection 1 of the current terminal corresponds to pin number 72 Further information with regard to the current terminals can be foun...

Page 78: ...rface mounting Compared to cabinet surface mounting the terminal can be mounted rotated by 180 giving easier access to the terminal screws The ordering data is specified in Appendix A1 Solid conductors as well as stranded conductors with or without conductor sleeves can be used as single cables Siemens recommends using twin cable end sleeves when connecting two single cables Mechanical Requirement...

Page 79: ...refully remove the mainboard Now unscrew the screws with which the communication module or GPS module is fixed Pay attention to any plug connectors when removing the module Figure 3 6 Module fixing Only use original spare parts to replace the modules If you have replaced an optical EN100 module subse quently fasten it with a cable tie 203 mm x 2 5 mm 3 1 2 5 Reassembly For assembly perform the ste...

Page 80: ...nections SIPROTEC 7SC805 Manual C53000 G1140 C380 1 Release date 05 2014 80 3 1 3 Installation 3 1 3 1 General To install the 7SC805 device in a rack or cabinet the two mounting brackets included in the delivery are re quired Figure 3 7 Device view ...

Page 81: ...on of the cable used must correspond to the maximum connected cross section but must be at least 2 5 mm2 tEstablish the connections according to the circuit diagram via the screwed connections The details on the connection technique for the communication modules in accordance with the SIPROTEC 4 System Descrip tion 1 and the details on the connection technique for the current and voltage terminals...

Page 82: ...ine Interface Optional You can operate the 7SC805 device using the Web Monitor or directly via the optional HMI You can mount the HMI either directly on the 7SC805 or detached and connected via cable Figure 3 8 Variant with attached HMIl Note If the HMI is attached directly on the 7SC805 remove the hexagonal bolts at the D SUB socket of the HMI ...

Page 83: ...Mounting and Commissioning 3 1 Mounting and Connections SIPROTEC 7SC805 Manual C53000 G1140 C380 1 Release date 05 2014 83 Figure 3 9 Panel Cutout for Variant with Attached HMI ...

Page 84: ...ning 3 1 Mounting and Connections SIPROTEC 7SC805 Manual C53000 G1140 C380 1 Release date 05 2014 84 Figure 3 10 Panel Cutout with Adhesive Sealing Glue the 2 parts of the flat gasket aligned from behind on the panel cut out ...

Page 85: ...PROTEC 7SC805 Manual C53000 G1140 C380 1 Release date 05 2014 85 Figure 3 11 Variant with Detached HMI Note You can connect or remove the HMI during device operation hot pluggable Note If you connect the HMI to the device via cable use the USB port of the HMI ...

Page 86: ...Mounting and Commissioning 3 1 Mounting and Connections SIPROTEC 7SC805 Manual C53000 G1140 C380 1 Release date 05 2014 86 Figure 3 12 Panel Cutout for Variant with Detached HMI ...

Page 87: ...Mounting and Commissioning 3 1 Mounting and Connections SIPROTEC 7SC805 Manual C53000 G1140 C380 1 Release date 05 2014 87 Figure 3 13 Panel Cutout with Adhesive Sealing ...

Page 88: ...8 Figure 3 14 Panel with Detached HMI Attaching the HMI at the device at the front side of the frame or at the mounting plate Figure 3 15 Connection Cable between 7SC805 and Detached HMI Screw M4 Length 10 mm attached HMI longer screws are permitted only with detached HMI Permissible tightening torque at the screw 0 6 Nm ...

Page 89: ...ions of the Interfaces Pin Assignment The following tables show the pin assignment of the various interfaces The position of the connections can be seen in the following figures Figure 3 16 9 pin D sub socket HMI Figure 3 17 USB interface Figure 3 18 Ethernet EN100 O MM Figure 3 19 SMB socket SubMiniature B for connecting a GPS Antenna Figure 3 20 ST Connector for PPS IRIG B ...

Page 90: ... of the HMI In this case the maximum length of your USB connecting cable is 2 m GPS Interface Via the SMB socket you can connect an active GPS antenna 5 V max 50 mA such as Trimble Bullet III GPS antenna If no GPS interface is available there is a cover instead If you have connected the device to the PC via Ethernet you will receive status information regarding GPS re ception via the EN100 Web pag...

Page 91: ...hat the time management issues the operational indication Clock SyncError ON although the time was correct before This might be caused by one of the following conditions The GPS module does not have enough satellites in view and is therefore not able to determine the correct time The cyclic synchronization can be absent for up to 10 minutes before the time is considered faulted As soon as a valid ...

Page 92: ...e for the 7SC805 must be available exclusively Parallel connections such as for example CAPDIS are not permissible In the case of a voltage measurement via bushing capacitances the value of the individual capacitances C1 and C2 for the 3 phases must be known approximately also see Section 2 1 2 2 Capacitive Voltage Mea surement These capacitance values are configured via the parameter addresses 24...

Page 93: ...m the power supply by opening the protective switches Disconnect the measuring test equipment restore the normal power supply connections Apply voltage to the power supply Close the protective switches for the voltage transformers Verify that the voltage phase rotation at the device terminals is correct Open the protective switches for the voltage transformers and the power supply Check the trip a...

Page 94: ...he device with secondary test equipment make sure that no other measurement quantities are connected and that the trip and close circuits to the circuit breakers and other primary switches are disconnect ed from the device DANGER Hazardous voltages during interruptions in secondary circuits of current transformers Non observance of the following measure will result in death severe personal injury ...

Page 95: ...gs in the DIGSI4 menu Power System Data 1 SMV settings are parameters 0455A 0456A and 0457A for optional data fields which can be added to the IEC61850 9 2 SV telegrams Parameter 0454A con trols transmission of 1 or 2 ASDUs in the ADPU of IEC61850 9 2 SV telegrams The Configuration of these features considers the IEC61850 9 2 Ed2 allowances and depends on the capability of the SV subscriber After ...

Page 96: ...he messages to be recognized as not resulting from actual faults Furthermore it can be determined by activating the transmission block that no annunciations are transmitted via the system interface during test mode The SIPROTEC 4 System Manual 1 describes in detail how to activate and deactivate the test mode and blocked data transmission Please note that when DIGSI is being used for device editin...

Page 97: ... dialog box Creating messages example Changing the Operating State When clicking one of the buttons in the column Action for the first time you will be prompted for the password no 6 for hardware test menus After correct entry of the password individual annunciations can be initiated To do so click on the button Send on the corresponding line The corresponding message is issued and can be read out...

Page 98: ...ether the reaction is correct 3 3 4 Communication Module Configuration Required Settings in DIGSI 4 and DIGSI Manager In order that the device can access the new communication module a change has to be made in the parameter set within the DIGSI Manager In DIGSI 4 Manager select the SIPROTEC device in your project and select the menu item Edit Object properties to open the Properties SIPROTEC 4 Dev...

Page 99: ...all annunciation buffers are erased If re quired these buffers should be read out with DIGSI and saved prior to the test The hardware test can be carried out using DIGSI in the Online operating mode Open the Online directory by double clicking the operating functions for the device appear Click on Test the function selection appears in the right half of the screen Double click in the list view on ...

Page 100: ...Each individual output relay can be energized allowing to check the wiring between the output relay of the 7SC805 and the system without having to generate the message that is assigned to the relay As soon as the first status change for any one of the output relays is initiated all output relays are separated from the internal device functions and can only be operated by the hardware test function...

Page 101: ...put is triggered and the password No 6 has been entered all binary inputs are separated from the plant and can only be activated via the hardware test function Test of the LEDS if HMI is available The LEDs may be tested in a similar manner to the other input output components As soon as the first state change of any LED has been triggered all LEDs are separated from the internal device functionali...

Page 102: ...e measured values are not plausible the connection must be checked and corrected after the line has been isolated and the current transformer circuits have been short circuited The measurements must then be re peated Note If the voltage measurement is carried out via feed through capacitances the display of the values of the phase to ground voltages and phase angle between the phase to ground volt...

Page 103: ...ease note that non interlocked switching can be a safety hazard Control by Protective Functions For OPEN commands sent to the circuit breaker please take into consideration that if the internal or external automatic reclosure function is used a TRIP CLOSE test cycle is initiated DANGER A test cycle successfully started by the automatic reclosure function can lead to the closing of the circuit brea...

Page 104: ...t is energized An oscillographic recording that is externally triggered that is without a protective element pickup or device trip is processed by the device as a normal oscillographic recording and has a number for establishing a se quence However these recordings are not displayed in the fault indication buffer as they are not fault events Starting Test Fault Recording In order to start a test f...

Page 105: ...ation buffers are deleted under Main Menu Annunciations Set Reset so that they only contain information on actual events and states in the future The counters of the switching statistics should be reset to the values prior to the testing The counters of the operational measured values e g operation counter if available are reset under Main Menu Measurement Reset Press the ESC key several times if ...

Page 106: ...Mounting and Commissioning 3 4 Final Preparation of the Device SIPROTEC 7SC805 Manual C53000 G1140 C380 1 Release date 05 2014 106 ...

Page 107: ... and its individual functions includ ing the limit values that may not be exceeded under any circumstances The electrical and functional data for the maximum functional scope are followed by the mechanical specifications with dimensioned drawings 4 1 General Device Data 108 4 2 Additional Functions 116 4 3 User defined Functions CFC 125 4 4 Dimensions 125 ...

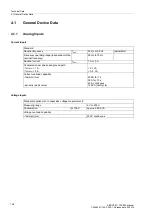
Page 108: ...ge independent of the nominal frequency 25 Hz to 70 Hz Nominal current INom 1 A or 5 A Consumption per phase and ground path for INom 1 A for INom 5 A 0 1 VA 0 5 VA Current overload capability thermal rms dynamic peak value 500 A for 1 s 50 A for 10 s 20 A continuous 1250 A half cycle Standard applies also to capacitive voltage measurement Measuring range 0 V to 250 V Consumption at 100 V approx 0...

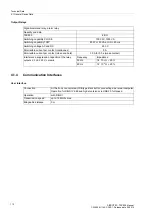
Page 109: ...rnating voltage VPS AC 115 V AC 230 V Permissible voltage ranges AC 92 V to 132 V AC 184 V to 265 V Overvoltage category IEC 60255 27 III Power consumption for AC 115 V 230 V 15 VA Bridging time for failure short circuit 100 ms Variant Quantity 7SC805 12 routable Range of rated direct voltage DC 0 V to 300 V Current consumption energized independent of oper ating voltage approx 0 4 mA Pickup time ...

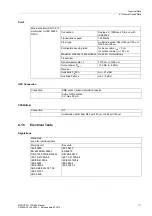
Page 110: ...witching voltage AC and DC 250 V Permissible current per contact continuous 5 A Permissible current per contact close and hold 30 A for 0 5 s make contact Interference suppression capacitor at the relay outputs 2 2 nF 250 V ceramic Frequency Impedance 50 Hz 1 4 106 20 60 Hz 1 2 106 20 Connection At the front non isolated USB type B socket for connecting a personal computer Operation for DIGSI V4 8...

Page 111: ...in 20 cm Maximum distance of transmission max 2 km for multimode Transmitter Optical wavelength c 1270 nm to 1360 nm Output power POUT 15 dBm to 8 dBm Receiver Sensitivity PINMin min 31 dBm Overload PINMax max 8 dBm Connection SMB socket subminiature B at device Active GPS antenna 5 V max 50 mA Connection ST multimode optical fiber G50 m 125 m G62 5 m 125 m Standards see also individual tests Merg...

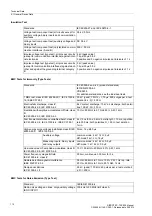
Page 112: ...EE C37 90 1 2 5 kV peak 1 MHz 15 µs 400 surges per s test duration 2 s Ri 200 Electrostatic discharge class IV IEC 60255 22 2 IEC 61000 4 2 8 kV contact discharge 15 kV air discharge both polari ties 150 pF Ri 330 Irradiation with amplitude modulated HF field class III IEC 60255 22 3 IEC 61000 4 3 10 V m 80 MHz to 2 7 GHz 80 AM 1 kHz Fast transient disturbance variables burst class IV IEC 60255 22...

Page 113: ...usoidal acceleration 15 g duration 11 ms 3 shocks each in both directions of the 3 orthogonal axes Seismic vibration IEC 60255 21 3 class 1 IEC 60068 3 3 sinusoidal 1 Hz to 8 Hz 8 0 mm amplitude horizontal axis 1 Hz to 8 Hz 4 0 mm amplitude vertical axis 8 Hz to 35 Hz 2 g acceleration horizontal axis 8 Hz to 35 Hz 1 g acceleration vertical axis frequency sweep rate 1 octave min 1 cycle in 3 orthog...

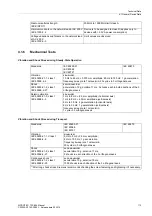
Page 114: ...the devices in a place where they are not exposed to direct sunlight or great temperature variations that could lead to condensation If condensation is anticipated the control cabinet into which the 7SC805 is installed must be equipped with a cabinet heating The device is designed for installation in standard relay rooms and compartments so that the electromagnetic compatibility EMC is ensured whe...

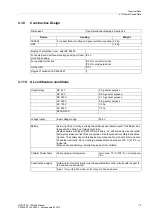
Page 115: ...C 120 V 1 3 hp AC 250 V 1 2 hp B300 R300 Voltage inputs Input voltage range 300 V Battery Servicing of the circuitry involving the batteries and replacement of the lithium bat teries shall be done by a trained technician Replace battery with type CR2032 lithium battery 3 V 230 mAh only Use of another battery may present a risk of fire or explosion See the manual for safety instructions Caution The...

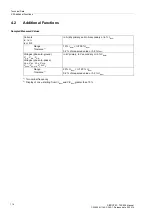
Page 116: ...ng from I INom and V VNom greater than 10 Currents IA IB IC IN or 3I0 in A kA primary and in A secondary or in INom Range Tolerance1 10 INorm I 200 INom 0 2 of measured value or 0 2 INom Voltages phase to ground VA N VB N VC N Voltages phase to phase VA B VB C VC A VSYN Vdelta Vph gnd Vx or V0 in kV primary in V secondary or in VNorm Range Tolerance1 20 UNom I 120 UNom 0 2 of measured value or 0 2...

Page 117: ...d value or 0 5 VNom S apparent power in kVAr MVUAR or GVAR primary and in of SNom Range Tolerance1 0 to 120 SNom 1 5 of SNom for V VNom and I INom 50 to 120 P active power with sign total and phase segregated in kW MW or GW primary and in SNom Range Tolerance1 0 to 120 SNom 2 of SNom for V VNom and I INom 50 to 120 and cos 0 707 to 1 with SNom 3 VNom INom Q reactive power with sign total and phase...

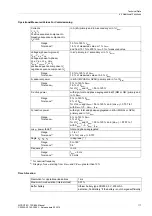
Page 118: ...essages Controlling transmission IEC 61850 9 2 Sample values Controlling transmisssion IEC 61850 9 2 Sample values quality bit PPS IRIG B signal status indication SMV synchronization status indications Time synchronization Binary input Communication IRIG B Signal Operating modes of the clock management Operating mode Comments Internal Clock Internal synchronization via RTC default IRIG B External ...

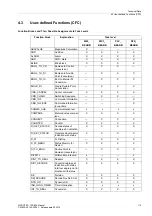
Page 119: ... X X X X CMD_CHAIN Switching Sequence X X CMD_INF Command Information X CMD_INF_EXE Command information in real time X COMMS_CHK Communication test x x x x COMPARE Metered value compar ison X X X X CONNECT Connection X X X COUNTER Counter X X X X DI_GET_STATUS Decode status of double point indication X X X X DI_SET_STATUS Generate double point indication with status X X X X D_FF D Flipflop X X X D...

Page 120: ...INT Adaptor X X X X REAL_TO_INT Conversion X X X X REAL_TO_UINT Conversion X X X X RISE_DETECT Edge detector X X X X RS_FF RS Flipflop X X X RS_FF_MEMO RS Flipflop with status memory X X X SQUARE_ROOT Root Extractor X X X X SR_FF SR Flipflop X X X SR_FF_MEMO SR Flipflop with status memory X X X ST_AND AND gate with status X X X X ST_NOT Inverter with status X X X X ST_OR OR gate with status X X X ...

Page 121: ...levels 32 If the limit is exceeded the device rejects the parameter set with an error message restores the last valid parameter set and restarts using that parameter set Maximum number of all CFC charts considering one task level 16 When the limit is exceeded an error message is output by the device Consequently the device starts monitoring The red ERROR LED lights up Maximum number of all CFC inp...

Page 122: ... LONG_TIMER 3 The time values for the blocks TIMER and TIMER_SHORT must not be selected shorter than the time res olution of the device of 10 ms as then the blocks will not then start with the starting pulse Maximum Number of TICKS on the Task Levels 1 When the sum of TICKS of all blocks exceeds the above mentioned limits an error message is output in the CFC Additional limits 1 for the following ...

Page 123: ... with output signal border 7 Additionally for each chart 1 Arithmetic ABS_VALUE 5 ADD 26 SUB 26 MUL 26 DIV 54 SQUARE_ROOT 83 Base logic AND 5 CONNECT 4 DYN_OR 6 NAND 5 NEG 4 NOR 5 OR 5 RISE_DETECT 4 X_OR 5 Information status SI_GET_STATUS 5 CV_GET_STATUS 5 DI_GET_STATUS 5 MVU_GET_STATUS 5 SI_SET_STATUS 5 DI_SET_STATUS 5 MVU_SET_STATUS 5 ST_AND 5 ST_OR 5 ST_NOT 5 Memory D_FF 5 D_FF_MEMO 6 RS_FF 4 R...

Page 124: ...DE 8 DINT_TO_REAL 5 DIST_DECODE 8 UINT_TO_REAL 5 REAL_TO_DINT 10 REAL_TO_UINT 10 Comparison COMPARE 12 LOWER_SETPOINT 5 UPPER_SETPOINT 5 LIVE_ZERO 5 ZERO_POINT 5 Integrated total COUNTER 6 Time and clock pulse TIMER 5 TIMER_LONG 5 TIMER_SHORT 8 ALARM 21 BLINK 11 Other COMMS_CHK 5 Diff87L 5 MAN_CBOp 12 Individual element Number of TICKS In addition to the defined preassignments indications and meas...

Page 125: ...Technical Data 4 4 Dimensions SIPROTEC 7SC805 Manual C53000 G1140 C380 1 Release date 05 2014 125 4 4 Dimensions 4 4 1 Merging unit 7SC805 Figure 4 1 Dimensional drawing merging unit 7SC805 ...

Page 126: ...Technical Data 4 4 Dimensions SIPROTEC 7SC805 Manual C53000 G1140 C380 1 Release date 05 2014 126 4 4 2 HMI Figure 4 2 Dimensional Drawing of an 7SC805 HMI ...

Page 127: ...grams that show the proper connections of the devices to primary equipment in many typical power system configurations Tables with all settings and all information available in this device equipped with all options are provided Default settings are also given A 1 Ordering Information and Accessories 128 A 2 Terminal Assignments 130 A 3 Connection Examples 131 A 4 Current Transformer Requirements 1...

Page 128: ...V AC 230 V 1 DC 24 V 48 V 2 Construction Pos 9 Surface mounted housing w o HMI A Flush mount housing with HMI B Surface mount hous with detached HMI C Region specific language default settings and function versions Pos 10 Region DE IEC German changeable A Region World IEC ANSI English changeable B System interfaces Pos 11 Additional protocols please see MLFB Ext L 9 Additional information for addi...

Page 129: ...3 1 7SC805 HMI cable kit C53207 A377 B701 1 Terminals Current terminal set of 10 pieces C53207 A406 D237 1 Process terminal 16 pin set of 18 pieces for cabinet surface mounting C53207 A406 D238 1 Process terminal 16 pin set of 18 pieces for cabinet flush mounting C53207 A406 D239 1 Mounting brackets Set of mounting brackets 2 pieces C53207 A406 D240 1 Function package Pos 15 Merging Unit M Functio...

Page 130: ...Assignments SIPROTEC 7SC805 Manual C53000 G1140 C380 1 Release date 05 2014 130 A 2 Terminal Assignments A 2 1 7SC805 Housing for cabinet flush mounting and cabinet surface mounting 7SC805 Figure A 1 Overview Diagram 7SC805 ...

Page 131: ...3 Connection Examples Figure A 2 Current transformer connections to three current transformers and neutral point current ground current Holmgreen connection appropriate for all networks Figure A 3 Current transformer connections to two current transformers only for isolated or resonant grounded networks ...

Page 132: ...transformer preferably for effectively or low resistance grounded networks Important Grounding of the cable shield must be effected at the cable side Note The switchover of the current polarity address 201 also reverses the polarity of the current input IN Figure A 5 Transformer connections to three current transformers and three voltage transformers phase to ground voltages normal circuit layout ...

Page 133: ...endix A 3 Connection Examples SIPROTEC 7SC805 Manual C53000 G1140 C380 1 Release date 05 2014 133 Figure A 6 Transformer connections to three current transformers and three voltage transformers capacitive ...

Page 134: ...rent Transformer Requirements The current transformer requirements should follow the requirements of the bay level equipment And the MU provides the configuration Accuracy Class which is distributed to the bay level equipment via IEC61850 Edition2 ICD file For more details about accuracy class please refer to capital A 8 ...

Page 135: ... 1 No Function configured LED11 Not configured 1 No Function configured LED12 Not configured 1 No Function configured LED13 Not configured 1 No Function configured LED14 Not configured 1 No Function configured LED15 Not configured 1 No Function configured LED16 Not configured 1 No Function configured LED17 Not configured 1 No Function configured LED18 Not configured 1 No Function configured LED19 ...

Page 136: ... Brk Aux NC 4602 Breaker contact OPEN if breaker is closed Breaker Breaker BI3 Brk Aux NO 4601 Breaker contact OPEN if breaker is open Breaker Breaker BI4 not pre assigned BI5 not pre assigned BI6 not pre assigned BI7 not pre assigned BI8 not pre assigned BI9 not pre assigned BI10 not pre assigned BI11 not pre assigned BI12 not pre assigned Binary Output Default function Function No Description BO...

Page 137: ... called functions are executed directly e g via the Web Monitor without any feedbacks one push button Function Keys Default function F1 not pre assigned F2 not pre assigned F3 not pre assigned F4 not pre assigned F5 not pre assigned F6 not pre assigned F7 not pre assigned F8 not pre assigned F9 not pre assigned F0 not pre assigned ...

Page 138: ...of pre defined measured value pages are available depending on the device type The start page of the default display appearing after startup of the device can be selected in the device data via parameter 640 Start image DD For the 6 line display of the 7SC805 e g via the Web Monitor Figure A 7 Default display of 7SC805 for models ...

Page 139: ...Sample Values Yes GOOSE Yes Operational measured values Yes Count values No Fault recording Yes Remote protection setting No User defined indications and switching objects Yes Time synchronization Yes Indications with time stamp Yes Commissioning aids GOOSE stop Yes SMV stop Yes Data transmission stop No Creation of test indications Yes Transmission mode event Baud rate 100 Mbps Type Ethernet ...

Page 140: ...g Options Default Setting Comments 104 OSC FAULT REC Disabled Enabled Disabled Oscillographic Fault Records 369 VT Con Type Conventional Cap Volt Meas Conventional Voltage connection type 459 SysConMUConf Enabled Disabled Enabled MU Configuration via IEC61850 Configurator 461 PhaseIndepRatio Enabled Disabled Disabled Phase Independent Ratio ...

Page 141: ... Secondary Voltage Vx 333 Vnom prim Vx P System Data 1 0 10 800 00 kV 20 00 kV Rated Primary Voltage Vx 352 U4 inverting P System Data 1 YES NO NO U4 inverting 403 MAX LENGTH Osc Fault Rec 0 30 6 00 sec 2 00 sec Max length of a Waveform Capture Record 404 PRE TRIG TIME Osc Fault Rec 0 05 0 50 sec 0 25 sec Captured Waveform Prior to Trigger 405 POST REC TIME Osc Fault Rec 0 05 0 50 sec 0 10 sec Cap...

Page 142: ...90 DestMac Addr5 Merging Unit 0 255 0 DestMACAddr Byte5 491 DestMac Addr6 Merging Unit 0 255 0 DestMACAddr Byte6 492 Application ID Merging Unit 16384 32767 16384 Application ID 562 Ch1RatedPrimCur P System Data 1 10 50000 A 400 A Channel1 Rated Primary Current 563 Ch1RatedSecCur P System Data 1 1 A 5 A 1 A Channel1 Rated Second Current 564 Ch2RatedPrimCur P System Data 1 10 50000 A 400 A Channel2...

Page 143: ...4 image 5 image 6 image 1 Start image Default 700 GOOSE Stop Device Configuration Yes No No GOOSE Stop 1101 FullScaleVolt P System Data 2 0 10 800 00 kV 20 00 kV Measurem FullScaleVolt age Equipm rating 1102 FullScaleCurr P System Data 2 10 50000 A 400 A Measurem FullScaleCur rent Equipm rating Addr Parameter Function C Setting Options Default Setting Comments ...

Page 144: ...evice General SP On Off LED BI BO Reset LED Reset LED Device General IntSP on LED BO 160 19 1 No Stop data transmission DataStop Device General IntSP On Off LED BO 160 20 1 Yes Test mode Test mode Device General IntSP On Off LED BO 160 21 1 Yes Feeder GROUNDED Feeder gnd Device General IntSP LED BO Breaker OPENED Brk OPENED Device General IntSP LED BO Hardware Test Mode HWTest Mod Device General I...

Page 145: ... Link Channel 2 Ch2 Fail Ch2 EN100 Modul 1 IntSP On Off LED BO 15 Test mode Test mode Device General SP LED BI BO 135 53 1 Yes 16 Stop data transmission DataStop Device General SP LED BI BO 135 54 1 Yes 51 Device is Operational and Pro tecting Device OK Device General OUT On Off LED BO 135 81 1 Yes 55 Reset Device Reset Device Device General OUT on 160 4 1 No 56 Initial Start of Device Initial Sta...

Page 146: ...ce 2 Opened Ctrl 2 P System Data 2 SP On Off LED BI BO 421 Opened Control device 3 Opened Ctrl 3 P System Data 2 SP On Off LED BI BO 422 Closed Control device 2 Closed Ctrl 2 P System Data 2 SP On Off LED BI BO 423 Closed Control device 3 Closed Ctrl 3 P System Data 2 SP On Off LED BI BO 424 Open control device 2 Open Ctrl 2 P System Data 2 OUT On Off LED BO 425 Close control device 2 Close Ctrl 2...

Page 147: ...On Off LED BI FC TN BO 31010 VTMCB aux Cont Merging Unit SP On Off LED BI BO 31011 SMV global synchronized SMV global sync Merging Unit OUT LED BO 31013 PPS lost Merging Unit OUT LED BO 31014 SMV local synchronized SMV local sync Merging Unit OUT LED BO 31015 SMV not synchronized SMV not sync Merging Unit OUT On Off LED BO 31026 PPS bad quality Merging Unit OUT On Off LED BO 31027 PPS global synch...

Page 148: ...TEC 7SC805 Manual C53000 G1140 C380 1 Release date 05 2014 148 A 10 Group Alarms No Description Function No Description 140 Error Sum Alarm 177 178 2186 191 193 Fail Battery I O Board error Error IO board Error Offset Alarm NO calibr ...

Page 149: ...40 C380 1 Release date 05 2014 149 Literature 1 SIPROTEC 4 System Description 1 E50417 H1176 C151 A1 2 SIPROTEC DIGSI Start UP E50417 G1176 C152 A2 3 DIGSI CFC Manual E50417 H1176 C098 A5 4 SIPROTEC SIGRA 4 Manual E50417 H1176 C070 A1 ...

Page 150: ...Literature SIPROTEC 7SC805 Manual C53000 G1140 C380 1 Release date 05 2014 150 ...

Page 151: ...logical view SIMATIC Manager offers you a component view The component view does not offer any overview of the hierarchy of a project It does however provide an overview of all the SIPROTEC 4 devices within a project Comtrade Common Format for Transient Data Exchange format for fault records Control display The image which is displayed on devices with a large graphic display after pressing the con...

Page 152: ...dance with IEC 61850 are data pack ages that are transmitted cyclically and event controlled via the Ethernet communication system They serve for direct information exchange among the relays This mechanism facilitates cross communication between bay devices GPS Global Positioning System Satellites with atomic clocks on board orbit the earth twice a day in different parts in approx 20 000 km They t...

Page 153: ...complished through an Ethernet net work Inter relay communication IRC combination IRC combination Inter Relay Communication IRC is used for directly exchanging process information between SIPROTEC 4 devices You require an object of type IRC combination to configure an Inter Relay Communication Each user of the combination and all the necessary communication parameters are defined in this object Th...

Page 154: ... of a project structure is called an object in DIGSI Object properties Each object has properties These might be general properties that are common to several objects An object can also have specific properties Off line In offline mode a link with the SIPROTEC 4 device is not necessary You work with data which are stored in files On line When working in online mode there is a physical link to a SI...

Page 155: ...or in some cases directly on the device SI Single point indication SICAM PAS Power Automation System Substation control system The range of possible configurations spans from integrated standalone systems SICAM PAS and M C with SICAM PAS CC on one computer to separate hardware for SICAM PAS and SICAM PAS CC to distributed systems with multiple SICAM Station Units The software is a modular system w...

Page 156: ...e view TxTap Transformer Tap Indication User address A user address comprises the name of the station the national code the area code and the user specific phone number Users DIGSI V4 6 and higher allows up to 32 compatible SIPROTEC 4 devices to communicate with each other in an inter relay communication network The individual participating devices are called users VD A VD Virtual Device includes ...

Page 157: ...108 D Direct voltage 109 E Electrical tests 111 EMC tests for immunity type tests 112 EMC tests for noise emission type test 112 F Fault recording 118 Final preparation of the device 105 Function blocks 119 H Humidity 116 J Insulation Test 114 Interlocked Switching 53 M Mechanical tests 113 N Non interlocked Switching 50 O Operating hours counter 118 Operation panel 69 Operational measured values ...

Page 158: ...ching Statistics 119 T Temperatures 116 Terminal Assignments 132 Test Fault Recording 107 Time Allocation 119 Time Synchronization Interface 95 U UL certification conditions 115 User interface 110 User defined functions 119 V Vibration and shock stress during steady state operation 113 Vibration and shock stress during transport 113 Voltage inputs 108 W Web Monitor 60 ...

Reviews: