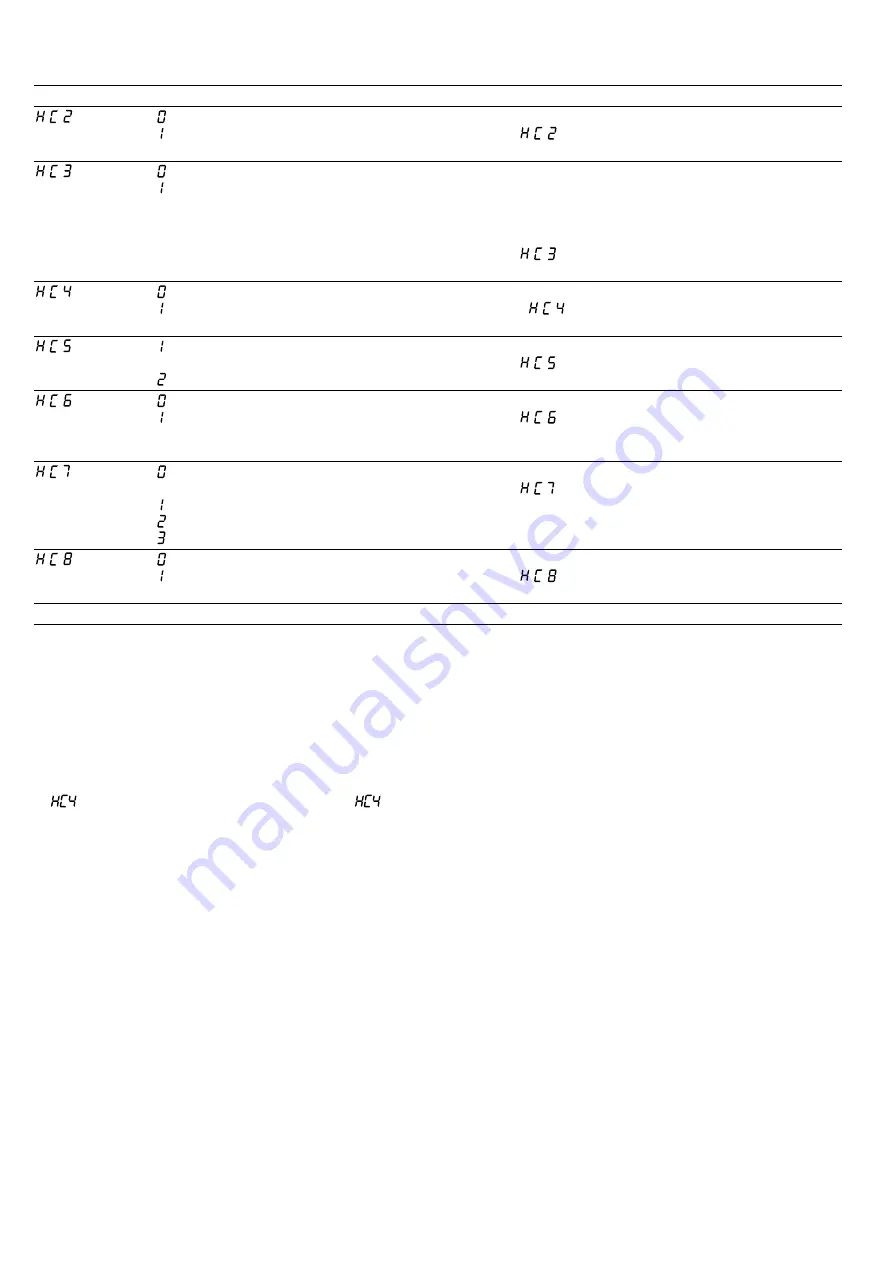
Siemens ET6 LNV1 Series User Manual Download Page 15

Home Connect 

 en

15

Setting

Selection or display

Description and additional information

⁠    ⁠

 – Not connected

 – Connect

Connection to app
The setting  ⁠     is only displayed if the appliance is
connected to the home network.

⁠    ⁠

 – Wireless module switched off

 – Wireless module switched on

Connection to the Wi-Fi
If Wi-Fi has been activated, you can use the Home Con-
nect functions.
In networked standby mode, your appliance requires
max. 2 W.
The setting  ⁠     is only displayed if the appliance has
been previously connected to a network.

⁠    ⁠

 – Switched off

 – Switched on

1

Set using the app
If the setting  ⁠    is switched off, only the hob's operat-
ing statuses will be displayed in the Home Connect app.

⁠    ⁠

 – Update available and ready to in-

stall

 – Start installation

Software update
The setting  ⁠     is only displayed if a software update is
available.

⁠    ⁠

 – Not authorised

 – Authorised

Controlling remote access by after-sales service
The setting  ⁠     is only displayed if after-sales service is
attempting to connect to the appliance. After granting ac-
cess, you can terminate this at any time.

⁠    ⁠

 – Not connected to the WLAN home

network (Wi-Fi)

 – Signal strength 1 (poor)

 – Signal strength 2 (moderate)

 – Signal strength 3 (good)

Display Wi-Fi signal strength
The setting  ⁠    is only displayed if there is a connection
to the WLAN home network (Wi-Fi).

⁠    ⁠

 – Not connected

 – Connected

Connection to Home Connect server
The setting  ⁠    is only displayed if there is a connection
to the WLAN home network (Wi-Fi).

1

Factory setting

14.3 Changing settings via the
Home Connect app

You can use the Home Connect app to change the set-
tings for the cooking zones and send them to the hob.

Requirements

¡

The appliance is connected to the home network
and to the Home Connect app.

¡

In order to set the hob via the app, the basic setting

 must be switched on. The basic setting 

 is

switched on on delivery. If the option for the trans-
mission of settings has been deactivated, only the
hob's operating statuses are displayed in the
Home Connect app.

1.

Select the setting in the Home Connect app and
send to the hob.
Follow the instructions in the Home Connect app.
Settings that you send from the Home Connect app
to the hob must be confirmed on the hob.

a

As soon as cooking settings are transmitted to a
cooking zone, the display starts to flash, depending
on the setting.

2.

To confirm the setting, touch the hotplate display for
the required cooking zone.

3.

To discard the setting, touch any other button on the
hob.

14.4 Software update

Your appliance's software can be updated using the
software update function, e.g. for the purposes of op-
timisation, troubleshooting or security updates.
To do this, you must be a registered Home Con-
nect user, have installed the app on your mobile device
and be connected to the Home Connect server.
As soon as a software update is available, you will be
informed via the Home Connect app and will be able to
start the software update via the app. Once the update
has been successfully downloaded, you can start in-
stalling it via the Home Connect app if you are in your
local area network. The Home Connect app will inform
you once installation is successful.

Notes

¡

You can continue to use your appliance as normal
while updates are downloading. Depending on your
personal settings in the app, software updates can
also be set to download automatically.

¡

We recommend that you install security updates as
soon as possible.

Summary of Contents for ET6 LNV1 Series

Page 1: ...Hob ET6 LNV1 en User manual Register your product on My Siemens and discover exclusive services and offers siemens home bsh group com welcome The future moving in Siemens Home Appliances ...

Page 2: ...Ø cm 2 ET6 LNV1 Ø 18 Ø 14 5 Ø 21 12 Ø 17 26 5 ...

Page 3: ...er or a separate remote control This does not apply if operation with appliances included in EN 50615 is switched off 1 3 Restriction on user group This appliance may be used by children aged 8 or over and by people who have reduced physical sensory or mental abilities or inad equate experience and or knowledge provided that they are supervised or have been instructed on how to use the appliance s...

Page 4: ...the appliance Never bring electrical appliance cables into contact with hot parts of the appliance WARNING Risk of injury Saucepans may suddenly jump due to liquid between the saucepan base and the hotplate Always keep hotplates and saucepan bases dry 2 Preventing material damage ATTENTION Rough pot and pan bases will scratch the ceramic Check your cookware Boiling pans dry may damage cookware or ...

Page 5: ...cepans with suitable lids Cooking without a lid consumes far more energy Lift lids as infrequently as possible When you lift a lid a lot of energy escapes Using a glass lid You can see into the pan through a glass lid without having to lift it Use pots and pans with flat bases Uneven bases increase energy consumption Use cookware suited to the quantity of food Large items of cookware containing li...

Page 6: ...eep warm function Timer Stopwatch function Notes Depending on the operating condition of the hob the touch fields that can currently be selected light up brightly or dimmed If you touch one of these fields the relevant function is activated Touch fields which cannot currently be selected do not light up The settings of the hotplates currently selected light up brightly Always keep the control pane...

Page 7: ...t a All hotplates are switched off a The residual heat indicator remains on until the hot plates have cooled down sufficiently 5 4 Setting the hotplates To set a hotplate it has to be selected The left hand hotplates are selected with the control panel on the left side and the right hand hotplates with it on the right Heat setting 1 Lowest setting 9 Highest setting Every heat setting has an interm...

Page 8: ...ick1 4 5 5 5 30 40 Hamburgers 2 cm thick1 6 7 10 20 Poultry breast 2 cm thick1 5 6 10 20 Poultry breast frozen1 5 6 10 20 Fish or fish fillet plain 5 6 8 20 Fish or fish fillet breaded 6 7 8 20 Fish or fish fillet breaded and frozen e g fish fingers 6 7 8 12 Scampi prawns 7 8 4 10 Vegetables or mushrooms fresh sautéing 7 8 10 20 Vegetables or meat in strips cooked Asian style 7 5 8 5 15 20 Stir fr...

Page 9: ...d on the hotplate There is no lid on the pan The sensor will not func tion with a lid You can use a splatter guard here You have looked up an appropriate frying setting in the recommended settings The hob is switched on The hotplate is selected 1 Touch a lights up in the hotplate indicator and is also displayed a 5 strokes light up on the control panel for the frying settings 1 5 2 Select the requ...

Page 10: ...aw pota toes 3 15 25 Potato pancakes 5 2 5 3 5 per batch Rösti Swiss potato fritter 2 40 45 Glazed potatoes 4 10 15 Vegetables Sweat garlic or onions until translucent 1 2 2 10 Fried onions 3 5 10 Courgettes aubergines 3 4 12 Peppers green asparagus 3 4 15 Sweating vegetables with fat but no water e g courgettes green peppers 1 10 20 Mushrooms 4 10 15 Glazed vegetables 4 6 10 Frozen products Escal...

Page 11: ...e hotplate is switched on and set 1 Touch twice and then select the hotplate 2x a The indicator lights up lights up on the timer display 2 Touch the required presetting on the control panel The possible presettings from left to right are 1 2 3 to 9 minutes 3 Within 10 seconds slide your finger along the con trol panel until the required cooking time is reached a The cooking time counts down If you...

Page 12: ...f the stop watch function is switched off as well Switching on the stopwatch function Touch a appears on the timer display a Time measurement begins a Seconds are displayed during the first minute then minutes Note If you select another time setting option in addi tion to the stopwatch function the setting appears on the timer display for 10 seconds The stopwatch func tion is then displayed again ...

Page 13: ...gy consumption display Ask your electricity supplier what the mains voltage is Consumption display is switched off 1 Consumption display at mains voltage of 230 V Consumption display at mains voltage of 400 V Consumption display at mains voltage of 220 V Consumption display at mains voltage of 240 V Automatic timer Switched off 1 Cooking time after which the hotplates switch off Duration of the ti...

Page 14: ... observed when operating the appliance via the Home Con nect app Safety Page 3 Hobs are not designed to be left unattended Al ways monitor the cooking process Operating the appliance on the appliance itself al ways takes priority During this time it is not possible to operate the appliance using the Home Connect app In networked standby mode the appliance requires a maximum of 2 W 14 1 Setting up ...

Page 15: ...d them to the hob Requirements The appliance is connected to the home network and to the Home Connect app In order to set the hob via the app the basic setting must be switched on The basic setting is switched on on delivery If the option for the trans mission of settings has been deactivated only the hob s operating statuses are displayed in the Home Connect app 1 Select the setting in the Home C...

Page 16: ...00 mW max 5 GHz band 100 mW max BE BG CZ DK DE EE IE EL ES FR HR IT CY LV LT LU HU MT NL AT PL PT RO SI SK FI SE UK NO CH TR 5 GHz WLAN Wi Fi For indoor use only 15 Hob based hood control If both appliances are Home Connect compatible the easiest way to connect the appliances is in the Home Connect app To do this connect the two appli ances to Home Connect and follow the instructions in the app Al...

Page 17: ... change the behaviour of your extractor hood in the basic settings of your hob depending on switch on off of the hob or individual cooking zones You can select other settings using the controls on the hob Setting the fan 1 Touch 2 Select a fan setting on the control panel You can choose between the levels 1 2 and 3 To select an intensive setting touch 4 or 5 on the control panel Alternatively you ...

Page 18: ...ay or stain remover Abrasive sponges High pressure or steam jet cleaners 16 2 Cleaning the glass ceramic Clean the hob after every use to stop cooking residues from getting burnt on Note Note the information on unsuitable cleaning products Page 18 Requirement The hob has cooled down 1 Remove heavy dirt using a glass scraper 2 Clean the hob with a cleaning product for glass ceramic Follow the clean...

Page 19: ...ents There is a risk of the electronics overheating Remove the pan a The display goes out shortly afterwards and audible signal Hot pan near the control elements The hotplate has been switched off to pro tect the electronics 1 Remove the pan 2 Touch any control a When the message no longer appears the electronics have cooled down sufficiently You can continue cooking The hotplate was on for too lo...

Page 20: ...er Service for a period of at least 10 years from the date on which your appliance was placed on the market within the European Economic Area Note Under the terms of the manufacturer s warranty the use of Customer Service is free of charge Detailed information on the warranty period and terms of warranty in your country is available from our after sales service your retailer or on our website If y...

Page 21: ......

Page 22: ......

Page 23: ......

Page 24: ...hen GERMANY www siemens home bsh group com Valid within Great Britain Imported to Great Britain by BSH Home Appliances Ltd Grand Union House Old Wolverton Road Wolverton Milton Keynes MK12 5PT United Kingdom Manufactured by BSH Hausgeräte GmbH under the trademark licence of Siemens AG ...

Reviews: