background image

9

1/4 IN. SHEET FINISHING SANDER 

 ENG

WORKING HINTS FOR YOUR 

SANDER

If your power tool becomes too hot, especially when 
used at low speed, set the speed to maximum and run 
it with no load for 2-3 minutes to cool the motor. Avoid 
prolonged usage at very low speeds. Always use sand 
paper that is suitable for the material you want to sand. 
Always ensure the work-piece is firmly held or clamped 
to prevent movement. Any movement of the material 
may affect the quality of the sanding finish. Start your 
sander before sanding and turn it off only after you stop 
sanding. For the best results, sand wood in the direction 
of the grain. Do not start sanding without having the 
sandpaper fitted. Do not allow the sandpaper to wear 
away it will damage the base-plate. The guarantee does 
not cover base-plate wear and tear. Use coarse grit 
paper to sand rough surfaces, medium grit for smooth 
surfaces and fine grit for the final surfaces. If necessary, 
first make a test run on scrap material. Use only good 
quality sandpaper. The sandpaper controls the sanding 
efficiency, not the amount of force you apply to the 
tool. Excessive force will reduce the sanding fficiency 
and cause motor overload. Replacing the sandpaper 
regularly will maintain optimum sanding efficiency.

MAINTAIN TOOLS WITH CARE  

Remove the plug from the socket before carrying 

out any adjustment, servicing or maintenance.

Keep tools sharp and clean for better and safer 
performance. Follow instructions for lubricating and 
changing accessories. Inspect tool cords periodically 
and if damaged, have repaired by authorized service 
facility. Your power tool requires no additional 
lubrication or maintenance. There are no user 
serviceable parts in your power tool. Never use water or 
chemical cleaners to clean your power tool. Wipe clean 
with a dry cloth. Always store your power tool in a dry 
place. Keep the motor ventilation slots clean. Keep all 
working controls free of dust. 
If the supply cord is damaged, it must be replaced by 
the manufacturer, its service agent or similarly qualified 
persons in order to avoid a hazard.

Summary of Contents for RC4151

Page 1: ...RC4151 1 4 IN SHEET FINISHING SANDER PAGE 4 ENG LIJADORA DE ACABADO DE HOJA DE 1 4 PULG PAGE 10 ESP PONCEUSE DE FINITION POUR FEUILLES DE PO PAGE 17 FRE...

Page 2: ...producto y de que estar completamente satisfecho con su compra Lea cuidadosamente las instrucciones de seguridad y de operaci n para obtener mayor informaci n acerca de c mo utilizar ste producto cor...

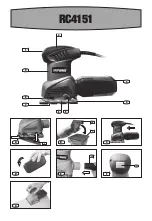
Page 3: ...RC4151 1 11 7 10 7 A D G E B C F 2 5 6 3 4 1 9 7 8...

Page 4: ...quality accessories marked with a well known brand name Choose the type according to the work you intend to undertake Refer to the accessory packaging for further details Store personnel can assist y...

Page 5: ...nding on cord length and nameplate ampere rating If in doubt use the next heavier gage The smaller the gage number the heavier the cord Table 1 Minimum gage for cord Ampere Rating Volts Total length o...

Page 6: ...Use clamps or another practical way to secure and support the workpiece to a stable platform i Holding the work by hand or against your body leaves it unstable and may lead to loss of control 5 SERVI...

Page 7: ...nesium material due to the risk of fire WARNING Some dust particles created by power sanding contain chemicals known to cause cancer birth defects or other reproductive harm Some examples of these che...

Page 8: ...tlet piece and take care that the dust box locks in the grooves of the outlet CAUTION To prevent the possibility of sanding dust or foreign body being thrown into your face or eyes never attempt to us...

Page 9: ...y first make a test run on scrap material Use only good quality sandpaper The sandpaper controls the sanding efficiency not the amount of force you apply to the tool Excessive force will reduce the sa...

Page 10: ...a herramienta Use accesorios de buena calidad una marca bien conocida Seleccione los que m s convengan al trabajo que intenta hacer Consulte el empaque de los accesorios para obtener m s detalles El p...

Page 11: ...tan el riesgo de que se produzcan descargas el ctricas e Cuando utilice una herramienta el ctrica en exteriores utilice un cable de extensi n apto para uso exterior La utilizaci n de un cable de exten...

Page 12: ...la herramienta o ponga el interruptor en la posici n de trabado o de apagado antes de hacer cualquier ajuste cambio de accesorios o guardar la herramienta Estas medidas de seguridad preventivas reduc...

Page 13: ...e de que la pieza de trabajo quede firmemente afianzada para impedir el movimiento 12 Su lijadora de correa es una herramienta manual no la sujete con abrazaderas 13 Antes del lijado verifique que la...

Page 14: ...lija alrededor de la placa base tan fuerte como pueda y fije el extremo bajo la otra pieza de sujeci n 8 Verifique que el papel quede en forma cuadrada respecto de la placa base de lo contrario ret re...

Page 15: ...de lijar al ras sobre tres lados de la placa base lo que permite un f cil acceso a las esquinas y bordes de moldeados 7 LIJADO ORBITAL Su lijadora funciona en rotaciones circulares peque as lo que per...

Page 16: ...s por el usuario Nunca emplee agua o productos qu micos para limpiar su herramienta Use simplemente un pa o seco Guarde siempre su herramienta en un lugar seco Mantenga limpias las ranuras de ventilac...

Page 17: ...ssoires du m me magasin qui vous a vendu l outil N utilisez que des accessoires de bonne qualit de marque renomm e Choisissez le type d outil appropri au travail que vous d sirez entreprendre Pour de...

Page 18: ...ment Un cordon endommag augmente le risque de choc lectrique e Quand vous utilisez un outil lectrique l ext rieur utilisez une rallonge qui convient un usage l ext rieur Ces cordons sont pr vus pour t...

Page 19: ...par l interrupteur est dangereux et doit tre r par c D branchez la batterie de l outil ou mettez son interrupteur en position OFF Arr t ou LOCKED Verrouill avant d effectuer un r glage de changer d ac...

Page 20: ...11 S assurer si possible que l ouvrage est fermement fix afin de l emp cher de bouger 12 La ponceuse est un outil main ne pas la fixer 13 Avant de poncer v rifier que la zone est d pourvue de clous vi...

Page 21: ...essez le papier abrasif autour de la semelle le plus fermement possible et fixez l extr mit sous l autre serre papier 8 V rifiez que le papier abrasif s aligne avec la semelle et s il est mal dispos r...

Page 22: ...qui facilite l acc s aux coins et aux bords des moulures 7 PON AGE ORBITAL La ponceuse fonctionne en faisant de petites rotations circulaires qui permettent un d capage efficace des mat riaux Fa tes f...

Page 23: ...tretenir par l utilisateur N utilisez jamais de l eau ou des nettoyants chimiques pour nettoyer l outil Essuyez le avec un chiffon sec Rangez toujours votre outil dans un endroit sec Gardez propres le...

Page 24: ...Copyright 2016 Positec All Rights Reserved Derechos reservados 2016 Positec Todos los derechos reservados Copyright 2016 Positec Tous droits r serv s AR01167800...

Reviews: