OPERATION Of BL series 1/2
MENU SELECTIO
N
STEP
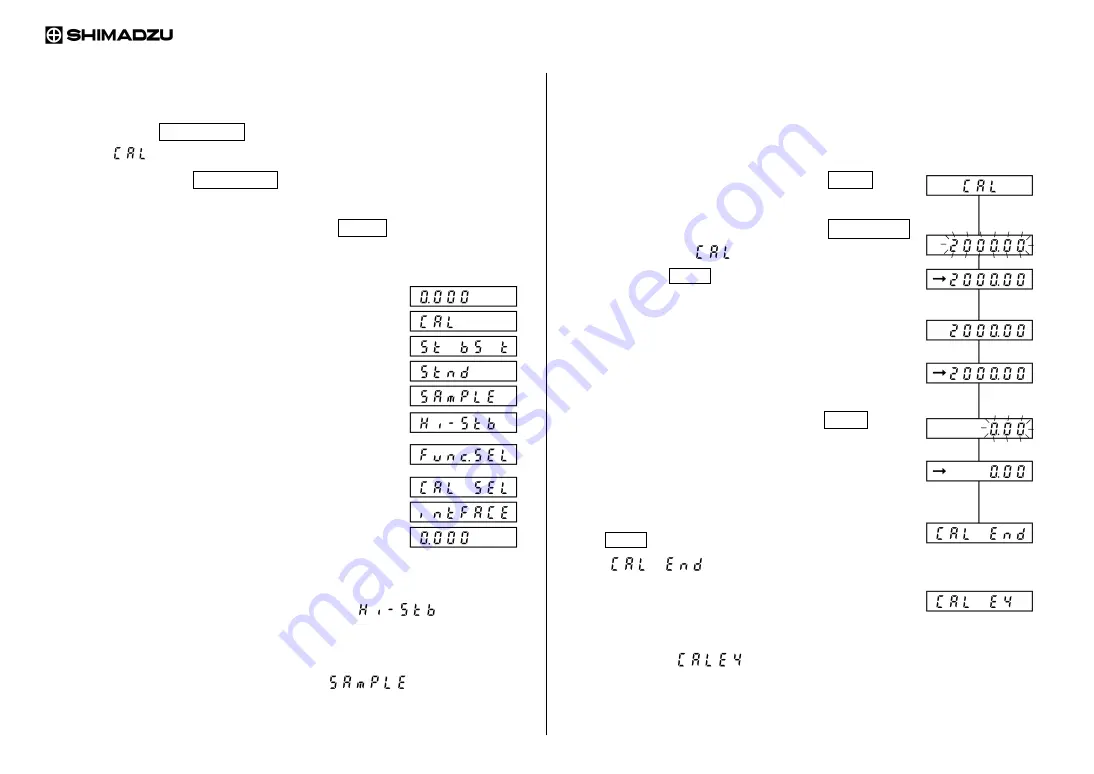
(1) Press the CAL/MENU key during the weight display.
(2) “ ” will be displayed.
(3) Every time the CAL/MENU key is subsequently pressed, the display be
changed in the order shown below.
(4) Select the desired condition and press the TARE key. Then, it will be set
or enter into the lower hierarchy.
Weight
display
<Sensitivity calibration mode>
<Currently set condition>
<Standard
mode>
<Sample pouring mode>
<High stability mode>
<Advanced measurement, unit registration, unit registration,
and individual setting mode>
<Setting the value of sensitivity calibration weight>
<Input/output format setting mode>
Weight
display
•
If the measurement is done at severe measurement environment and the stability
of the display is not so good, set the balance to “
” (high-stability
mode).
•
When the high-speed sample pouring mode is executed, or the small mount of
sample pouring is done, set the balance to “
” (sample mode).
SENSITIVITY CALIBRATION
STEP
(1) Warm up the balance well. Refer to “INSTRUCTION MANUAL”.
(2) Check
leveling.
(3) Unload the sample on the pan and press the TARE key to
zero the display.
(4) Following the menu selection, press the
key to display “
”.
(5) Press the TARE key to start the sensitivity
calibration.
(6) The set weight value appears and blinks.
(7) Make sure that the stability mark is lit.
(8) Place the calibration weight on the pan. At this time,
the stability mark will once disappear.
(9) When the stability mark is lit again, press the TARE key.
(10) The display shows zero and blinks.
Make sure that the stability mark is lit.
(11) Unload the weight.
(12) When the stability mark is lit again, press the
TARE key.
(13) “
” is displayed for several seconds
and the balance returns to weight display. This
completes the sensitivity calibration.
(14) If the different weight is used for this sensitivity
calibration,
“
” is displayed for several seconds and the balance
returns to weight display. Check the weight and retry the sensitivity
calibration.
M054-E089A
CAL/MENU
Summary of Contents for BL2200H
Page 2: ......
Page 6: ......
Page 8: ......
Page 10: ... 2 Display and keypad Display Keypad ...
Page 36: ......


