11/9/8
08_XL-E171DVH_EN.fm
E-8
8
7
6
5
4
3
2
1
System connections (continued)
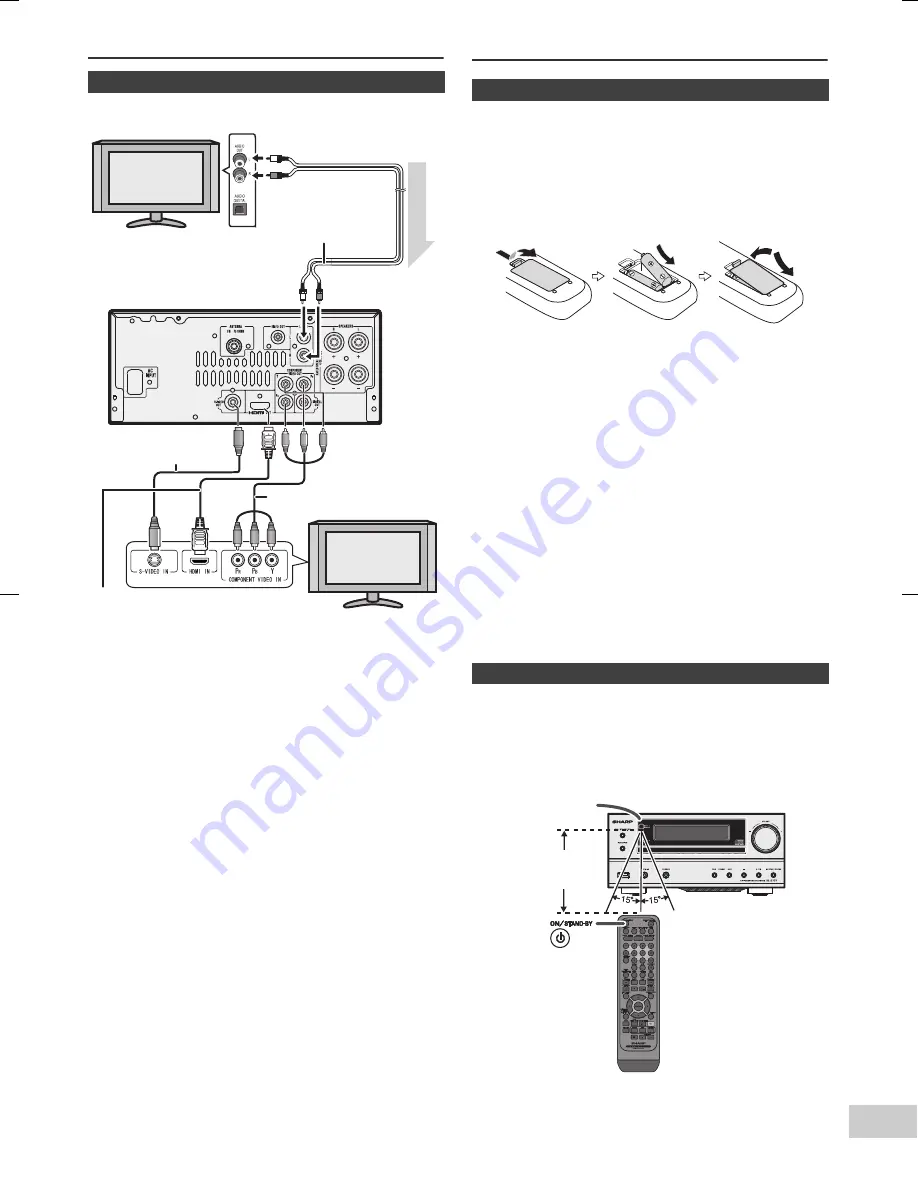
Connect to the TV using an audio cable.
To select Line In function:
●
On main unit: Press FUNCTION button repeatedly until
Line In is displayed.
●
On remote control: Press AUDIO/LINE (INPUT) button
repeatedly until Line In is displayed.
For better quality, you can also connect with S-video using
the S-VIDEO OUT jack.
If your TV also has a component video input or HDMI input,
you can connect this too.
Using the component video jacks:
Component video should deliver superior picture quality
when compared to composite video. A further advantage
is progressive-scan video, which delivers a very stable,
flicker-free picture. See the manuals that came with your
TV to check whether they are compatible with progressive-
scan video.
Using HDMI terminal:
If you have an HDMI or DVI (with HDCP) equipped TV, you
can connect it to this receiver using a commercially
available HDMI cable.
Note:
If the video signal does not appear on your TV, try
adjusting the resolution settings on your component or
display. Note that some video contents have resolutions
that may not be displayed. In this case, use a (analog)
composite connection.
Remote control
Caution:
●
Remove the battery if the unit will not be used for a long
period of time. This will prevent potential damage due
to battery leakage.
●
Do not use rechargeable battery (nickel-cadmium
battery, etc.).
●
Installing the battery incorrectly may cause the unit to
malfunction.
●
Batteries (battery pack or batteries installed) shall not
be exposed to excessive heat such as sunshine, fire or
the like.
Notes concerning use:
●
Replace the battery if the operating distance is reduced
or if the operation becomes erratic. Purchase a “AAA”
size battery (UM-4, R03, HP-16 or similar).
●
Periodically clean the transmitter on the remote control
and the sensor on the unit with a soft cloth.
●
Exposing the sensor on the unit to strong light may
interfere with operation. Change the lighting or the
direction of the unit if this occurs.
●
Keep the remote control away from moisture, heat,
shock, and vibrations.
Check the remote control after checking all the
connections.
Point the remote control directly at the remote sensor on
the unit. The remote control can be used within the range
shown below:
■
Connecting a TV, etc.
A
u
di
o s
ig
na
l
TV
To audio
output sockets
Audio cable
(commercially
available)
Main unit
To LINE input
sockets
Component video cable
(commercially available)
S-video cable
(commercially available)
HDMI cable
(commercially available)
TV
■
Battery installation
1
Open the battery cover.
2
Insert the supplied battery according to the direction
indicated in the battery compartment.
When inserting or removing the battery, push it towards
the (–) battery terminals.
3
Close the cover.
■
Test of the remote control
0.2 m - 6 m
(8" - 20' )
Remote sensor


