background image

11/8/24

08_XL-E171DVH_EN.fm

E-18

8

7

6

5

4

3

2

1

Useful operation

You can freeze the picture during playback.

Note:

The sound is muted during still picture.

You can advance frame by frame.

Notes:

Frame playback operates forward only.

Still picture and frame advance features are disabled
on some discs.

The sound is muted during step function.

You can slow down the playback speed.

Note:

On some discs, the slow-motion play functions are
disabled.

You can change the angle of view when playing a DVD disc
that contains scenes recorded from multiple angles.

Notes:

The angle number is not displayed if angles are not
recorded on the disc.

Refer to the manual of the disc as the operation may
vary depending on the disc.

You can magnify images during playback.

To return to normal view:

Press the ZOOM button repeatedly.

Notes:

Images may become distorted when zoomed.

Subtitles cannot be zoomed.
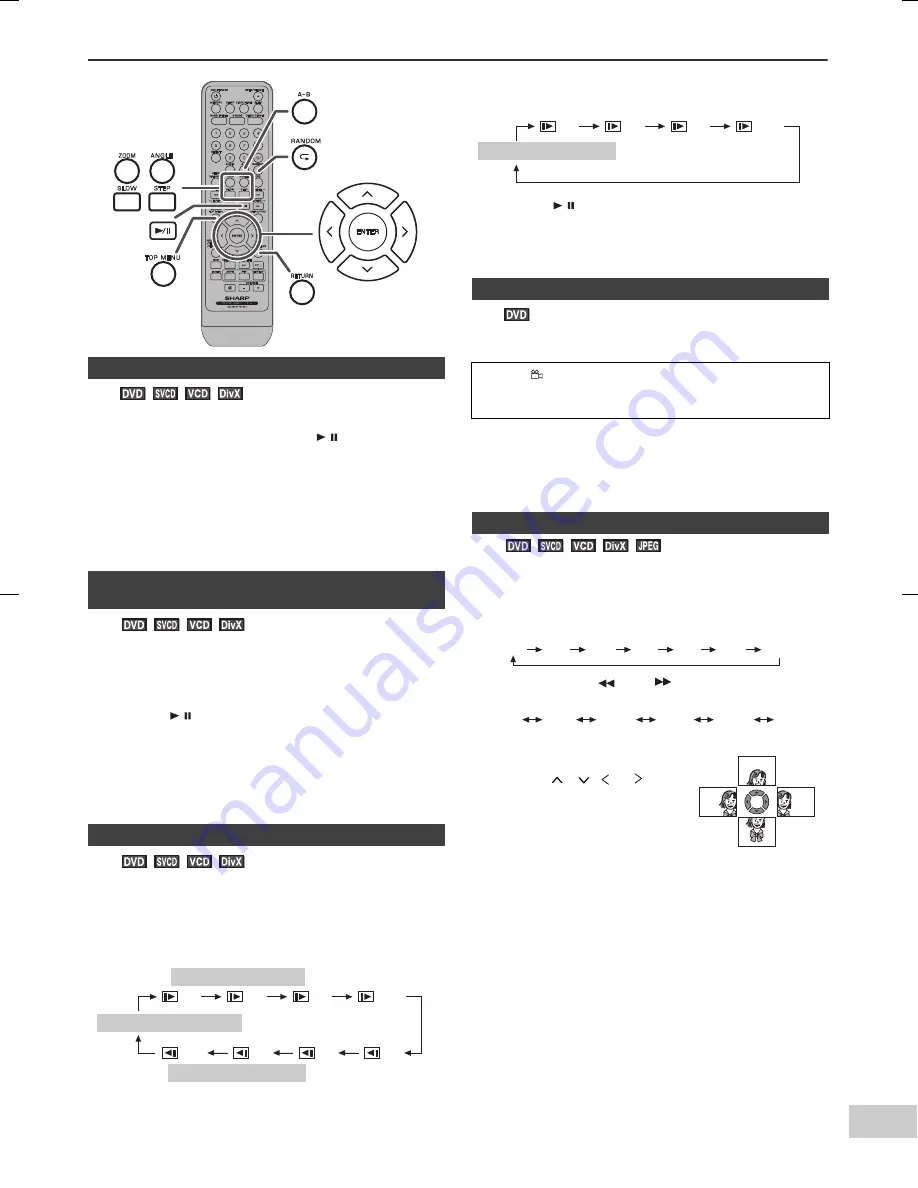
Still picture 

1

Whilst a disc is playing, press the  /  button.  

2

The image or picture will freeze on TV screen. 

“II”

 appears on the TV screen.  

The unit display counter will blink.

Step function (Frame by frame advance 

playback) 

1

Whilst a disc is playing, press the STEP button.
Each press of the STEP button advances the frame.

2  

Press the  /  button to return to the normal playback.  

Slow-motion play

1

Whilst a disc is playing, press the SLOW button
repeatedly to select the desired speed. 

On DVD, the speed changes as follows:

1/2

1/4

1/

8

1/16

1/16

1/

8

1/4

1/2

SLOW forward play

PLAY (Normal play)

SLOW reverse play

On SVCD/VCD/DivX, only forward play is possible and the
speed changes as follows:

2

Press the  /  button to return to the normal playback.   

To change the angle

When “

” is displayed in the upper right corner of

the TV screen, press the ANGLE button repeatedly to
select the desired angle number.  

To zoom images (zoom) 

1

Whilst a disc is playing, press the ZOOM button.  
Each press of the ZOOM button cycles through the
zoom setting as follows:  

Each press the 

  and 

 buttons will switch the

ZOOM setting as follows:  

2

To shift the view and display the
desired part of a zoomed image,

press the 

,  

,   or    button

repeatedly. 

1/2

1/4

1/

8

1/16

PLAY (Normal play)

2 X

3

 X

4 X

1/2

1/

3

1/4

OFF

50% 75% 100% 125% 150% 200%

Summary of Contents for XL-E171DVH

Page 1: ...tp mp3licensing com MPEG Layer 3 audio coding technology licensed from Fraunhofer IIS and Thomson Accessories Please confirm that the following accessories are included Page General Information Precautions 2 Controls and indicators 2 4 Types of playable discs 5 Description of discs 6 Preparation for Use System connections 7 8 Remote control 8 Changing the setup menu 9 13 Basic Operation General co...

Page 2: ...Attention should be drawn to the environmental aspects of battery disposal This unit should only be used within the range of 5 C 35 C 41 F 95 F The apparatus is designed for use in moderate climates Warning The voltage used must be the same as that specified on this unit Using this product with a higher voltage other than that which is specified is dangerous and may result in a fire or other type ...

Page 3: ...9 ENTER Button 9 20 Subtitle Digest Display Button 20 22 21 USB VIDEO AUDIO Button 26 22 DVD Button 15 23 Tuner Button 30 31 32 24 RDS ASPM Button 31 25 Mute Button 14 26 Open Close Button 15 27 Clock Timer Button 34 28 Sleep Button 35 29 Demo Dimmer Button 14 30 Random Button 18 31 OSD Button 20 32 ANGLE Button 18 33 Tuner Preset Up Button 15 16 21 33 34 STEP Button 18 35 Tuning Up Skip Up Fast F...

Page 4: ... 14 18 X bass Indicator 14 19 Title Indicator 27 20 Artist Indicator 27 21 Folder Indicator 26 22 Album Indicator 27 23 File Indicator 26 24 Track Indicator 27 25 Daily Timer Indicator 34 26 Once Timer Indicator 34 27 Disc Indicator 16 28 Total Indicator 26 29 Sleep Indicator 35 30 DVD indicator 16 31 DivX indicator 16 32 Dolby Digital indicator 20 Speaker system 1 Tweeter 2 Woofer 3 Bass Reflex D...

Page 5: ...nding on the recording equipment or the disc 2 JPEG or JPG picture discs also play on this unit However pictures may not be clear depends on resolution and recording method 3 Maximum JPEG file size is 10Mb If photo bigger than this size it will take some time for the file to be displayed Icons used in this operation manual Some functions may not be available depending on discs The following icons ...

Page 6: ...rack Audio CDs consist of tracks A track is each tune on an audio CD DivX Chapter 1 Chapter 2 Chapter 3 Chapter 1 Chapter 2 Title 1 Title 2 Track 1 Track 2 Track 3 Track 4 Track 5 Icons used on DVD discs Display Description Region number playable area number DVD discs are programmed with region numbers indicating countries in which they can be played This system can play discs with region number o...

Page 7: ...the wall socket Note Unplug the AC power lead from the wall socket if the unit will not be in use for a prolonged period of time Make sure to unplug the AC power lead before making any connections Right speaker FM aerial To video input socket Wall socket AC 220 240 V 50 60 Hz Video cable not supplied Red Black Left speaker TV Label is located at the bottom of the unit Aerial connection Speaker con...

Page 8: ... battery leakage Do not use rechargeable battery nickel cadmium battery etc Installing the battery incorrectly may cause the unit to malfunction Batteries battery pack or batteries installed shall not be exposed to excessive heat such as sunshine fire or the like Notes concerning use Replace the battery if the operating distance is reduced or if the operation becomes erratic Purchase a AAA size ba...

Page 9: ...ton to change the setting and press the ENTER button See the list on pages 9 13 for the selectable parameters 5 Press the SETUP VIDEO MODE button The setting is completed To change other settings begin from step 2 Setup menu Selectable parameters indicates default setting Description GENERAL SETUP PAGE TV DISPLAY 4 3 PANSCAN 4 3 LETTERBOX 16 9 WIDE SQUEEZE The screen mode should be set according t...

Page 10: ... setting if the decorder can support Dolby Digital or DTS LPCM OUT 48KHZ 96KHZ Select the sampling frequency at 48 kHz 16 bit or 96 kHz 24 bit capability after you select SPDIF PCM at SPDIF SETUP DOLBY DIGITAL SETUP DUAL MONO STEREO L MONO R MONO MIX MONO DYNAMIC 1 FULL Audio with fully compressed dynamic range 3 4 1 2 1 4 Audio with partially compressed dynamic range OFF Audio with uncompressed d...

Page 11: ...NG SHARPNESS HIGH MEDIUM LOW BRIGHTNESS 20 0 20 CONTRAST 16 0 16 GAMMA HIGH MEDIUM LOW NONE HUE 9 0 9 SATURATION 9 0 9 LUMA DELAY 0T 1T DIVX R VOD OK SHARP provide you the DivX registration code that allows you to rent and purchase videos using the DivX service Please go to www divx com vod for more information HDMI SETUP HDMI ON OFF AUDIO SOURCE AUTO PCM PREFERENCE PAGE TV TYPE PAL AUTO NTSC 3 Pl...

Page 12: ... See page 13 for password setting DEFAULT RESET This resets all setting Except for Parental and Password to factory default TV display setting Indicator Setting 4 3 PANSCAN When playing a wide image 16 9 disc the left and right sides of the image are cut pan scan to display a natural looking 4 3 size image A wide image disc without pan scan is played back in 4 3 letterbox A 4 3 disc is played in 4...

Page 13: ...firmation TV type setting Indicator Setting AUTO Select this mode for the multi system TV NTSC Select this mode for the NTSC TV PAL Select this mode for the PAL TV Language setting Indicator Setting OSD LANGUAGE A language for screen display can be set for the setup menu messages etc AUDIO A language for audio can be set You can specify a language for conversation and narration SUBTITLE A language...

Page 14: ...he power is first turned on the unit will enter the extra bass mode which emphasises the bass frequencies and X BASS will appear To cancel the extra bass mode press the X BASS button on the remote control 1 Press the BASS TREBLE button to select Bass 2 Within 5 seconds press the VOLUME or button to adjust the bass 1 Press the BASS TREBLE button to select Treble 2 Within 5 seconds press the VOLUME ...

Page 15: ...scs an error message will appear on the TV display and the disc will not play 1 Viewing is prohibited on some DVDs according to the audience age 1 Press the ON STAND BY button to turn the power on 2 Press the CLOCK TIMER button 3 Within 10 seconds press the ENTER button To adjust the day press the or button and then press the ENTER button 4 Press the or button to select 24 hour or 12 hour display ...

Page 16: ...oes not operate between tracks When search is performed during the DVD playback pictures may not be forwarded or reversed in the search speed specified in this manual depending on the disc or the scene being played The search does not operate on JPEG discs To resume playback after stopping resume play 1 Whilst a disc is playing press the button The system stores the point you stopped 2 To restart ...

Page 17: ... start playback from the desired point direct play 1 Whilst in the stop mode press the DIRECT button 2 Within 10 seconds enter the title number first then only can enter the chapter number by using the Direct Search buttons Press or button for title or chapter selection Example To select title or chapter 1 Press 1 To select title or chapter 12 Press 10 and 2 To select title or chapter 22 Press 10 ...

Page 18: ...n the TV screen The unit display counter will blink Step function Frame by frame advance playback 1 Whilst a disc is playing press the STEP button Each press of the STEP button advances the frame 2 Press the button to return to the normal playback Slow motion play 1 Whilst a disc is playing press the SLOW button repeatedly to select the desired speed On DVD the speed changes as follows 1 2 1 4 1 8...

Page 19: ...C see page 21 The repeat play mode changes as follows on audio CD MP3 DivX and JPEG are displayed when menu screen is ON see page 24 2 To return to the normal playback press the RANDOM button repeatedly until no display on TV screen To play the contents between the specified points repeatedly A B repeat 1 Whilst a disc is playing press the A B button This registers the start point A CHAPTER TV scr...

Page 20: ...l E g The audio channel changes as follows on DVD To change the display on TV screen SUBTITLE 01 03 ENGLISH Audio 1 2 AC3 5 CH English Audio 2 2 AC3 2 CH English AUDIO 1 AUDIO 2 AUDIO 3 AUDIO 4 MONO LEFT MONO RIGHT MIX MONO STEREO 0 17 17 TT 01 03 CH 01 29 Current title number Total number of chapters Total number of titles Current chapter number Playback time DVD SVCD VCD CD DivX TITLE ELAPSED TI...

Page 21: ... P B C mode is off To play by specifying time time search Cancel the P B C playback control In the playback mode Notes Some discs cannot play from the specified point Time search feature is disabled on some discs Time search feature is not available on MP3 and JPEG discs Playback of a video CD super video CD with P B C ON 1 Press the MENU PBC button with PBC ON The menu will appear on the TV and p...

Page 22: ... mode press the SUBTITLE DIGEST DISPLAY button 2 Select digest type by using cursor or button and then press ENTER button Track digest disc will be divided by tracks Disc Interval disc will be divided into 10 minutes interval Up to 6 tracks will be displayed on the screen 3 Press the Direct Search buttons on the remote control to select the desired track Playback will be started from the selected ...

Page 23: ...indows Media Player Bitrate which is supported by WMA is 64 160 kbps The following playback functions are the same as DVD or VCD operations Page Playback 15 To locate the beginning of a chapter track skip 16 Fast forward Fast backward search 16 To zoom images zoom 18 To play repeatedly repeat play 19 To change the display on TV screen 20 To start playback from the desired point direct play Whilst ...

Page 24: ...p mode Each time the button is pressed the play mode changes in the following order Notes To view back the file list press the MEMORY button whilst in the main menu screen To return to the main menu screen whilst playback press the MENU PBC button Playback on the menu screen 1 Load a disc containing MP3 WMA JPEG and DivX files the menu screen appears 2 Press the or button to select a track and pre...

Page 25: ...r of the tracks During random play repeat function is not possible Note Notes This unit only supports MPEG 1 Audio Layer 3 format Sampling Frequency is 32 44 1 48kHz MPEG 2 Audio Layer 3 MPEG 2 5 Audio Layer 3 and MP1 MP2 format are not supported Playback order for MP3 files may differ sometimes depending on the writing software used during file downloading Bitrate which is supported by MP3 is 32 ...

Page 26: ...r is set as folder 1 2 As for folders inside ROOT folder Folder A and Folder B the folder which is recorded earlier on the disc will be set as folder 2 and folder 3 3 As for folder inside Folder A Folder C and Folder D the folder which is recorded earlier on the disc will be set as folder 4 and folder 5 4 Folder E that is inside Folder D will be set as folder 6 5 Press the or button on the remote ...

Page 27: ...ontrol or FUNCTION button repeatedly on main unit to select USB Audio function Connect the USB memory device that has MP3 WMA format files on the unit When the USB memory is connected to the main unit the device information will be displayed 2 Select desired file to be played back by pressing the or button 3 Press the CD USB button Playback will start and the file name will be displayed Title Arti...

Page 28: ...peration On the other hand the button does not allow you to move to the previous track The beginning of the track being played will be located In random play the unit will select and play tracks automatically You cannot select the order of the tracks To cancel the programmed play mode During programmed stop mode press the button The display will show Memory Clear and all the programmed contents wi...

Page 29: ...z 44 1 kHz 48 kHz Playback order for MP3 files may differ depending on the writing software used during file download Bitrate which is supported by MP3 is 32 kbps to 320 kbps WMA is 64 kbps to 160 kbps For MP3 WMA files please put MP3 WMA extension Files cannot be played back if there is no MP3 WMA extension Playlist are not supported on this unit This unit can display Folder Name or File Name up ...

Page 30: ...ereo or FM Mono 3 Press the TUNING or button on the remote control to tune in to the desired station Manual tuning Press the TUNING or button repeatedly to tune in to the desired station Auto tuning When the TUNING or button is pressed for more than 0 5 seconds scanning will start automatically and the tuner will stop at the first receivable broadcast station Memorising a station 1 Perform steps 1...

Page 31: ...adcasting on different frequencies the strongest frequency will be stored in memory Any station which has the same frequency as the one stored in memory will not be stored If 40 stations have already been stored in memory the scan will be aborted If you want to redo the ASPM operation erase the preset memory If no station have been stored in memory END will appear for about 4 seconds If the RDS si...

Page 32: ...r RDS operation To recall stations in memory 1 Press the TUNER button on the remote control or FUNCTION button repeatedly on the main unit to select TUNER function 2 Press the RDS PTY button on the remote control SELECT and PTY TI will appear alternately for about 6 seconds 3 Within 6 seconds press the or button to select the programme type Each time the button is pressed the programme type will a...

Page 33: ...y phone or at a public forum TRAVEL Features and programmes concerned with travel to near and far destinations package tours and travel ideas and opportunities Not for use for announcements about problems delays or roadworks affecting immediate travel where TP TA should be used LEISURE Programmes concerned with recreational activities in which the listener might participate Examples include Garden...

Page 34: ...ss the or button and then press the ENTER button 8 To adjust the minutes press the or button and then press the ENTER button 9 Set the time to finish as in steps 7 and 8 above 10 Adjust the volume using the VOLUME control and then press the ENTER button Do not turn the volume up too high 11 Press the ON STAND BY button to enter the power stand by mode The TIMER indicator lights up and the unit is ...

Page 35: ... Within 5 seconds press the Direct Search button to set the time 1 minute 99 minutes 4 SLEEP will appear 5 The unit will enter the power stand by mode automatically after the preset time has elapsed 1 Whilst SLEEP is indicated press the SLEEP button 1 Whilst SLEEP is indicated press the SLEEP button 2 Within 5 seconds press the 0 button twice until SLEEP 00 appears To use timer and sleep operation...

Page 36: ...condensation formed inside the unit Remote control Symptom Possible cause The remote control does not operate Is the AC power lead of the unit plugged in Is the battery polarity correct Are the batteries dead Is the distance or angle incorrect Does the remote control sensor receive strong light Tuner Symptom Possible cause The radio makes unusual noises continuously Is the unit placed near the TV ...

Page 37: ...occur due to an accumulation of dirt on the disc surface Follow the guidelines below for maximum enjoyment from your CD collection and player Do not write on either side of the disc particularly the non label side from which signals are read Do not mark this surface Keep your discs away from direct sunlight heat and excessive moisture Always hold the CDs by the edges Fingerprints dirt or water on ...

Page 38: ...o signal Horizontal resolution 500 lines S N ratio 70 dB Audio signal Frequency characteristic Linear PCM DVD 20 Hz to 20 kHz sampling rate 48 kHz 20 Hz to 20 kHz sampling rate 96 kHz CD 20 Hz to 20 kHz S N radio CD 94 dB 1 kHz Dynamic range Linear PCM DVD 95 dB CD 94 dB Total harmonic distortion ratio 0 01 maximum Video Section Signal level Composite 1 Vp p 75 ohms S video Y 1 Vp p 75 ohms C 0 28...

Reviews: