Basic Operation
-39
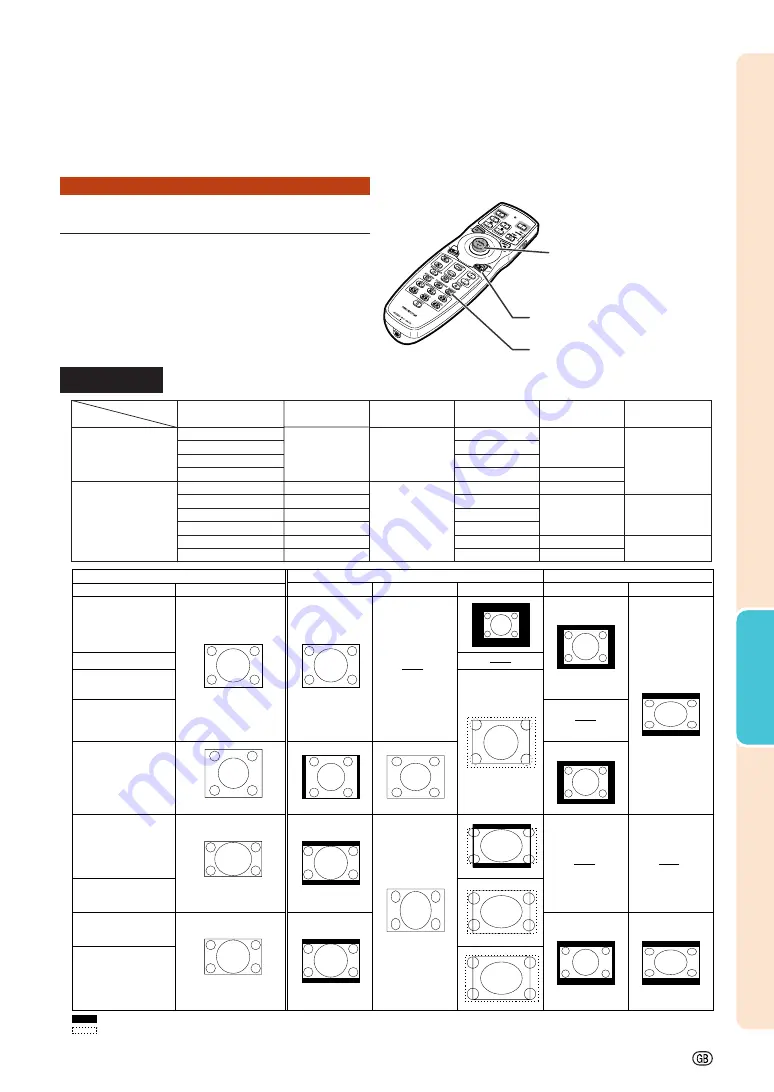
Resize Mode
Press
RESIZE
on the remote control.
•
Pressing
RESIZE
changes the display as shown
in the tables below.
•
To return to the standard image, press
UNDO
while “
RESIZE
” is displayed on the screen.
•
This function can also be accessed from the OSD
menu (see page
56
).
This function allows you to modify or customize the resize mode to enhance the input image. Depend-
ing on the input signal, you can choose a desired image.
COMPUTER
STRETCH
For 4:3 screen
For 16:9 screen
Input signal
Image type
NORMAL
FULL
BORDER
4:3 aspect ratio
5:4 aspect ratio
16:10 aspect ratio
16:9 aspect ratio
: Cutout area on which images cannot be projected
: Area where the signals are off screen
*1
The Digital Shift function can be used for these images.
*2
Same as NORMAL mode.
Computer
Resolution
lower than
XGA
XGA
Resolution
higher than
SXGA
SXGA
(1280
×
1024)
1280
×
720
1280
×
768
1280
×
800
1360
×
768
1366
×
768
SXGA
(1152
×
864)
DOT BY DOT
*1
*1
*1
*1
*1
*1
*1
*2
*2
*2
*2
4:3
aspect ratio
Other aspect ratios
SVGA (800
×
600)
XGA (1024
×
768)
SXGA (1152
×
864)
SXGA+ (1400
×
1050)
SXGA (1280
×
1024)
1280
×
720
1360
×
768
1366
×
768
1280
×
768
1280
×
800
1024
×
768
968
×
768
1024
×
576
1024
×
578
1024
×
576
1024
×
614
1024
×
640
—
768
×
576
—
720
×
576
—
960
×
576
922
×
576
1024
×
576
—
1024
×
576
NORMAL
FULL
BORDER
STRETCH
DOT BY DOT
800
×
600
—
1152
×
864
1400
×
1050
1280
×
1024
1280
×
720
1360
×
768
1366
×
768
1280
×
768
1280
×
800
RESIZE button
Mouse/adjustment button
(
'
/
"
/
\
/
|
)
UNDO button
Main resolution
1024
×
768
Summary of Contents for XG-P560W - WXGA DLP Projector
Page 86: ...SHARP CORPORATION ...


