3-9
PRINTER
Contents
2
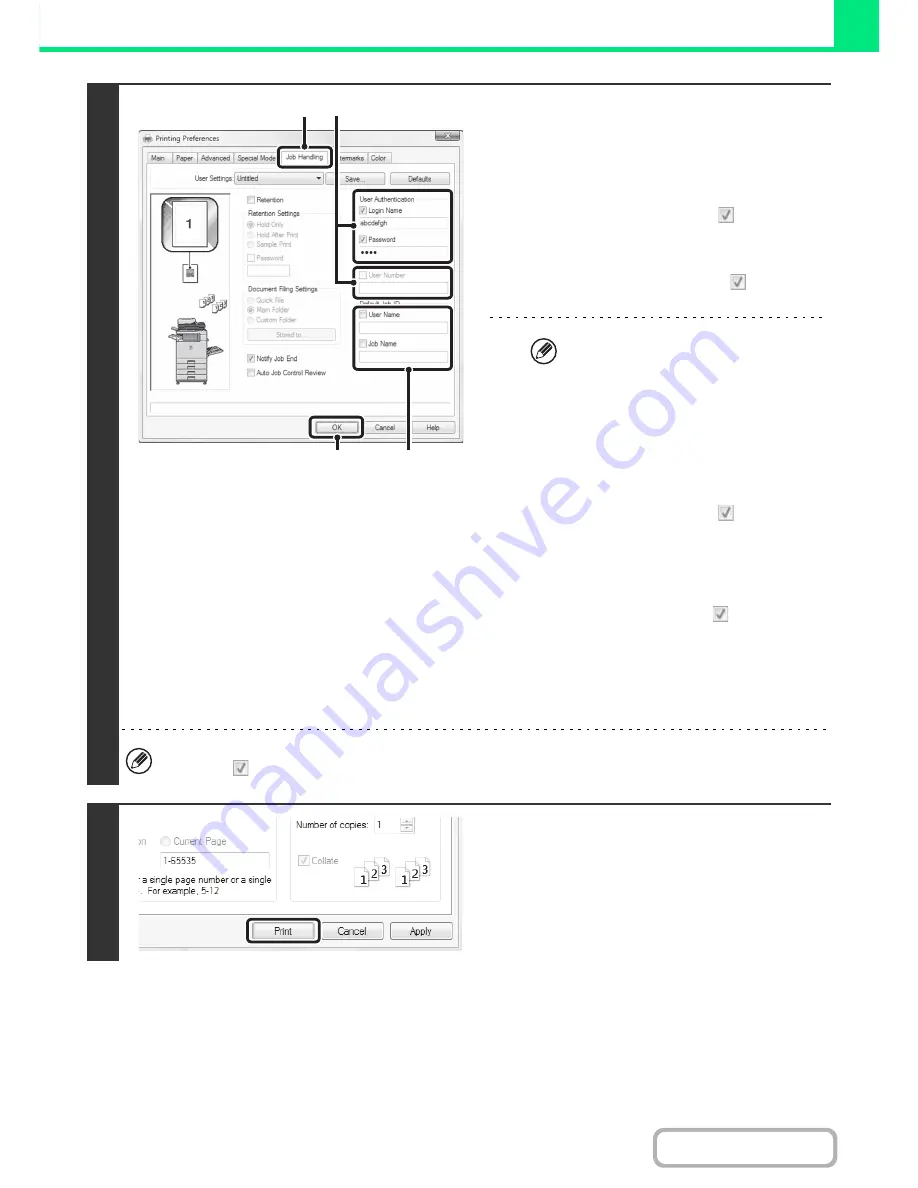
Enter your login name and password.
(1) Click the [Job Handling] tab.
(2) Enter your user information.
•
When authentication is by login name/password
Select the [Login Name] and [Password]
checkboxes so that checkmarks
appear, and
enter your login name and password. Enter 1 to 32
characters for the password.
•
When authentication is by user number
Click the [User Number] checkbox
and enter a
user number (5 to 8 digits).
(3) Enter the user name and job name as
necessary.
•
User Name
Click the [User Name] checkbox
and enter your
user name (maximum of 32 characters). Your
entered user name will appear at the top of the
operation panel. If you do not enter a user name,
your computer login name will appear.
•
Job Name
Click the [Job Name] checkbox
and enter a job
name (maximum of 30 characters). The entered job
name will appear at the top of the operation panel
as a file name. If you do not enter a job name, the
file name set in the software application will appear.
(4) Click the [OK] button.
To have a confirmation window appear before printing starts, select the [Auto Job Control Review] checkbox so that a
checkmark
appears.
3
Start printing.
(4)
(1)
(2)
(3)
When [User Authentication] has been
checked on [Pninting Policy] in the
[Configuration] tab, you cannot enter the
user information. Enter the user information
in the dialog box whenever you print.
Summary of Contents for MX-C382SC
Page 4: ...Reduce copy mistakes Print one set of copies for proofing ...
Page 6: ...Make a copy on this type of paper Envelopes and other special media Transparency film ...
Page 11: ...Conserve Print on both sides of the paper Print multiple pages on one side of the paper ...
Page 35: ...Organize my files Delete a file Delete all files Periodically delete files Change the folder ...
Page 296: ...3 19 PRINTER Contents 4 Click the Print button Printing begins ...
Page 831: ...MXC382SC EX ZZ Operation Guide MX C382SC MODEL ...


