MX-2310U MX-2310U (MAIN UNIT) 2 – 4
9)
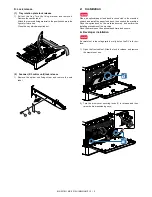
Close the drum positioning cover, and lock it.
10) Re-install the waste toner box and lock into place.
B. Set the control level for the reference toner
density
1)
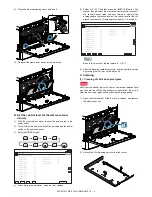
With the front cabinet open, connect the power plug to the
power outlet.
2)
Turn ON the main power switch of the machine and the power
switch on the operation panel.
3)
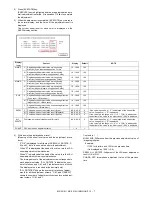
Enter the SIM25-2 mode.
4)
After entering the simulation, close the front cabinet.
5)
Select K, C, M, Y and then press the [EXECUTE] button. The
system then performs the simulation, samples the toner den-
sity control sensor value, and sets (stores in memory) the
average sensor detection level as the control level for the ref-
erence toner density. (Operating times: approx. 1.5 minutes)
Be sure to select all of the four colors: K, C, M, Y.
6)
After the machine completes cycling, exit the simulation mode
by pressing the [CA] key on the main unit.
C. Cleaning
(1) Cleaning of LSU's dust-proof glass
Dust from the transfer belt or shutter or some other adjacent part
may fall onto the LSU during transport or installation. Be sure to
clean the dust-proof glass before checking the image quality.
1)
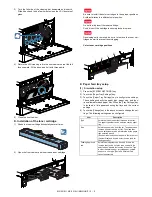
Open the front cabinet. Slide the lock to release, and remove
the waste toner box.
2)
Detach the LSU cleaning bar from the front cover.
2
1
ǂǂǂ6,08/$7,21ǂǂ12
&/26(
7(67
$8720$7,&'(9(/23(5$'-8670(17
(;(&87(
$7'(9($'-B/B.
$7'(9(92B0B.
$7'(9($'-B/B&
$7'(9(92B0B&
$7'(9($'-B/B0
$7'(9(92B0B0
$7'(9($'-B/B<
$7'(9(92B0B<
$7'(9($'-B0B.
$7'(9($'-B0B&
$7'(9($'-B0B0
$7'(9($'-B0B<
$7'(9(92B/B.
$7'(9(92B/B&
$7'(9(92B/B0
$7'(9(92B/B<
.
&
0
<
ǂǂǂ6,08/$7,21ǂǂ12
&/26(
7(67
$8720$7,&'(9(/23(5$'-8670(17
(;(&87(
$7'(9($'-B/B.
$7'(9(92B0B.
$7'(9($'-B/B&
$7'(9(92B0B&
$7'(9($'-B/B0
$7'(9(92B0B0
$7'(9($'-B/B<
$7'(9(92B0B<
$7'(9($'-B0B.
$7'(9($'-B0B&
$7'(9($'-B0B0
$7'(9($'-B0B<
$7'(9(92B/B.
$7'(9(92B/B&
$7'(9(92B/B0
$7'(9(92B/B<
.
&
0
<


