Sharp LC-50LE275X Operation Manuals Download Page 5


-

 3

Preparation

Connecting a DVD player/Digital TV STB (Set Top Box)

You can use the INPUT 1 (HDMI/ARC)/INPUT 2 (HDMI/MHL) or INPUT 3 terminals when connecting to a DVD 
player/Digital TV STB (Set Top Box) and other audiovisual equipment.

When using HDMI-certifi ed cable (commercially 
available)

When using component cable (commercially 
available)

C.I.

USB

DC5V 0.5A

DIGITAL
AUDIO

OUTPUT

AUDIO

OUT 

(R/L)

SERVICE

ONLY

HDMI 1

HDMI 2

MHL

(DC5V 900mA)

ARS

COMPONENT/AV INPUT

 INPUT 3

L - AUDIO - R

PR(CR) PB(CB) VIDEO/Y

HDMI 2

MHL

(DC5V 900mA)

COMPONENT/AV INPUT

 INPUT 3

L - AUDIO - R

P

R

(C

R

) P

B

(C

B

) VIDEO/Y

DVD player/
Digital TV STB 
(Set Top Box)

DVD player/
Digital TV STB 
(Set Top Box)

Connecting a PC

You can use the INPUT 1 (HDMI/ARC)/INPUT 2 
(HDMI/MHL) terminal when connecting to a PC.

C.I.

C.I.

USB

DC5V 0.5A

DIGITAL

AUDIO

OUTPUT

AUDIO
OUT 
(R/L)

SERVICE
ONLY

HDMI 1

HDMI 2

MHL

(DC5V 900mA)

ARS

COMPONENT/AV INPUT

 INPUT 3

L - AUDIO - R

PR(CR) PB(CB) VIDEO/Y

HDMI 2

MHL

(DC5V 900mA)

HDMI 1

ARC

PC

C.I.

USB

DC5V 0.5A

DIGITAL

AUDIO
OUTPUT

AUDIO

OUT 

(R/L)

SERVICE

ONLY

HDMI 1

HDMI 2

MHL

(DC5V 900mA)

ARS

COMPONENT/AV INPUT

 INPUT 3

L - AUDIO - R

PR(CR) PB(CB) VIDEO/Y

USB

DC5V 1.5A

CAUTION 

•  Do not disconnect a USB device from the TV while 

transferring fi les, when a screen is in “USB” mode.

Connecting a USB device

Connect a USB device to the TV.

Using Digital Audio Output

It is possible to output audio through the DIGITAL 
AUDIO OUTPUT terminal. PCM audio outputs from 
the terminal.

C.I.

USB

DC5V 0.5A

DIGITAL
AUDIO

OUTPUT

AUDIO
OUT 
(R/L)

SERVICE
ONLY

HDMI 1

HDMI 2

MHL

(DC5V 900mA)

ARS

COMPONENT/AV INPUT

 INPUT 3

L - AUDIO - R

PR(CR) PB(CB) VIDEO/Y

DIGITAL

AUDIO

OUTPUT

Optical fi bre cable 
(commercially available)

To optical digital input 
of external audio 
devices

NOTE 

•  The DIGITAL AUDIO OUTPUT terminal usually outputs the same audio from the speakers. (The audio of the content you are 

viewing is output from the terminal.)

•  The DIGITAL AUDIO OUTPUT terminal does not output some signals, depending on devices and software.

•  The illustrations used throughout this manual are based on LC-50LE275X.
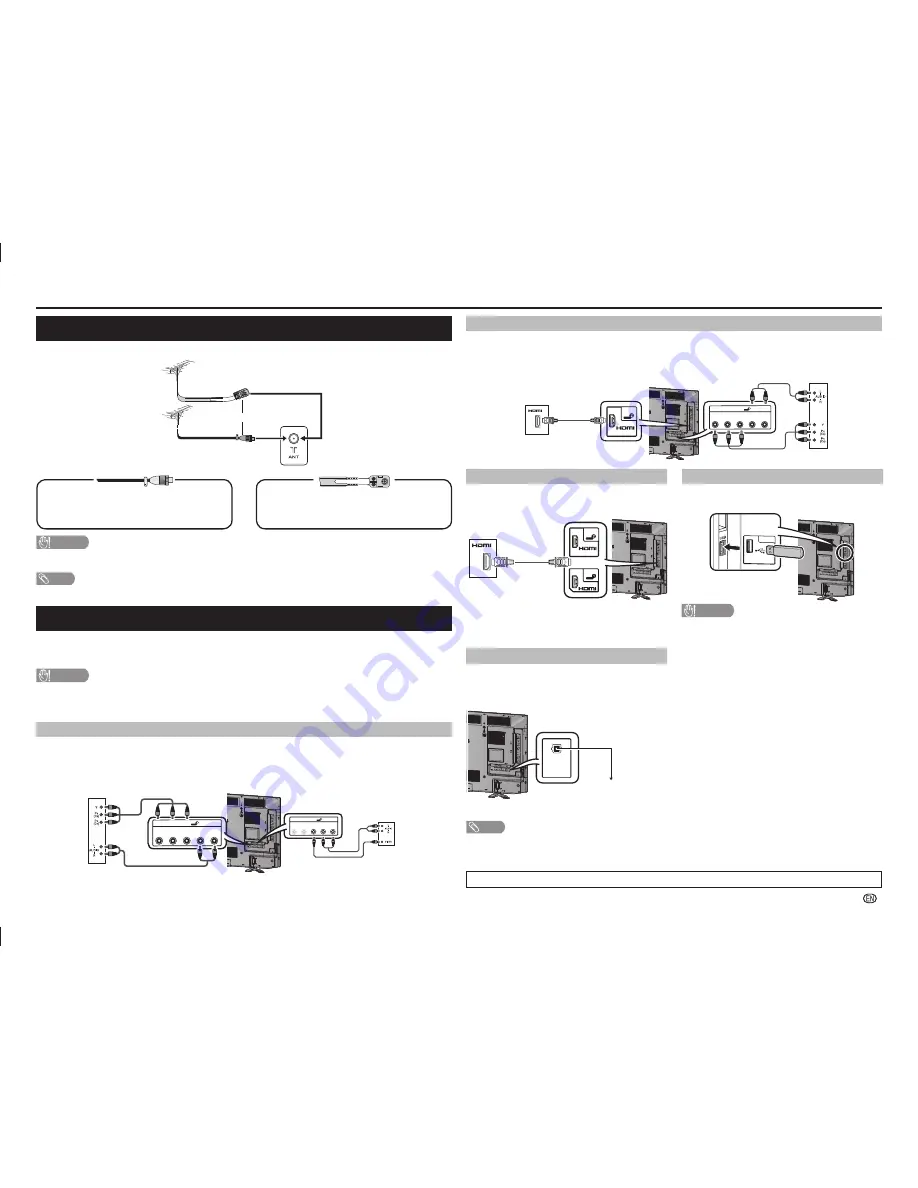
Antenna connection

Connect antenna cable to the antenna terminal

or

If your outdoor antenna uses a 75-ohm coaxial cable 
with a standard DIN45325 plug (IEC 169-2), plug it into 
the antenna jack at the rear of the set.

If your outdoor antenna uses a 300-ohm twin-lead fl at 
feeder, connect a 300-ohm to 75-ohm impedance 
converter and plug it into the antenna jack at the rear of 
the set.

CAUTION 

•  TO PREVENT RISK OF ELECTRIC SHOCK, DO NOT TOUCH UN-INSULATED PARTS OF ANY CABLES WITH THE 

AC CORD CONNECTED.

NOTE 

•  Place the TV close to the AC outlet, and keep the power plug within reach.

Connecting external devices

You can connect many types of external equipment to your TV, like a VCR, game console, camcorder, DVD 
player, Digital TV STB (Set Top Box) and PC. To view external source images, select the input source from 

INPUT

 on the remote control unit or 

INPUT

 on the TV.

CAUTION 

•  To protect all equipment, always turn off the TV before connecting to a VCR, game console, camcorder, DVD player, Digital 

TV STB (Set Top Box), PC or other external equipment.

•  Refer to the relevant operation manual (VCR, DVD player, etc.) carefully before making connections.

Connecting a VCR, game console or camcorder

A VCR, game console, camcorder and some other audiovisual equipment can be conveniently connected 
using the INPUT 3 terminal.

When using component cable (commercially 
available)

When using composite cable (commercially 
available)

VCR/Game 
console/
Camcorder

VCR/Game 
console/
Camcorder

C.I.

USB

DC5V 0.5A

DIGITAL

AUDIO

OUTPUT

AUDIO
OUT 
(R/L)

SERVICE

ONLY

HDMI 1

HDMI 2

MHL

(DC5V 900mA)

ARS

COMPONENT/AV INPUT

 INPUT 3

L - AUDIO - R

PR(CR) PB(CB) VIDEO/Y

COMPONENT/AV INPUT

 INPUT 3

L - AUDIO - R

P

R

(C

R

) P

B

(C

B

) VIDEO/Y

COMPONENT/AV INPUT

 INPUT 3

L - AUDIO - R

P

R

(C

R

) P

B

(C

B

) VIDEO/Y

P

R

(C

R

) P

B

(C

B

)

LC-505865LE275X_EN_G446.indd   3

LC-505865LE275X_EN_G446.indd   3

5/18/2015   5:44:38 PM

5/18/2015   5:44:38 PM

Summary of Contents for LC-50LE275X

Page 1: ...LC 50LE275X LC 58LE275X LC 65LE275X LED BACKLIGHT TV LED OPERATION MANUAL 使用说明书 POWER 中文 ENGLISH Cover_LC 50_5865LE275X_G446 indd 1 Cover_LC 50_5865LE275X_G446 indd 1 5 18 2015 1 35 44 PM 5 18 2015 1 35 44 PM ...

Page 2: ...Cover_LC 50_5865LE275X_G446 indd 2 Cover_LC 50_5865LE275X_G446 indd 2 5 18 2015 1 35 44 PM 5 18 2015 1 35 44 PM ...

Page 3: ...oduct with 2 073 600 pixels giving you fine picture details Due to the very large number of pixels occasionally a few non active pixels may appear on the screen as a fixed point of blue green or red This is within product specifications and does not constitute a fault Precautions when transporting the TV When transporting the TV never carry it by holding or otherwise putting pressure onto the display...

Page 4: ...the base area to lay the TV on This will prevent it from being damaged 1 Confirm the screws supplied with the TV Screws 4 2 Insert the stand assembly into the openings on the bottom of the TV 1 3 Insert and tighten the screws into the holes on the rear of the TV 2 USB DC5V0 5A HDMI 1 HDMI 2 MHL DC5V 900mA ARS 1 2 DIGITAL AUDIO OUTPUT AUDIO OUT R L SERVICE ONLY COMPONENT AV INPUT L AUDIO R PR CR PB ...

Page 5: ...t from the terminal The DIGITAL AUDIO OUTPUT terminal does not output some signals depending on devices and software The illustrations used throughout this manual are based on LC 50LE275X Antenna connection Connect antenna cable to the antenna terminal or If your outdoor antenna uses a 75 ohm coaxial cable with a standard DIN45325 plug IEC 169 2 plug it into the antenna jack at the rear of the set...

Page 6: ...tone of the still image See page 11 14 PHOTO Display your pictures directly on the TV screen See page 12 15 INPUT INPUT SOURCE Select an input source 16 CHr CHs TV input mode Select the channel CHr Increase the channel number CHs Decrease the channel number TELETEXT mode Select a page See page 12 17 MENU Display the menu screen 18 MPX Select the sound multiplex mode 19 RETURN MENU mode Return to t...

Page 7: ... auto installation wizard appears Follow the menu and make the necessary settings one after another 1 Press POWER on the TV The initial auto installation wizard appears 2 Press a b to select your country channels listed on the screen and then press ENTER Press a b to select the desired language and then press ENTER Press a b to select HOME or STORE and then press ENTER HOME STANDARD will be the de...

Page 8: ... to lock the selected channel Press 5 again to unlock the locked channel On Screen Display Menu Selecting a preset AV mode AV mode gives you several viewing options to choose from to best match the system environment which can vary due to factors like room brightness type of programme watched or the type of image input from external equipment 1 Press MENU and the MENU screen displays 2 Press c d t...

Page 9: ...er treble Bass For weaker bass For stronger bass Balance Decrease audio from the right speaker Decrease audio from the left speaker H Surround When you set to On you can enjoy surround sound the same as if you were in a movie theatre On Off NOTE For resetting all Sound adjust items to the factory preset values press a b to select Reset press ENTER press a b to select Yes and then press ENTER ECO m...

Page 10: ...hildren from watching violent or sexual scenes that may be considered inappropriate 1 Repeat steps 1 to 3 in Setting a password 2 Press a b to select Parental rating and then press ENTER 3 Press a b to select your desired rating and then press ENTER Selected item Description Off Cancel the blocking Age xx years Select desired age to block Example If age 14 is selected programmes rated for ages of ...

Page 11: ...s selectable only when inputting a composite signal Time zone This function enables you to select your local time zone 1 Press MENU and the MENU screen displays 2 Press c d to select Setup 3 Press a b to select Digital setup and then press ENTER 4 Press a b to select Time zone and then press ENTER 5 Press c d to select the desired time zone NOTE This function lets you select the right time zone in...

Page 12: ...O BBC1 B G MONO PAL NICAM PAL ATV ATV BBC1 ATV Analogue TV You can run the auto installation to set channels automatically 1 To watch the analogue TV select ATV from Auto installation in Programme setup menu See page 5 2 After setting the channels you can select a channel using CHr s or 0 9 on the remote control unit See page 4 DTV Digital TV When the TV accesses to DTV mode for the first time you ...

Page 13: ...White with greenish tone b White with reddish tone c White with bluish tone d White with yellowish tone R Reveal hide the setting screen G Set adjustment to last user setting B Close the setting screen and unfreeze image ENTER Save exit setting NOTE The colour adjustment screen and still image will automatically goes out after 30 minutes Freeze Colour adjustment function does not work in USB Photo...

Page 14: ...EXT TELETEXT NOTE If you select a programme with no Teletext signal No Teletext available is displayed The same message displays during other modes if no Teletext signal is available Button functions Buttons Description CH r s Increase or decrease the page number Colour Red Green Yellow Blue You can select a group or block of pages displayed in the coloured brackets at the bottom of the screen by ...

Page 15: ...ockwise 90º Rotate counterclockwise 90º Zoom in an image Select to display larger image size Zoom out an image Select to display smaller image size Pan image up down left or right after you zoom in Press ENTER to exit Select playback length of a slideshow Select photo display interval Wide mode You can manually select the size of a picture appeared on your screen NOTE Files in folder which are not...

Page 16: ...ot leave the unit in a hot or cold location Also do not leave the unit in a location exposed to direct sunlight or near a heater as this may cause the cabinet to deform and the LCD panel to malfunction Storage temperature f20 C to e60 C Specifications Item Model LC 50LE275X LC 58LE275X LC 65LE275X LCD panel 126 cm 146 cm 164 cm Resolution 2 073 600 pixels 1920 g 1080 Video colour system PAL SECAM N...

Page 17: ... MHL DC5V 900mA HDMI LC 58LE275X Dimensional drawings Unit mm 687 400 831 255 400 82 60 7 1123 1103 622 4 656 POWER USB DC5V 0 5A DIGITAL AUDIO OUTPUT AUDIO OUT R L SERVICE ONLY HDMI 1 ARC HDMI 2 MHL DC5V 900mA COMPONENT AV INPUT INPUT 3 L AUDIO R PB CB PR CR VIDEO Y HDMI LC 50LE275X LC 505865LE275X_EN_G446 indd 15 LC 505865LE275X_EN_G446 indd 15 5 18 2015 5 44 49 PM 5 18 2015 5 44 49 PM ...

Page 18: ...he MENU screen and then press c d to select Setup 2 Press a b to select Child lock and then press ENTER and the password input screen display 3 If you enter 3001 using 0 9 the Child lock setting menu will be displayed 4 Enter the 4 digit number as a password using 0 9 The new password is now set DISPLAY ATV DTV DISPLAY ATV DTV The Password is NOTE As a precautionary measure make a note of your pas...

Page 19: ... 17 Note LC 505865LE275X_EN_G446 indd 17 LC 505865LE275X_EN_G446 indd 17 5 18 2015 5 44 54 PM 5 18 2015 5 44 54 PM ...

Page 20: ... 18 Note LC 505865LE275X_EN_G446 indd 18 LC 505865LE275X_EN_G446 indd 18 5 18 2015 5 44 54 PM 5 18 2015 5 44 54 PM ...

Page 21: ...Printed in Malaysia 马来西亚印刷 TINS G446WJZZ 15P05 MA NP Cover_LC 50_5865LE275X_G446 indd 4 Cover_LC 50_5865LE275X_G446 indd 4 5 18 2015 1 35 44 PM 5 18 2015 1 35 44 PM ...

Reviews: