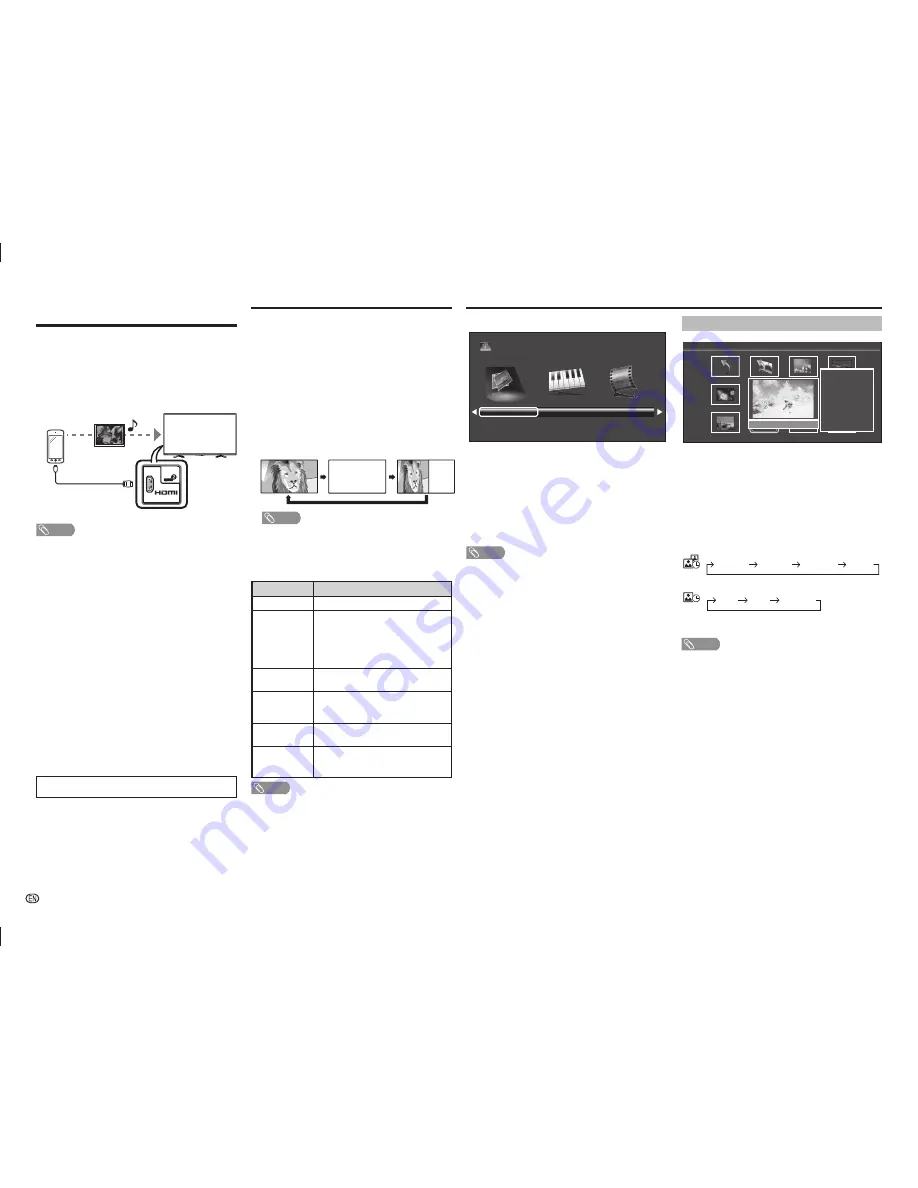
Sharp LC-50LE275X Operation Manuals Download Page 14


-

 12

H


Selecting modes

Photo mode

Music mode

Movie mode

USB

1

Press 

INPUT

 to select the “USB” mode.

2

Press 

c

/

d

 to select “Photo mode”, “Music 

mode” or “Movie mode”, and then press 

ENTER

.

3

Press 

c

/

d

 to select your USB directory, and 

then press 

ENTER

.

4

Press 

a

/

b

/

c

/

d

 to select the desired folder, and 

then press 

ENTER

.

NOTE 

•  “Wide mode” is fi xed during “Photo mode” and “Music 

mode”.

•  Depending on the USB device, the TV may not be able to 

recognise the contained data.

•  A fi le name with more than 10 characters may not be 

displayed all (depending on the character set).

•  Files in USB 1.1 devices may not be played properly.
•  Operation using USB hubs is not guaranteed.
•  The compatibility of USB HDDs may not be guaranteed.

PHOTO slideshow

C:\Photo

1/2

Back

Fireworks.jpg

Switzerland.jpg

Japan-hokkaid..

Island.jpg

Ski Action.jpg

WxH:

1300 X 822

Size:

789 KBytes

Date:

2011 / 08 / 04

Time:

10 : 12 :12

Ski Action.jpg

When you press 

PHOTO

, the TV screen will 

automatically play the photo slideshow.

•  If there is no USB drive, the TV will switch to 

Selecting 

modes

 screen.

•  Photo slideshows will autoplay only for the photos located 

on the top layer of USB drive. To enable autoplay for 
photos located in a subfolder, you need to manually select 
the subfolder, and then press 

PHOTO

.

You can select the duration for each photo to display, 
and also the duration for the slideshow to play.

Duration for photos to display

1 minute

10 seconds

5 seconds

3 seconds

Duration for slideshow to play

Continuous

3 hour

1 hour

•  The TV will automatically power off after the 

selected playtime ends.

NOTE 

•  Background music will autoplay during a slideshow only if 

the music fi le is located in the same folder with the photo 
fi les.

•  If you want to stop the photo slideshows, press 

RETURN


to exit.

USB Media Player

Teletext function

What is Teletext?

Teletext broadcasts pages of information and 
entertainment to specially equipped television sets. 
News, weather reports, sports information, stock 
exchange prices and programme previews are 
among the many services available.

Turning on and off Teletext

1

Select a TV channel or external input source 
providing the Teletext programme.

2

Press 

m

 to display the Teletext.

3

Each time you press 

m

, the screen switches as 

shown below.

TELETEXT

TELETEXT

NOTE 

•  If you select a programme with no Teletext signal, 

“No Teletext available.” is displayed.

•  The same message displays during other modes if no 

Teletext signal is available.

Button functions

Buttons

Description

CH (

r

/

s

)

Increase or decrease the page number.

Colour (Red/
Green/Yellow/
Blue)

You can select a group or block 
of pages displayed in the coloured 
brackets at the bottom of the screen 
by pressing the corresponding 

Colour 

(Red/Green/Yellow/Blue)

 on the 

remote control unit.

0 – 9

Directly select any page from 100 to 899 
by using 

0 – 9

.

k

 (Reveal 

hidden for 
TELETEXT)

To reveal hidden information such as an 
answer to a quiz.

3

 (Hold)

To stop updating Teletext pages 
automatically or release the hold mode.

[

 (Subtitle for 

TELETEXT)

Display the subtitle during Teletext page.

•  Subtitle will not be displayed when the 

service does not contain subtitle information.

NOTE 

•  Teletext can display only when it is sent by a network. Not 

used to convert between languages.

Using a Smartphone with 
the TV

This function enables you to connect the TV to a 
smartphone that supports Mobile High-Defi nition 
Link (MHL) using an MHL-compatible cable.
To connect the TV to your MHL-compatible 
smartphone, be sure to use an MHL-compatible 
cable (commercially available).

•  You can view pictures and video on a large screen.
•  You can play back music fi les.

POWER

HDMI 2

(DC 5V 900mA)

MHL

MHL-compatible cable

INPUT 2 terminal (Rear side)

NOTE 

•  An MHL-compatible portable device is required to use this 

function. Connect the device to the INPUT 2 terminal.

•  This product incorporates MHL 2.

H

 Auto power on

When an MHL-compatible device is connected to 
the TV, the TV turns on automatically.

•  This function operates when “Link operation” is set to “On”. 

(See page 8.)

H

 Auto input selection

When an MHL-compatible device is connected 
while the TV is on, the input mode is selected 
automatically.

•  This function operates when “Link operation” is set to “On”.  

(See page 8.)

H

 Operation using the remote control

The remote control of the TV can be used to operate 
a portable device.

• 

a

/

b

/

c

/

d

ENTER

0 – 9

, etc.

•  The operations vary depending on the connected 

equipment and content being viewed.

• 

Colour (Red/Green/Yellow/Blue)

 may be available to 

control play/pause/fast forward/back forward function.

•  The illustrations used throughout this manual are based 

on LC-50LE275X.

LC-505865LE275X_EN_G446.indd   12

LC-505865LE275X_EN_G446.indd   12

5/18/2015   5:44:49 PM

5/18/2015   5:44:49 PM

Summary of Contents for LC-50LE275X

Page 1: ...LC 50LE275X LC 58LE275X LC 65LE275X LED BACKLIGHT TV LED OPERATION MANUAL 使用说明书 POWER 中文 ENGLISH Cover_LC 50_5865LE275X_G446 indd 1 Cover_LC 50_5865LE275X_G446 indd 1 5 18 2015 1 35 44 PM 5 18 2015 1 35 44 PM ...

Page 2: ...Cover_LC 50_5865LE275X_G446 indd 2 Cover_LC 50_5865LE275X_G446 indd 2 5 18 2015 1 35 44 PM 5 18 2015 1 35 44 PM ...

Page 3: ...oduct with 2 073 600 pixels giving you fine picture details Due to the very large number of pixels occasionally a few non active pixels may appear on the screen as a fixed point of blue green or red This is within product specifications and does not constitute a fault Precautions when transporting the TV When transporting the TV never carry it by holding or otherwise putting pressure onto the display...

Page 4: ...the base area to lay the TV on This will prevent it from being damaged 1 Confirm the screws supplied with the TV Screws 4 2 Insert the stand assembly into the openings on the bottom of the TV 1 3 Insert and tighten the screws into the holes on the rear of the TV 2 USB DC5V0 5A HDMI 1 HDMI 2 MHL DC5V 900mA ARS 1 2 DIGITAL AUDIO OUTPUT AUDIO OUT R L SERVICE ONLY COMPONENT AV INPUT L AUDIO R PR CR PB ...

Page 5: ...t from the terminal The DIGITAL AUDIO OUTPUT terminal does not output some signals depending on devices and software The illustrations used throughout this manual are based on LC 50LE275X Antenna connection Connect antenna cable to the antenna terminal or If your outdoor antenna uses a 75 ohm coaxial cable with a standard DIN45325 plug IEC 169 2 plug it into the antenna jack at the rear of the set...

Page 6: ...tone of the still image See page 11 14 PHOTO Display your pictures directly on the TV screen See page 12 15 INPUT INPUT SOURCE Select an input source 16 CHr CHs TV input mode Select the channel CHr Increase the channel number CHs Decrease the channel number TELETEXT mode Select a page See page 12 17 MENU Display the menu screen 18 MPX Select the sound multiplex mode 19 RETURN MENU mode Return to t...

Page 7: ... auto installation wizard appears Follow the menu and make the necessary settings one after another 1 Press POWER on the TV The initial auto installation wizard appears 2 Press a b to select your country channels listed on the screen and then press ENTER Press a b to select the desired language and then press ENTER Press a b to select HOME or STORE and then press ENTER HOME STANDARD will be the de...

Page 8: ... to lock the selected channel Press 5 again to unlock the locked channel On Screen Display Menu Selecting a preset AV mode AV mode gives you several viewing options to choose from to best match the system environment which can vary due to factors like room brightness type of programme watched or the type of image input from external equipment 1 Press MENU and the MENU screen displays 2 Press c d t...

Page 9: ...er treble Bass For weaker bass For stronger bass Balance Decrease audio from the right speaker Decrease audio from the left speaker H Surround When you set to On you can enjoy surround sound the same as if you were in a movie theatre On Off NOTE For resetting all Sound adjust items to the factory preset values press a b to select Reset press ENTER press a b to select Yes and then press ENTER ECO m...

Page 10: ...hildren from watching violent or sexual scenes that may be considered inappropriate 1 Repeat steps 1 to 3 in Setting a password 2 Press a b to select Parental rating and then press ENTER 3 Press a b to select your desired rating and then press ENTER Selected item Description Off Cancel the blocking Age xx years Select desired age to block Example If age 14 is selected programmes rated for ages of ...

Page 11: ...s selectable only when inputting a composite signal Time zone This function enables you to select your local time zone 1 Press MENU and the MENU screen displays 2 Press c d to select Setup 3 Press a b to select Digital setup and then press ENTER 4 Press a b to select Time zone and then press ENTER 5 Press c d to select the desired time zone NOTE This function lets you select the right time zone in...

Page 12: ...O BBC1 B G MONO PAL NICAM PAL ATV ATV BBC1 ATV Analogue TV You can run the auto installation to set channels automatically 1 To watch the analogue TV select ATV from Auto installation in Programme setup menu See page 5 2 After setting the channels you can select a channel using CHr s or 0 9 on the remote control unit See page 4 DTV Digital TV When the TV accesses to DTV mode for the first time you ...

Page 13: ...White with greenish tone b White with reddish tone c White with bluish tone d White with yellowish tone R Reveal hide the setting screen G Set adjustment to last user setting B Close the setting screen and unfreeze image ENTER Save exit setting NOTE The colour adjustment screen and still image will automatically goes out after 30 minutes Freeze Colour adjustment function does not work in USB Photo...

Page 14: ...EXT TELETEXT NOTE If you select a programme with no Teletext signal No Teletext available is displayed The same message displays during other modes if no Teletext signal is available Button functions Buttons Description CH r s Increase or decrease the page number Colour Red Green Yellow Blue You can select a group or block of pages displayed in the coloured brackets at the bottom of the screen by ...

Page 15: ...ockwise 90º Rotate counterclockwise 90º Zoom in an image Select to display larger image size Zoom out an image Select to display smaller image size Pan image up down left or right after you zoom in Press ENTER to exit Select playback length of a slideshow Select photo display interval Wide mode You can manually select the size of a picture appeared on your screen NOTE Files in folder which are not...

Page 16: ...ot leave the unit in a hot or cold location Also do not leave the unit in a location exposed to direct sunlight or near a heater as this may cause the cabinet to deform and the LCD panel to malfunction Storage temperature f20 C to e60 C Specifications Item Model LC 50LE275X LC 58LE275X LC 65LE275X LCD panel 126 cm 146 cm 164 cm Resolution 2 073 600 pixels 1920 g 1080 Video colour system PAL SECAM N...

Page 17: ... MHL DC5V 900mA HDMI LC 58LE275X Dimensional drawings Unit mm 687 400 831 255 400 82 60 7 1123 1103 622 4 656 POWER USB DC5V 0 5A DIGITAL AUDIO OUTPUT AUDIO OUT R L SERVICE ONLY HDMI 1 ARC HDMI 2 MHL DC5V 900mA COMPONENT AV INPUT INPUT 3 L AUDIO R PB CB PR CR VIDEO Y HDMI LC 50LE275X LC 505865LE275X_EN_G446 indd 15 LC 505865LE275X_EN_G446 indd 15 5 18 2015 5 44 49 PM 5 18 2015 5 44 49 PM ...

Page 18: ...he MENU screen and then press c d to select Setup 2 Press a b to select Child lock and then press ENTER and the password input screen display 3 If you enter 3001 using 0 9 the Child lock setting menu will be displayed 4 Enter the 4 digit number as a password using 0 9 The new password is now set DISPLAY ATV DTV DISPLAY ATV DTV The Password is NOTE As a precautionary measure make a note of your pas...

Page 19: ... 17 Note LC 505865LE275X_EN_G446 indd 17 LC 505865LE275X_EN_G446 indd 17 5 18 2015 5 44 54 PM 5 18 2015 5 44 54 PM ...

Page 20: ... 18 Note LC 505865LE275X_EN_G446 indd 18 LC 505865LE275X_EN_G446 indd 18 5 18 2015 5 44 54 PM 5 18 2015 5 44 54 PM ...

Page 21: ...Printed in Malaysia 马来西亚印刷 TINS G446WJZZ 15P05 MA NP Cover_LC 50_5865LE275X_G446 indd 4 Cover_LC 50_5865LE275X_G446 indd 4 5 18 2015 1 35 44 PM 5 18 2015 1 35 44 PM ...

Reviews: