background image


EN      13  


En

gl

is

Switch TV to standby


Press   on the remote control. The remote 
control sensor on the TV switches to red. 

Switch off the TV


Press the power switch at the base of the 

TV to the 

OFF

 position.   

The TV no longer consumes energy. 

Note

: If there is no user interaction (such as 

pressing a remote control button or a 
control on the front panel) for four hours, 
the TV will automatically switch to standby. 

To disable automatic switch off:


1. Press 

MENU

2. Select 

[Setup]

 > 

[TV settings]

 > 

[Preferences]

 > 

[Auto switch off]

 > 

[Off]


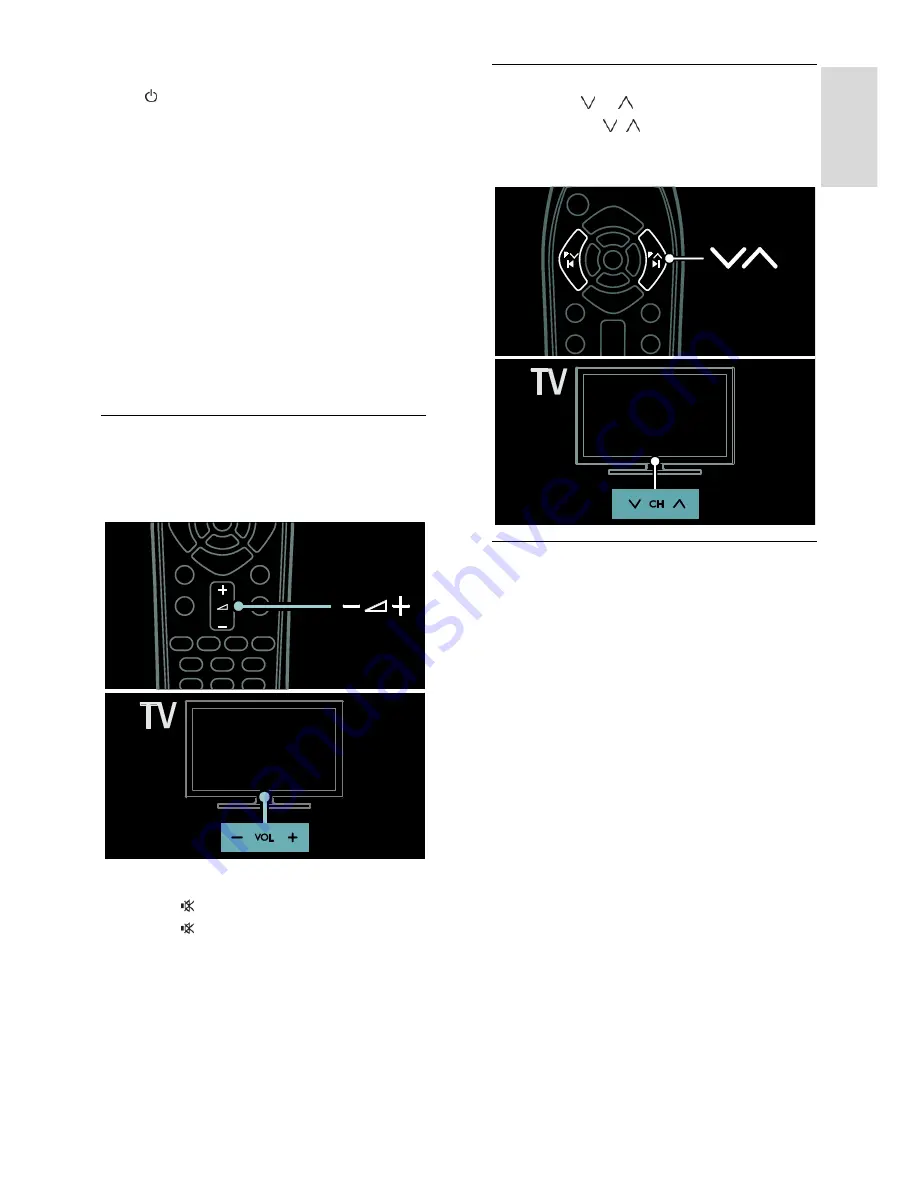
Adjust TV volume 

Increase or decrease the TV volume


Press 

+/-

 on the remote control. 


Press 

VOL +/-

 on the front of the TV. 


Mute or unmute the TV volume


Press   to mute the TV, or 


Press   again to restore the volume. 

Adjust headphone volume


1. Press 

MENU

 > 

[TV settings]

 > 

[Sound]

2. Select 

[Headphones volume]

, then press 

OK


Switch TV channels 


Press 

P

 / 

P

 on the remote control. 


Press 

CH   /  

  on the TV. 


Press the 

Alphanumeric buttons

 to 

enter a channel number. 


Manage channel lists 

You can view all channels, or only your 
favourites in the channel list. 
Press 

FIND

 to access the channel list. 

Create a channel list


You can create a channel list that contains 
only your favourite channels. 
1. Press 

FIND

2. Press 

OPTIONS

3. Select 

[Mark as favourite]

 or 

[Unmark as 

favourite]

, then press 

OK


Select a channel list


1. In the channel list, press 

OPTIONS

2. Select 

[Select list]

 > 

[Favourites]

 to 

display channels in the favourite list; or 

[All]


to display all channels. 

3. Press 

OK

 to confirm.  


Summary of Contents for LC-32LE631E

Page 1: ...e Link operation 27 4 Set up your TV 30 Settings assistant 30 Picture and sound 30 Channels 31 Menu language 34 Other settings 34 Update software 34 Reinstall the TV 35 5 Connect your TV 36 About cables 36 Connect devices 37 Connect more devices 43 Computers and the Internet 45 Common interface 47 6 Troubleshooting 48 contact SHARP 48 General TV 48 TV channel 48 Picture 49 Sound 49 HDMI 50 USB 50 ...

Page 2: ...seful features To open or close the Source menu In the Source menu access connected devices To open or close the Find menu In the Find menu access the channel list To open or close the Options menu Options menus offer convenient settings for TV channels or programmes To return to the previous menu page To exit from a menu or function To select a red menu option or watch TV demonstration clips ...

Page 3: ...ray disc player or game console through HDMI TM To watch a device add it to the TV menu 1 Press MENU Add your devices 2 Follow the onscreen instructions Note If you are prompted to select the TV connection select the connector that this device uses See Connect your TV Connect devices Page 37 for information on connection If a Link operation or HDMI Consumer Electronic Control HDMI CEC compliant de...

Page 4: ... network an HD game console for example X Box 360 or PlayStation 3 connected with an HDMI cable playing an HD game HD video clip To experience the stunning sharpness and picture quality of HD TV watch the HD video clip from the Home menu Press MENU Setup Watch demos Watch Demo is on the second page of the setup menu For more information about the availability of HD channels in your country contact...

Page 5: ...When stand mounting the TV use only the supplied stand Secure the stand to the TV tightly Place the TV on a flat level surface that can support the combined weight of the TV and the stand When wall mounting the TV use only a wall mount that can support the weight of the TV Secure the wall mount to a wall that can support the combined weight of the TV and wall mount SHARP bears no responsibility fo...

Page 6: ...ff water drops as soon as possible Avoid stationary images as much as possible Stationary images are images that remain onscreen for extended periods of time Stationary images include onscreen menus black bars time displays etc If you must use stationary images reduce screen contrast and brightness to avoid screen damage Environmental efforts Energy efficiency SHARP continuously focuses on lowerin...

Page 7: ...e European Directive 2002 96 EC Please inform yourself about the local separate collection system for electrical and electronic products Please act according to your local rules and do not dispose of your old products with your normal household waste Correct disposal of your old product helps to prevent potential negative consequences for the environment and human health Your product contains batt...

Page 8: ...ons provided with the TV mount SHARP bears no responsibility for improper wall mounting that results in accident injury or damage To prevent damage to cables and connectors leave a gap of at least 5 5 cm 2 2 inches from the back of the TV For 32 inch to 46 inch TVs Before you wall mount the TV find the correct length of screw To find the length of screw add the thickness of your wall mount to the ...

Page 9: ...elp menu and the TV menu by pressing the Yellow button contact SHARP If you like you can contact the SHARP service centre in your country for support Contact information is available at www sharp eu com Before you contact SHARP note down your TV model and serial number You can find this information on the back of your TV or on its packaging ...

Page 10: ... select items 3 P P Switch channels navigate through menu pages tracks albums or folders 4 MENU Access the TV menu 5 OK Confirm an entry or selection 6 OPTIONS Access options for the current activity or selection 7 Back Return to the previous menu page 8 EXIT Exit from a menu or function 9 Colour buttons Select tasks or options Not supported in MHEG mode 10 FIND Access the menu to select TV channe...

Page 11: ...tion controls Link operation allows you to control your TV and other HDMI CEC devices with one remote control Access Link operation controls 1 While you view content from a connected HDMI CEC device press OPTIONS 2 Select Show device keys then press OK 3 Select the Link operation control button then press OK Read more on Link operation in Use more of your TV Use Link operation Page 27 Watch TV Swi...

Page 12: ... TV Mute or unmute the TV volume Press to mute the TV or Press again to restore the volume Adjust headphone volume 1 Press MENU TV settings Sound 2 Select Headphones volume then press OK Switch TV channels Press P P on the remote control Press CH on the TV Press the Alphanumeric buttons to enter a channel number Manage channel lists You can view all channels or only your favourites in the channel ...

Page 13: ...ramme reminders Clear reminder Clear programme reminders Change day Select the day to display More info Display programme information Search by genre Search TV programmes by genre Scheduled reminders List programme reminders Update EPG Update the latest programme information Use smart picture settings Select your preferred picture setting 1 While you watch TV press OPTIONS 2 Select Smart picture 3...

Page 14: ... in the picture menu Watch a connected device Add new device Notes Before you watch a connected device you must add its icon to the TV menu See Connect your TV Connect device Page 37 If you connect an HDMI CEC compliant device to the TV it is automatically added to the TV menu 1 Connect and switch on the device 2 Press MENU 3 Select Add your devices then press OK 4 Follow the onscreen instructions...

Page 15: ... disable random play of videos View picture Press the Navigation buttons to select a picture then press OK To pause or stop play press OK To skip to the previous or next file press or Press and hold to exit content browser Press OPTIONS to access or exit the following picture options Show info Display the file information Stop Stop slideshow Rotate Rotate the file Repeat Repeat the slideshow Play ...

Page 16: ...ars Tick the Share my media box and click OK A device marked as Unknown Device appears in the Media Sharing screen If the unknown device does not appear after a minute or so make sure that your PC firewall is not blocking the connection 3 From the Media Sharing screen select the unknown device and click Allow A green tick appears next to the device By default Windows Media Player shares files from...

Page 17: ... Home network then press OK If the network installation starts follow the onscreen instructions 5 If the content browser is displayed select a file then press OK The file starts to play 6 Press the Play buttons on the remote control to control play View pictures To play a picture slideshow select a photo then press OK To pause or stop playback press OK again To play the previous or next file press...

Page 18: ...d 2 To agree to the terms and conditions press OK Access AQUOS NET apps The first page shown is the AQUOS NET home page The icons on this page represent the applications Apps Browse Internet websites with the Internet Apps Press the Navigation buttons to select an App then press OK to confirm Access the App Gallery to add more Apps to your home screen You can change country settings and select App...

Page 19: ...ht Reload page If a page does not load correctly reload it Press OPTIONS and select Reload page Security info To view security information about a page press OPTIONS and select Security info Rent online video What you can do With this TV you can rent a video from an online video store 1 Open a video store You may need to register or enter your login 2 Select a video 3 Make the online payment 4 Dow...

Page 20: ...nt if you do not have one The login might consist of your email address and a personal PIN code When you are logged in you can select the payment method a credit card or a value code in most cases Consult the video store website for more information on its payment terms To enter a number code PIN use the Numeric buttons on the remote control To enter an email address select the text field on the p...

Page 21: ... TV channel that offers HbbTV the interactive pages will open automatically or at some point you will be invited to open them Depending on the broadcaster you might need to press the red button or OK on the remote control to access the page To exit the HbbTV pages select the relevant button on screen and press OK Navigate HbbTV pages To navigate the HbbTV pages you can use the navigation buttons c...

Page 22: ... group to display different character sets correctly 3 Press OPTIONS to exit Teletext language Some digital TV broadcasters provide several teletext languages You can set your primary and secondary language 1 Press MENU 2 Select Setup Channel settings or Satellite settings 3 Select Languages Primary Text or Secondary Text 4 Select your preferred teletext languages then press OK Subpages A teletext...

Page 23: ... saving time or Standard time then press OK Daylight saving is enabled or disabled Set the clock manually If clock mode is set to Manual set the date and time manually 1 In the Clock menu select Date or Time then press OK 2 Use the Navigation buttons to make your selection 3 Select Done then press OK Sleeptimer Sleeptimer switches the TV to standby after a specified time You can switch off your TV...

Page 24: ... Note If MHEG application is activated subtitles are not displayed If you select On during mute subtitles are displayed only when you press to mute the sound Subtitle language You can change the subtitle language on some digital channels 1 Press MENU 2 Select Setup Channel settings or Satellite settings Subtitle language 3 Select Primary subtitles or Secondary subtitles for the preferred language ...

Page 25: ...n Switch on hearing impaired audio and subtitles 3 Press to exit Visually impaired Tip To verify whether visually impaired audio is available press OPTIONS and select Audio language Languages with an eye icon support visually impaired audio To switch on visually impaired audio if available 1 While you watch TV press OPTIONS 2 Press the green button to select Visually impaired 3 Press one of the fo...

Page 26: ...y the picture processing features of other devices switch on Brilliant colour processor To switch on Brilliant colour processor see Use more of your TV Use Link operation Retain picture quality see Retain picture quality on page 29 Maximize display for subtitled video While you view subtitles in a video you can maximize the video display area Some subtitles can create a separate subtitle bar under...

Page 27: ...ontrol OSRC To access the OSRC 1 While you view content from a connected device press OPTIONS 2 Select Show device keys then press OK 3 Select an onscreen button then press OK 4 Press to exit Select speaker output If the connected device is HDMI Audio Return Channel HDMI ARC compliant you can output TV audio through an HDMI cable An additional audio cable is not required See Connect your TV About ...

Page 28: ... can create a separate subtitle bar under the video which limits the video display area After you switch on auto subtitle shift the subtitles display over the video image which maximises the video display area Switch on auto subtitle shift 1 Press MENU 2 Select Setup TV settings Link operation Auto subtitle shift 3 Select On then press OK to activate Note Make sure that the picture format of the T...

Page 29: ...Processor Access advanced settings including Fine motion 100Hz double frame driving Advanced sharpness Dynamic contrast Dynamic backlight MPEG artefact reduction Colour enhancement Gamma PC mode Allow picture settings to be changed when a PC is connected to the TV through HDMI If enabled you can select Picture format Unscaled which provides maximum detail for display of PC content Light sensor Adj...

Page 30: ...ings remain the same 1 While you watch TV press MENU 2 Select Setup TV settings Factory settings then press OK TV settings are reset to default Channels Reorder and rename Reorder channels After the channels are installed you can reorder the channel list to your preference 1 While you watch TV press FIND The channel list is displayed 2 Select the channel to reorder and press OPTIONS 3 Select Reord...

Page 31: ...tomatic updates In the Channel installation menu select Automatic channel update Off Automatic install When the TV was switched on for the first time a full installation of channels was performed You can run this full installation again to set your language country and install all available TV channels 1 Press MENU 2 Select Setup Search for channels or Search for satellite then press OK 3 Follow t...

Page 32: ...allation 3 Select Digital Reception test Search then press OK 4 Press the Numeric buttons to enter the channel frequency 5 Select Search then press OK 6 When the correct channel is located select Store then press OK 7 Press to exit Notes If the reception is poor reposition your antenna and repeat the procedure If you receive the channel with DVB C select Automatic in Symbol rate mode unless your c...

Page 33: ...e is FAT or DOS formatted and has its write protection disabled Access to a computer with a USB port and internet access 1 Press MENU 2 Select Setup Update software then press OK The update assistant starts 3 Follow the onscreen instructions to start the update Update from the Internet To update the TV software directly from the Internet connect the TV to the Internet through a router with a high ...

Page 34: ...lish Reinstall the TV Reinstall your TV to reset all picture and sound settings and reinstall all TV channels 1 Press MENU 2 Select Setup TV settings Reinstall TV then press OK 3 Follow the onscreen instructions ...

Page 35: ... a SCART cinch adapter to connect the device to a SCART connector on the TV HDMI An HDMI connection has the best picture and sound quality An HDMI cable combines video and audio signals Use HDMI for high definition HD TV signals and to enable Link operation An HDMI Audio Return Channel ARC connector allows output of TV audio to an HDMI ARC compliant device Do not use an HDMI cable longer than 5 me...

Page 36: ...gnals but cannot handle high definition HD TV signals VGA Use this connection to display PC content on the TV For video and sound use the VGA and AUDIO IN connectors Connect devices Overview You can connect your devices to the TV with any of the following options After connection press MENU Add your devices ...

Page 37: ...player with an HDMI cable to the TV Connect the disc player with a component cable Y Pb Pr and an audio L R cable to the TV TV receiver Connect the satellite or digital TV receiver with an antenna cable to the TV SAT is available on certain models only ...

Page 38: ...e or digital TV receiver with an HDMI cable to the TV Connect the satellite or digital TV receiver with a SCART cable to the TV Connect the satellite or digital TV receiver with a component cable Y Pb Pr and an audio L R cable to the TV ...

Page 39: ...ct the recorder with an antenna cable to the TV SAT is available on certain models only Connect the recorder with a SCART cable to the TV Connect the recorder with a component cable Y Pb Pr and an audio L R cable to the TV ...

Page 40: ... For the best gaming experience set the TV to game mode 1 Press ADJUST 2 Select Smart picture Game then press OK 3 To exit press Connect the game console with an HDMI cable to the TV Connect the game console with a component cable Y Pb Pr and an audio L R cable to the TV Home theatre system Connect the home theatre with an HDMI cable and an audio cable to the TV ...

Page 41: ...nnect the home theatre with a SCART cable to the TV Connect the home theatre with a component cable Y Pb Pr and an audio L R cable to the TV Digital camera Connect the digital camera with a USB cable to the TV ...

Page 42: ... the digital camera with an HDMI cable to the TV Connect the digital camcorder with a component cable Y Pb Pr and an audio L R cable to the TV Connect more devices External hard disk Connect the external hard disk with a USB cable to the TV ...

Page 43: ...EN 44 Computer Connect the computer with an HDMI cable to the TV Connect the computer with a DVI HDMI cable to the TV Connect the computer with a VGA cable and an audio cable to the TV ...

Page 44: ...e home network on page 17 To connect your TV to the Internet you also need a high speed connection to the Internet Connect 1 Switch on the router and switch on its DHCP setting 2 With the ethernet cable connect the router to the TV Alternatively you can also connect the router to the TV wirelessly through a wireless USB adaptor not included See Connect your TV Computers and the Internet Wireless L...

Page 45: ...ecimal numbers Find this hexadecimal key in the router software on your PC Write down the first key of the WEP keys list and enter it on the TV with the remote control If the security key is accepted the TV is connected with the wireless router If asked agree to the End User Licence Agreement If you are using the Wireless USB adapter keep it connected to the USB connector on the TV Wi Fi Ready Pro...

Page 46: ... these instructions Notes This TV supports CI as well as CI CI allows service providers to offer premium HD digital programmes with a high level of copy protection Refer to the documentation from your service operator on how to insert a smart card into the Conditional Access Module 1 Switch off the TV 2 Follow the directions printed on the CAM and insert the CAM into the Common Interface at the si...

Page 47: ...able If the blinking reoccurs contact the SHARP service centre You forgot the code to unlock the child lock feature Enter 8888 The TV menu is in the wrong language Change the TV menu to your preferred language For more information see Set up your TV Menu language Page 34 When you are turning the TV on off or to standby you hear a creaking sound from the TV chassis No action is required The creakin...

Page 48: ...icture signals from some devices may not fit the screen correctly Check the signal output of the device The picture from broadcasts is scrambled You may need a Conditional Access Module to access content Check with your service operator An E POP banner displaying information appears on the TV display The TV is in Shop mode To remove the banner set the TV to Home mode then restart the TV See Get st...

Page 49: ...nnected USB USB device content is not displayed Make sure that the USB storage device is set to Mass Storage Class compliant as described in the storage device s documentation Make sure that the USB storage device is compatible with the TV Make sure that the audio and picture file formats are supported by the TV Audio and picture files do not play or display smoothly The transfer performance of th...

Page 50: ...escreen 16 9 Panel resolution 1920 x 1080 p 100 Hz Brilliant colour processor picture enhancement 1080 p 24 25 30 50 60 Hz processing 100 Hz LCD Sound Output power RMS 20 W Incredible Surround Clear Sound Dynamic Bass Enhancement Mono Stereo NICAM Display resolutions Computer formats HDMI Resolution refresh rate 640 x 480 60 Hz 800 x 600 60 Hz 1024 x 768 60 Hz 1280 x 1024 60 Hz 1360 x 765 60 Hz 16...

Page 51: ...d 128 characters Supported audio video files Multimedia file names must not exceed 128 characters Supported DLNA compliant media server software Windows Media Player for Microsoft Windows Twonky Media for Microsoft Windows and Mac OS X Sony Vaio Media Server for Microsoft Windows TVersity for Microsoft Windows Nero MediaHome DiXiM for Microsoft Windows Macrovision Network Media Server for Microsof...

Page 52: ... input Side Common Interface CI SD card USB Headphones Stereo 3 5 mm mini jack HDMI Dimensions Note Dimensions and weights are approximate values only Design and specifications are subject to change without notice Legend for TV dimensions The legends used to indicate the TV dimensions are as follows 81 cm 32 inch TV 102 cm 40 inch TV 117 cm 46 inch TV Take a note of the legend that corresponds to ...

Page 53: ...e the weight of the TV with stand Use your TV legend to note the dimensions of your TV with and without the stand Use your TV legend to note the thickness of your TV with and without the stand Help version UMv 0000 000 0001 20110427 ...

Page 54: ...onnect PC 44 connect USB 16 contact SHARP 10 controls 11 D devices add 15 devices watch 15 digital channels subtitles 25 digital radio 13 dimensions 53 display resolution 51 E end of use 8 environment efforts 7 environment recycle 8 F factory settings 31 favourites list add 13 H HDMI 36 HDMI ARC 36 hearing impaired 26 help onscreen 10 high definition HD content 5 home mode 9 home network browse 17...

Page 55: ...format 20 SD card memory size 20 settings assistant 30 settings picture 30 settings sound 30 shop mode 9 sleeptimer 24 software 34 software Internet update 34 software version 34 sound settings 30 specifications 51 subtitle analogue 25 subtitle digital 25 subtitle language 25 subtitles 25 T teletext 23 teletext 2 5 24 teletext digital text 23 teletext dual screen 23 teletext enlarge 23 teletext la...

Reviews: