23
FU-40SE-TA
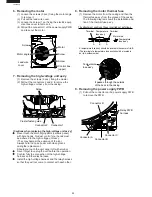
3. Removing the display PWB, the dust
sensor and the switch PWB
CAUTION:
LED support can not be removed from display
PWB (Because there is LED of Cluster ion lamp.)
(1)Remove the screws (2 pcs.) fixing th display PWB.
(2) Pull out the connector F and remove the dust
sensor.
(3) Pull out the connector G and remove the screw.
Unscrew the switch PWB support to remove it.
Make harness processing in assembling as mentioned
in the figure. Confirm whether the movement of the
power supply button is smooth after assembling.
4. Removing the relay PWB
(1) Pull out the connectors H and J.
(2) Push the head of spacer A and remove relay
PWB.
5. Removing the fan
(1) Loosen the nut and remove the fan washer, the
rubber washer, the fan washer, the fan, the fan
washer T2 and the washer.
(2) The tie torque of the nut is 1.5 Nm.
(3) Apply the screw lock (Three Bond 1401B) to the
shaft and tighten the nut. To reduce the fan face
runout, never touch the periphery of the fan when
tightening the nut.
Relay PWB
Connector J
Spacer A
Small
Medium
Large
Nut
Fan washer
Washer
Special washer
Fan washer T2
Fan
Rubber washer
Connector E
Connector F
Connector H
Screw
Screw
Screw
Switch PWB harness
The line processing at the
time of an assembly should
let the bottom of rib pass.
Connector G
Screw
Switch PWB guide
Switch PWB harness
Switch PWB
Display PWB
LED support
LED of Cluster ion lamp
LED sticker
Connector F
Connector H


