


22
FU-40SE-TA
REPLACEMENT OF MAIN PARTS
Drive each screw into the original position when assembling the unit after servicing. Screws are respectively used
according to their headÉÜs shape, thread diameter and length. Check that the lead wires are not pinched and the
connectors are properly inserted.
After assembling the unit, operate the unit with buttons on the remote control and the main unit and check whether
there are no vibrations or noises.
[ Caution for handling the PWBs]
Be sure to connect each harness to the matching color indicated on the PWB.
(Lock them until you hear the click.)
When handling the PWB, be sure to put on the earth band to protect it from the static electricity.
(Especially when handling the LSI (microcomputer), EEPROM and 2-color LED of blue and green, that are
vulnerable to the static electricity.)
Never place the PWB on the mat such as polystyrene foam, mirror mat, etc., which may discharge static electricity.
[ Preparation for disassembling ]
Be sure to pull out the plug from the outlet. Remove the front panel, the pre-filter, the stamina power carbon and the
HEPA filter from the main unit.
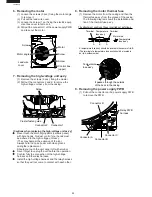
1. Removing the stand
(1) Remove the front panel.
Take out the pre-filter, the stamina power
carbon and the HEPA filter, too.
(2) Place the main unit with the front side facing down
ward on the level and stable surface and remove
the thumbscrews (2 pcs.) of the bottom surface.
Lay a soft cloth, etc. beneath the main unit so
as not to damage it.
2. Removing the frost panel and the frost
base
(1) Remove the screws (hexagon head screws (4
pcs.) and tapping screws (3 pcs.)) fixing the frost
panel. Use the Allen wrench (3 mm) to remove the
hexagon head screws.
(2) Remove the screws (9 pcs.) fixing the frost base.
Screws (3 pcs.)
Screws (2 pcs.)
Screws (4 pcs.)
Screws (3 pcs.)
Screws (6 pcs.)
1
1
2
Front panel


