background image

20

EN

Getting started

Channel setting (cont’d)

1

2

3

6

5

4

7

0

8

9

AUDIO

REPEAT

PAUSE

SEARCH

SLOW

MENU LIST

TOP MENU

STOP

PLAY

FWD

REV

SKIP

PROG.

CLEAR/C-RESET

VCR

REC/OTR

DVD

REC/OTR

PQRS

TUV

WXYZ

GHI

JKL

MNO

.@/:

ABC

DEF

SPACE

DISPLAY

ENTER

ZOOM

REC MODE

VCR

RAPID PLAY

DVD

CM SKIP

SETUP

T-SET

    OPEN/CLOSE

EJECT

TIMER PROG.

DUBBING

VCR/DVD RECORDER

COMBINATION

NB203ED

RETURN

OPERATE

2
3
4
5

7

1
8

7

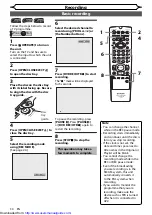
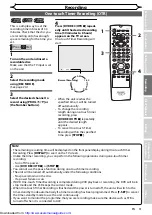
Press [Cursor 

K

 / 

L

] to start 

scanning.

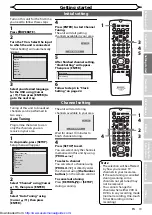
•  The tuner will begin to search 

up or down automatically. 
When a channel is found, the 
unit will stop searching and 
the picture will appear on the 
TV screen.

•  You can select a desired 

channel number using 

[the 

Number buttons]

. Refer to the 

following Channel Plan table 
and press the three digits to 
select the channel number.

  (To select channel 4, press 

[0]

 first and then press 

[0]


and 

[4]

. Or press 

[4] 

and then 

“– – 4” appears and wait for 2 
seconds.)

•  If this is the channel you want, 

press 

[Cursor 

{

]

.

Channel Plan

CH. Indication

TV Channel

02 - 12

E2 - E12

13 - 20

A - H

(only ITALY)

21 - 69

E21 - E69

74 - 78

X, Y, Z, Z+1, Z+2

80 - 99, 100

S1 - S20, GAP

121-141

S21-S41

This unit can receive the Hyper 
and Oscar frequency bands.
•  If “Skip” is set to “ON,” select 

“Skip” using 

[Cursor 

K

 / 

L

]

then press 

[Cursor 

B

]

. Select 

“OFF” using 

[Cursor 

K

 / 

L

]

then press 

[Cursor 

{

]

.

•  If you want to decode 

scrambled signals, select 
“Decoder” using 

[Cursor 

K

 / 

L

]

then press 

[Cursor 

B

]

. Select 

“ON” using 

[Cursor 

K

 / 

L

]

, then 

press 

[Cursor 

{

]

.

•  To store another channel, 

repeat steps 4 to 7.

8

After completion, press 
[SETUP] to exit.

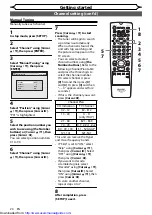
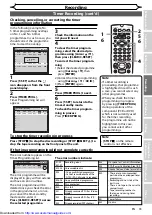
Manually tune each channel.

1

In stop mode, press [SETUP].

2

Select “Channel” using [Cursor 

K

 / 

L

], then press [ENTER].

3

Select “Manual Tuning” using 
[Cursor 

K

 / 

L

], then press 

[ENTER].

Manual Tuning

Position

Channel

Decoder

Skip

P01

2

OFF

ON

DVD

VCR

4

Select “Position” using [Cursor 

K

 / 

L

], then press [Cursor 

B

].

“P01” is highlighted.

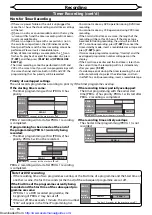
5

Select the position number you 
wish to use using [the Number 
buttons] or [Cursor 

K

 / 

L

], then 

press [Cursor 

{

].

You can select position numbers 
01 to 99.

6

Select “Channel” using [Cursor 

K

 / 

L

], then press [Cursor 

B

].

Manual Tuning

6
7

5

Downloaded from: 

http://www.usersmanualguide.com/

Summary of Contents for DV-RW360S

Page 1: ... region number for this unit is 2 DV RW360S G OPERATE DV RW360 OPEN CLOSE STOP PLAY STOP EJECT PLAY REC OTR DVD VCR OUTPUT SELECT DUBBING PROGRAMME TRACKING REC OTR F FWD REW PAL PAL Recording Disc Playback Editing Before you start Connections Getting started Changing the Setup menu Others VCR functions Downloaded from http www usersmanualguide com ...

Page 2: ...from heating appliances Never put any heavy object on the AC power cord Do not bundle any cables such as AC power cord Round Coaxial cable or other cables that are used to connect this unit to your TV together Or never put any cables on the top panel of this unit The noise or disturbance of the picture may be generated Do not attempt to repair or reconstruct the AC power cord in any way Warning of...

Page 3: ...ttempting to record copy protected material on a VCR or other recording device the copy protection will activate and the protected material will not be recorded correctly In addition attempting to display copy protected material on a monitor connected via a VCR whether for the purpose of viewing or not will cause an inferior quality picture to be displayed This is not a fault of the equipment Plea...

Page 4: ...vironment temperature humidity dust etc in which the unit is used Contact your authorised SHARP supplier for details DISC HANDLING When you handle a disc hold it by its edge and try not to touch the surface of the disc Always store a disc in its protective case when it is not used AUTO HEAD CLEANING Automatically cleans video heads as you insert or remove a cassette so you can see a clear picture ...

Page 5: ... discs 42 Colour systems 42 Region codes 42 Playing back on DivX file 42 Basic playback 43 Hint for DVD playback 43 Playing back a DVD RW DVD R DVD RW DVD R disc 43 Playing back a DVD Video CD Video CD 44 Playing back an MP3 JPEG 44 Playing back a DivX 45 Playing back discs using the Disc menu 47 Playing back a disc using the Title menu 48 PBC function for Video CDs 48 Playing back a Video CD usin...

Page 6: ... search functions An index mark will be assigned at the beginning of each recording you make For Time search function you can go to a specific point on a tape by entering the exact amount of time you wish to skip Editing DVD MODE Delete titles If the title is no longer you need you can delete it from the disc This is a useful method if you want to increase the capacity of DVD RW discs Editing titl...

Page 7: ...vancing the tape 9 PLAY B button VCR Press to start playback 10 REC OTR button VCR Press once to start a basic recording Press repeatedly to set the One touch Timer Recording 11 Remote control sensor Receives signals from your remote control so you can control the unit from a distance 12 Display VCR DVD Refer to Front Panel Display Guide on page 13 13 PROGRAMME TRACKING L K buttons VCR DVD Press t...

Page 8: ...Connect to the Aerial jack on your TV cable box or direct broadcast system Use the supplied Round Coaxial cable 9 ANTENNA IN jack VCR DVD Connect to an antenna or cable 1 2 3 6 5 4 7 0 8 9 AUDIO REPEAT PAUSE SEARCH SLOW MENU LIST TOP MENU STOP PLAY FWD REV SKIP PROG CLEAR C RESET VCR REC OTR DVD REC OTR PQRS TUV WXYZ GHI JKL MNO ABC DEF SPACE DISPLAY ENTER ZOOM REC MODE VCR RAPID PLAY DVD CM SKIP ...

Page 9: ... it for more than 5 seconds to protect any operations both the unit and the remote control 10 Number buttons VCR DVD Press to select channel numbers Press to select a title chapter track on the display DVD Press to enter values for settings in the Setup menu Press to enter the number in the Index or Time search in VCR mode Press to enter the characters in edit function DVD 11 CLEAR C RESET button ...

Page 10: ... the battery compartment Caution Incorrect use of batteries can result in hazards such as leakage and bursting Do not mix new and old batteries together Do not use different kinds of batteries together Make sure that the plus and minus ends of each battery match the indications inside the battery compartment Remove batteries if the equipment will not be used for a month or more When disposing used...

Page 11: ...REC OTR I on the remote control even if another equipment VCR or DVD is selected In this case the mode of the remote control will be automatically switched to the appropriate component In the wrong mode the unit does not respond to your commands correctly Before starting your desired operation select the correct mode by following the instruction VCR DVD COMBINATION NA527AD 1 2 3 6 5 4 7 0 10 8 9 S...

Page 12: ...y Slide Show 5 sec PBC Video CD only ON 4 5 4 5 5 7 6 5 Disc Finalise Format 1 2 1 2 DVD RW DVD R Video mode DVD RW VR mode CD Video CD MP3 JPEG KODAK PICTURE CD Before you start Functional overview cont d Setup menus Press SETUP to display the Setup menu then press ENTER to display each menu using Cursor K L These menus provide entries to all main functions of the unit 1 Format DVD RW only Allows...

Page 13: ...it Appears when an Audio CD or a CD RW R disc is inserted into the unit Appears when a Video CD is inserted into the unit Appears when a DVD DivX is inserted into the unit or when recording or the timer standby mode Flashes when switch to the timer standby mode while programming cannot set Flashes when a programme cannot be performed for some reasons Appears when a DVD RW disc is inserted into the...

Page 14: ...ng on the unit T V This unit VCR Note Playback picture from DVD cannot be delivered through the Round Coaxial cable The Round Coaxial cable is only for sending the antenna signal to the TV Connect the unit directly to the TV If you attempt to view video on a TV connected via a VCR the copy protection function will scramble the picture commercially available CB Y CR COMPONENT VIDEO IN or PB Y PR DV...

Page 15: ...ially available AV3 Front Audio cable commercially available Connecting to a TV cont d Note The unit is sending each video signals simultaneously If you connected an S VIDEO OUT and or a COMPONENT VIDEO OUT with the VIDEO OUT SCART make sure your TV s input mode is set correctly according to the connection you made You will not be able to hear all of the sound being output by the unit if you use t...

Page 16: ...e speakers By hooking this unit up to a Multi channel Dolby Digital decoder you can enjoy high quality Dolby Digital 5 1 channel surround sound as heard in the movie theatres By hooking this unit up to the DTS decoder you can enjoy 5 1 channel surround system which reproduces the original sound as truthfully as possible 5 1 channel surround system is developed by the Digital Theater Systems Inc To...

Page 17: ...ording format VR mode will be available depending on the inserted disc type Formatting is only neces sary to prepare the disc for recording Details are on pages 26 28 When you format a disc the entire contents on that disc will be erased The unit automatically starts formatting when an unused disc is inserted DVD disc types DVD RW VR DVD RW Video You want to Record TV programs Reuse by deleting un...

Page 18: ...ient editing functions which are possible only with DVD RW R discs Title List offers the following editing functions Putting names on titles Setting pictures for thumbnails Setting clearing chapter marks Deleting parts of titles or scenes Possible editing functions depend on the recording format and editing method Original and Playlist VR mode You can edit the contents on a Playlist without changi...

Page 19: ...channels in your local area If the auto tuning is cancelled during scanning some channels not yet tuned may not be received You cannot change the channel when either VCR or DVD is in any recording mode normal recording One touch Timer Recording or timer recording Channel setting The unit will start storing channels available in your area Auto Tuning Now P 01 Wait for about 10 minutes to finish cha...

Page 20: ...Channel Plan CH Indication TV Channel 02 12 E2 E12 13 20 A H only ITALY 21 69 E21 E69 74 78 X Y Z Z 1 Z 2 80 99 100 S1 S20 GAP 121 141 S21 S41 This unit can receive the Hyper and Oscar frequency bands If Skip is set to ON select Skip using Cursor K L then press Cursor B Select OFF using Cursor K L then press Cursor If you want to decode scrambled signals select Decoder using Cursor K L then press ...

Page 21: ...ttons Enter channel numbers as a two digit number for the quickest result For example to select channel 6 press 0 and 6 If you only press 6 channel 6 will be selected after 2 seconds You can only select channels 1 to 99 You can select the external input mode AV1 AV2 or AV3 To select the AV1 AV2 or AV3 press 0 0 1 or 0 0 2 or 0 0 3 accordingly or use PROG To select a channel 1 2 3 6 5 4 7 0 8 9 AUD...

Page 22: ... 5 4 7 0 8 9 AUDIO REPEAT PAUSE SEARCH SLOW MENU LIST TOP MENU STOP PLAY FWD REV SKIP PROG CLEAR C RESET VCR REC OTR DVD REC OTR PQRS TUV WXYZ GHI JKL MNO ABC DEF SPACE DISPLAY ENTER ZOOM REC MODE VCR RAPID PLAY DVD CM SKIP SETUP T SET OPEN CLOSE EJECT TIMER PROG DUBBING RETURN OPERATE 6 1 2 3 6 5 4 7 0 8 9 AUDIO REPEAT PAUSE SEARCH SLOW MENU LIST TOP MENU STOP PLAY FWD REV SKIP PROG CLEAR C RESET...

Page 23: ...can 16 9 Wide 4 3 Letter Box DVD 4 Select the desired option using Cursor K L then press ENTER 5 Press SETUP to exit Note If you have a standard TV Select 4 3 Letter Box for a full width picture with black bars at the top and bottom Select 4 3 Pan Scan for a full height picture with both sides trimmed If you have a wide screen TV Select 16 9 Wide 2 3 4 1 5 Selecting the On Screen Display OSD langu...

Page 24: ... DVD players bearing the logo are capable of playing back DVD RW discs recorded in VR mode Disc type Disc format Functions Playing back Limited recording Limited editing DVD RW DVD R 4 7 Playing back Recording Original Playlist editing Playing back Limited recording Limited editing VR mode Video mode Video mode Recording mode You can select a recording mode from 6 options The recording time will v...

Page 25: ...ture you are recording Making discs playable in other DVD players Finalise After recording you must finalise the disc to play it back in other players See page 40 You cannot finalise discs in other DVD recorders After finalising After DVD R discs are finalised A Title menu is created automatically Undo finalising is not possible Additional recording or editing is not possible After DVD RW Video mo...

Page 26: ...atting is completed 100 is indicated 1 2 3 6 5 4 7 0 8 9 AUDIO REPEAT PAUSE SEARCH SLOW MENU LIST TOP MENU STOP PLAY FWD REV SKIP PROG CLEAR C RESET VCR REC OTR DVD REC OTR PQRS TUV WXYZ GHI JKL MNO ABC DEF SPACE DISPLAY ENTER ZOOM REC MODE VCR RAPID PLAY DVD CM SKIP SETUP T SET OPEN CLOSE EJECT TIMER PROG DUBBING VCR DVD RECORDER COMBINATION NB203ED RETURN OPERATE 3 1 6 4 2 Note The recording for...

Page 27: ...u wish to set Auto Chapter off select OFF using Cursor K L then press ENTER If you wish to change the time period for Auto Chapter select the required time period using Cursor K L then press ENTER 5 Press SETUP to exit Setting Auto Chapter Note PCM stands for Pulse Code Modulation It changes analogue sound to digital sound without compressing audio data When the recording mode is set at other than...

Page 28: ...hoosing the recording format of a brand new DVD RW disc on page 26 Insert a recordable disc 1 In stop mode press SETUP 2 Select Disc using Cursor K L then press ENTER Disc Format Finalise Disc Protect OFF ON 3 Select Format using Cursor K L then press ENTER Format Format Mode Video mode Start 4 Select Start using Cursor K L then press ENTER Format Format mode Video mode Start Are you sure Yes No A...

Page 29: ... see next section for more detail This unit can receive bilingual broadcasts You can switch between modes by pressing AUDIO on the remote control Each mode is indicated on the TV screen as follows Mode Audio output Display on the TV screen Main Main audio from both speakers Main Sub Sub audio from both speakers Sub Main Sub Main audio from the left speaker Sub audio from the right speaker Main Sub...

Page 30: ... DVD CM SKIP SETUP T SET OPEN CLOSE EJECT TIMER PROG DUBBING VCR DVD RECORDER COMBINATION NB203ED RETURN OPERATE 5 6 8 Follow the steps below to record a TV programme VCR DVD COMBINATION NA527AD 1 2 3 6 5 4 7 0 10 8 9 STOP PLAY VCR DVD Press first 1 Press OPERATE to turn on the unit Turn on the TV and be sure to select the input to which the unit is connected 2 Press OPEN CLOSE EJECT A to open the...

Page 31: ... off when it is connected to AV2 This is a simple way to set the recording time in blocks of 30 minutes Check that the disc you are recording onto has enough space remaining for the time you set VCR DVD COMBINATION NA527AD 1 2 3 6 5 4 7 0 10 8 9 STOP PLAY VCR DVD Press first 1 Turn on the unit and insert a recordable disc Make sure that the TV input is set on the unit 2 Select the recording mode u...

Page 32: ...P01 Date Start End CH Mode DVD VCR DVD VCR 5 Select the channel number to record using Cursor K L then press Cursor B Timer Programming 2 1 01 01 12 00 13 00 P01 Date Start End CH Mode DVD VCR DVD VCR To record from the external input select AV1 AV2 or AV3 6 Select the recording media DVD or VCR using Cursor K L then press Cursor B Timer Programming 2 1 01 01 12 00 13 00 P01 DVD Date Start End CH ...

Page 33: ...ammes When you check the timer programming in progress by pressing TIMER PROG during operations of the component VCR or DVD which is not currently used for the timer recording the programme will not be highlighted In this case you cannot select other programmings Checking cancelling or correcting the timer programming information To stop the timer recording in progress Press STOP C to stop the dis...

Page 34: ...E EJECT A The timer recording cannot be performed in DVD and VCR at the same time If you set two programmings with the same channel and time both in DVD and VCR the programming that has priority will be recorded You cannot make any DVD operation during DVD timer recording You cannot make any VCR operation during VCR timer recording If the Start and End times are same the length of the recording wi...

Page 35: ...STOP PLAY FWD REV SKIP PROG CLEAR C RESET VCR REC OTR DVD REC OTR PQRS TUV WXYZ GHI JKL MNO ABC DEF SPACE DISPLAY ENTER ZOOM REC MODE VCR RAPID PLAY DVD CM SKIP SETUP T SET OPEN CLOSE EJECT TIMER PROG DUBBING VCR DVD RECORDER COMBINATION NB203ED RETURN OPERATE 1 2 3 4 5 6 7 8 9 3 Select Satellite Link using Cursor K L then press ENTER Setting menu will appear Satellite Link Start Mode 17 30 DVD SP...

Page 36: ...3 jacks you have to select S INPUT or VIDEO input jacks depending on the connected devices Use a commercially available Scart S Video or Video cable and an Audio cable for this connection 1 In stop mode press SETUP 2 Select Required Setting using Cursor K L then press ENTER Select Video TV Aspect Required Setting 4 3 Letter Box Video In DVD VCR 3 Select Select Video using Cursor K L then press ENT...

Page 37: ...NATION NA527AD 1 2 3 6 5 4 7 0 10 8 9 STOP PLAY VCR DVD Press first Press OPEN CLOSE EJECT A to open the disc tray then place the disc to record on Press OPEN CLOSE EJECT A again to close the disc tray 3 Select the external input mode to which the external equip ment is connected AV1 AV2 or AV3 To use the Scart terminal or input jacks on the rear of this unit To select the AV1 or AV2 press 0 0 1 o...

Page 38: ...lfunction Be advised to play back the tape until the picture is stabilized then set the starting point which you wish to start recording and start VCR to DVD duplication This unit will automatically stop the duplication if playback with no image detected for more than 3 minutes during VCR to DVD duplication If the playback sound mode of VCR is set to STEREO LEFT or RIGHT the sound mode upon dubbin...

Page 39: ...JECT TIMER PROG DUBBING VCR DVD RECORDER COMBINATION NB203ED RETURN OPERATE 5 5 7 4 DVD to VCR 4 Select DVD VCR using Cursor K L then press ENTER Dubbing Mode DVD VCR VCR DVD VCR DVD 5 Press SETUP to exit VCR DVD COMBINATION NA527AD 1 2 3 6 5 4 7 0 10 8 9 STOP PLAY VCR DVD Press first Press PLAY B DVD on the unit and then press PAUSE F at the point you wish to start recording 6 VCR DVD COMBINATION...

Page 40: ... MODE VCR RAPID PLAY DVD CM SKIP SETUP T SET OPEN CLOSE EJECT TIMER PROG DUBBING VCR DVD RECORDER COMBINATION NB203ED RETURN OPERATE 2 3 1 4 Setting a disc to protect To prevent accidental over recording editing or erasing of recordings you can protect them using the Setup menu Insert a recordable disc 1 In stop mode press SETUP 2 Select Disc using Cursor K L then press ENTER Disc Format Finalise ...

Page 41: ...s SETUP to exit Note Auto finalise function is not available for discs formatted in VR mode 1 5 2 3 4 Auto finalise Note Finalising a disc in Video mode automatically creates a Title menu You can use the unit to record or edit a disc recorded in VR mode even after it is finalised After you finalise a disc recorded in Video mode you cannot edit or record anything else on that disc To release the fi...

Page 42: ... ALL regions You cannot play back DVDs that are labelled for other regions Look for DVDs that bear either of the symbols shown below If these region symbols do not appear on your DVD you cannot play back the DVD in this unit ALL 2 The number inside the globe refers to region of the world A DVD labelled for a specific region can only be played back in the unit with the same region code Playing back...

Page 43: ...on the unit Turn on the TV and be sure to select the input to which the unit is connected 2 Press OPEN CLOSE EJECT A to open the disc tray 3 Place the disc on the disc tray with its label facing up Be sure to align the disc with the disc tray guide Disc tray guide 4 Press OPEN CLOSE EJECT A to close the disc tray 5 Press TOP MENU to display the Title menu You can switch between the Original and Pl...

Page 44: ...o Files is displayed High resolution or large size JPEG files take a few moments to be displayed It is not possible to play back progressive JPEGs JPEG files saved in progressive format on this unit It is not possible to play back JPEG files of 12MB or more It is recommended that files to be played back in this unit are recorded under the following specifications MP3 Sampling frequency 44 1kHz or ...

Page 45: ...n the Slide Show the display moves to the next track During JPEG or Kodak Picture CD playback press Cursor B or Cursor to rotate a picture 90 degrees clockwise or counterclockwise respectively Not available when the display menu appears Playing back a DivX VCR DVD COMBINATION NA527AD 1 2 3 6 5 4 7 0 10 8 9 STOP PLAY VCR DVD Press first 1 Follow the steps 1 to 4 in Playing back a DVD RW DVD R DVD R...

Page 46: ...G4 Files whose extension other than avi and divx will not be listed on the DivX menu However unplayable groups or tracks may be displayed depending on the recording conditions Even if the file has an extension of either avi and divx this unit cannot play it back if it is recorded in the format other than DivX Folders are known as Groups files are known as tracks A symbol of is shown on the top of ...

Page 47: ...he features you want are set up or to start playing back the disc from the menu The following operations are available MENU LIST button Displays the DVD menu which will vary among discs and may be same with the Title menu Cursor K L B buttons Move the cursor from item to item on the screen ENTER button Selects the currently highlighted menu option the Number buttons Selects a numbered menu option ...

Page 48: ...Pbc is displayed instead of the playing back time and current track indications on the front panel display Some operations cannot be performed unless the function is cancelled either automatically or intentionally by you Operations that are not available when the PBC function is set to ON are indicated by the following symbol in this manual PBC OFF This unit conforms to ver 1 1 and ver 2 0 of the ...

Page 49: ...MODE VCR RAPID PLAY DVD CM SKIP SETUP T SET OPEN CLOSE EJECT TIMER PROG DUBBING RETURN OPERATE Special playback Resume playback PBC OFF You can resume playback from the point where you stopped it before VCR DVD COMBINATION NA527AD 1 2 3 6 5 4 7 0 10 8 9 STOP PLAY VCR DVD Press first 1 During playback press STOP C The resume message will appear 2 Press PLAY B In a few seconds playback will resume f...

Page 50: ...ck at normal speed press PLAY B Picture quality of DivX files in fast reverse is lower than that in fast forward For some DivX files Fast forward Fast reverse may not function x20 Normal speed playback x2 x20 x5 x40 x40 Skipping TV commercials during playback To enjoy recorded programmes without any interruptions press CM SKIP VCR DVD COMBINATION NA527AD 1 2 3 6 5 4 7 0 10 8 9 STOP PLAY VCR DVD Pr...

Page 51: ...AY VCR DVD Press first 1 During playback press RAPID PLAY B Press RAPID PLAY once during playback Plays back approximately at 0 8 times of normal play back B Press RAPID PLAY twice during playback Plays back approximately at 1 3 times of normal play back B Press RAPID PLAY three times to play back in nor mal speed No effects 2 Press PLAY B to continue the normal playback Note Audio language settin...

Page 52: ...will remain muted x1 8 Pause x1 16 x1 8 x1 16 x1 3 x1 4 To return to normal playback press PLAY B 1 2 3 6 5 4 7 0 8 9 AUDIO REPEAT PAUSE SEARCH SLOW MENU LIST TOP MENU STOP PLAY FWD REV SKIP PROG CLEAR C RESET VCR REC OTR DVD REC OTR PQRS TUV WXYZ GHI JKL MNO ABC DEF SPACE DISPLAY ENTER ZOOM REC MODE VCR RAPID PLAY DVD CM SKIP SETUP T SET OPEN CLOSE EJECT TIMER PROG DUBBING RETURN OPERATE 1 7 0 8 ...

Page 53: ...R ZOOM REC MODE VCR RAPID PLAY DVD CM SKIP SETUP T SET OPEN CLOSE EJECT TIMER PROG DUBBING RETURN OPERATE 1 2 3 Marker Setup PBC OFF You can assign a specific point on a disc to return later VCR DVD COMBINATION NA527AD 1 2 3 6 5 4 7 0 10 8 9 STOP PLAY VCR DVD Press first 1 During playback press DISPLAY 2 Select the icon using Cursor B then press ENTER Marker setup menu for DVD Video mode 1 2 3 4 5...

Page 54: ...IMER PROG DUBBING RETURN OPERATE 3 2 Note Total number of chapters and playback time of the selected title are also displayed The title number and playback time of the selected chapter are also displayed Total number of titles Total number of chapters Total time of titles 001 028 00 00 00 02 18 33 01 01 3 4 Track search PBC OFF VCR DVD COMBINATION NA527AD 1 2 3 6 5 4 7 0 10 8 9 STOP PLAY VCR DVD P...

Page 55: ...During Random playback or Programme playback you cannot search the desired time The title number and chapter number of the setting time are also displayed Time search function is available only in the same track or title If the time search is not available there is no display 1 2 3 6 5 4 7 0 8 9 MENU LIST TOP MENU SKIP PROG CLEAR C RESET PQRS TUV WXYZ GHI JKL MNO ABC DEF SPACE DISPLAY ENTER ZOOM R...

Page 56: ...ollowing operations are available Title The current title will be played back repeatedly DVD only Chapter The current chapter will be played back repeatedly DVD only All The current disc will be played back repeatedly DVD RW VR mode CD Video CD MP3 JPEG and DivX only A B The A B point will be played back repeatedly DVD CD Video CD and DivX only When pressing ENTER while A B is highlighted A B repe...

Page 57: ... 2 3 6 5 4 7 0 8 9 AUDIO REPEAT PAUSE SEARCH SLOW MENU LIST TOP MENU STOP PLAY FWD REV SKIP PROG CLEAR C RESET VCR REC OTR DVD REC OTR PQRS TUV WXYZ GHI JKL MNO ABC DEF SPACE DISPLAY ENTER ZOOM REC MODE VCR RAPID PLAY DVD CM SKIP SETUP T SET OPEN CLOSE EJECT TIMER PROG DUBBING VCR DVD RECORDER COMBINATION NB203ED RETURN OPERATE 1 PBC OFF You can use this function to play back a disc randomly inste...

Page 58: ...00 Total 3 Select the desired track using Cursor K L then press ENTER or Cursor B Program Play 0 06 11 Total 09 4 Press PLAY B to start pro gramme playback 1 2 3 6 5 4 7 0 8 9 AUDIO REPEAT PAUSE SEARCH SLOW MENU LIST TOP MENU STOP PLAY FWD REV SKIP PROG CLEAR C RESET VCR REC OTR DVD REC OTR PQRS TUV WXYZ GHI JKL MNO ABC DEF SPACE DISPLAY ENTER ZOOM REC MODE VCR RAPID PLAY DVD CM SKIP SETUP T SET O...

Page 59: ...U SKIP PROG CLEAR C RESET PQRS TUV WXYZ GHI JKL MNO ABC DEF SPACE DISPLAY ENTER ZOOM REC MODE VCR RAPID PLAY DVD CM SKIP SETUP T SET OPEN CLOSE EJECT TIMER PROG DUBBING RETURN OPERATE 1 2 3 1 2 3 6 5 4 MENU LIST TOP MENU PROG GHI JKL MNO ABC DEF ENTER ZOOM REC MODE VCR RAPID PLAY DVD CM SKIP SETUP T SET OPEN CLOSE EJECT TIMER PROG DUBBING RETURN OPERATE 2 3 This unit allows you to play back the fi...

Page 60: ...l switch 1 2 3 6 5 4 7 0 8 9 AUDIO REPEAT PAUSE SEARCH SLOW MENU LIST TOP MENU STOP PLAY FWD REV SKIP PROG CLEAR C RESET VCR REC OTR DVD REC OTR PQRS TUV WXYZ GHI JKL MNO ABC DEF SPACE DISPLAY ENTER ZOOM REC MODE VCR RAPID PLAY DVD CM SKIP SETUP T SET OPEN CLOSE EJECT TIMER PROG DUBBING RETURN OPERATE 1 2 3 4 Switching virtual surround system Note Select Virtual Surround OFF in a case sound is dis...

Page 61: ...JECT TIMER PROG DUBBING VCR DVD RECORDER COMBINATION NB203ED RETURN OPERATE 1 2 3 Switching camera angles Some DVD Videos feature scenes shot from two or more angles The disc case is usually marked with an angle icon if the disc has multi angle scenes VCR DVD COMBINATION NA527AD 1 2 3 6 5 4 7 0 10 8 9 STOP PLAY VCR DVD Press first 1 During playback press DISPLAY The angle icon appears when a switc...

Page 62: ...without finalisation it will not be playable on another player After finalising a disc in Video mode you cannot edit any information that is on that disc If you have recorded in VR mode on DVD RW disc then editing is still permitted after finalising Main Title List Specific title options Guide to a title list Edit the recorded disc You can edit a disc recorded using the PAL system It is not possib...

Page 63: ... recordable space will NOT be increased The deleted title cannot be crea ted the space Type of title Item Page Video Mode Deleting titles Editing title names 64 65 DVD RW VR Mode Original Adding or deleting chapter marks Setting pictures for thumbnails Deleting a part of a title 67 68 69 70 71 DVD RW VR Mode Playlist Dividing a title Combining titles Adding titles to a Playlist Erasing all Playlis...

Page 64: ...T to switch between Original and Playlist if the disc is recorded in VR mode 2 Select the desired title using Cursor K L B then press ENTER Pop up window will appear e g DVD RW VR mode Playlist Playlist 15 04 06 19 00 P12 XP 4 5 6 2 1 Play Edit 3 Select Edit using Cursor K L then press ENTER Edit menu will appear Playlist Scene Delete Title Delete Edit Title Name Chapter Mark Index Picture Title D...

Page 65: ... 3 6 5 4 7 0 10 8 9 STOP PLAY VCR DVD Press first 1 Follow the steps 1 to 3 on page 64 to display the Edit menu 2 Select Edit Title Name using Cursor K L then press ENTER A window for entering the title name will appear e g DVD RW VR mode Playlist Playlist Edit Title Name a b c A B C 1 2 3 15 04 06 19 00 P12 XP 0 00 59 3 3 To enter the title name refer to Guide to edit title name on page 66 charac...

Page 66: ...en press ENTER 2 Using the list below as a guide press the Number buttons repeatedly until the desired let ter appears Note To delete letters press CLEAR C RESET repeatedly Press and hold CLEAR C RESET to delete all letters Press Cursor B to move the cursor to the left or right You can enter up to 30 letters Unrecognisable characters will be replaced with asterisks If you delete them adjoining cha...

Page 67: ... 7 0 10 8 9 STOP PLAY VCR DVD Press first 1 Follow the steps 1 to 3 on page 64 to display the Edit menu 2 Select Chapter Mark using Cursor K L then press ENTER Option window will appear e g DVD RW VR mode Playlist Playlist Chapter Mark Delete Add 15 04 06 19 00 P12 XP 0 00 59 3 Chapter 2 2 3 Use SKIP H G REV E r FWD D q PLAY B and PAUSE F to find the point where you will create a new chapter mark ...

Page 68: ... mark If you select Add at step 4 a new chapter mark is created at the point you specified e g Add Chapter 2 2 Playlist Chapter Mark Add No Yes 15 04 06 19 00 P12 XP Wait for a moment 3 A chapter mark is added Deleting a chapter mark If you select Delete at step 4 the chapter mark you selected is deleted e g Delete Chapter 2 2 Playlist Chapter Mark Delete No Yes 15 04 06 19 00 P12 XP Wait for a mo...

Page 69: ...ll appear e g DVD RW VR mode Playlist Playlist Index Picture No Yes 15 04 06 19 00 P12 XP 0 00 59 3 F 4 Select Yes using Cursor K L then press ENTER The picture is set as the thumbnail Playlist Index Picture No Yes 15 04 06 19 00 P12 XP Wait for a moment 3 F 5 Press RETURN and then RETURN or STOP C to exit Writing on the disc starts It may take a while to write the data on a disc 1 2 3 6 5 4 7 0 8...

Page 70: ...Delete using Cursor K L then press ENTER Option window will appear e g DVD RW VR mode Playlist Playlist Scene Delete End Start Preview Delete 15 04 06 19 00 P12 XP 0 00 59 3 3 Use SKIP H G REV E r FWD D q PLAY B and PAUSE F to find the start point then press ENTER Playlist Scene Delete End Start Preview Delete 15 04 06 19 00 P12 XP 0 00 59 3 Then use SKIP H G REV E r FWD D q PLAY B and PAUSE F aga...

Page 71: ...iting on the disc starts It may take a while to write the data on a disc 1 2 3 6 5 4 7 0 8 9 AUDIO REPEAT PAUSE SEARCH SLOW MENU LIST TOP MENU STOP PLAY FWD REV SKIP PROG CLEAR C RESET VCR REC OTR DVD REC OTR PQRS TUV WXYZ GHI JKL MNO ABC DEF SPACE DISPLAY ENTER ZOOM REC MODE VCR RAPID PLAY DVD CM SKIP SETUP T SET OPEN CLOSE EJECT TIMER PROG DUBBING VCR DVD RECORDER COMBINATION NB203ED RETURN OPER...

Page 72: ...the point where you wish to divide the title 3 Select Title Dividing using Cursor K L then press ENTER Confirmation window will appear Playlist Title Dividing No Yes 15 04 06 19 00 P12 XP 0 00 59 3 F 4 Select Yes using Cursor K L then press ENTER The title is divided into two new titles with the same title names The thumbnail you set is reset to the first picture of each title Playlist Title Divid...

Page 73: ...Cursor K L then press ENTER Title Combining setting window will appear Selected title grays out and the frame of the next title becomes yellow Playlist Title Combining 15 04 06 19 00 P12 XP 1 2 3 1 3 Select another title to combine using Cursor K L s B then press ENTER Confirmation window will appear Yes No Playlist Title Combining 1 2 3 1 2 4 Select Yes using Cursor s B then press ENTER The two t...

Page 74: ...le using Cursor K L s B then press ENTER The added title will appear as the final title Playlist Add New Title 14 05 06 18 05 P06 SEP 1 4 2 5 3 Wait for a moment 4 Press RETURN or STOP C to exit Writing on the disc starts It may take a while to write the data on a disc 1 2 3 6 5 4 7 0 8 9 AUDIO REPEAT PAUSE SEARCH SLOW MENU LIST TOP MENU STOP PLAY FWD REV SKIP PROG CLEAR C RESET VCR REC OTR DVD RE...

Page 75: ...nu is shown Confirmation window will appear Playlist Delete Playlist Yes No 2 5 3 1 4 Add New Delete Playlist Title 3 Select Yes using Cursor s B then press ENTER Are you sure will appear Select Yes using Cursor s B and then press ENTER Playlist Delete Playlist Yes No 2 5 3 1 4 Add New Delete Playlist Title Wait for a moment Are you sure Are you sure Playlist is deleted Playlist Add New Delete Pla...

Page 76: ...ll appear If you press ENTER the title will be released from protection icon will appear on the title in the Original list Original Protect OFF ON 15 04 06 19 00 P12 XP 3 Wait for a moment 4 Press RETURN and then RETURN or STOP C to exit Writing on the disc starts It may take a while to write the data on a disc To protect a whole disc DVD RW VR mode Only Select Disc Protect OFF ON from the Disc me...

Page 77: ...R Confirmation window will appear Title List Chapter Mark No Yes 15 04 06 19 00 P12 XP 0 00 59 3 4 Select Yes using Cursor K L then press ENTER Chapter marks are added If you select OFF at step 3 all the chapter marks are erased 5 Press RETURN and then RETURN or STOP C to exit Writing on the disc starts It may take a while to write the data on a disc 1 2 3 6 5 4 7 0 8 9 AUDIO REPEAT PAUSE SEARCH S...

Page 78: ...M Stream Sets the digital audio output signal specification MPEG PCM Stream Sets the digital audio output signal specification DTS ON OFF Sets whether DTS signal is output or not Dynamic Range Control ON OFF Compresses the sound volume range 4 Video setting Pages 83 84 Still Mode Auto Field Frame Sets the type of still image in pausing playback TV System PAL Auto Sets the TV system Video Out SCART...

Page 79: ...anguage is the default of the inserted disc Select a setting using Cursor K L then press ENTER Your setting is activated Audio Default Original Set the Audio language Subtitle Default OFF Set the Subtitle language Language Audio Original Disc Menu English Subtitle OFF DivX Subtitle OFF DVD Language Audio Original Disc Menu English Subtitle OFF DVD DivX Subtitle OFF Language Disc Menu French Spanis...

Page 80: ... page 95 1 2 3 6 5 4 7 0 8 9 MENU LIST TOP MENU SKIP PROG CLEAR C RESET PQRS TUV WXYZ GHI JKL MNO ABC DEF SPACE DISPLAY ENTER ZOOM REC MODE VCR RAPID PLAY DVD CM SKIP SETUP T SET OPEN CLOSE EJECT TIMER PROG DUBBING RETURN OPERATE Display setting 1 In stop mode press SETUP 2 Select Display using Cursor K L then press ENTER 3 Select the desired item using Cursor K L then press ENTER 1 2 3 OSD Langua...

Page 81: ...ght OSD Language English DVD VCR Display Angle Icon ON Screen Saver FL Dimmer 10 minutes Bright OSD Language English DVD Audio setting Choose the appropriate Audio settings for your audio equipment This will only affect DVDs playback 1 In stop mode press SETUP 2 Select Playback using Cursor K L then press ENTER 3 Select Audio using Cursor K L then press ENTER 4 Select the desired item using Cursor...

Page 82: ... this unit is set to ON Even if you select 96kHz the sound is down sampled to 48kHz Note When playing back a DVD RW disc recorded in VR mode If the audio source on a disc is in Dolby Digital format set Dolby Digital to PCM so that you can switch to main audio L sub audio R or a combination of both L R using your amplifier decoder Digital Out DTS OFF ON DVD Dolby Digital conversion Default Stream S...

Page 83: ...our setting is activated The Dynamic Range Control function is effective only with analogue audio connection Dynamic Range Control Default ON Set to ON to make the dynamic range narrower Audio Dynamic Range Control OFF ON DVD Audio Digital Out Dynamic Range Control ON DVD Video TV System PAL Video Out SCART RGB Still Mode Auto DVD Still Mode Default Auto Set the type of still image in pausing play...

Page 84: ... RGB DVD Refer to page 15 for more details If you select SCART RGB or Component Interlace I proceed to step 5 SCART RGB Select SCART RGB if your TV has a scart terminal and connected to it Component Progressive P If your TV is compatible with progressive scanning select Component Progressive P and make sure the connection indicated by each jacks Y PB PR properly Video Video Out Activating progress...

Page 85: ...DVD CM SKIP SETUP T SET OPEN CLOSE EJECT TIMER PROG DUBBING VCR DVD RECORDER COMBINATION NB203ED RETURN OPERATE 1 2 3 Note The parental lock function may not be available on some discs It may be difficult to determine if some DVDs support the parental lock function Be sure to confirm that the parental lock function operates in the way that you have set Record the password in case you forget it Cha...

Page 86: ...D REV SKIP PROG CLEAR C RESET VCR REC OTR DVD REC OTR PQRS TUV WXYZ GHI JKL MNO ABC DEF SPACE DISPLAY ENTER ZOOM REC MODE VCR RAPID PLAY DVD CM SKIP SETUP T SET OPEN CLOSE EJECT TIMER PROG DUBBING VCR DVD RECORDER COMBINATION NB203ED RETURN OPERATE 4 4 Press SETUP to exit A password is not yet set A password is already set Enter the current password using the Number buttons Select Yes using Cursor...

Page 87: ...6 5 4 7 0 10 8 9 STOP PLAY VCR DVD Press first 1 Turn on the unit and insert a recordable tape Make sure that the TV input is set on the unit 2 Select the recording mode using REC MODE The desired recording mode is selected in SP standard playback or LP long playback mode by pressing REC MODE 3 Select the desired channel to record using PROG or the Number buttons 4 Press VCR REC OTR I to start rec...

Page 88: ...s Recording and One touch Timer Recording OTR cont d 1 2 3 6 5 4 7 0 8 9 AUDIO REPEAT PAUSE SEARCH SLOW MENU LIST TOP MENU STOP PLAY FWD REV SKIP PROG CLEAR C RESET VCR REC OTR DVD REC OTR PQRS TUV WXYZ GHI JKL MNO ABC DEF SPACE DISPLAY ENTER ZOOM REC MODE VCR RAPID PLAY DVD CM SKIP SETUP T SET OPEN CLOSE EJECT TIMER PROG DUBBING VCR DVD RECORDER COMBINATION NB203ED RETURN OPERATE Note The remaini...

Page 89: ...A527AD 1 2 3 6 5 4 7 0 10 8 9 STOP PLAY VCR DVD Press first 1 Press SEARCH so that the index search menu appears 2 Enter the number of record ings you wish to skip using the Number buttons within 30 seconds INDEX 03 3 Press FWD D q or REV E r to start index search If you want to go in the forward direction press FWD D q If you want to go in the reverse direction press REV E r After index search th...

Page 90: ...ny mode If the stereo signal becomes weak the broadcast is automatically recorded in monaural Hi Fi Stereo Sound System VCR functions VCR DVD COMBINATION NA527AD 1 2 3 6 5 4 7 0 10 8 9 STOP PLAY VCR DVD Press first To cue or review picture during playback Picture Search Press FWD D q or REV E r during playback Press it again and the unit will search in super high speed To freeze the picture on TV ...

Page 91: ...is distorted If a DVD player VCR or tuner is connected to your TV via the unit the copyprotection signal applied to some programmes could affect picture quality Disconnect the playback equipment in question and connect it directly to your TV Nothing was recorded even though you set the timer setting correctly There was a power failure during recording The unit s internal clock stopped due to a pow...

Page 92: ...nserted a disc whose Title menu or DVD menu automatically appears on the TV screen when it is first inserted The unit starts playing back the disc automatically The DVD Video features an auto playback function Some functions such as Stop Search or Slow motion Playback cannot be performed Depending on the disc you may not be able to perform some of those operations See the instruction manual suppli...

Page 93: ...g process When selecting Yes the disc may not be usable Yes No Others Troubleshooting cont d If the above remedies do not solve the problem please call an authorised service centre VCR Picture noise appears Adjust tracking control for better picture by pressing PROG while you are playing back a video tape Head cleaning for VCR may be necessary Refer to AUTO HEAD CLEANING on page 4 The unit does no...

Page 94: ...to a disc that is set as protected in the Setup menu Remove the disc protect setting in the Setup menu See page 40 Recording Error Disc is full No area for new recording You are trying to record onto a disc that has no space for recording Insert a recordable disc with enough recording space Delete unnecessary original titles See page 64 Recording Error You cannot record more than 99 titles on one ...

Page 95: ...ashmiri 5765 Kazakh 5757 Kinyarwanda 6469 Kirghiz 5771 Kirundi 6460 Korean 5761 Kurdish 5767 Laothian 5861 Latin 5847 Latvian Lettish 5868 Lingala 5860 Lithuanian 5866 Macedonian 5957 Malagasy 5953 Malay 5965 Malayalam 5958 Maltese 5966 Maori 5955 Marathi 5964 Moldavian 5961 Mongolian 5960 Nauru 6047 Nepali 6051 Norwegian 6061 Occitan 6149 Oriya 6164 Oromo Afan 6159 Panjabi 6247 Pashto Pushto 6265...

Page 96: ...oint Photographic Experts Group JPEG is a method of compressing still image files You can copy JPEG files on CD RW R discs from a computer and play back the files on this unit MP3 MPEG Audio Layer 3 MP3 is a method of compressing files You can copy MP3 files on CD RW R discs from a computer and play back the files on this unit PBC Video CD only Playback Control This function enables you to play ba...

Page 97: ... Operating temperature 5 C to 40 C Operating humidity Less than 80 no condensation TV format PAL B G Recording Recording format Video Recording format DVD RW only Video format DVD RW DVD R Recording discs DVD ReWritable DVD Recordable Video recording format Sampling frequency Compression format 13 5MHz MPEG Audio recording format Sampling frequency Compression format 48kHz Dolby Digital Tuner Rece...

Page 98: ...Downloaded from http www usersmanualguide com ...

Page 99: ...e due to inappropriate waste handling 2 In other Countries outside the EU If you wish to discard this product please contact your local authorities and ask for the correct method of disposal For Switzerland Used electrical or electronic equipment can be returned free of charge to the dealer even if you don t purchase a new product Further collection facilities are listed on the homepage of www swi...

Page 100: ...SHARP CORPORATION SHARP ELECTRONICS EUROPE GmbH Sonninstraße 3 D 20097 Hamburg Printed in China 9HS1VMN23026 E9B30ED 1VMN23026 Downloaded from http www usersmanualguide com ...

Page 101: ... tv dvd and othes Manual users user manuals user guide manual owners manual instruction manual manual owner manual owner s manual guide manual operation operating manual user s manual operating instructions manual operators manual operator manual product documentation manual user maintenance brochure user reference pdf manual Downloaded from http www usersmanualguide com ...

Reviews: