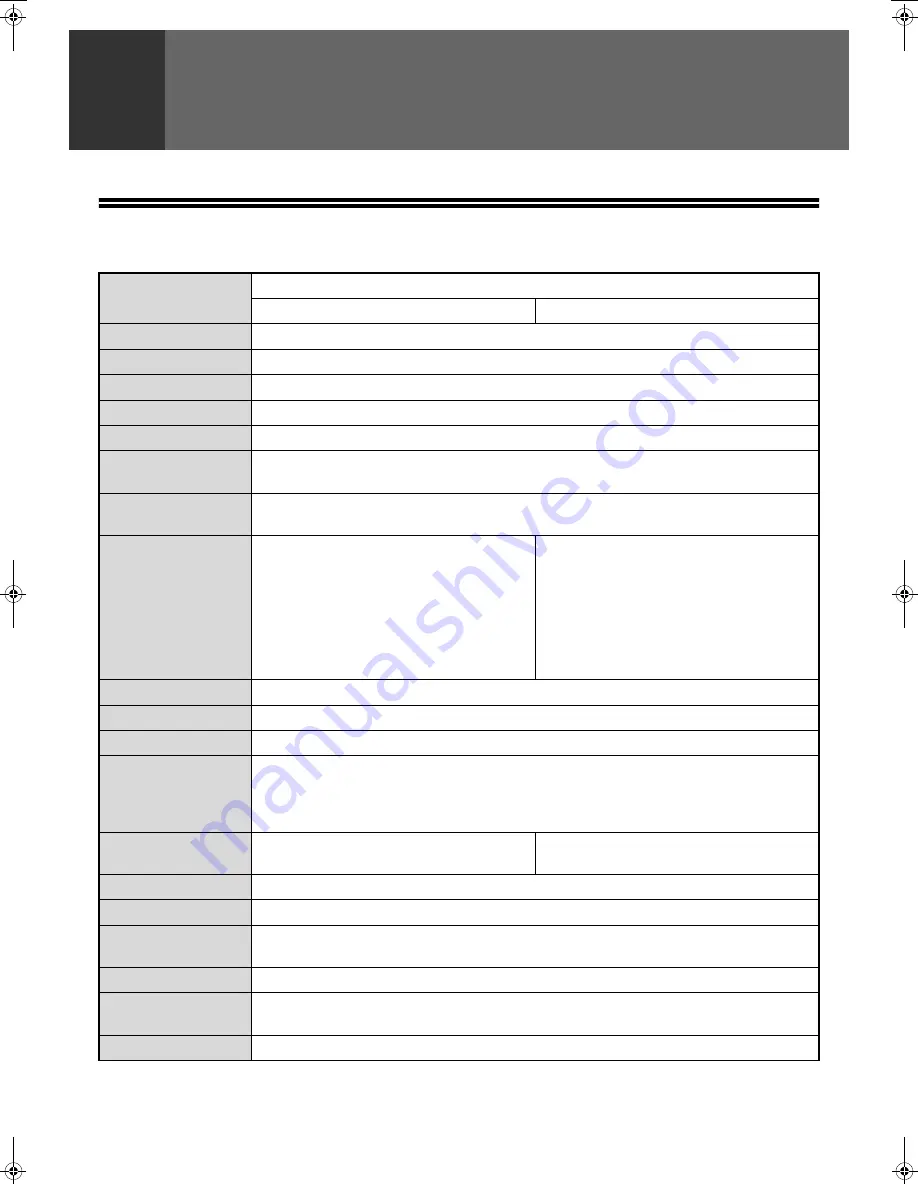
background image

73

6

APPENDIX

SPECIFICATIONS

Name

Digital Multifunctional System

AR-M161/AR-M162/AR-M165

AR-M206/AR-M207

Type

Desktop

Photoconductive type

OPC drum

Document glass type

Fixed

Copy system

Laser electrostatic method

Originals

Sheets, bound documents, max. original size A3 (11" x 17")

Copy sizes

Max. A3 (11" x 17"), min. A5 (5-1/2" x 8-1/2")
(A5 (5-1/2" x 8-1/2") can only be fed from tray 1 and the bypass tray)

Image loss:

Max. 4 mm (5/32") at top edge and bottom edge, combined maximum of approximately 6 
mm (11/64")

Copying speed

  9 copies/min.
10 copies/min.
11 copies/min.
12 copies/min.
14 copies/min.
16 copies/min.

A3 (11" x 17")
B4 (8-1/2" x 14")
8-1/2" x 13"
A4R (8-1/2" x 11"R)
B5R
A4, B5, A5 (8-1/2" x 11", 
5-1/2" x 8-1/2")

10 copies/min.
11 copies/min.
12 copies/min.
14 copies/min.
15 copies/min.
16 copies/min.
20 copies/min.

11" x 17"
A3
B4 (8-1/2" x 14", 8-1/2" x 13")
A4R
8-1/2" x 11"R
B5R
A4, B5, A5 (8-1/2" x 11", 
5-1/2" x 8-1/2")

Continuous copying

1-999 copies (decrement type) (can be changed to 1- 99 in the key operator programs)

First-copy time*

1

, *

2

Approx. 7.2 s

Warm-up time*

2

Approx. 45 sec.

Copy ratios

Variable: 25% to 400%, in 1% increments (total 376 steps) (50% to 200% when the SPF is used)
Fixed preset:  25%, 50%, 70%, 81%, 86%, 100%, 115%, 122%, 141%, 200%, 400%

(25%, 50%, 64%, 77%, 95%, 100%, 121%, 129%, 141%, 200%, 400%)
(25% and 400% only when the SPF is used)

Paper feeding

One automatic feeding paper tray (250 
sheets) + bypass tray (100 sheets)

Two automatic feeding paper trays (250 
sheets each) + bypass tray (100 sheets)

Fusing system

Heat rollers

Developer system

Dry development

Resolution

Scanning: 600 x 300 dpi, output: 600 x 600 dpi (AUTO/TEXT mode)
Scanning: 600 x 600 dpi, output: 600 x 600 dpi (PHOTO mode)

Gradation

Scanning: 256 halftones, printing: 2 halftones

Power supply

Local voltage ±10% (For this machine's power supply requirements, see the name plate 
located on the back of the machine.)

Power consumption

Max. 1.2 kW

*1 Measured when copying is started after warm-up following power on, using the document glass. (Exposure set to "AUTO". 

"RESOLUTION IN AUTO/TEXT MODE" set to 300 dpi and "WAITING COPY LAMP SETTING" set to "ON" in the key operator 
programs. Paper fed from tray 1 on machine, A4 (8-1/2" x 11") original and paper oriented horizontally, no reduction or enlargement.)

*2 May vary depending on machine operating conditions and ambient conditions such as power voltage and humidity.

Chapter06.fm  73 

ページ


2004年10月5日 火曜日 午前11時58分

Summary of Contents for AR-M161

Page 1: ...ation and copier and operation manuals for any optional equipment which has been installed MODEL DIGITAL MULTIFUNCTIONAL SYSTEM OPERATION MANUAL for general information and copier PART 1 GENERAL INFORMATION BEFORE USING THE PRODUCT TROUBLESHOOTING AND MAINTENANCE PERIPHERAL DEVICES AND SUPPLIES PART 2 COPIER OPERATION COPY FUNCTIONS CONVENIENT COPY FUNCTIONS APPENDIX KEY OPERATOR S GUIDE 12 24 40 ...

Page 2: ... type Should the fuse need to be replaced a BSI or ASTA approved fuse to BS1362 marked or and of the same rating as the one removed from the plug must be used Always refit the fuse cover after replacing the fuse on the moulded plug Never use the plug without the fuse cover fitted In the unlikely event of the socket outlet in your home not being compatible with the plug supplied either cut off the ...

Page 3: ...1 Part 1 General Information ...

Page 4: ...2 ...

Page 5: ...t series consists of the models indicated below The product configuration varies by model The explanations and illustrations in this manual generally use the AR M206 AR M207 with the optional RSPF installed As of the end of October 2004 The Dual function board cited in this manual can be installed as an option in some models and is pre installed standard in other models For detailed information pl...

Page 6: ...E 23 USING AUDITING MODE 23 2 TROUBLESHOOTING AND MAINTENANCE TROUBLESHOOTING 25 MACHINE COPYING PROBLEMS 25 INDICATORS AND DISPLAY MESSAGES 28 REMOVING MISFEEDS 29 ORIGINAL MISFEED IN THE SPF 29 MISFEED IN THE BYPASS TRAY 30 MISFEED IN THE MACHINE 31 MISFEED IN TRAY 1 33 MISFEED IN TRAY 2 34 REPLACING THE TONER CARTRIDGE 35 CHECKING THE TOTAL OUTPUT COUNT 36 CLEANING THE MACHINE 37 CLEANING THE D...

Page 7: ...S TRAY 61 DUAL PAGE COPY Dual page copy 62 INTERRUPTING A COPY RUN Interrupt copying 63 5 CONVENIENT COPY FUNCTIONS ROTATING THE IMAGE 90 DEGREES Rotation copy 64 SORT MODE 64 COPYING MULTIPLE ORIGINALS ONTO A SINGLE SHEET OF PAPER 2 in 1 4 in 1 copy 66 CREATING MARGINS WHEN COPYING Margin shift 68 ERASING SHADOWS AROUND THE EDGES OF A COPY Erase copy 69 CARD SHOT 71 6 APPENDIX SPECIFICATIONS 73 7...

Page 8: ...e the power cord from the outlet Do not cover the machine with a dust cover cloth or plastic film while the power is on Doing so may prevent heat dissipation damaging the machine Do not make any modifications to this machine Doing so may result in personal injury or damage to the machine Do not make copies of anything which is prohibited from copying by law The following items are normally prohibi...

Page 9: ...rs The equipment s exterior covers contain several safety interlock switches Do not bypass any safety interlock by inserting wedges or other items into switch slots For Europe CLASS 1 LASER PRODUCT LASER KLASSE 1 LUOKAN 1 LASERLAITE KLASS 1 LASERAPPARAT CAUTION INVISIBLE LASER RADIATION WHEN OPEN INTERLOCKS DEFEATED AVOID EXPOSURE TO BEAM VORSICHT UNSICHTBARE LASERSTRAHLUNG WENN ABDECKUNG GEÖFFNET...

Page 10: ...ar an air conditioner or heater 4 Be sure to allow the required space around the machine for servicing and proper ventilation ENVIRONMENTAL INFORMATION Connect the machine to a power outlet which is not used for other electric appliances If a lighting fixture is connected to the same outlet the light may flicker A small amount of ozone is produced within the printer during operation The emission l...

Page 11: ...ansion kit AR NB3 must be installed Operation manual for network scanner 2 This explains how to use the machine as a network scanner when it is connected to a computer To use the machine as a network scanner the optional network expansion kit must be installed 1 The Operation manual for facsimile is contained in the optional facsimile expansion kit 2 The Operation manual for printer and scanner is...

Page 12: ...s used the zoom copy ratio range is 50 to 200 Up to 999 copies can be made of an original scanned just once This can be changed to a maximum of 99 copies in the key operator programs The key operator programs allow functions to be selected and managed to meet your specific needs For example access to the machine can be controlled by enabling audit mode The optional dual function board can be insta...

Page 13: ... can be installed to enable the machine to be used as a network printer and network scanner Environment and people friendly design Preheat and auto power shut off modes are provided to reduce power consumption when the machine is not in active use A universal design has been implemented in the product whereby the height of the operation panel and shape of the keys are designed to be usable by as m...

Page 14: ...an original that you wish to scan face down here Page 45 7 Handles Use to move the machine 8 Power switch Press to turn the machine power on and off 9 Centre tray Copies and printed pages are output to this tray 10 Top tray when the job separator tray kit is installed Received faxes when the fax option is installed and print jobs are delivered to this tray 11 Operation panel Contains operation key...

Page 15: ...f the originals 25 Feeding roller cover when the SPF is installed Open to remove misfed originals 26 Right side cover when the SPF is installed Open to remove misfed originals 27 Fusing unit release levers To remove the paper misfed in the fusing unit push down on these levers and remove the paper 28 Roller rotating knob Rotate to remove misfed paper 29 Exit area when the SPF is installed Original...

Page 16: ...network scanner that accompanies the optional network expansion kit 5 Display Shows various messages For more information see page 16 6 BACK key Press to return the display to the previous screen 7 FAX STATUS key when the fax option is installed This key is used in fax mode For more information see the Operation manual for facsimile that accompanies the optional facsimile expansion kit 8 OK key Pr...

Page 17: ...n models that support two sided printing Select the two sided copying mode Page 56 21 Arrow keys Press to move the highlighting which indicates that an item is selected in the display 22 SPECIAL FUNCTION key Press to select special functions 23 ACC C key Press the end the use of an account and return the display to the account number entry screen Page 23 24 0 key Press during a continuous copy run...

Page 18: ...ter the page that is currently being printed is output the job is interrupted 3 Only possible when the computer is connected to the USB 2 port 4 Only possible when the computer is connected to the parallel port or USB 1 port the job is interrupted after the page that is currently being printed is output 5 After output of the page that is currently being printed via the parallel port or USB 1 port ...

Page 19: ...ion state if the duration of time set in the key operator programs elapses without the machine being used when the power is on In preheat mode the display turns off Normal operation automatically resumes when a key on the operation panel is pressed an original is placed or a print job or fax is received Auto power shut off mode This function automatically switches the machine to a state that consu...

Page 20: ...re allowed to accumulate 3 The number of sheets of the paper which can be set changes with the weight of a paper The indicated numbers are for 80 g m2 20 lbs paper 4 The trays are numbered 1 2 3 and 4 from the top Paper that can be used for automatic 2 sided printing Paper used for automatic two sided printing must meet the following conditions Paper type Plain paper special paper cannot be used P...

Page 21: ...n the guide and slide the guide to the indicator line of the paper to be loaded The plate B is an insert type guide Remove it and then insert it at the indicator line of the paper to be loaded When using 11 x 17 sized paper store the plate B in the slot at the left front of the paper tray 3 Push the pressure plate down Push the centre of the pressure plate down until it locks into place 4 Fan the ...

Page 22: ...et at a time through the bypass tray When adding paper first remove any paper remaining in the tray combine it with the paper to be added and then reload as a single stack The paper to be added must be the same size and type as the paper already in the tray Do not use paper that is smaller than the original This may cause smudges or unclean images Do not use paper that has already been printed on ...

Page 23: ...the or key to select the paper tray for which the paper size is being changed Example Tray 2 5 Press the key The cursor moves to the paper size selection position on the right 6 Press the or key to select the paper size Example Selecting B4 size To change the size of another paper tray press the key and then repeat steps 4 to 6 7 Press the OK key A message asking you to confirm the new paper size ...

Page 24: ...ting screen will appear 4 Press the key repeatedly until AUTO TRAY SWITCHING appears Move the cursor to the lowest tray and then press the key again The above screen will appear 5 Press the OK key When a checkmark does not appear in the checkbox the auto tray switching function will not operate 6 Press the key You will return to the paper size setting screen To re enable auto tray switching press ...

Page 25: ...ode 2 When the copy job is finished press the ACC C key If you are performing an interrupt copy job page 63 when auditing mode is enabled be sure to press the INTERRUPT key CA key or ACC C key when finished to exit interrupt mode Mode Number of accounts Remarks 1 Same for copy print and scan modes 50 maximum Copying printing and scanning counts are managed under one account number 2 Fax 50 maximum...

Page 26: ...aper size used for the copy is different from the selected paper size part of the image is cut off or too much of the page is blank 26 Wrinkles appear in the paper or the image disappears in places 26 Paper misfeed 26 The original size is not automatically selected or the copy is not made on paper that matches the size of the original 27 Copies are smudged or dirty 27 White or black lines appear o...

Page 27: ... seconds to warm up after the power switch is turned on While the machine is warming up copy settings can be selected but copying is not possible Wait until Ready to copy appears 17 The front cover or the side cover is not completely closed Close the front cover or the side cover The machine is in auto power shut off mode When auto power shut off mode has activated only mode key indicators are lit...

Page 28: ... has occurred See REMOVING MISFEEDS to remove the paper misfeed 29 The size or weight of the paper being used is not within the specified range Use copy paper within the specified range 18 The paper is curled or damp Replace it with dry copy paper During periods when the machine is not used for a long time remove the paper from the tray and store it in a dark place in a bag to prevent moisture abs...

Page 29: ...IAL SIZE ORIGINAL to make the copy 51 Copies are smudged or dirty The document glass or the underside of the document cover SPF is dirty Clean these regularly 37 The original is smudged or blotchy Use a clean original White or black lines appear on copies The scanner glass for the SPF is dirty Clean the long narrow scanning glass 37 The transfer charger is dirty Clean the transfer charger 38 A tra...

Page 30: ...turn it back on If this does not clear the message write down the 2 digit main code and 2 digit sub code turn off the power and promptly contact your authorised service representative Toner cartridge replacement required icon The toner cartridge must be replaced soon Check the toner cartridge Check to see if the toner cartridge has been installed properly Remove paper from the output tray and pres...

Page 31: ...5 5 1 2 x 8 1 2 original or if the misfeed occurred in the reversing tray open the right side cover and gently remove the original Close the right side cover Check location C Carefully remove the misfed original from the exit area When using the RSPF If the misfed original cannot be easily removed from the exit area open the moveable part of the document feeder tray remove the reversing tray and t...

Page 32: ...ust be returned to the document feeder tray Return the originals to the document feeder tray and press the START key MISFEED IN THE BYPASS TRAY 1 Carefully remove the misfed paper from the bypass tray 2 Grasp the side cover handle and gently open and close the side cover The message Clear paper path will be cleared and copying will be possible If the message does not clear check again to make sure...

Page 33: ...g removal 3 Close the front cover and the side cover The message Clear paper path will be cleared and copying will be possible Location B If paper is misfed here go to Misfeed in B page 32 Location C If paper is misfed here go to Misfeed in C page 33 Location A If paper is misfed here go to Misfeed in A below The fusing unit is hot Do not touch the fusing unit when removing misfed paper Doing so m...

Page 34: ...be cleared and copying will be possible The fusing unit is hot Do not touch the fusing unit when removing misfed paper Doing so may cause a burn or injury Do not touch the photoconductive drum green portion when removing the misfed paper Doing so may damage the drum and cause smudges on copies Take care not to allow unfixed toner on the misfed paper to soil your hands or clothes Roller rotating kn...

Page 35: ...aper during removal 2 Open and close the side cover The message Clear paper path will be cleared and copying will be possible 3 Gently push tray 1 into the machine Push the tray in completely The fusing unit is hot Do not touch the fusing unit when removing misfed paper Doing so may cause a burn or injury 1 Warning When closing the side cover hold the handle If the paper was torn make sure that no...

Page 36: ... Gently close the side cover The message Clear paper path will be cleared and copying will be possible 5 Gently push tray 2 into the machine Push the tray in completely Make sure that there is no misfed paper in the tray before pulling it out Page 31 Also use the following procedure to remove misfeeds that occur in the 250 sheet paper feed unit and the 2 x 250 sheet paper feed unit Note If the mes...

Page 37: ...ying originals with many dark areas the message Toner replenishment in progress may appear and copying will stop even though toner remains The machine will feed toner for about 2 minutes When the START indicator lights up press the START key to resume copying When the toner cartridge replacement required icon appears in the display little toner remains and thus copies may be faint Note After remov...

Page 38: ...t and the total scan count can be used as a guideline for cleaning When the total output count and the total scan count exceed 999 999 the counts return to 0 An A3 or 11 x 17 page is counted as two pages Each two sided sheet that is output is counted as two pages An A3 or 11 x 17 sheet is counted as four pages Blank copies and blank prints are included in the count If the last page of a two sided ...

Page 39: ...he provided glass cleaner to clean the original scanning glass If white or black lines appear in copies printed pages or printed fax pages when the SPF is not used see CLEANING THE TRANSFER CHARGER on page 38 1 Open the SPF and take out the glass cleaner 2 Clean the original scanning glass with the glass cleaner 3 Return the glass cleaner to its original position CLEANING THE BYPASS TRAY PAPER FEE...

Page 40: ...the transfer charger and gently slide the cleaner in the direction indicated by the arrow two or three times If the sheet metal on the transfer charger is smudged with toner wipe it with a soft clean cloth 6 Return the charger cleaner to its original position 7 Close the tray and side cover 8 Turn the power switch to the ON position Charger cleaner Slide the charger cleaner from one end to the oth...

Page 41: ...reen will appear 4 Adjust the contrast with the or key To reset the contrast to the default setting press the C key 5 Press the SPECIAL FUNCTION key You will return to the base screen 2 SIDED COPY SPECIAL FUNCTION ACC DUPLEXSCAN SPECIAL FUNCTION SPECIAL MODES ORIG SIZE ENTER PAPER SIZE SET DISPLAY CONTRAST GH PQR 2 SIDED COPY SPECIAL FUNCTION SPECIAL FUNCTION SPECIAL MODES ORIG SIZE ENTER PAPER SI...

Page 42: ...corporated in some models as standard equipment AR M161 AR M162 AR M165 AR M206 AR M207 Reversing single pass feeder AR RP6N No No Yes Yes Yes Single pass feeder AR SP6N Yes Yes Yes Yes Yes Document cover AR VR5 Standard Standard Standard Yes Yes 250 sheet paper feed unit AR D24 Yes Yes Yes Yes Yes 2 x 250 sheet paper feed unit AR D25 Yes Yes Yes Yes Yes Job separator tray kit AR TR4 Yes Yes Yes Y...

Page 43: ...4 or less for B4 8 1 2 x 14 or larger originals up to 30 sheets Detectable original sizes A5 B5 B5R A4 A4R B4 A3 5 1 2 x 8 1 2 1 8 1 2 x 11 8 1 2 x 11 R 8 1 2 x 14 11 x 17 Original exchange speed 2 When installed on AR M161 AR M162 AR M165 16 pages min When installed on AR M206 AR M207 20 pages min Weight 5 0 kg 11 1 lbs 5 4 kg 12 0 lbs Dimensions 583 mm W x 435 mm D x 133 mm H 22 61 64 W x 17 9 6...

Page 44: ... copying rotation copy border erase copying margin copying card shot USB 2 0 port Hi speed printer function for the dual function board ROPM function High speed data transfer Electronic sort compression method JBIG Electronic sort memory 16 MB Electronic sort scannable pages 100 standard A4 8 1 2 x 11 originals For best copying results be sure to use only SHARP Genuine Supplies which are designed ...

Page 45: ...43 Part 2 Copier Operation ...

Page 46: ...44 ...

Page 47: ... or the size was not detected correctly see SELECTING THE ORIGINAL SIZE page 50 Note Note If the auto paper select function has been disabled in the key operator programs page 88 use the PAPER SELECT key to select the desired paper size If you wish to use a size of paper different from the size automatically selected by the machine use the PAPER SELECT key to select the desired paper size Paper in...

Page 48: ...o cancel a copy job in progress press the C key Differences in copy conditions may cause the position of the printed copy image to vary even the copies are of the same original on the same paper For more information see Points concerning the position of the printed copy image on page 47 Note If the original is a non standard size or the size was not detected correctly see SELECTING THE ORIGINAL SI...

Page 49: ...n be used A maximum of 40 pages can be placed at once For originals that are B4 or larger 8 1 2 x 14 or larger a maximum of 30 pages can be placed at once Originals that cannot be used in the SPF The following originals cannot be used These may cause misfeeds or smudging and unclear images Transparencies tracing paper other transparent or translucent paper and photographs Carbon paper thermal pape...

Page 50: ...st suits the original with the or key The EXPOSURE key can also be pressed to select the exposure mode 3 Adjust the exposure level as needed with the or key The exposure level cannot be adjusted when AUTO is selected For a darker image press the key For a lighter image press the key The default exposure levels for TEXT and PHOTO can be set in the key operator programs 4 Press the OK key To return ...

Page 51: ...e made even if 0 is displayed Important note when making a large number of copies If the number of sheets output to the centre tray exceed its maximum capacity 250 sheets when a job separator tray kit is not installed 150 sheets when a job separator tray kit is installed during a copy job the copy job will stop temporarily If this happens promptly remove the copies and press the OK key to resume c...

Page 52: ...n and the selected original size will appear in the original size display Selecting an inch original size 6 Select the original size with the or key To return to selection of AB original sizes press the key to return to step 4 7 Press the OK key You will return to the base screen and the selected original size will appear in the original size display Standard sizes The following sizes can be detec...

Page 53: ...selected in step 4 The size entry screen appears and is ready for entry of the width of the original If other than SIZE INPUT was selected in step 4 You will return to the base screen Go to step 8 6 Select X width with the or key and enter the width with the or key and then do the same for the length Y 7 Press the OK key You will return to the base screen 8 Press the START key Copying begins POSUR...

Page 54: ...rator programs when reducing or enlarging a original Page 87 If the message Image edge loss is displayed part of the original image may be cut off 4 Set the number of copies and press the START key To cancel automatic ratio selection press the AUTO IMAGE key again When copying from the SPF automatic ratio selection mode will automatically disable after the START key is pressed and the original is ...

Page 55: ...pidly hold down the or key However the value will stop at the preset reduction or enlargement ratios To move beyond these ratios release the key and then hold it down again Note that if the key auto repeat function has been disabled in the key operator programs the ratio will not change when the key is held down See DISABLE AUTO KEY REPEAT on pege 84 To cancel a ratio setting return the ratio to 1...

Page 56: ...lected are 25 to 400 50 to 200 when the SPF is used 1 Place the original in the document feeder tray or on the document glass 2 Press the SPECIAL FUNCTION key The special function screen will appear 3 Press the OK key The special modes screen will appear 4 Select XY ZOOM with the or key 5 Press the OK key The XY zoom screen will appear ready for selection of the X horizontal ratio 6 Set the horizo...

Page 57: ... function has been enabled the appropriate copy paper size will be automatically selected based on the original size and the selected copy ratios Image rotation will take place if necessary 11 Select any other copy settings as needed and press the START key _ FUNCTION ACC C READ E XY ZOOM 115 ZOOM 100 X 115 86 Y 100 X Y OK Ready to copy A4R X115 Y 99 B4 AUTO AUTO If the COPY RATIO key is pressed w...

Page 58: ...165 AR M206 AR M207 Page One sided originals to two sided copies using the SPF No Yes 1 57 One sided originals to two sided copies using the document glass No Yes 58 Two sided originals to two sided copies using the RSPF No Yes 2 59 Two sided originals to one sided copies using the RSPF No Yes 2 60 If you are using the AR M161 AR M162 see TWO SIDED COPIES USING THE BYPASS TRAY on page 61 There are...

Page 59: ... COPY key 4 If you wish to have the orientation of the image on the back of the copy paper be opposite the orientation of the image on the front set BINDING CHANGE to ON with the or key If the copies are to be bound at the top reversing the orientations of the images on the front and back sides of each copy will result in a uniform orientation when the bound copies are viewed note that this may de...

Page 60: ...ber of copies and press the START key 8 Remove the first original and then place the original for the back side of the copy on the document glass Close the SPF and press the START key The copy will be delivered to the centre tray To cancel two sided copying press the C key To cancel two sided duplex copy mode press the 2 SIDED COPY key to select 1 to 1 and then press the OK key When making two sid...

Page 61: ...dth of your originals and place the originals face up in the document feeder tray 2 Press the 2 SIDED COPY key The duplex mode selection screen appears 3 Select 2 to 2 with the or key or with the 2 SIDED COPY key 4 Press the OK key You will return to the base screen 5 Set the number of copies and press the START key To stop copying in the middle of a run press the C key TO GE OUTPUT 2 SIDED COPY S...

Page 62: ...wish to have the orientation of the back image be opposite the orientation of the front image set BINDING CHANGE to ON with the or key If the copies are to be bound at the top reversing the orientations of the front and back images will result in a uniform orientation when the bound copies are viewed note that this may depend on the orientation of the originals 5 Press the OK key You will return t...

Page 63: ...PAPER SELECT key and then press the START key The copies are delivered to the centre tray 1 2 1 If you are using the AR M165 AR M206 AR M207 The AR M165 AR M206 AR M207 is equipped standard with an automatic two sided copying function that automatically turns over the paper If paper in Paper that can be used for automatic 2 sided printing on page 18 is used this enables easier two sided copying th...

Page 64: ...l page copy select DUAL PAGE COPY which has a checkmark in the special modes screen once again and press the OK key A4 8 1 2 x 11 paper can be used for dual page copying When rotation copy is enabled A4R 8 1 2 x 11 R paper can also be used When used in combination with XY zoom copying enlargement is not possible Dual page copying cannot be used in combination with the following functions 2 in 1 4 ...

Page 65: ...ops remove the previous original s and place the original s of the interrupt copy job 3 Select copy settings as needed 4 Set the number of copies and then press the START key 5 When the copy job is finished press the INTERRUPT key to end interrupt mode and remove the original s The INTERRUPT indicator will turn off indicating that the interrupt function is no longer operating The copy settings wil...

Page 66: ...s loaded vertically The rotation copy function is initially enabled It can be disabled in the key operator programs Page 87 SORT MODE Copies of multiple original pages can collated into sets The rotation copy function cannot be used in combination with the margin shift function Rotation copy will not operate when a copy is enlarged to a paper size greater than A4 8 1 2 x 11 In this case place the ...

Page 67: ...n the START indicator lights replace the original with the next original and press the START key Repeat step 6 until all originals have been scanned 7 When all originals have been scanned press the READ END key Copying will start If the memory becomes full while the originals are being scanned Memory is full will appear in the display To start copying the originals that have been scanned to that p...

Page 68: ...ly selected based on the original size the paper size and the selected number of images When using the document glass reduction is possible to 25 When using the SPF reduction is possible to 50 Certain combinations of original size paper size and number of images may result in images being cut off Even if Rotation copy is disabled in the key operator programs the images may be rotated if needed dep...

Page 69: ...eeder tray copying will start after all originals are scanned If you placed the first original on the document glass go to the next step 13 When the START indicator lights replace the original with the next original and then press the START key Repeat step 13 until all originals have been scanned Copies will be output each time two originals for 2 in 1 copy or four originals for 4 in 1 copy have b...

Page 70: ...t the margin edge is to the left When a left edge margin is selected and you are copying from the document glass set the original face down so that the margin edge is to the right When a top edge margin is selected place the original with the margin edge toward the rear of the document feeder tray or the document glass 2 Press the SPECIAL FUNCTION key The function screen appears with SPECIAL MODES...

Page 71: ...cannot be used when copying a special size original Note that if the width of the erasure is too large the edge of the image may be partially erased The default setting for the erasure width can be changed Page 86 1 Place the original in the document feeder tray or on the document glass 2 Press the SPECIAL FUNCTION key The function screen appears with SPECIAL MODES selected 3 Press the OK key The ...

Page 72: ... 0 mm 0 the printed result is the same as when OFF is selected 8 Press the OK key You will return to the base screen 9 Select other copy settings as needed and press the START key To cancel an edge erase setting return to the edge erase settings screen and select OFF OK WXYZ _ READ END ...

Page 73: ...n appears 6 Select X width with the or key and enter the width with the or key and then do the same for the length Y 7 Press the OK key You will return to the base screen CARD CARD CARD Original Example Portrait A4 size Example Landscape A4 size Copy Back of card Front of card 2 SIDED COPY SPECIAL FUNCTION ACC DUPLEXSCAN SPECIAL FUNCTION SPECIAL MODES ORIG SIZE ENTER PAPER SIZE SET DISPLAY CONTRAS...

Page 74: ...NCTIONS 8 Press the START key The front side of the card is scanned 9 Turn the original over on the document glass 10 Press the START key Copying will start after both sides of the original have been scanned WXYZ _ READ END ...

Page 75: ...opy ratios Variable 25 to 400 in 1 increments total 376 steps 50 to 200 when the SPF is used Fixed preset 25 50 70 81 86 100 115 122 141 200 400 25 50 64 77 95 100 121 129 141 200 400 25 and 400 only when the SPF is used Paper feeding One automatic feeding paper tray 250 sheets bypass tray 100 sheets Two automatic feeding paper trays 250 sheets each bypass tray 100 sheets Fusing system Heat roller...

Page 76: ...kg 65 5 lbs AR M162 AR M165 Approx 30 0kg 66 2 lbs AR M206 Approx 33 8kg 74 6 lbs AR M207 Approx 34 2kg 75 3 lbs Dimensions 590 mm W x 595 mm D x 469 mm H 23 15 64 W x 23 7 16 D x 18 15 32 H 590 mm W x 595 mm D x 520 mm H 23 15 64 W x 23 7 16 D x 20 31 64 H Operating conditions Temperature 15 C to 30 C 59 F to 86 F Humidity 20 to 85 Noise level Sound Power Level LwA 1B 10dB Copying 6 3 B or less S...

Page 77: ... the function cannot be used When auditing mode is enabled for the printer function an account number must be entered at the user s computer when the print command is selected Depending on the key operator program settings a job may be printed even if an incorrect account number is entered and thus care must be taken when managing printer page counts If CANCEL JOBS OF INVALID ACCOUNTS is enabled i...

Page 78: ...s 6 Enter the new 5 digit key operator code with the numeric keys Any 5 digits can be used for the key operator code 7 Press the OK key The previously programmed key operation code is replaced by the new key operator code Press the CA key to return to the base screen 2 SIDED COPY SPECIAL FUNCTION ACC DUPLEXSCAN SPECIAL FUNCTION SPECIAL MODES ORIG SIZE ENTER PAPER SIZE SET DISPLAY CONTRAST GH PQR 2...

Page 79: ...CTION 82 MEM FOR PRINTER 82 USB2 0 MODE 82 RETURN FROM COPY MODE TIMING 83 OPERATION SETTING AUTO CLEAR 83 DISABLE DISPLAY TIMEOUT 83 LANGUAGE SETTING 83 MESSAGE TIME 83 KEY TOUCH SOUND 84 KEYS TOUCH SOUND AT INITIAL POINT 84 KEY PRESS TIME 84 DISABLE AUTO KEY REPEAT 84 DISABLE PAPER SIZE SET 84 ENERGY SAVE AUTO POWER SHUT OFF 85 AUTO POWER SHUT OFF TIMER 85 PREHEAT MODE 85 TONER SAVE MODE 85 Prog...

Page 80: ...am that has a checkbox go to step 9 7 Select the desired program with the or key 8 Press the OK key and follow the instructions in the program screen 9 To use another program for the same mode select the desired program with the or key To use a program for a different mode press the BACK key and select the desired mode To exit the key operator programs press the CA key 2 SIDED COPY SPECIAL FUNCTIO...

Page 81: ... the selected mode press the OK key so that a checkmark appears in the checkbox Auditing mode is enabled To disable auditing mode for the selected mode press the OK key to remove the checkmark from the checkbox Auditing mode is disabled TOTAL ACCOUNT This program is used to display the page counts of each account in copy print and scan modes and the usage limits for copy and print modes Misfed pag...

Page 82: ... the or key and then press the OK key 2 If you wish to delete all account numbers select DELETE ALL ACC and press the OK key When the message DELETE appears select YES with the or key to delete all accounts and press the OK key If you do not wish to delete all account numbers select NO and press the OK key 3 If you wish to delete an each account number select DELETE 1 ACC and press the OK key 4 En...

Page 83: ...ct account number is entered three times in a row During this time Please see your key operator for assistance will appear in the display To enable this program select ACC SECURITY and then press the OK key so that a checkmark appears in the checkbox To disable this program select ACC SECURITY and then press the OK key so that a checkmark does not appear in the checkbox CANCEL JOBS OF INVALID ACCO...

Page 84: ...t of this memory is also used to store print data This program is used to set the percentage of memory that is allocated to the print function The memory allocation can be set from 30 to 70 in increments of 10 The factory default setting is 50 Select MEM FOR PRINTER and press the OK key The following screen will appear 1 Select the desired percentage with the or key 2 Press the OK key USB2 0 MODE ...

Page 85: ...s are pressed on the operation panel for one minute in scan or fax mode The factory default setting is automatic return to the base screen To disable automatic return to the base screen select DISABLE DISPLAY TIMEOUT and press the OK key so that a checkmark appears in the checkbox To re enable automatic return to the base screen select DISABLE DISPLAY TIMEOUT once again and press the OK key to cle...

Page 86: ...ind however that when a longer setting is selected more care is required when pressing keys to ensure that the key input is registered The initial factory setting is MINIMUM Select KEY PRESS TIME and press the OK key The following screen appears 1 Select the desired time with the or key 2 Press the OK key DISABLE AUTO KEY REPEAT This program is used to stop a setting from changing continuously whe...

Page 87: ...its your work conditions The factory default setting is 5 min Select AUTO POWER SHUT OFF TIMER and press the OK key The following screen will appear 1 Select the desired time with the or key 2 Press the OK key PREHEAT MODE This program is used to set the duration of time until preheat mode which automatically lowers the fusing unit temperature activates when the operation panel is not used Using t...

Page 88: ...an be set from 0 to 20 mm in increments of 5 mm 0 to 1 in increments of 1 4 2 Press the OK key ERASE ADJUST When the dual function board is installed This is used to set the default erasure width The factory default setting is 10 mm 1 2 inch Select ERASE ADJUST and press the OK key The following screen will appear 1 Adjust the edge erase and centre erase width with the or key The edge erase width ...

Page 89: ...ding select STREAM FEEDING once again and press the OK key so that the checkmark is cleared from the checkbox ROTATION COPY When the dual function board is installed If the orientation of the original does not match that of the paper the image can be rotated Rotation copy operates when automatic paper selection or automatic ratio selection operates The function is initially enabled factory default...

Page 90: ...MIT OF COPIES and press the OK key The following screen will appear 1 Select 99 copies or 999 copies with the or key 2 Press the OK key DISABLE AUTO PAPER SELECTION This program is used to disable automatic paper selection When automatic paper selection is disabled the most suitable paper is not selected automatically when an original is placed on the document glass or in the document feeder tray ...

Page 91: ... United Kingdom Sharp Electronics U K Ltd Telephone number for information 08705 274 277 France Sharp Electronics France S A Telephone number for information 01 49 90 34 00 Austria Sharp Electronics GMBH Telephone number for information 01 727 19 0 Italy Sharp Electronics Italy S P A Telephone number for information 02895951 Spain Sharp Electronics Espana S A Telephone number for information 93 58...

Page 92: ...medical personnel Ingestion Rinse with water and drink several glasses of water If irritation or discomfort does occur consult medical personnel 5 FIRE FIGHTING MEASURES Extinguishing Media Water CO2 foam and dry chemicals Special Fire Fighting Procedures None Fire and Explosion Hazards Toner material like most finely divided organic powders may form an explosive mixture 6 ACCIDENTAL RELEASE MEASU...

Page 93: ...eactions Dust explosion like most finely divided organic powders Conditions to Avoid Electric discharge throwing into fire Materials to Avoid Oxidizing Materials Hazardous Decomposition Products CO CO2 and NOX Further Information None 11 TOXICOLOGICAL INFORMATION Acute Toxicity Ingestion oral LD50 2500mg kg Rats Inhalation No Data Eye irritation Not an irritant Rabbits Skin irritation Not an irrit...

Page 94: ...cable rules or order under TSCA SARA Superfund Amendments and Reauthorization Act Title III 302 Extreme Hazardous Substance None 311 312 Hazard Classification None EU Information 1999 45 EC and 67 548 EEC Symbol Indication Not required R Phrase Not required 76 769 EEC All chemical substances in this product comply with all applicable rules or order under 76 769 EEC 16 OTHER INFORMATION NFPA Rating...

Page 95: ...more information 040 2376 2613 United Kingdom Sharp Electronics U K Ltd Telephone number for information 08705 274 277 France Sharp Electronics France S A Telephone number for information 01 49 90 34 00 Austria Sharp Electronics GMBH Telephone number for information 01 727 19 0 Italy Sharp Electronics Italy S P A Telephone number for information 02895951 Spain Sharp Electronics Espana S A Telephon...

Page 96: ...nnel Ingestion Rinse with water and drink several glasses of water If irritation or discomfort does occur consult medical personnel 5 FIRE FIGHTING MEASURES Extinguishing Media Water CO2 foam and dry chemicals Special Fire Fighting Procedures None Fire and Explosion Hazards Toner material like most finely divided organic powders may form an explosive mixture 6 ACCIDENTAL RELEASE MEASURES Personal ...

Page 97: ...plosion like most finely divided organic powders Conditions to Avoid Electric discharge throwing into fire Materials to Avoid Oxidizing Materials Hazardous Decomposition Products CO CO2 and NOX Further Information None 11 TOXICOLOGICAL INFORMATION Acute Toxicity Ingestion oral LD50 2500mg kg Rats Inhalation No data Eye irritation No data Skin irritation Not an irritant Rabbits Skin sensitizer No s...

Page 98: ...l applicable rules or order under TSCA SARA Superfund Amendments and Reauthorization Act Title III 302 Extreme Hazardous Substance None 311 312 Hazard Classification None EU Information 1999 45 EC and 67 548 EEC Symbol Indication Not required R Phrase Not required 76 769 EEC All chemical substances in this product comply with all applicable rules or order under 76 769 EEC 16 OTHER INFORMATION NFPA...

Page 99: ...ger 38 Cleaning the transfer charger 38 Copy functions 45 COPY key indicator 14 Copy number display 14 COPY RATIO key 15 D DATA indicator 14 15 Default settings 18 Developer replacement required icon 28 Disable auto paper selection 88 Display 14 16 39 Document cover 13 Cleaning 37 Removing 47 Document feeder tray 13 Document glass 12 45 Cleaning 37 Normal copying 45 Two sided copies of one sided o...

Page 100: ... Automatic ratio selection 52 Preset copy ratios zoom 52 XY zoom copying 54 Removing the document cover 47 Replacing the toner cartridge 35 Reversing tray 13 29 Right side cover 13 29 Roller rotating knob 13 31 32 Rotation copy 64 RSPF One sided copies of two sided originals 60 Two sided copies of two sided originals 59 S SCAN key indicator 14 Selecting the tray 49 Setting the number of copies 49 ...

Page 101: ...wo sided originals 60 Placing the original Document glass 45 SPF 46 Reducing or enlarging a copy 52 Removing the document cover 47 Selecting the original size 50 Selecting the tray 49 Setting the number of copies 49 Two sided copies of two sided originals 59 Two sided copies using the bypass tray 61 Two sided copying of one sided originals 57 Using the bypass tray to copy a special size original 5...

Page 102: ...100 ...

Page 103: ...101 ...

Page 104: ...102 ...

Page 105: ...must be entered when accessing the Key Operator Program for the first time Page 76 The Key Operator Code Number is an important security number allowing the Key Operator to configure the copier s functions and auditor s settings You should register your own code number different from the factory setting above immediately after your copier is installed Detach this page and store it in a safe place ...

Page 106: ......

Page 107: ...89 336 EEG en 73 23 EEG gewijzigd door 93 68 EEG Dette udstyr overholder kravene i direktiv nr 89 336 EEC og 73 23 EEC med tillæg nr 93 68 EEC Quest apparecchio è conforme ai requisiti delle direttive 89 336 EEC e 73 23 EEC come emendata dalla direttiva 93 68 EEC Este equipamento obedece às exigências das directivas 89 336 CEE e 73 23 CEE na sua versão corrigida pela directiva 93 68 CEE Este apara...

Page 108: ...04M KS1 TINSE1334QSZZ AR M161 AR M162 AR M165 AR M206 AR M207 SHARP CORPORATION This manual has been printed using a vegetable based soy oil ink to help protect the environment Printed on 100 post consumer recycled paper ...

Reviews: