background image

Timer Transmission

92

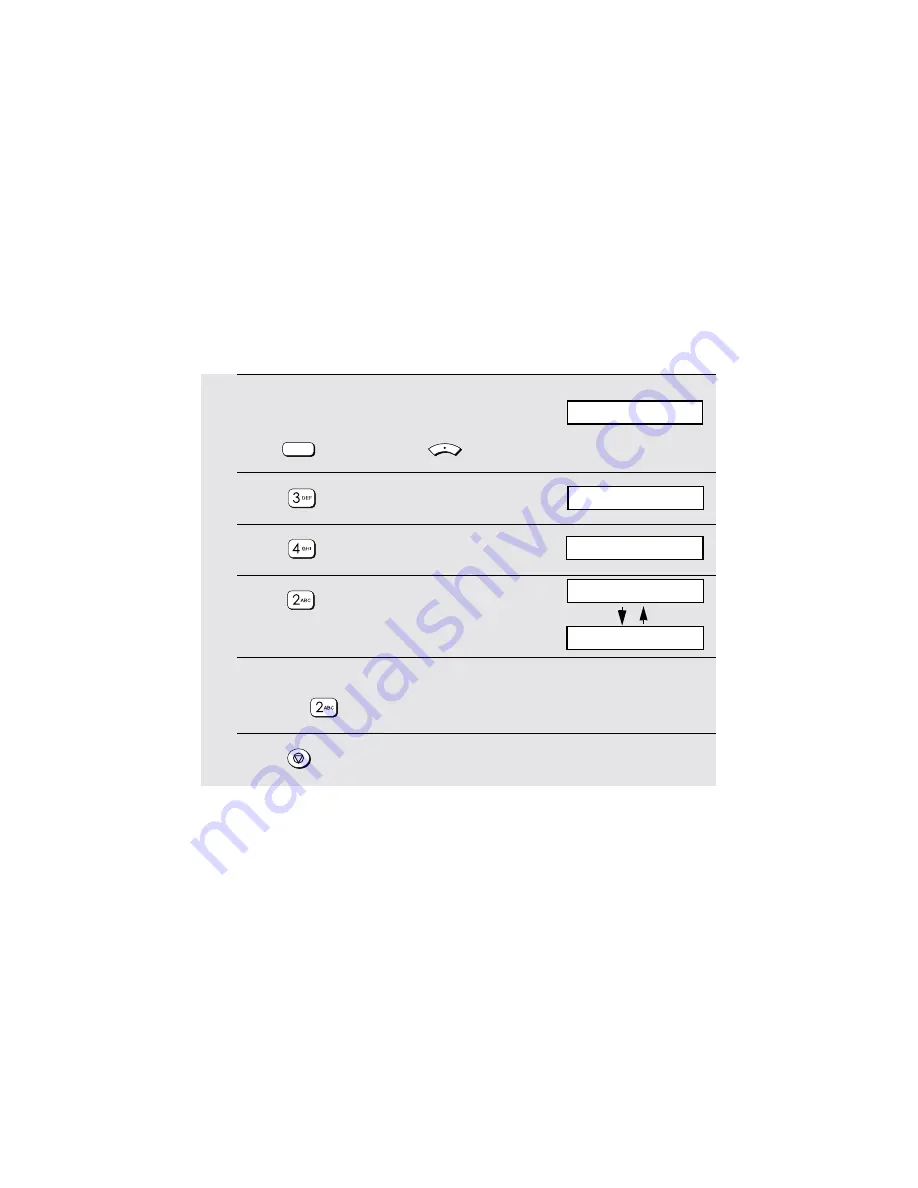
Canceling a timer job

If you need to cancel a timer job before it is performed, follow the steps below.

i

You will need to know the timer number assigned to the job in order to 
cancel it. If you don’t remember the number (it appears in the display when 
you store the job), print out the Timer List. (See page 126.)

1

Make sure that the date and time 
display of fax mode appears (if needed 

press

) and then press 

.

2

Press .

3

Press .

4

Press 

 to select CLEAR.

5

Enter the number of the timer job that you want to clear. 

Example:

6

Press 

 repeatedly to exit.

FAX

MENU

1: AUTO RECALL

Display:

FAX SETTING

1: SET, 2: CLEAR

ENTER TIMER #

TIMER CLEAR

Summary of Contents for AM 900 - Digital Office Laser Copier

Page 1: ...AL MULTIFUNCTIONAL SYSTEM ONLINE GUIDE MODEL AM 900 1 Installation 2 Copying 3 Sending Faxes 4 Receiving Faxes 5 Special Fax Functions 6 Printing 7 Scanning 8 Printing Lists 9 Maintenance 10 Troubleshooting ...

Page 2: ... any person to use a computer or other electronic device to send any message via a telephone facsimile machine unless such message clearly contains in a margin at the top or bottom of each transmitted page or on the first page of the transmission the following information 1 The date and time of transmission 2 Identification of either the business business entity or individual sending the message 3...

Page 3: ...1500 pages Replacement cartridge AM 90ND Approx 3000 pages Drum cartridge yield continuous printing 5 page coverage letter paper Initial starter cartridge included with machine 20 000 pages average Replacement cartridge AM 90DR 20 000 pages average PC print speed 12 ppm pages per minute Resolution 600 u 600 dpi dots per inch Copy speed 12 cpm copies per minute Copy quality settings Text Photo Copy...

Page 4: ...MB approx 125 average letter pages Resolution Horizontal 203 lines inch 8 lines mm Vertical Standard 98 lines inch 3 85 lines mm Fine Halftone 196 lines inch 7 7 lines mm Super fine 391 lines inch 15 4 lines mm Halftone 256 levels Reception modes FAX ONLY EXT TEL Scanner type CIS Contact Image Sensor Resolution 300 600 x 300 dpi 300 600 x 600 dpi Scan speed TWAIN scanning using the auto document f...

Page 5: ...eets max 20 lbs Legal size 1 sheet max 20 lbs Computer connection USB 2 0 or 1 1 port USB 2 0 or 1 1 cable must be purchased separately Effective scanning width 8 2 208 mm max Effective printing width 8 2 208 mm max Display 16 digit LCD display Paper tray capacity letter size plain paper 250 sheets 20 lbs At room temperature and normal humidity Power requirements 120 V AC 60 Hz Operating temperatu...

Page 6: ...d to a 120 V 60 Hz grounded 3 prong outlet Connecting it to any other kind of outlet will damage the machine and invalidate the warranty Never insert objects of any kind into slots or openings on the machine This could create a risk of fire or electric shock If an object falls into the machine that you cannot remove unplug the machine and consult a qualified service representative Do not place thi...

Page 7: ...er are trademarks of Microsoft Corporation in the U S A and other countries Acrobat and Adobe are trademarks of Adobe Systems Incorporated Eastman Software is a trademark of Eastman Kodak Company All other company names and product names appearing in this manual are the trademarks of their respective owners ...

Page 8: ...46 2 Copying 51 Making a Copy 51 Selecting Temporary Copy Settings 54 Permanent Copy Settings 57 Using the Auto Document Feeder 60 Copying onto Envelopes and Cards 62 3 Sending Faxes 65 Sending a Fax 65 Storing a Number for Speed Dialing 70 Selecting Temporary Fax Settings 75 Other Fax Transmission Settings 77 Using an Extension Phone to Send a Fax 83 Broadcasting Sending a Fax to Multiple Destina...

Page 9: ...Application 110 Scanning From a WIA Application Windows XP Me only 114 Scanning From the Scanner Wizard Windows XP Me only 117 Scanning From the Operation Panel 118 8 Printing Lists 126 9 Maintenance 131 Cleaning the Scanning Glasses and Rollers 131 Replacing the Toner Cartridge 135 Replacing the Drum Cartridge 136 10 Troubleshooting 139 Problems and Solutions 139 Messages and Signals 144 Clearing...

Page 10: ... When making a copy press either of these keys after selecting an enlargement reduction setting with the ZOOM key to increase or decrease the setting by 1 page 54 When sending a fax press either of these keys to search through your auto dial fax numbers page 67 MENU key Press this key followed by the left or right arrow key to access special functions and settings CONTRAST key Press this key to se...

Page 11: ...is open or when a paper jam has occurred a message will appear to indicate the problem DUPLEX SCAN key Press this key to copy page 56 or fax page 76 multiple two sided pages PRINT STOP key Press this key to cancel a print job sent to the machine from a computer page 103 ENTER key Press this key to enter or select a setting BROADCAST key Press this key to send the same fax to multiple destinations ...

Page 12: ...s or air conditioners Keep dust away from the machine Keep the area around the machine clear About condensation If the machine is moved from a cold to a warm place it is possible that condensation may form on the scanning glass preventing proper scanning of documents To remove the condensation turn on the power and wait approximately two hours before using the machine CD ROM Setup Guide Toner cart...

Page 13: ...feeder tray Slide the output tray into the machine as shown When it stops lift the end slightly and push in so that the tray locks in place Important The output tray must be attached correctly or the machine will not operate If you will be using legal paper pull out the tray extension ...

Page 14: ...ner lock may damage the machine If you need to move the machine i In the event that you need to move the machine to a new location disconnect the telephone line cord before unplugging the power cord After you have unplugged the power cord push the scanner release back in to lock the scanner i After moving release the scanner lock first and then plug in the power cord Connect the telephone line las...

Page 15: ...machine and is not covered under the warranty Comments i The machine does not have a power on off switch The power is turned on and off by simply plugging in or unplugging the power cord i Whenever you unplug the power cord wait at least 5 seconds before plugging it back in i If your area experiences a high incidence of lightning or power surges it is recommended that you install surge protectors ...

Page 16: ...st set the machine for pulse dialing Press the keys on the operation panel as follows 1 Make sure that the date and time display of fax mode appears if needed press and then press 2 Press 3 Press 4 Select the dial mode TONE PULSE 5 Press repeatedly to exit FAX MENU Display The display briefly shows your selection then 1 TONE FAX SETTING 5 RINGER VOLUME 1 DATE TIME SET TEL LINE TEL SET Make sure th...

Page 17: ...imile function in conjunction with any of these services you may experience errors during transmission and reception of facsimile messages i The facsimile function of this machine is not compatible with digital telephone systems Extension phone optional If desired you can connect an extension phone to the TEL SET jack on the machine 1 Remove the seal covering the TEL SET socket 2 Connect the exten...

Page 18: ...imately 20 000 letter size pages When replacing the drum cartridge use a SHARP AM 90DR drum cartridge Follow the steps below to install the toner cartridge and the drum cartridge Note The quality of the toner cartridge is guaranteed for 18 months after the date of manufacture indicated on the package The quality of the drum cartridge is guaranteed for 24 months after the date of manufacture indica...

Page 19: ...her contaminants get on the drum wipe it gently with a clean cloth x Exposure to light for more than several minutes will damage the drum Be sure to insert the drum cartridge promptly into the machine x If you find it necessary to leave the cartridge out of the machine for more than several minutes wrap the cartridge in black paper 4 Remove the new toner cartridge from its packaging Shake the cart...

Page 20: ...n the arrow mark to make sure it clicks into place x Do not touch the roller in the toner cartridge 6 Close the front cover and then the side cover x Make sure the side cover is completely closed Otherwise light may enter the print compartment and damage the drum 2 1 1 YES 2 NO TONER EXCHANGED Display Press on this mark to make sure the cartridge clicks into place Grasp this handle to insert the c...

Page 21: ...lay LIFE 7 If you installed a new toner cartridge press to select YES this will reset the toner counter to zero x If you temporarily removed and then replaced an old toner cartridge for maintenance or other reason press to continue using the previous toner count Note Be sure to press or the machine will not alert you when the toner cartridge is out of toner 8 Press 9 If you installed a new drum ca...

Page 22: ...is reset in Step 7 on the previous page The procedure below is normally not necessary however it can be used in the event that you need to reset the toner counter manually 1 Press and then or repeatedly until the display at right appears 2 Press 3 Press 4 Press repeatedly to exit MENU Z A Display CLEAR START KEY LIFE TONER COUNTER 3 CLR DRUM COUNT ...

Page 23: ...e the blank side of paper that has already been printed on 1 Remove the output tray 2 Insert a stack of paper into the tray print side up x Important The stack of paper must not be higher than the paper height line on the paper tray 3 Squeeze the sides of the paper guide as shown and slide it to the slot for the length of the paper you are loading Paper height line ...

Page 24: ... Setting the paper size The machine has been set at the factory to use letter size paper If you loaded legal size paper you must change the paper size setting to LEGAL 1 Press or and then 2 Press 3 Select the paper size LETTER LEGAL 4 Press repeatedly to exit COPY SCAN MENU The display briefly shows your selection then 1 LETTER Display COMMON SETTING 2 AUTO CLEAR ...

Page 25: ... 5 5 or higher is required to install Sharpdesk if this is not installed you will be prompted during the installation procedure to install Internet Explorer 6 0SP1 from the CD ROM Minimum system requirements Operating system Windows Me 2000 Professional XP Port USB 2 0 or 1 1 port Display 800 x 600 SVGA with 256 colors or more Free hard disk space 150 MB or more Other requirements An environment i...

Page 26: ...for Hi Speed mode purchase a USB 2 0 cable A USB 2 0 certified cable is recommended i To install the software on Windows 2000 XP using the installer you must log in with administrator s rights i The windows shown in the following procedure appear in Windows XP The windows that appear in other versions of Windows may be slightly different i Make a note of the login name that you use when installing...

Page 27: ...vary depending on your country or region 6 Follow the instructions in the windows that appear i When the Setup Type Selection window appears select Standard to install all software components this should normally be selected If you only wish to install certain components select Custom and then select the components that you wish to install Note If you wish to select the folder where Sharpdesk is i...

Page 28: ...ck Close 8 If the installation was a Standard installation the following window will appear Click OK i If you installed the MFP drivers using a Custom installation and did not install Sharpdesk the following window will appear Click OK and go to Step 11 9 The following window will appear Click Yes to restart your computer ...

Page 29: ...reen instructions to create an index database for Sharpdesk 11 Make sure that the power cord of the machine is not plugged in the machine is powered off and then connect the USB cable i Insert one end of the USB cable into the USB port on the machine and the other end into your computer s USB port ...

Page 30: ...0 will not operate correctly i If you find that your computer does not recognize the machine or operation is unstable try connecting the USB cable to a different USB port on your computer or try a different USB cable use the shortest possible cable 12 Plug in the power cord of the machine This completes the installation of the software ...

Page 31: ...the event that you need to remove the software from your computer follow the steps below i To remove the software you must log in using the same user name as when you installed the software 1 Disconnect the USB cable from your computer and the machine 2 Open the Control Panel and select Add or Remove Programs or Add Remove Programs 3 Select SHARP AM 900 Series MFP Driver or Sharpdesk from the list...

Page 32: ...the clients that will use the machine as a printer i If you have not yet installed the software on the server and connected the machine to the server with a USB cable do so as explained in the previous section beginning on page 23 before completing the procedures in this section Note The clients the computers that are not connected directly to the machine must be running the same version of Window...

Page 33: ...g window will appear Click Network Setup Wizard to run the wizard 4 After running the wizard the following window will appear Select Share this printer i If you would like to change the name enter a new name this must be 8 characters or less to allow sharing with Windows Me computers ...

Page 34: ...t button point to Settings and select Printers 2 Right click the SHARP AM 900 icon and select Sharing 3 The following window will appear Click Shared as i If you would like to change the name enter a new name this must be 8 characters or less to allow sharing with Windows Me computers 4 Click OK ...

Page 35: ...ft Networks appears in the list of installed network components If it appears click the OK button and go to Step 8 If it does not appear continue from Step 3 3 Click the Add button on the Configuration tab 4 Select Service from the list of network component types and click Add 5 Select File and printer sharing for Microsoft Networks and click OK 6 Click OK in the Network dialog box i If you are as...

Page 36: ...our computer Click OK to restart 8 Click the Start button point to Settings and select Printers 9 Right click the SHARP AM 900 icon and select Sharing 10 Select Shared As on the Sharing tab i If you would like to change the name enter a new name this must be 8 characters or less 11 Click OK ...

Page 37: ...s for multiple AM 900 printers connected to the network or directly to the client and switch between those printers Note If the server is running Windows XP or 2000 it may be necessary to set up an account for each client on the server before installing the printer driver to allow the clients to select and use the machine Windows XP 1 Click the start button and click Printers and Faxes 2 Click Add...

Page 38: ...the AM 900 from the list of shared printers and click Next 6 Select Yes if you would like to use the AM 900 as the default printer and click Next 7 Click Finish Windows 2000 1 Click the Start button point to Settings and select Printers 2 Double click the Add Printer icon Click Next in the Add Printer Wizard ...

Page 39: ...l appear Select Network printer and click Next 4 Select Type the printer name or click Next to browse for a printer and click Next 5 Select the AM 900 from the list of shared printers and click Next 6 Select Yes if you would like to use the AM 900 as the default printer Click Next 7 Click Finish ...

Page 40: ...t to Settings and select Printers 2 Double click the Add Printer icon Click Next in the Add Printer Wizard 3 The following window will appear Select Network printer and click Next 4 The following window will appear Click Browse 5 Select the AM 900 from the list of shared printers and click Next ...

Page 41: ... running Windows XP or 2000 the dialog box below will appear Click Have Disk and click Next If the server is running Windows Me go to Step 10 7 Click Browse 8 Navigate to your CD ROM drive and open the Driver folder the Printer folder and then the EnglishA folder Select WinMe and click OK ...

Page 42: ...inter on a Network 40 9 The following window will appear Click Next 10 Select Yes if you would like to use the AM 900 as the default printer and click Next 11 Select Yes if you would like the printer to print a test page Click Finish ...

Page 43: ...ou send Enter your name and fax number here and set the date and time as explained in the following section to have the fax machine include this information automatically at the top of your fax messages 1 Make sure that the date and time display of fax mode appears if needed press and then press 2 Press 3 Press 4 Enter your fax number by pressing the number keys max 20 digits x To insert a space b...

Page 44: ...rst letter To clear a mistake press i To enter a lower case letter continue pressing the key for the letter until the lower case letter appears To enter one of the following symbols press or repeatedly _ Note National characters of the selected display language will appear at the end of the symbol list For some languages no national characters will appear 7 Press 8 Press repeatedly to exit ENTER A...

Page 45: ...s When the date and time need to be set the following messages appear in fax mode 1 Make sure that the date and time display of fax mode appears if needed press and then press 2 Press 3 Press 4 Enter a two digit number for the month 01 for January 02 for February 12 for December etc Example February x To correct a mistake press FAX MENU Z Display The currently set date appears DATE 01 01 2005 DATE...

Page 46: ... Example 2005 7 Enter a two digit number for the hour 01 to 12 and a two digit number for the minute 00 to 59 Example 9 25 8 Press to select A M or to select P M 9 Press to start the clock 10 Press repeatedly to exit ENTER TIME 09 25 AM 2 DAY LIGHT SAVE The currently set time appears example TIME 12 00 AM DATE 02 05 2005 ...

Page 47: ... press 2 Press twice 3 Press to select YES adjust the time automatically or to select NO 4 Press repeatedly to exit FAX MENU Daylight Saving Time If desired you can set the clock to move forward and backward automatically at the beginning and end of Daylight Saving Time Follow these steps 1 YES 2 NO Display FAX SETTING 3 OWN NUMBER ...

Page 48: ...r or turn it off follow the steps below 1 Make sure that the date and time display of fax mode appears if needed press and then press 2 Press 3 Press 4 Press a number key to select the desired volume setting HIGH MIDDLE LOW OFF 5 Press repeatedly to exit FAX MENU Display 1 DATE TIME SET FAX SETTING 1 HIGH The display briefly shows your selection then 6 ALARM VOLUME ...

Page 49: ... volume of the alarm or turn it off follow the steps below 1 Make sure that the date and time display of fax mode appears if needed press and then press 2 Press 3 Press 4 Press a number key to select the desired volume setting HIGH LOW OFF 5 Press repeatedly to exit FAX MENU Display 1 DATE TIME SET FAX SETTING 1 HIGH The display briefly shows your selection then 1 DATE TIME SET ...

Page 50: ...g pressed on the operation panel If desired you can change the amount of time that must elapse to 30 seconds or 120 seconds or turn auto clear off so that temporary settings are never automatically cleared 1 Press or and then 2 Press 3 Press a number key to select the desired setting 30 SEC 60 SEC 120 SEC OFF 4 Press repeatedly to exit COPY SCAN MENU The display briefly shows your selection then D...

Page 51: ...press a key on the operation panel If you wish to turn off the key tone follow the steps below 1 Press or and then 2 Press 3 Press to turn on the key tone or to turn off the key tone 4 Press repeatedly to exit COPY SCAN MENU The display briefly shows your selection then 1 ON 2 OFF Display COMMON SETTING 4 LANGUAGE ...

Page 52: ...splay reports and lists 1 Press or and then 2 Press 3 Press or until the desired language appears and then press x The selections that are available vary by country 4 Press repeatedly to exit COPY SCAN MENU MENU Z A ENTER The display briefly shows your selection then 1 ENGLISH Display COMMON SETTING 1 PAPER SIZE ...

Page 53: ...inal on the document glass or insert it into the auto document feeder i The auto document feeder allows you to load up to 20 letter size originals at once 1 Press to select copy mode COPY 100 LTR 01 Display COPY Enlarge reduce ratio Paper size setting page 22 Number of copies ...

Page 54: ...to document feeder Adjust the document guide to the width of your original s and then insert the original face up into the feeder x Up to 20 letter size sheets can be inserted at once x For detailed information on using the auto document feeder and the types of originals that can be used see pages 60 to 62 Note If an original is placed in both the auto document feeder and on the document glass the...

Page 55: ...eder turn the entire stack over do not change the order of the pages or remove any pages insert it into the auto document feeder again and press x If you are using the document glass to copy multiple originals and E Sort is selected After the original is scanned the following alternating messages will appear Remove the original from the document glass place the next original and press Repeat until...

Page 56: ...more of the following temporary copy settings before pressing to begin copying Enlarge reduce Press one or more times until the desired enlargement or reduction percentage appears in the display The preset percentages are 100 78 legal to letter size 64 50 25 400 200 and 129 letter to legal size i After selecting one of the above preset percentages you can press or to increase or decrease the perce...

Page 57: ... To change the setting press until the desired selection appears in the display and then press Note TEXT may not produce a satisfactory result with certain types of originals If you find that the result is not satisfactory when TEXT is selected try PHOTO QUALITY ENTER QUALITY TEXT PHOTO ENTER Contrast To adjust the contrast press repeatedly or press followed by or to increase or decrease the lengt...

Page 58: ...en this setting is selected after the stack of originals is fed through the auto document feeder the first time you simply turn the stack over do not change the order of the pages or remove any pages insert it into the auto document feeder again and press to scan the back side of the originals The machine will automatically sort the copies into the correct order front of 1st page back of 1st page ...

Page 59: ...d Default copy quality setting The default quality setting page 55 is TEXT this is the setting that is used if you do not make a selection If desired you can change the default quality setting to PHOTO 1 Press and then or until the display at right appears 2 Press 3 Select the default quality setting TEXT PHOTO 4 Press repeatedly to exit MENU Z A The display briefly shows your selection then 1 TEX...

Page 60: ...harper image follow the steps below to change the setting to 600 dpi 1 Press and then or until the display at right appears 2 Press 3 Select the resolution setting 300 DPI 600 DPI 4 Press repeatedly to exit MENU Z A The display briefly shows your selection then 1 300 DPI Display COPY SETTING 3 COPY CONTRAST ...

Page 61: ...election If desired you can change the default contrast to a higher or lower level 1 Press and then or until the display at right appears 2 Press 3 Press to decrease the default contrast level or to increase the default contrast level 4 Press 5 Press repeatedly to exit MENU Z A Z A ENTER The display briefly shows your selection then Display COPY SETTING 1 COPY QUALITY ...

Page 62: ...t at a time manual feeding Max size 8 5 x 14 216 x 356 mm Max weight 42 lbs 157 g m2 Maximum document size The maximum size and weight of documents that you can load in the document feeder depend on how many sheets you load Letters or graphics on the edges of a document will not be scanned The maximum scanning width is 8 2 208 mm and the top and bottom 0 16 4 mm of the document cannot be scanned L...

Page 63: ... from the document glass Loading the Document Up to 20 letter size sheets can be placed in the auto document feeder at once The sheets will automatically feed into the machine starting from the top sheet i If you need to send or copy more than the maximum number of sheets place the additional sheets gently and carefully in the feeder under the last sheet while the last sheet is being scanned Do no...

Page 64: ...elopes cards and other special sizes of paper use the bypass tray on the side of the machine The bypass tray can be used to copy onto the following sizes 1 Letter 2 Legal 3 A4 4 A5 5 Envelope 10 ENVELOPE COM10 4 1 8 x 9 1 2 6 Envelope Monarch ENV MONARCH 3 7 8 x 7 1 2 7 Envelope DL ENV ISO DL 110 mm x 220 mm 4 33 x 8 66 8 A6 European postcard 105 mm x 148 mm 4 13 x 5 83 i Only one sheet envelope c...

Page 65: ... top edge against the document guide x Make sure the center of the original is aligned with the center mark on the document guide and then close the cover Using the auto document feeder Adjust the document guide to the width of your original and then insert the original face up into the feeder x Multiple originals max letter size can be placed 3 Adjust the document guides on the bypass tray to the...

Page 66: ...ppear Press to select YES and then reset the paper size 8 Select temporary copy settings as needed and then press to begin copying x If you placed multiple originals in the auto document feeder or set the number of copies to more than 1 copying will stop after the first copy is made and the display will alternately show SET BYPASS PAPER and the required paper size When you insert the next sheet or...

Page 67: ... a Speed Dial number you must first store the number in the machine as explained on page 70 i You can perform the following procedure even when the machine is already busy sending or receiving a fax In this case the fax transmission will be stored in the machine s memory and performed once all previously stored jobs have been completed SPEED 1 Make sure that the date and time display of fax mode a...

Page 68: ...he original face up into the feeder x Up to 20 letter size sheets can be inserted at once x For detailed information on using the auto document feeder and the types of originals that can be used see pages 60 to 62 i If an original is placed in both the auto document feeder and on the document glass the original in the auto document feeder will be faxed i When the document glass is used to send a f...

Page 69: ... the settings to the default settings 4 Enter the number of the receiving machine using one of the following methods x Direct Keypad Dialing Press the number keys to enter the fax number Note If a pause is required between any of the digits to access a special service or an outside line press The pause will appear as a hyphen two seconds per pause Several pauses can be entered in a row x Speed Dia...

Page 70: ...machine and send the fax If the machine is busy with a previously stored job the fax job will be stored in memory and then transmitted once the machine is free x If you are using the document glass After the original is scanned the following alternating messages will appear Remove the original from the document glass place the next original and press Repeat until all originals have been scanned Af...

Page 71: ... REDIAL If the memory becomes full If the memory becomes full while the document is being scanned MEMORY IS FULL will appear in the display i Press if you want to transmit the pages which have been stored up to that point in memory If you are using the auto document feeder the remaining pages will feed out without being scanned After transmission the memory will be cleared and you can transmit the...

Page 72: ...pecial service or an outside line press The pause appears as a hyphen two seconds per pause Several pauses can be entered in a row 6 Press FAX MENU Z REDIAL ENTER 1 SPEED DIAL Storing a Number for Speed Dialing You can dial a fax number by pressing and entering a two digit number This is called Speed Dialing i To use Speed Dialing you must first store the full fax number in the machine and select ...

Page 73: ...equire the same key press after entering the first letter To clear a mistake press i To enter a lower case letter continue pressing the key for the letter until the lower case letter appears i To enter one of the following symbols press or repeatedly _ Note National characters of the selected display language will appear at the end of the symbol list For some languages no national characters will ...

Page 74: ... when Super G3 mode is used x Note that even when ON is selected Super G3 mode is used only if the other machine also supports Super G3 mode 10 The display will show the next available Speed Dial number If that number is acceptable press If not enter the desired two digit number and press 11 Return to Step 4 to store another number or press repeatedly to exit ENTER ENTER STORED 01 OK NO SET SPEED ...

Page 75: ...ou wish to edit or delete for example press or press or until the name or fax number of the destination appears in the display and press x If you pressed for CLEAR in Step 5 go to Step 12 7 If you selected EDIT in Step 5 make the desired changes to the number x To move the cursor to the right press When the cursor is over a digit that you wish to change simply enter the new digit The new digit wil...

Page 76: ...er key repeatedly until the desired letter appears see Step 7 on page 71 The new letter will replace the old letter To backspace and clear letters press x If you do not wish to change the name go directly to Step 10 10 Press 11 Press if you want the number to use Super G3 mode Otherwise press 12 Return to Step 4 to edit or delete another number or press repeatedly to exit ENTER A Z ENTER SUPER G3 ...

Page 77: ...ffective for receiving a document Contrast Three contrast settings are available for faxing LIGHT for dark originals NORMAL and DARK for faint originals To adjust the contrast press until the desired setting appears in the display and then press STANDARD Use STANDARD for ordinary documents This setting gives you the fastest and most economical transmission FINE Use FINE for documents containing sm...

Page 78: ...e front of 2nd page back of 2nd page etc i Note that any blank sides must be included when scanning the pages if the number of pages is not equal each time the machine scans the stack an error will result To select Duplex Scan press once or twice so that DUPLEX SCAN ON appears and then press Line Monitor Select this setting when you wish to listen to the line hear the dial tone fax tones etc throu...

Page 79: ...s procedure to cancel a stored fax job 1 Make sure that the date and time display of fax mode appears if needed press and then press 2 Press The first job will appear in the display 3 Press or to scroll through the jobs 4 To cancel a job scroll until the job appears and then press 5 Press to cancel the job 6 When you have finished checking the jobs press repeatedly to exit FAX MENU Z A ENTER Displ...

Page 80: ...der certain conditions for example if a person answers the call on a telephone automatic redialing may stop before the set number of redial attempts are made Recall interval for automatic redialing when the line is busy If desired you can change the interval at which the machine makes automatic redialing attempts when the line is busy i The initial setting is 05 minutes 1 Make sure that the date a...

Page 81: ... is 02 times 1 Make sure that the date and time display of fax mode appears if needed press and then press 2 Press 3 Press twice 4 Press 5 Press the numeric keys to enter the desired number of recall attempts any 2 digit number from 00 to 14 Example 5 attempts 6 Press repeatedly to exit FAX MENU 1 AUTO RECALL Display FAX SETTING 1 RECALL INTERV The display briefly shows your selection then 1 RECAL...

Page 82: ...waiting for automatic redialing follow the procedure in Checking and canceling stored fax jobs on page 77 When you scroll to the job during the procedure the number or name of the destination will alternate with RECALL ERROR in the display Recall interval for automatic redialing after a line error occurs If desired you can change the interval after which the machine makes an automatic redialing at...

Page 83: ...and then press 2 Press 3 Press 4 Press twice 5 Press the numeric keys to enter the desired number of recall attempts 0 or 1 Example 0 attempts 6 Press repeatedly to exit FAX MENU 1 AUTO RECALL Display FAX SETTING 1 RECALL BUSY The display briefly shows your selection then 1 RECALL INTERV 6 Press the numeric keys to enter the desired interval in minutes any 2 digit number from 01 to 15 Example 1 mi...

Page 84: ...Select the resolution setting STANDARD FINE SUPER FINE 5 Press repeatedly to exit FAX MENU Default resolution for faxing The default resolution for faxing is initially set to STANDARD If desired you can change the default resolution to FINE or SUPER FINE 1 AUTO RECALL Display FAX SETTING The display briefly shows your selection then 3 LINE MONITOR ...

Page 85: ...NU Display FAX SETTING 1 MONITOR ON The display briefly shows your selection then 4 TIMER SEND Using an Extension Phone to Send a Fax If you have connected an extension phone to the TEL SET jack on the machine as explained on page 15 you can use the extension phone to send a fax i Using an extension phone to send a fax allows you to listen to the line and talk to the other party before faxing i Th...

Page 86: ...ial tone and dial the fax number of the receiving machine using the keypad of the extension phone 4 Depending on the setting of the other machine you will either hear a fax tone or the other person will answer x If the other person answers ask them to press their Start key This causes the other machine to issue a fax tone 5 When you hear the fax tone press on the machine 6 Press to select SEND Rep...

Page 87: ...ot be dialed 1 Make sure that the date and time display of fax mode appears if needed press 2 Place the original on the document glass or in the auto document feeder x If needed select temporary fax settings such as the resolution and contrast 3 Press 4 Select a destination using one of the methods below x Enter the 2 digit Speed Dial number of the destination x Press or until the name of the dest...

Page 88: ...stinations are marked Busy or have a communication error code If so send the document to those destinations again MENU Broadcasting using a Group Key If the fax machines to which you want to broadcast have all been programmed into a Group see Storing numbers in a Group which follows you can perform the broadcasting operation using the following simplified procedure 1 Make sure that the date and ti...

Page 89: ...1 Make sure that the date and time display of fax mode appears if needed press and then press 2 Press 3 Press 4 Press to select SET x Note which Group number Group 1 or Group 2 appears in the display This is the number of the Group you are storing 5 Select a destination using one of the methods below x Enter the 2 digit Speed Dial number of the destination x Press or until the name of the destinat...

Page 90: ...e destination and then press 8 When you have finished storing the destinations press 9 Press repeatedly to exit MENU ENTER 1 Make sure that the date and time display of fax mode appears if needed press and then press 2 Press 3 Press 4 Press to select CLEAR 5 Enter the number of the Group that you want to clear Example 6 Press FAX MENU ENTER 1 SPEED DIAL Display FAX SETTING 1 SET 2 CLEAR Deleting a...

Page 91: ...ut having to be there when the fax is sent Note If a power failure occurs or the machine s power cord is unplugged after a timer transmission job is stored the job will be cleared from memory When the power is restored a MEMORY CLEAR report will be printed to inform you that the job was cleared If this happens store the job again 1 Make sure that the date and time display of fax mode appears if ne...

Page 92: ... which you want the fax to be sent Example 9 25 8 Press to select A M or to select P M 9 Enter a number as follows to select the day of the operation skip this step if the fax will be sent within the next 24 hours Sunday Monday Tuesday Wednesday Thursday Friday Saturday 10 Press ENTER The first available Timer number appears TIMER NUMBER 1 ENTER TIME TIME 09 25 AM PM ENTER STATION ...

Page 93: ...and press x Press or until the name of the destination appears in the display if no name was stored the number will appear and press x Enter the full fax number of the destination and press 12 If needed select temporary fax settings such the the resolution and contrast 13 Press The original is scanned and the timer job is stored SPEED ENTER Z A ENTER ENTER ...

Page 94: ... t remember the number it appears in the display when you store the job print out the Timer List See page 126 1 Make sure that the date and time display of fax mode appears if needed press and then press 2 Press 3 Press 4 Press to select CLEAR 5 Enter the number of the timer job that you want to clear Example 6 Press repeatedly to exit FAX MENU 1 AUTO RECALL Display FAX SETTING 1 SET 2 CLEAR ENTER...

Page 95: ...ls on the line connected to the machine All calls including faxes must be answered by picking up the extension phone TEL will appear in the fax mode display To select the reception mode follow the steps below i The reception mode is initially set to FAX ONLY mode 1 Make sure that the date and time display of fax mode appears if needed press and then press 2 Press 3 Press 4 Select the reception mod...

Page 96: ...chine answers incoming calls in FAX ONLY mode Any number from 0 to 9 can be selected i To have the machine answer without ringing enter 0 1 Make sure that the date and time display of fax mode appears if needed press and then press 2 Press 3 Press 4 Enter the desired number of rings any number from 1 to 9 or enter 0 to have the machine answer without ringing Example 3 rings 5 Press repeatedly to e...

Page 97: ...ppears if needed press on the machine and then pick up the extension phone x Important The machine must be in fax mode before you pick up the extension phone or fax reception will not be possible 2 If you hear a fax tone press on the machine x If the other party first speaks with you press after speaking Press before the sender presses their Start key 3 Press to select RECEIVE Replace the extensio...

Page 98: ...ond page In this case the cut off point may occur in the middle of a line i Automatic reduction may not be possible if the received document is too large contains too many fine graphics or images or is sent at high resolution In this case the remainder of the document will be printed on a second page 1 Make sure that the date and time display of fax mode appears if needed press and then press 2 Pr...

Page 99: ...th a message that indicates the problem When you resolve the problem the stored faxes will automatically print out i If you received faxes in memory because the machine ran out of paper be sure to add paper which is the same size as the paper previously used If not the document print out size may not match the size of the printing paper Caution i When faxes are stored in memory do not turn the pow...

Page 100: ...e distinctive ring services Distinctive ring is a service offered by some local telephone companies whereby they assign an additional second number to your regular single line The second number rings differently from your normal number If you subscribe to a distinctive ring service you can set the machine to automatically answer when your second number is called This allows you to use the second n...

Page 101: ...hort rings Canada only PATTERN 5 Two very short rings Canada only STANDARD RING Your standard normal ring pattern OFF SETTING Turn distinctive ring off 5 Press repeatedly to exit 6 Make sure that the reception mode is set to FAX ONLY see page 93 x When using distinctive ring you must set the reception mode to FAX ONLY When your designated fax number is dialed the machine will automatically answer ...

Page 102: ... polling function the other machine must be capable of being polled i Before polling make sure the other machine is set up to receive your polling request 1 Make sure that the date and time display of fax mode appears if needed press and then press 2 Press 3 Press 4 Dial the number of the machine that you want to poll using one of the following methods x Enter the full fax number and press x Press...

Page 103: ...ng only once the document s will be automatically cleared from memory after polling If you allow polling an unlimited number of times the document will remain in memory until you clear it as explained in the following section Clearing a memory polling document 1 Place the original on the document glass or in the auto document feeder 2 Make sure that the date and time display of fax mode appears if...

Page 104: ...s 4 Press to select CLEAR 5 Press x The document is cleared from memory FAX MENU ENTER 1 AUTO RECALL Display FAX SETTING 1 SET 2 CLEAR 7 If needed select the resolution and or contrast otherwise skip this step 8 Press x The document is scanned into memory x Make sure the reception mode is set to FAX ONLY see page 93 When the polling fax machine calls the machine must answer automatically in order ...

Page 105: ...Preferences SHARP AM 900 Properties in some versions of Windows appear Adjust the settings as desired see page 104 and then click OK Note Do not use the keys on the machine to adjust print settings The machine keys are only for copying and faxing 4 Select the print range and adjust any other settings as desired in the Print dialog box 5 When you are ready to begin printing click Print or OK in the...

Page 106: ...eferences from the Printers and Faxes folder the Printers folder in Windows Me 2000 as explained below Windows XP Click the start button click Control Panel click Printers and Other Hardware and then click Printers and Faxes In the Printers and Faxes window click on the SHARP AM 900 icon and select Printing Preferences from the File menu Windows 2000 Click the Start button point to Settings and se...

Page 107: ...elected If you wish to print two reduced pages on each sheet of paper select 2 Pages per Sheet x For a normal document set the Orientation to Portrait If the document is oriented so that the width is longer than the height like a landscape painting select Landscape x If you set Copies to a number greater than 1 use Output Order to select how the copies are ordered The displayed page order changes ...

Page 108: ...dvanced tab The Advanced tab is used to specify how the printed image is scaled to the paper Normally Match Page Size is selected so that the image size matches the paper size selected on the Page Setup tab the image is not reduced ...

Page 109: ...lect Auto Scaling The paper size setting on the Page Setup tab will appear in Current Page Size Select the size to which you wish to scale the image in Output Size The amount of the reduction will be shown in the page image The following example shows reduction of a letter size image to A4 size ...

Page 110: ...2 Envelope DL 110 mm x 220 mm 4 33 x 8 66 A6 European postcard 105 mm x 148 mm 4 13 x 5 83 i Only one sheet envelope card etc can be inserted at a time in the bypass tray i Be sure to select the correct envelope or paper size in the Page Setup tab of the SHARP AM 900 Printing Preferences or Properties before printing Select Properties Setup or Printer from the Print dialog box to open the SHARP AM...

Page 111: ...pending on the application in the dialog box to open the SHARP AM 900 Printing Preferences or Properties Set the Paper Source to Bypass Tray on the Page Setup tab and then select the appropriate paper size x Select other settings as needed and click OK Click Print or OK in the Print dialog box to begin printing x Do not use the keys on the machine to adjust print settings The machine keys are only...

Page 112: ... will not respond Scanning From a TWAIN Application You can scan a document into Sharpdesk or any other TWAIN compliant software program i The machine does not need to be in scan mode to scan a document from a TWAIN application 1 Place the original on the document glass or in the auto document feeder Using the document glass Open the document glass cover and place the original face down on the gla...

Page 113: ... to 20 letter size sheets can be inserted at once Note that some applications may only allow you to scan one page at a time x For detailed information on using the auto document feeder and the types of originals that can be used see pages 60 to 62 2 Start your TWAIN compliant application on your computer 3 Click the File menu and select Select Scanner x The File menu of Sharpdesk is shown below ...

Page 114: ... the Select button Note The selection WIA SHARP AM 900 is for WIA applications and is explained in the following section 5 Click the File menu and select Acquire Image 6 The TWAIN scanner driver window will appear Select settings as desired see the next page and then click the Scan button to begin scanning ...

Page 115: ... the Standard Preset field x The Advanced Controls can be adjusted as needed Note that the Contrast and Brightness settings only appear when Color Type is set to Color or Grayscale x If you wish to specify the area that is scanned drag the frame that appears in the preview screen with your mouse The dimensions of the area will appear in Width and Height x To view a preview of the scanned image usi...

Page 116: ...t Make sure the glass is clean Any dirt fingerprints hair or other debris may affect the quality of the scanned image 2 Start your WIA compliant application on your computer Scanning From a WIA Application Windows XP Me only If you are using Windows XP or Windows Me you can scan a document into Paint or any other WIA compliant application i The auto document feeder cannot be used to scan a documen...

Page 117: ...Scanning 3 Click the File menu and select From Scanner or Camera x The File menu of Paint is shown below 4 If you have WIA drivers for other devices installed on your system the Select Device window will appear Select WIA SHARP AM 900 and click the OK button ...

Page 118: ... x To view a preview of the scanned image using the selected settings click the Preview button x After the Preview button is pressed and the preview image appears the scanning area indicated by the dotted frame on the preview image is automatically set to the size of the original To change the scanning area drag any of the four corners of the dotted frame with your mouse ...

Page 119: ... the start button click Control Panel click Printers and Other Hardware and then click Scanners and Cameras In Windows Me click the Start button point to Settings select Control Panel and then double click Scanners and Cameras In the window below right click the SHARP AM 900 icon and select Get picture using Scanner Wizard select Use Wizard in Windows Me The Scanner and Camera Wizard will open Fol...

Page 120: ... computer and the image is scanned into that program i Six scan menus SC1 to SC6 are available on the machine The programs that are available on your computer to link to scan menus will vary depending on your system and what programs you have installed Linking programs to scan menus Follow the appropriate procedure below for your operating system to link programs to scan menus Windows XP 1 Click t...

Page 121: ...Scanning From the Operation Panel 119 7 Scanning 3 The SHARP AM 900 Properties appear Click on the Events tab 4 Select SC1 scan menu SC1 from the Select an event list ...

Page 122: ...ou wish to link to scan menu SC1 from the list of programs i Microsoft Scanner and Camera Wizard is selected as an example in the window below 6 Click the Apply button 7 Repeat Steps 4 through 6 as needed for any of the other scan menus SC2 to SC6 that you wish to use When finished click the OK button to close the window ...

Page 123: ... in the SHARP AM 900 Properties 5 Select SC1 from the Scanner events list 6 In Send to this application select the program that you wish to link to scan menu SC1 make sure only one program is selected 7 Click the Apply button 8 Repeat Steps 5 through 7 as needed for any of the other scan menus SC2 to SC6 that you wish to use When finished click the OK button to close the window i To make the new s...

Page 124: ...anel options 2 Right click the SHARP AM 900 icon and select Properties 3 The SHARP AM 900 Properties appear Click on the Events tab 4 Select SC1 scan menu SC1 from the Select an event list 5 In the Actions field select Prompt for which program to run 6 Click the Apply button 7 Repeat Steps 4 through 6 for each of events SC2 through SC6 select Prompt for which program to run for each event When fin...

Page 125: ...he following window will appear on your computer Select the program that you wish to link to scan menu from the list of programs In addition to stop the window from appearing each time you use that scan menu select Always use this program for this action i Microsoft Scanner and Camera Wizard is selected as an example in the window below ...

Page 126: ...y affect the quality of the scanned image Using the auto document feeder Adjust the document guide to the width of your original s and then insert the originals face up into the feeder x Up to 20 letter size sheets can be inserted at once Note that some applications may only allow you to scan one page at a time x For detailed information on using the auto document feeder and the types of originals...

Page 127: ... Press or until the desired scan menu appears in the display Example Press once for SC2 4 Press x The program linked to the selected scan menu starts on your computer Respond appropriately as prompted by the program to complete the scan Z A A SCAN SC2 ...

Page 128: ...is divided into two parts the SEND REPORT which shows information on fax transmissions and the RECEIVE REPORT which shows information on fax receptions i All information is erased after a report is printed out If information on 30 fax transactions accumulates the information on the oldest transaction will be deleted each time a new transaction takes place i You can have the Activity List printed o...

Page 129: ...t This list shows your current selections for the MENU key settings The list also shows your name and fax number as entered in the machine and a sample of the header printed at the top of every page you transmit HEADER PRINT Timer List This shows the timer transmission jobs that are currently stored Help List This list provides a brief guide to the operation of the machine To print this list press...

Page 130: ...ll appear under NOTE in the report to indicate whether the transaction was successful and if not the reason for the failure OK Transmission reception was successful P FAIL A power failure prevented the transaction JAM The printing paper or document jammed preventing the transaction BUSY The fax was not sent because the line was busy COM E X Where X is a number A telephone line error prevented the ...

Page 131: ... Press a number from to to select the condition for printing 5 Press repeatedly to exit ALWAYS PRINT A report will be printed after each transmission reception or error SEND ONLY A report will be printed after each transmission ERROR ONLY A report will be printed only when an error occurs NEVER PRINT A report will never be printed FAX MENU The display briefly shows your selection then 1 TX RX REPO...

Page 132: ...ty List can still be printed on demand at any time Follow these steps 1 Make sure that the date and time display of fax mode appears if needed press and then press 2 Press 3 Press 4 Press to turn on auto print or to turn it off 5 Press repeatedly to exit FAX MENU 1 TX RX REPORT Display FAX SETTING 1 AUTO PRINT YES 1 TX RX REPORT The display briefly shows your selection then ...

Page 133: ...lass is difficult to clean If you find it difficult to remove dirt from the scanning glass you can try moistening the cloth with isopropyl alcohol or denatured alcohol Take care that no alcohol gets on the rollers 9 Maintenance Cleaning the Scanning Glasses and Rollers Any dirt fingerprints or other small debris on the scanning glasses will degrade the quality of copies faxes and scanned images an...

Page 134: ...e it clicks into place Cleaning the document glass Open the document glass cover and clean the document glass by wiping it with a soft dry cloth be sure not to use a cloth that will scratch the glass If needed moisten the cloth with isopropyl alcohol or denatured alcohol Press down on the marks ...

Page 135: ...earing on your output To clean the rollers press the side cover release to open the side cover and then clean the rollers indicated below with a clean cloth Cleaning the housing Wipe the external parts and surface of the machine with a dry cloth Caution i Do not use benzene or thinner These solvents may damage or discolor the machine ...

Page 136: ...Press the side cover release and open the side cover 2 Press the center roller with your finger to make it rotate a half turn back into the machine 3 Remove the output tray and then remove the paper from the paper tray Wipe the side of the center roller that is visible in the paper inlet with a damp cloth x When finished replace the paper and the output tray and close the side cover 1 2 ...

Page 137: ... regulations If in doubt contact your local waste disposal agency Replacing the Toner Cartridge When the toner cartridge nears empty about 200 pages can still be printed TONER NEAR EMPTY will appear in the display When the toner cartridge is empty TONER EMPTY will appear in the display i While TONER EMPTY appears printing will be possible although the output will be increasingly faint until a fax ...

Page 138: ...aintain excellent printing quality we recommend that you replace the drum cartridge after 20 000 pages have been printed Follow these steps to view the total number of pages printed 1 Press and then or repeatedly until the display at right appears 2 Press x The number of pages printed will appear in the display 3 Press repeatedly to exit MENU Z A Display LIFE ...

Page 139: ... except as instructed in the following steps 2 Squeeze the toner cartridge handle and pull the toner cartridge out of the compartment x Place the toner cartridge on a sheet of paper on a level surface x Do not touch the roller in the toner cartridge 1 2 3 1 Replacing the drum cartridge When 20 000 pages have been printed DRUM LIFE OVER will appear in the display Replace the drum cartridge with the...

Page 140: ...or other contaminants get on the drum wipe it gently with a clean cloth x Exposure to light for more than several minutes will damage the drum Be sure to insert the drum cartridge promptly into the machine x If you find it necessary to leave the cartridge out of the machine for more than several minutes wrap the cartridge in black paper 6 Replace the toner cartridge and close the front cover and t...

Page 141: ... correctly with the other fax machine The error is usually due to a problem on the phone line Try the transaction again If the error persists check the following Check the connection The cord from the TEL LINE jack to the wall jack should be no longer than six feet Make sure there are no modem devices sharing the same telephone line Check with the other party to make sure their fax machine is func...

Page 142: ...ee page 14 The power is on but no transmission takes place Make sure that the receiving machine has paper Make sure that the telephone line cord is plugged into the TEL LINE jack and not the TEL SET jack If the receiving machine is in manual mode with no attendant reception will not be possible Check the display for error messages If an extension phone is connected to the machine pick up the phone...

Page 143: ...on page 98 The power is on but reception does not take place Make sure that the telephone line cord is plugged into the TEL LINE jack and not the TEL SET jack The paper comes out blank when you receive a fax Make sure that the document is loaded properly in the feeder of the transmitting machine Make a copy or print a report to confirm the printing ability of your machine The received document is ...

Page 144: ...er is used Any dirt or material on the scanning glasses will cause spots or lines to appear on copies and on transmitted faxes and scanned images Clean the scanning glasses as explained on page 131 The paper comes out blank when you make a copy If you are using the document feeder make sure the original is placed face up in the feeder If you are using the document glass make sure the original is p...

Page 145: ...is plugged in Unplug the power cord immediately and make sure that the scanner lock has been released see page 12 Characters or parts of the image are missing from printed output Remove the drum cartridge as explained on page 137 and wipe the surface of the drum the green cylinder with a dry cotton swab If print quality does not improve after wiping with a dry cotton swab you can try moistening th...

Page 146: ...OWER alternating messages Make sure that the scanner lock has been released see page 12 and then unplug the power cord wait at least 5 seconds and plug it back in COVER OPEN One or both of the print compartment covers are open Make sure both covers are closed DATE TIME UNSET The date and time need to be set see page 43 Note that the date and time settings will be lost if the machine is unplugged o...

Page 147: ...e an additional message will indicate the problem resolve the problem so that printing can continue see Substitute Reception to Memory on page 97 If you are attempting to send a fax see If the memory becomes full on page 69 If you are copying see If MEMORY IS FULL appears on page 54 NO STORED This appears if you attempt to search for a Speed Dial number when none have been stored OFF HOOK This app...

Page 148: ...y for a print job or copy job that requires use of the bypass tray Insert the indicated size of paper in the tray TONER EMPTY The toner cartridge must be replaced Printing will be possible although the output will be increasingly faint until a fax is received Once a fax is received it will be held in memory and printing will not be possible until the toner cartridge is replaced TONER NEAR EMPTY Th...

Page 149: ...ssing If the document doesn t feed out open the auto document feeder cover and remove it Important Do not try to remove a document without opening the auto document feeder cover This may damage the feeder mechanism 1 Squeeze the cover release and open the auto document feeder cover Open the document glass cover 2 Remove the document x The document can be removed from either the top or the bottom s...

Page 150: ...Clearing Paper Jams 148 3 Close the auto document feeder cover pressing down on both sides to make sure it clicks into place Press down on the marks ...

Page 151: ... operation Do not touch the fusing unit 3 If the jammed page is protruding from the side of the machine gently pull it out Take care not to tear the paper or leave any torn pieces of paper in the print compartment x If this clears the jam go to Step 5 x If you are unable to clear the jam in this way go to Step 4 x Take care not to touch or allow other objects to contact the drum the green cylinder...

Page 152: ...it and then the side cover Note If you find that another paper jam occurs immediately after clearing a paper jam open the side cover and then the front cover and remove the jammed paper as explained above With the front cover and side cover still open remove the output tray and remove the printing paper from the paper tray Replace the output tray and close the front cover and then the side cover R...

Page 153: ... 2121XHSA Part distribution centers Tritronics Inc 1306 Continental Drive Abingdon MD 21009 Tel 1 800 638 3328 Fax 1 800 888 FAXD Tritronics Inc 1015 NW 52nd Street Ft Lauderdale FL 33309 Tel 1 800 365 8030 Fax 1 800 999 FAXD Fox International Ltd 23600 Aurora Road Bedford Heights OH 44146 Tel 1 800 321 6993 Fax 1 800 445 7991 Andrews Electronics 25158 Avenue Stanford Santa Clarita CA 91355 Tel 1 ...

Page 154: ...lephone network the telephone company will notify you in advance that temporary discontinuance of service may be required But if advance notice isn t practical the telephone company will notify the customer as soon as possible Also you will be advised of your right to file a complaint with the FCC if you believe it is necessary The telephone company may make changes in its facilities equipment ope...

Page 155: ... Effect None currently known Inhalation Effect None currently known Minimal respiratory tract irritation may occur as with exprosure to large amount of any non toxic dust Eye Effect None currently known Skin Effect None currently known Chronic Effects Prolonged inhalation of excessive dusts may cause lung damage Use of this product as intended dose not result in inhalation of excessive dust Enviro...

Page 156: ...dling Advice Try not to disperse the particulates Storage Technical Measures None Storage Conditions Keep container closed Store in a cool and dry place Keep out of reach of children Incompatible Products None Section 8 Exposure Control Personal Protection Engineering Measures Ventilation None required with intended use Control Parameters As total dust OSHA PEL USA 15mg m3 ACGIH TLV USA 10mg m3 DF...

Page 157: ...in 22 of the animals at the middle exposure level 4 mg m3 and a mild to moderate degree of fibrosis was observed in 92 of the rats at the highest exposure level 16mg m3 The lung changes observed in the higher exposure groups are interpreted in term of ìlung overloadingî a series of generic responses to the presence of large quantities of respirable insoluble and relatively benign dusts retained fo...

Page 158: ...les or order under TSCA California Proposition 65 Ingredient carbon black subject to California Proposition 65 is bound in polymer matrices so that warnings are not required EU Information Information on the label 1999 45 EC and 67 548 EEC Not required Article 14 2 1 of Directive 1999 45 EC is not applicable to this product Section 16 Other Information HMIS Rating The National Paint and Coating As...

Page 159: ...ttings default 52 Copying on cards 62 Copying on envelopes 62 D Date setting 43 Daylight Saving Time 45 Dial mode 14 Dialing Direct Keypad 67 Search 67 Speed 67 Direct Keypad Dialing 67 Display messages 144 Distinctive ring 98 Document glass cleaning 132 Document guides 61 Document guides bypass tray 63 Document maximum scanning size 60 Drum cartridge Installing 16 Replacing 136 Duplex Scan 56 76 ...

Page 160: ...ing default 57 R Recall interval Line busy 78 Line error 80 Recall times Line busy 79 Line error 81 Reception mode EXT TEL mode 95 FAX ONLY mode 94 Reception Ratio setting 96 Reducing a copy 54 Resolution copy 58 Resolution default for fax 82 Resolution fax 75 Ringer volume 46 S Scanning From a TWAIN application 110 From a WIA application 114 From the operation panel 118 Scanner and Camera Wizard ...

Page 161: ...LECTRONICS CORPORATION Sharp Plaza Mahwah New Jersey 07430 1163 SHARP ELECTRONICS OF CANADA LTD SHARP ÉLECTRONIQUE DU CANADA LTÉE 335 Britannia Road East Mississauga Ontario L4Z 1W9 http www sharp ca SHARP CORPORATION ...

Reviews: