background image

 2

Dimension: 176 x 250mm

14AG2DC (01-08)EN

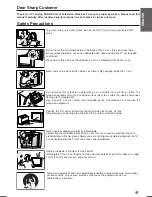
Wall or shelf mounting should follow the manufacturer’s instructions, and should use
a mounting kit approved by the manufacturer.

Do place the TV set onto an even stand, table or track which size is bigger than the
TV set. If the TV set is put onto a smaller size or uneven stand, table or track may
cause the TV cabinet to distort.

Do not put or insert anything between TV set and the stand, table or track.

To prevent electrical shock, do not subject the AC power cord to damage by bending
or twisting it, or by placing heavy items on top of it and do not place the AC and DC
power cord under the TV set. If the AC and DC power cord becomes damaged,
unplug it from the wall outlet immediately and call your dealer for service.

To prevent fire, never place any type of candle or naked flames on the top or near
the TV set.

To prevent fire or shock hazard, do not expose this products to dripping or splashing.
No objects filled with liquids, such as vases, should be placed on the products.

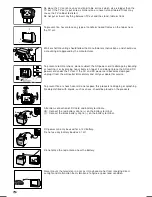
Attention–connection of DC cord and battery terminals.

±

: Connect the red battery clip to (+) on the battery terminal.

: Connect the black battery clip to (–) on the battery terminal.

Red

Black

DC power can only be used for a 12V battery.
Do not use any battery besides a 12V.

Do not place the rod antenna near the battery.

Never mount the television in a car as it may become hot from receiving direct
sunlight and malfunction from vibration of engine or poor road condition.

Summary of Contents for 14AG2-DC

Page 1: ...COLOUR TELEVISION T E L E V I S Y E N W A R N A BUKU PANDUAN OPERASI 14AG2 DC Please read this operation manual carefully before using the colour television Sila baca dengan teliti buku panduan operasi ini sebelum menggunakan TV warna Veuillez lire attentivement ce mode d emploi avant d utiliser ce téléviseur couleur ...

Page 2: ...oles at the back of the TV set this can cause fire or other serious problems Leave an adequate open space behind the TV set for good ventilation Do not place this set in confined spaces such as a bookshelf or built in case Unplug the power cord from the wall outlet immediately if the TV set begins to make unusual noises or give off smoke or an odd smell then call our service centre for service Nev...

Page 3: ... power cord becomes damaged unplug it from the wall outlet immediately and call your dealer for service To prevent fire never place any type of candle or naked flames on the top or near the TV set To prevent fire or shock hazard do not expose this products to dripping or splashing No objects filled with liquids such as vases should be placed on the products Attention connection of DC cord and batt...

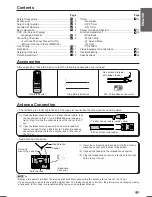
Page 4: ...d antenna and the signal from TV station is weak or not clear the picture may not display clearly or properly In this case we recommend that you use an outdoor antenna 300 75 impedance converter Rod antenna dipole with ribbon feeder Rod Antenna Connection 1 Insert the rod antenna s base post into the antenna mounting socket until it clicks into position 2 Connect the feeder to the impedance conver...

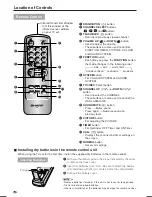
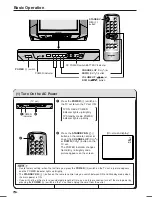
Page 5: ...utton the mode changes in the following order SYSTEM button For COLOUR SYSTEM and SOUND SYSTEM TV VIDEO Select button CHANNEL UP CHr or DOWN CHs button Used to select the CHANNEL These buttons are also used to control the OSD LANGUAGE SOUND MUTE e button Press Mutes sound Press again Restores sound to previous level PICTURE button For adjusting the PICTURE Q TIMER button For Reminder OFF Timer and...

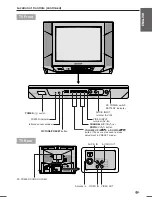
Page 6: ...POWER indicator VOLUME UP or DOWN button These are also used to make adjustment in PRESET mode CHANNEL UP CHr or DOWN CHs button VIDEO INPUT terminal AV IN AUDIO INPUT terminal AV IN TV Front DC POWER switch BATTERY indicator AUDIO OUT AUDIO IN Antenna in VIDEO IN VIDEO OUT TV Rear DC POWER CORD HOLDER ...

Page 7: ...er by pressing the POWER X switch on the TV set and unplug the cord from the outlet TV VIDEO NORMAL SYSTEM TIMER FUNCTION PICTURE TV 1 2 3 4 5 6 7 8 0 9 CH CH STANDBY ON B button POWER indicator POWER X switch POWER indicator Press the POWER X switch on the TV set to turn the TV set ON Press the STANDBY ON B button on the remote control or any of the CHANNEL UP CHr or DOWN CHs button on the TV set...

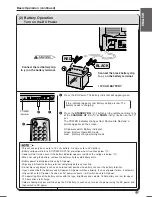
Page 8: ...ven if the battery indicator appears red when the voltage is below 11V When not using the battery remove the battery clip to avoid battery drain Battery power is disabled while using AC power Wipe any dirt from the battery terminal completely before connecting Do not place any object such as an antenna rod besides the battery clip near the battery terminal If you connect both the battery and AC po...

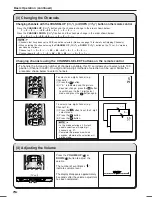
Page 9: ...lay disappears approximately 3 seconds after the volume adjustment has been completed To select a two digit channel e g Channel 15 1 Press the button to set the 2 digit select mode 2 Press the 1 button 3 Press the 5 button In this mode entering a 0 first will enable selection of single digit channels e g 07 Complete this procedure within 6 seconds otherwise the selection will not be made To select...

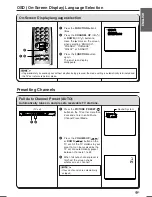
Page 10: ...et for more than 2 seconds to turn on Full Auto Channel Preset Mode Press the VOLUME UP or DOWN button on the TV set All the TV stations in your area that can be received by the TV set are automatically preset between channels 1 to 99 When full auto channel preset is finished the screen shows whatever is on channel 1 Unused channels are automatically skipped NORMAL SYSTEM TIMER FUNCTION PICTURE 1 ...

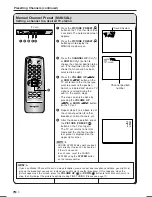
Page 11: ...search stops This step can only be done by pressing the VOLUME UP or DOWN button on the TV set Repeat steps 3 to 4 above to set the channel position for other broadcast cable channels etc After the above operation press the PICTURE PRESET 1 button on the TV set again The TV set returns to normal mode and the channel number last preset is displayed on the upper right corner SOUND SYSTEM may not hav...

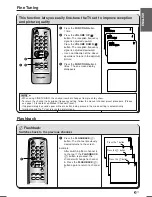
Page 12: ...NCTION button 5 times The on screen display disappears When using FINE TUNING the channel number changes from green to yellow To return the channel to its original frequency setting follow the manual channel preset procedure Please see page 10 for details on Manual Channel Preset If approximately 6 seconds pass without a button being pressed the mode setting is automatically terminated and the TV ...

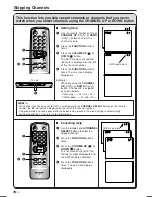
Page 13: ...Press the VOLUME UP or DOWN button The SKIP mode is set and the mark is displayed on the left of the channel number Press the FUNCTION button 4 times The on screen display disappears Example When pressing the CHANNEL UP CHr or DOWN CHs button Channel 25 is skipped as shown below Channel up 23 24 26 Channel down 27 26 24 SKIP mode mark TV VIDEO NORMAL SYSTEM TIMER FUNCTION PICTURE 1 2 3 4 5 6 7 8 0...

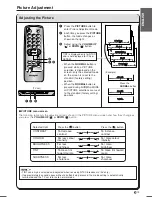
Page 14: ...t mode Each time you press the PICTURE button the mode changes as shown on the right Adjust using the VOLUME UP or DOWN button Adjusting the Picture TV VIDEO NORMAL SYSTEM TIMER FUNCTION PICTURE TV 1 2 3 4 5 6 7 8 0 9 CH CH Press the NORMAL button Example TINT is displayed only for NTSC and is not displayed for PAL or SECAM Selected Item CONTRAST To decrease To increase contrast contrast COLOUR Fo...

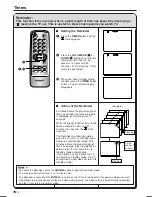
Page 15: ... Standby mode the TV set remains on and does not return to Standby mode To cancel the Reminder press the NORMAL button during the Reminder mode The minute setting of the timer is in 10 minute units The Reminder is cancelled if the POWER X switch on the TV set is turned off or if the power is otherwise cut off If approximately 6 seconds pass without a button being pressed the mode setting is automa...

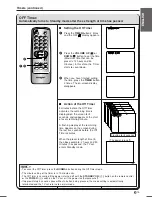
Page 16: ...mer mode The minute setting of the timer is in 10 minute units The Off Timer is cancelled if the power is turned off with the STANDBY ON B button on the remote control or the POWER X switch on the TV set or if the power is otherwise cut off If approximately 6 seconds pass without a button being pressed the mode setting is automatically terminated and the TV set returns to normal mode Setting the O...

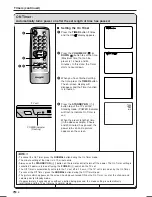
Page 17: ...tandby mode If approximately 6 seconds pass without a button being pressed the mode setting is automatically terminated and the TV set returns to normal mode Setting the On Timer Press the TIMER button 3 times and the ON display appears Press the VOLUME UP or DOWN button to set the time Maximum time that can be preset is 12 hours and 50 minutes In this state the Timer starts to count down When you...

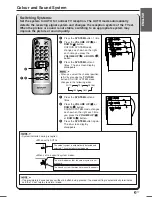
Page 18: ...ystem of the TV set When the picture or sound is not stable switching to an appropriate system may improve the picture or sound quality Press the SYSTEM button 1 time Press the VOLUME UP or DOWN button COLOUR SYSTEM mode changes as shown on the right each time you press the VOLUME UP or DOWN button Press the SYSTEM button 2 times The on screen display disappears When you select the channel positio...

Page 19: ...e Standby mode Press the FUNCTION button 4 times Press the VOLUME UP or DOWN button to select ON or OFF Press the FUNCTION button 2 times The on screen display disappears No signal after 5 seconds Blue screen Screen off after 15 minutes Blue Back Automatically turns the screen blue after 5 seconds if the broadcast signal is not received e g when a TV station closes down After 15 minutes of non rec...

Page 20: ...ustment continued TV VIDEO NORMAL SYSTEM TIMER FUNCTION PICTURE TV 1 2 3 4 5 6 7 8 0 9 CH CH Press the SOUND MUTE e button This SOUND MUTE e symbol appears on the screen and the sound is silenced Press the SOUND MUTE e button again and the volume returns to its previous level e Sound Mute Silences the sound TV VIDEO NORMAL SYSTEM TIMER FUNCTION PICTURE TV 1 2 3 4 5 6 7 8 0 9 CH CH Press the SOUND ...

Page 21: ... seconds and the SOUND MUTE e symbol is displayed TV VIDEO Switches between TV broadcasts and AV input programs When no Timer is set the channel number colour and sound system appear on the screen Press again to clear these current settings display on the screen TV VIDEO NORMAL SYSTEM TIMER FUNCTION PICTURE TV 1 2 3 4 5 6 7 8 0 9 CH CH TV VIDEO NORMAL SYSTEM TIMER FUNCTION PICTURE TV 1 2 3 4 5 6 7...

Page 22: ...to the VCR using preset Channel 0 AUDIO IN AUDIO OUT VIDEO IN VIDEO OUT Antenna in FRONT Example of connection Front terminals Camcorder To Audio Video out terminals REAR Yellow To VIDEO White To AUDIO To RF out TV set To antenna in To Audio Video out terminals To Audio Video out terminals To Audio Video in terminals Laser Disc Player or Video CD Player VCR VCR Editing Example of connection Yellow...

Page 23: ...e please use the troubleshooting guide below before calling for repair service If after following the guide none of the remedies work unplug the TV set and call for service Try a new channel to check for possible station trouble TV not plugged in Outlet power OFF POWER X switch of TV not ON Antenna not connected to terminal at the rear of the TV set If outside antenna is used check for broken wire...

Page 24: ... Hz NTSC 4 43 6 5 MHz 50 Hz SECAM I 6 0 MHz VCR Playback SECAM L French SECAM Using Video in terminals PAL 60 Hz NTSC 3 58 MHz Laserdisc PAL 5 5 MHz 60 Hz Player Playback PAL 6 0 MHz 60 Hz Using RF in terminals PAL 6 5 MHz 60 Hz Reception Channels PAL B G VHF E2 E12 ch SECAM B G UHF E21 E69 ch PAL D K VHF C1 C12 ch R1 R12 ch SECAM D K K1 UHF C13 C57 ch R21 R69 ch PAL I VHF B J ch UHF 21 69 ch Hong...

Page 25: ...24 Memo ...
Page 26: ...TINS B096WJZZ 03P01 MSG J 14AG2 DC ...

Reviews: