background image

26

Compact Operating Instructions – MOVIFIT® basic

5

Connections of MOVIFIT

®

basic with binary control

Electrical Installation

5.6.3

X13: Signal outputs 0 and 1 of MOVIFIT

®

 basic

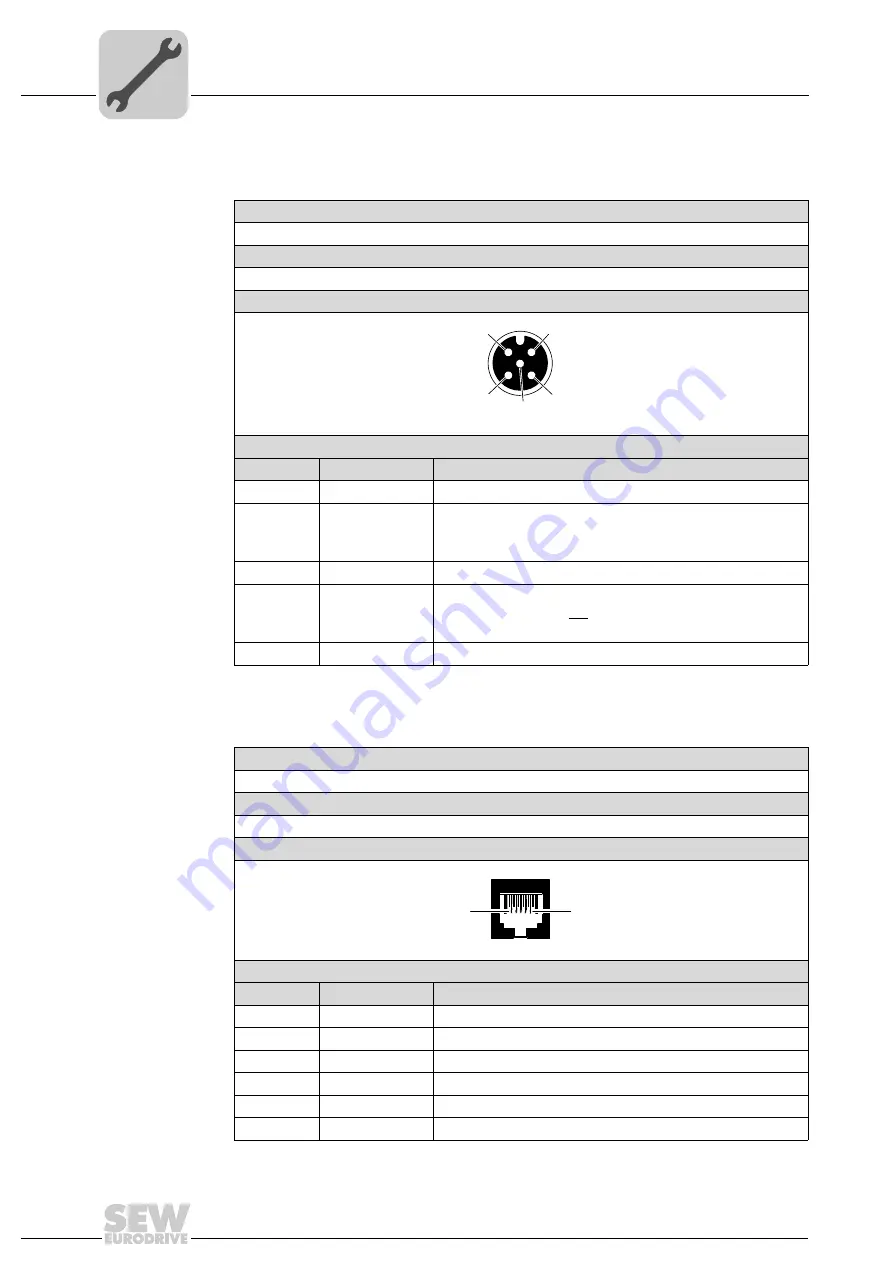
The following table informs about this connection:

5.6.4

X50: Diagnostic interface

The following table informs about this connection:

Function

Binary outputs 0 and 1

Connection type

M12, 5-pole, female, A-coded

Wiring diagram

2264816267

Assignment
No.

Name

Function

1

+24 V

DC 24 V output

2

DO1

Binary output 1 (manual mode)
0:  MOVIFIT

®

 basic control via control signals

1: Manual control of MOVIFIT

®

basic

3

0V24

0V24 reference potential

4

DO0

Binary output 0 (ready signal)
0: MOVIFIT

®

 basic is not ready

1: MOVIFIT

®

 basic is ready

5

PE

Equipotential bonding/protective earth conductor

1

4

3

2

5

Function

Diagnostics and programming interface

Connection type

RJ11 (6P6C)

Wiring diagram

3163123211

Assignment
No.

Name

Function

1

n. c.

Not connected

2

RS+

RS-485 data line (+)

3

RS 

RS-485 data cable (–)

4

+24 V

DC 24 V output for keypad

5

0V24

0V24 reference potential for keypad

6

n. c.

Not connected

1

6

Summary of Contents for movifit basic

Page 1: ...Drive Technology Drive Automation System Integration Services Compact Operating Instructions MOVIFIT basic Edition 05 2011 19284810 EN...

Page 2: ...SEW EURODRIVE Driving the world...

Page 3: ...ling MOVIFIT basic 11 5 Electrical Installation 12 5 1 Installation instructions 12 5 2 Power bus connection line cable 15 5 3 Motor connection 20 5 4 Control unit connection 22 5 5 Connections of MOV...

Page 4: ...s Read the detailed operating instructions before you start working with MOVIFIT basic Observe the information instructions and notes in the detailed operating instructions and the AC Motors DR 71 225...

Page 5: ...ture of the embedded safety notes Embedded safety notes are directly integrated in the instructions just before the descrip tion of the dangerous action This is the formal structure of an embedded saf...

Page 6: ...ives can have live and bare parts as well as hot surfaces depend ing on their enclosure Removing covers without authorization improper use as well as incorrect installation or operation may result in...

Page 7: ...ic conditions stated in chapter Technical Data of the operating instructions 2 7 Installation The units must be installed and cooled according to the regulations and specifications in the correspondin...

Page 8: ...ecessary for applications with increased potential risk Do not touch live components or power connections immediately after disconnecting from the supply voltage because some capacitors may still be c...

Page 9: ...basic inverter 3 2 Type designation The following table shows the MOVIFIT basic type designation 3782535691 MBF07A K1 A1 Connection module Version Control K via AS Interface B binary control Version M...

Page 10: ...d caps The degree of protection specified in the technical data only applies for a correctly installed MOVIFIT basic unit 4 1 2 Installation requirements Make sure that the following requirements are...

Page 11: ...2 Mounting position You can install the MOVIFIT basic unit in any mounting position 4 3 Installing MOVIFIT basic Mount the MOVIFIT basic unit with 4 screws according to the following figure Tightening...

Page 12: ...on against contact observe the note above in accordance with EN 61800 5 1 5 1 2 Line contactor Only use a contactor of utilization category AC3 EN 60947 4 1 as a line contactor WARNING Electric shock...

Page 13: ...h leakage currents 3 5 mA can occur To meet the requirements of EN 61800 5 1 you must establish 2 PE connections Install a second PE conductor with a cross section of at least the cross section of the...

Page 14: ...and phase to ground If safe electrical disconnection is required it must be implemented outside the unit for altitudes of 2000 m above sea level and higher safe electrical disconnection in accordance...

Page 15: ...nting position see following figure WARNING Electric shock due to charged capacitors Severe or fatal injuries De energize the MOVIFIT basic drive using a suitable external cut off device before removi...

Page 16: ...tilt up the upper part of the FieldPower contact module 4 Loosen the 4 screws and remove the strain relief brackets Remove the two cable seals 5 Remove the sheath of the line cable with a suitable st...

Page 17: ...als with the line cable in the recesses in the ABOX 7 WARNING Risk of crushing due to wrong sense of rotation or damage due to reverse connection of phases Severe or fatal injuries irreparable damage...

Page 18: ...line cable with the brackets tightening torque 0 6 Nm 5 3 lb in 9 Place the upper part of the contact module on the hinge hooks Tilt down the upper part of the contact module until it latches on both...

Page 19: ...osition the EBOX on the ABOX Screw on the EBOX with 4 screws tightening torque 2 Nm 18 lb in NOTICE Ingression of moisture or dust when bending the line cable Damage to the MOVIFIT basic unit Do not b...

Page 20: ...ection 5 3 1 Motor connection variants The following figure shows the motor plug connector variants for MOVIFIT basic MOVIFIT basic inverter MOVIFIT basic reversing starter MOVIFIT basic dual motor st...

Page 21: ...about this connection Function Power connection for motor with brake Connection type Q 8 0 female Wiring diagram 2441429259 Assignment No Name Function 1 U Motor phase U output 2 n c Not connected 3 W...

Page 22: ...basic MOVIFIT basic with AS Interface MOVIFIT basic with binary control 9007202071153547 2816402955 1 X22 Binary input sensor 2 5 X12 Signal inputs DI2 DI3 2 X21 AS Interface connection 6 X11 Signal i...

Page 23: ...this connection Function AS Interface input Connection type M12 4 pole male A coded Wiring diagram 2384154763 Assignment No Name Function 1 AS Interface AS Interface 2 n c Not connected 3 AS Interface...

Page 24: ...e M12 5 pole female A coded Wiring diagram 2264816267 Assignment No Name Function 1 24 V DC 24 V output sensor supply 2 n c Not connected 3 0V24 0V24 reference potential 4 DI3 Binary input sensor 3 5...

Page 25: ...FIT basic The following table provides information about this connection Function Binary inputs 0 and 1 Connection type M12 4 pole male A coded Wiring diagram 2718233355 Assignment No Name Function 1...

Page 26: ...e Function 1 24 V DC 24 V output 2 DO1 Binary output 1 manual mode 0 MOVIFIT basic control via control signals 1 Manual control of MOVIFIT basic 3 0V24 0V24 reference potential 4 DO0 Binary output 0 r...

Page 27: ...tion block of the control unit You must remove the screw plug before plugging in the connector into the diagnostic interface DANGER Danger of burns due to hot surfaces of the MOVIFIT basic unit Severe...

Page 28: ...vere or fatal injuries De energize the MOVIFIT basic unit using a suitable external cut off device before removing the EBOX Secure the MOVIFIT basic unit against unintended re connection to the voltag...

Page 29: ...erve a sufficient safety distance to all parts driven by the motor 5 Set the following parameters See chapter Parameter setting page 32 6 NOTICE Loss of the ensured degree of protection if the screw p...

Page 30: ...otor current via the potentiometer IMotor according to the motor nameplate 3 Make sure that the motor cannot start e g by unplugging the motor connector s from the MOVIFIT basic unit 4 Set the AS Inte...

Page 31: ...eypad displays important information about the state of the drive Features Illuminated display Keypad with 5 keys Connection cable Key assignment The following figure shows the key assignment of the L...

Page 32: ...5 Use the key to activate the parameter mode press key for more than 1 s P 1 0 1 6 Use the key and the key to select the desired parameter P 1 0 3 7 Use the key to activate the setting mode 5 0 8 Use...

Page 33: ...O2 DO1 DO0 MOVIFIT basic inverter X X 0 0 Stop X X 0 1 Enable CW X X 1 0 Enable CCW X X 1 1 Stop reset 0 0 X X Setpoint speed n1 0 1 X X Setpoint speed n2 1 0 X X Setpoint speed n3 1 1 X X Setpoint sp...

Page 34: ...IFIT basic sends back to the higher level controller e g PLC Control signals Function DI3 DI2 DI1 DI0 MOVIFIT basic inverter X X 0 0 Stop X X 0 1 Enable CW X X 1 0 Enable CCW X X 1 1 Stop reset 0 0 X...

Page 35: ...DI3 DI2 DI1 DI0 STATUS 5 6 7 8 9 LED color LED status Meaning Off Input signal at binary input DI open or 0 Yellow Illuminated Input signal present at binary input DI LED color LED status Meaning Off...

Page 36: ...sure that the mechanical brake is released if installed Display remains on StoP No enable signal for the drive Check whether the enable signal from the higher level controller is present Make sure the...

Page 37: ...length meets the requirements Make sure that the parameters P1 07 P1 08 and P1 09 were set correctly according to the motor nameplate In vector control mode P4 01 0 or 1 check the motor power factor i...

Page 38: ...and symmetry At F02 The measured stator resistance of the motor is too high Make sure that the motor is connected correctly Check whether the power rating of the motor corresponds with the power rati...

Page 39: ...bH Co KG Ernst Blickle Stra e 42 D 76646 Bruchsal declares under sole responsibility that the units of the series MOVIFIT basic MBF MBS are in conformity with Low Voltage Directive 2006 95 EC EMC Dire...

Page 40: ...URODRIVE Driving the world SEW EURODRIVE Driving the world www sew eurodrive com SEW EURODRIVE GmbH Co KG P O Box 3023 D 76642 Bruchsal Germany Phone 49 7251 75 0 Fax 49 7251 75 1970 sew sew eurodrive...

Reviews: