background image

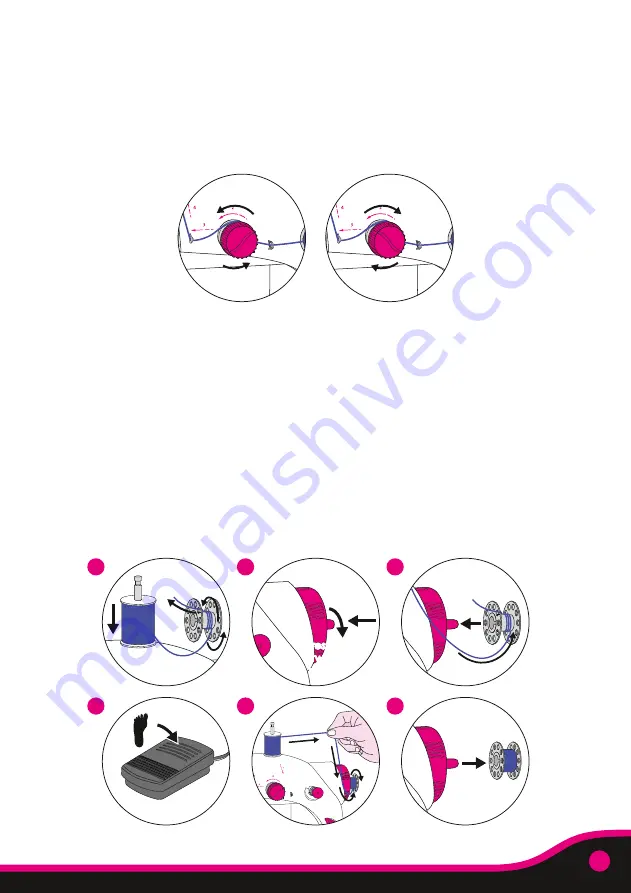
You can wind your own bobbins with thread from spools you purchase separately. Make sure to 
remove any bobbin already in the bobbin compartment 

(N)

 before you wind a new bobbin.

Place the thread spool 

(E)

 on the thread spindle 

(C)

.

Take an empty bobbin. Take the loose end of the cotton thread and push it through one of the holes 
of the bobbin (from the inside to the outside) leave about 2cm hanging outside. Wind the remaining 
thread around the bobbin starting over not under. Do this 7-8 times to secure the line to the bobbin.
Press in and twist towards you the bobbin winder spindle 

(T)

, located in the centre of the hand wheel 

(K)

 to unlock and pop the spindle out. 

Place the bobbin on to the bobbin winder spindle 

(T)

.


Ensure that the thread is winding onto the 

bobbin starting under not over.
Press down the foot pedal or use the auto sew mode. The machine will then start to wind thread onto 
the bobbin.
Hold the thread line out lightly between finger and thumb to help guide it onto the bobbin.
When the bobbin is full. Lift your foot off the pedal or switch off the auto sew mode.
Lift the bobbin up away from bobbin winder spindle 

(T)

.

1. 

2.

3.

4.

5.

6.

4

5

6

1

2

3

Press and

twist to

pop out

Press and

twist to

pop out

To ensure a smooth and flat seam on both sides of the fabric, a correct thread tension is needed.
To loosen the thread tension, turn the tension screw 

(Q)

 to the left. Loosening the thread tension can 

be very useful while threading the machine as it is easier to pull thread through. Sewing on heavier 
fabric may also benefit from a looser tension.
To tighten the tension turn the tension screw 

(Q)

 to the right. Sewing on very light fabric may require 

tighter tension.

Note: If you experience the machine jamming, this is likely to be because the tension is set incorrectly. 
Please follow the above steps to adjust this.

1. 
2.

3.

Loosen

Tighten

Summary of Contents for Sewing Station TY6142

Page 1: ... ...

Page 2: ...Iphone Open camera app and point at QR code then open link at top of screen Android Use QR code reader or Google lens to scan code GETTING STARTED Scan the below code to access our tutorial videos ...

Page 3: ...Take up Lever D 4 Thread Trimmer Light Finger Guard W 5 Light On Off Switch Z Auto Sew Mode On Off Switch Y Speed Switch X Bobbin Compartment N Needle R 6 Presser Foot F Needle Clamp O Needle Threader Metal Bobbins Fool Pedal AC Adaptor Sewing Kit Tin Tape Measure Machine Sewing Needle Thimble Hand Sewing Needle Headed Pins Thread Spools E Thread Spindle C Presser Foot Lever G Foot Pedal Jack M AC...

Page 4: ... Sew Mode button Y will put the machine into auto sew mode In this mode the machine will continuously stitch without the need for the foot pedal De pressing the button button in up position will return the machine to manual mode and the foot pedal will be required to start stitching recommended for beginners Pressing down the speed button X will change the speed at which the machine stitches to sl...

Page 5: ... direction toward the left side of the machine Pull thread down to thread guide 5 and insert thread from the top downward Pull thread downward through thread guide 5 If necessary lower the needle R to reach this thread guide by turning the hand wheel K slightly towards you lnsert thread through hole 6 of the needle R from the left toward the right side of the machine Use needle threader if necessa...

Page 6: ...igns over the hole directly below the needle R Turn the hand wheel K towards you until the needle R has moved down and then up again picking up the bobbin thread Lower the presser foot F by pushing the presser foot lever down G Replace the bobbin compartment N cover by sliding it back into place Replace the finger guard W Use some scissors or tweezers to bring both the spool thread and bobbin thre...

Page 7: ... the auto sew mode The machine will then start to wind thread onto the bobbin Hold the thread line out lightly between finger and thumb to help guide it onto the bobbin When the bobbin is full Lift your foot off the pedal or switch off the auto sew mode Lift the bobbin up away from bobbin winder spindle T 1 2 3 4 5 6 4 5 6 1 2 3 Press and twist to pop out Press and twist to pop out To ensure a smo...

Page 8: ... needle clamp O Place the new needle R with the flat side facing in against the needle clamp O Push it gently as far up as it will go and against the needle clamp O Tighten the needle clamp screw O while holding the needle R in place Turn the hand wheel K away from you to lower the needle R Replace the finger guard Note Needles come in various sizes The smaller the number the thinner the needle Us...

Page 9: ... or placement of the bobbin in the case could result in damage to the machine Do not pull on fabric as you sew Gently guide only Pulling could break the needle and result in damage to the machine or injury Remove batteries when the machine is not in use for long periods This saves battery life and protects the machine Keep extra batteries on hand so projects will not be interrupted when batteries ...

Page 10: ...avy Use thinner fabric Footplate not lowered Machine is not threaded correctly Tension is too loose Tension is too tight Lower footplate when sewing Release tensioner fully by turning anti clockwise and make sure machine is threaded correctly If thread is sewing too loosely tighten tensioner until desired threading is achieved If thread is sewing too tightly loosen tensioner until desired threadin...

Page 11: ......

Page 12: ...142 Wilton Bradley Ltd Heathfield Newton Abbot TQ12 6TL UK Wilton Bradley Europe B V Barbara Strozzilaan 201 1083HN Amsterdam Netherlands Design rights 2019 Sew Amazing is a trade mark ofWBL Made in China ...

Reviews: