background image

48

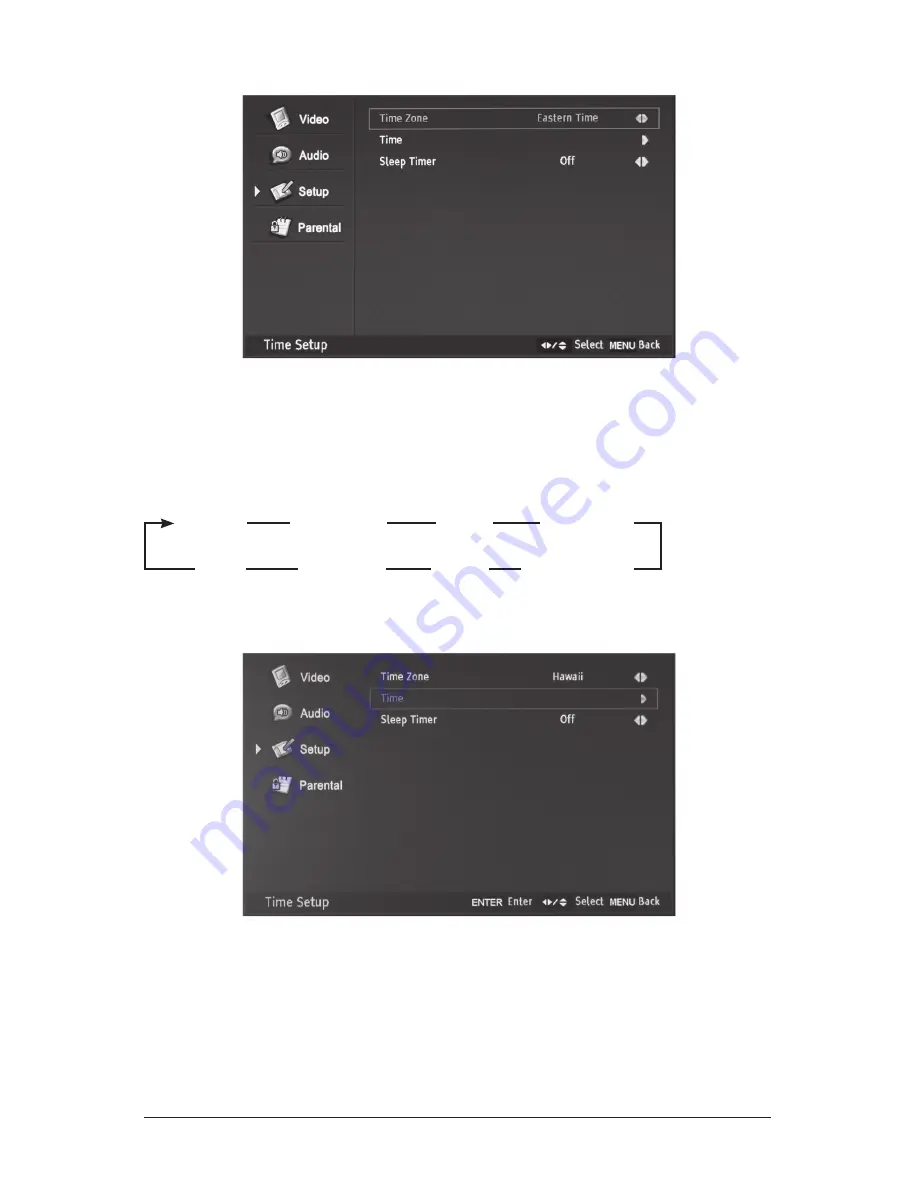
Selection of “Time Zone”

after entering the “Time Setup” menu

1)  Press 

or 

6

 to highlight your selection.

2)  Press 

3

 or 

4

 to select “Hawaii”, “Eastern Time”, “Indiana”, “Central Time”, 

“Mountain Time”, “Arizona”, “Pacific Time” or “Alaska”.

3)  Press MENU or ExIT to return or exit menu mode

Selection of “Time”

after entering the “Time Setup” menu

1)  Press 

or 

6

 to highlight your selection.

2)  Press 

or Ok to enter the sub-menu.

3)  Press MENU or ExIT to return or exit menu mode

Hawaii

Eastern Time

Indiana

Central Time

Mountain Time

Arizona

Pacific Time

Alaska

Summary of Contents for Hydra S-1913-19.1-HY.1

Page 1: ...IMPORTANT Please read this operation manual before operating the equipment Waterproof 19 High Definition Liquid Crystal Television User Manual 19 TFT LCDTelevision Model S 1913 19 1 HY 1 ...

Page 2: ... manual is subject to change without prior notice Caution A Any changes or modifications in construction of this device which are not expressly approved void the manufacturers warranty B Do not attempt your own maintenance If a problem occurs please turn theTV off and consult yourTV Dealer or Supplier Opening or altering the appliance by unauthorized persons results in void of warranty C Do not ex...

Page 3: ...fore use Do not use a damaged power cord or plug Do not use the product close to any heat sources such as radiators heat registers stoves or other products that produce heat Do not place heavy articles or step on the product Placing the product on an unstable base can cause the product to fall resulting in serious personal injuries as well as damage to the product If you notice any smoke or scorch...

Page 4: ...teries 17 1 7 Menu Controls on Remote 18 1 8 Menu Configuration 19 1 9 Basic Operation 20 CHAPTER 2 Connection 2 1 Preparation 22 2 2 Connecting Power 22 2 3 ConnectingTV Antenna 23 2 4 Connecting VIDEO S VIDEO 24 2 5 Connecting HDMI 25 2 6 Connecting PC 26 2 7 Connecting RS 232C PC Control 28 2 8 Connecting Audio Lineout 28 Contents ...

Page 5: ... Menu 3 1The Menu System 30 3 2 Video Menu 31 3 3 Audio Menu 39 3 4 TV Menu 41 3 5 Setup Menu 46 3 6 Parental Menu 55 CHAPTER 4 Specifications 4 1 Specifications 63 CHAPTER 5 Troubleshooting 5 1Troubleshooting 66 ...

Page 6: ...6 1 1 InThe Box 1 2 Parts 1 3Terminals 1 4 Installation 1 5 Remote Control 1 6 Insert Remote Control Batteries 1 7 Menu Controls on Remote 1 8 Menu Configuration 1 9 Basic Operation 1 Set Up ...

Page 7: ...uded Hydra waterproof LCD product 1 Back Box 2 TV Assembly Waterproof Sealant 20 ft Low Voltage Power Cord CL2R Power Supply Brick 110 240V Standard USA A type plug Waterproof Remote Control with battery Mounting Hardware User Manual 1 1 In The Box ...

Page 8: ...oltage pass through port top top bottom bottom Framing member screw mounting slots 4 2 per side Framing member screw mounting slots 4 low voltage power location on unit control buttons glass face gravity lock guide slots 4 gravity lock mounts inputs outputs ...

Page 9: ...ut green Composite S Video Component Input RGB RS 232 Input HDMI Input DC Power Input 2 Channel Amplified Speaker Out 5 IR Lead with 3 5 mm Male Connector b o tt o m glass face 1 back box Note this view shows back box andtv assembly installedtogether 2 tv assembly Source Menu Power Volume Channel ...

Page 10: ...ad all installation instructions before beginning installation 1 back box vertical framing members Screw into framing members using screw mounting slots 4 PASS THROUGH PORT LOW VOLTAGE POWER audio videO Note Do not overtighten mounting hardware Back box should fit snuggly between framing members If the fit is poor and overtightening occurs the back box may deform resulting in a poorly sealed insta...

Page 11: ...g any gap Once complete the final wall surface should be flush with the front edge of the back box as shown 1 back box maintain cords in pass through port during wall finishing finished wall finished wall wall board framing member screw mounting slots note surface of finished wall and front edge of back box are flush 1 back box ...

Page 12: ...ool as near to the installed back box as possible to reduce wire slack B Before applying adhesive dry fit theTV assembly in back box Notice that the gravity lock mounts engage and ensure remote and LCD functionality in installed position C RemoveTV assembly from back box and place face down near back box Do not disconnect any wires Clean any residue from glass and remove debris D Apply supplied wa...

Page 13: ... power cable 2 BACK BOX Note Immediately afterTV assembly is installed and sealed verify functionality of LCD and remote If operation has been compromised by the installation corrections can easily be made until the sealant has cured ...

Page 14: ...recommended time designated by sealant instructions Once fully cured use a razor blade or utility knife to remove excess sealant finished wall wall board framing member Note glass face plate seals directly to finished wall surface sealant creates water tight seal completely installed back box and tv assembly ...

Page 15: ...oom Button Electronic Program Guide Button Mute Button Number Selection Buttons Channel Control Buttons Volume Control Buttons Enter Button 1 2 3 4 5 6 7 8 9 10 11 12 9 5 6 8 7 12 10 11 1 4 2 3 Remote performs best within 20 ft 6 m of the LCD and within 30º to the left or right of the display 1 5 Remote Control ...

Page 16: ...n Arrows 3456 Control menu options OK Confirm selection SLEEP Set sleep timer ZOOM Zoom current picture EPG View available electronic program guide MUTE Temporarily turn off audio 0 9 Numeric selection Channel Control Buttons V Select control Volume Control Buttons Volume control ENTER Confirm selection Functions by remote control buttons Button Function ...

Page 17: ...nd remove battery and safety tab Discard plastic safety tab Reinsert the battery positive side out the side with writing facing out Ensure waterproof ring is securely in place before returning cover Return cover and turn to CLOSE position Battery CR2032 3V Lithium Battery 1 6 Insert Remote Control Batteries ...

Page 18: ...ight arrow 4 to move to sub menu of a selected main menu Press EXIT button to return from sub menu to main menu or from main menu to menu removal To change a selected menu setting use Menu control buttons 34 Functions of theTV set can be controlled by the Menu Control Center on the remote control Familiarity with these functions will provide ease of operation ...

Page 19: ...d menu Press 4 or OK to enter the menu Use 5 or 6 within the selected menu to navigate to a submenu or setting to adjust Press 4 or OK to enter the submenu or use 3 or 4 to adjust selected setting Press EXIT at any time or wait 10 seconds to exit the menu 1 8 Menu Configuration OR ...

Page 20: ...he unit Press Power Standby button on the remote control or on the side panel again to return the display to standby off mode Selection of Input Mode Press the Source button to display the signal source menu Press 5 or 6 to select the signal source you desire then press OK to confirm 1 9 Basic Operation ...

Page 21: ...reparation 2 2 Connecting Power 2 3 ConnectingTV Antenna 2 4 Connecting VIDEO S VIDEO 2 5 Connecting HDMI 2 6 Connecting PC 2 7 Connecting RS 232C PC control 2 8 Connecting Lineout External Speaker 2 Connection ...

Page 22: ...re switched off 2 1 Preparation 2 2 Connecting Power You can connect many types of external equipment to yourTV To view external source options select the input source by pressing the SOURCE button on the remote control TheTV automatically adjusts voltage Before connecting power please check your power adapter for compatibility with wall outlet Power cable should be firmly connected to the power s...

Page 23: ...ut For watching digitalTV connect wall outlet with Antenna input Turn on theTV after all connections Watching AnalogTV DigitalTV AnalogTV signal has a channel number structure of 1 2 3 4 5 etc but DigitalTV signal has a channel number structure of 1 1 2 1 3 1 4 1 5 1 etc If you pressTV button on the remote control its input source changes from Analog to Digital or Digital to Analog ...

Page 24: ...op box Video S Video use same audio line so if two types of external equipment are connected with Video S Video audio will only be available for one type of the connected equipment Press SOURCE on the remote control and select Video or S Video Note Video S Video and audio cables are not included 2 4 Connecting VIDEO S VIDEO ...

Page 25: ...itor Connect 15 pin cable to 15 pin port on theTV and PC Connect audio cable to audio output of a PC stereo jack and PC audio input port of theTV Note D Sub stereo cables are not included Note Optimal Resolution is 1280 X 1024 60Hz For watching digital DVD Camcorder etc signal Press SOURCE on the remote control to select VGA ...

Page 26: ...NEL DIRECT D A 2 P 0100 9999 EX 50 2 50 02 DIG D C 2 U _ 1 999 EX 50 2 050 002 DIG CHANNEL UP C H U P X _ _ _ THE CHANNEL NUMBER OFTV X IF I CHANNEL DOWN C H D W X _ _ _ THE CHANNEL NUMBER OFTV X IF I NOTES UNDERSCORES _ WITHINTHE PARAMETER COLUMN REPRESENT A SINGLE SPACE ASTERISKS WITHINTHE PARAMETER COLUMN REPRESENT A VALUE WITHINTHE RANGE INDICATED INTHE CONTROL CONTENTS X WITHINTHE PARAMETER C...

Page 27: ...E ONLY AVAILABLE WHEN 4 3 SIGNAL IS BEING INPUT ONLY AVAILABLE WHEN 4 3 SIGNAL IS BEING INPUT ONLY AVAILABLE WHEN 4 3 SIGNAL IS BEING INPUT AV ONLY AVAILABLE WHEN 1080i p IS BEING INPUT N 0 02 DIGITAL AIR TWO PART NUMBERS 3 DIGIT PLUS 2 DIGIT 50 002 DIGITAL CABLE TWO PART NUMBERS 3 DIGIT PLUS 3 DIGIT OFTV X IF IT IS NOTTV DISPLAY IT WILL INPUT SWITCHTOTV SAME FUNCTION AS CH5 OFTV X IF IT IS NOTTV ...

Page 28: ...l Connect component cable to component ports ofTV and DVD player VCR Set Top box or camcorder Note Component and audio cables are not included 2 8 Connecting DVD Sound via the audio output terminal can be adjusted with the volume buttons on the remote control When selected the Variable option mutes the internal audio system ...

Page 29: ...29 3 1The Menu System 3 2 Video Menu 3 3 Audio Menu 3 4 TV Menu 3 5 Setup Menu 3 6 Parental Menu 3 Menu ...

Page 30: ...rcular display Note TV menu page is only forTV mode Press the Menu button on the remote control or on the side panel it will change in the following sequence Main Menu Exit Sub Menu Main Menu Exit 1 Press MENU to display the menu system 2 Press 5 or 6 to select the menu pages 3 Press OK or 4 to enter 4 Press 5 or 6 to select an item 5 Press 3 4 5 6 to select or adjust a setting Note If you do not ...

Page 31: ... is recommended to start with the following settings Brightness 51 Contrast 68 Hue 19 ColorTemperature Cool These settings maximize LCD picture for optimal performance through the mirror glass To achieve maximum performance customize these settings according to the lighting in your environment ...

Page 32: ... 6 to highlight your selection 4 Press 3 or 4 to adjust 5 Press MENU or EXIT to return or exit menu mode Adjustment of Brightness or Contrast 1 Press MENU for the Video menu to appear 2 Press 4 or OK to select the Video menu 3 Press 5 or 6 to highlight your selection 4 Press 3 or 4 to adjust 5 Press MENU or EXIT to return or exit menu mode ...

Page 33: ...or 6 to highlight your selection 4 Press 3 or 4 to adjust 5 Press MENU or EXIT to return or exit menu mode Adjustment of Hue only for NTSC 1 Press MENU for the Video menu to appear 2 Press 4 or OK to select the Video menu 3 Press 5 or 6 to highlight your selection 4 Press 3 or 4 to adjust 5 Press MENU or EXIT to return or exit menu mode ...

Page 34: ...o highlight your selection 4 Press 4 or OK to enter the sub menu 5 Press 3 or 4 button to select one of Cool Standard Warm or User for balance of whitening 6 Press MENU or EXIT to return or exit menu mode If you adjust one item of R Gain G Gain or B Gain the color temperature will change to User automatically Cool Standard Warm User ...

Page 35: ...r the Video menu to appear 2 Press 4 or OK to select the Video menu 3 Press 5 or 6 to highlight your selection 4 Press 4 or OK to enter the sub menu 5 Press 5 or 6 to highlight your selection 4 Press 3 or 4 to select 5 Press MENU or EXIT to return or exit menu mode ...

Page 36: ...ender dark colors creating a crush effect White Peak On Off Volume boost without distortion Limiter due to over run on the speakers CTI Off Low Medium Select dynamic color Strong improve level FleshTone On Off Select On to color correct flesh tones automatically Adaptive Luma On Off Select to control the luminance This Control feature will set the brightness and contrast levels for optimum perform...

Page 37: ...o menu 3 Press 5 or 6 to highlight your selection 4 Press 4 or OK to enter the sub menu Selection of Auto Adjust After entering the VGA menu 1 Press 5 or 6 to highlight your selection 2 Press 4 or OK button to confirm 3 Press the MENU button to return or exit Note This item will auto adjust the picture display ...

Page 38: ...6 to select V Position Use 3 or 4 to move the image up or down Phase Use 5 or 6 to select Phase Use 3 or 4 to adjust Clock Use 5 or 6 to select Clock Use 3 or 4 to adjust Selection of H Position V Position Phase Clock After entering the VGA menu 1 Press 5 or 6 to highlight your selection 2 Press 4 or OK button to confirm 3 Press the MENU button to return or exit ...

Page 39: ...Treble 1 Press MENU then press 6 for the Audio menu to appear 2 Press 4 or OK to select the Audio menu 3 Press 5 or 6 to highlight your selection 4 Press 3 or 4 to adjust 5 Press MENU or EXIT to return or exit menu mode 3 3 Audio Menu ...

Page 40: ...40 ...

Page 41: ...er Mode 1 Press MENU then press 6 until the TV menu appears 2 Press 4 or OK to select the TV menu 3 Press 5 or 6 to highlight your selection 4 Press 3 or 4 to select Cable or Antenna 5 Press MENU or EXIT to return or exit menu mode ...

Page 42: ... OK to start searching The channels that are found will save automatically 5 If you want to stop searching press MENU or EXIT to return or exit menu mode Note Locked channels will be skipped during the search Selection ofTuner Modes Cable or Antenna will affect the channel search When in Cable mode the searched channels are 1 135 When in Antenna mode it will search 2 69 ...

Page 43: ... to enter the TV menu 3 Press 5 or 6 to highlight your selection 4 Press 4 or OK to enter the sub menu 5 Press 5 or 6 to choose an item then press OK to confirm or cancel your selection 6 When you select theTV will automatically skip the channel 7 Press MENU or EXIT to return or exit menu mode ...

Page 44: ...channel after this theTV will go back to your last channel displayed When in DTV mode the operation is shown as below 13 1 Note If you select a channel higher than those already in memory theTV will display the last channel selected Number Buttons Dot Button Number Button Press 5 or 6 to select the channel number and then press the Enter button to play that channel content Press V buttons to selec...

Page 45: ...e start and end times of available channels In addition detailed information about the program is often available in the Guide The availability and the amount of program details will vary depending on the broadcaster 1 Press the EPG button to display the Guide menu 2 Press 4 or 3 to select the channel number 3 Press 5 or 6 to select the channel program 4 Press MENU or EXIT to return or exit menu m...

Page 46: ...NU then press 6 until the Setup menu appears 2 Press 4 or OK to select the Setup menu 3 Press 5 or 6 to highlight your selection 4 Press 3 or 4 to select English Español or Français 5 Press MENU or EXIT to return or exit menu mode English Español Français ...

Page 47: ...etup menu appears 2 Press 4 or OK to select the Setup menu 3 Press 5 or 6 to highlight your selection 4 Press 4 or OK to enter the sub menu 5 Press 3 or 4 to choose Time Zone Time or SleepTimer 6 Press MENU or EXIT to return or exit menu mode Time Zone Time SleepTimer ...

Page 48: ...ralTime MountainTime Arizona PacificTime or Alaska 3 Press MENU or EXIT to return or exit menu mode Selection of Time After entering the Time Setup menu 1 Press 5 or 6 to highlight your selection 2 Press 4 or OK to enter the sub menu 3 Press MENU or EXIT to return or exit menu mode Hawaii EasternTime Indiana CentralTime MountainTime Arizona PacificTime Alaska ...

Page 49: ...ffTimer 4 Press MENU or EXIT to return or exit menu mode Note Pressing the Standby button to turn off the LCD the setup time will be retained If the unit is unplugged or main power is otherwise disrupted the memory for time will be lost The following items are active only when you select Off of Auto Synchronization and select On of Timer Date Power OnTimer Time Power OffTimer ...

Page 50: ...r entering the Time Setup menu 1 Press 5 or 6 to highlight your selection 2 Press 3 or 4 to select 10 20 30 40 50 60 90 120 180 240 Minutes or Off 3 Press MENU or EXIT to return or exit menu mode 10 40 90 240 30 60 180 20 50 120 Off ...

Page 51: ...election 4 Press 4 or OK to enter the sub menu 5 Press MENU or EXIT to return or exit menu mode Selection of Analog Closed Caption After entering the Caption menu 1 Press 5 or 6 to highlight your selection 2 Press 3 or 4 to select CC1 CC2 CC3 CC4 TEXT 1 TEXT 2 TEXT 3 TEXT 4 or Off 3 Press MENU or EXIT to return or exit menu mode CC1 CC2 CC3 CC4 TEXT 1 TEXT 2 TEXT 3 TEXT 4 Off ...

Page 52: ...ew captions highlight CC1 CC2 CC3 or CC4 CC1 displays translation of the primary language in your area Note If the program or video you selected is not closed captioned no captions will display on screen To view text highlightText 1 Text 2 Text 3 orText 4 Note If text is not available in your area a black rectangle may appear on screen If this happens turn off the Closed Caption feature Note A clo...

Page 53: ... Caption Style After entering the Caption menu 1 Press 5 or 6 to highlight your selection 2 Press 4 or OK to enter the sub menu 3 Press 3 or 4 to select As Broadcaster or Custom When you select Custom you can use 5 6 or 3 4 buttons to highlight and select the option 4 Press MENU or EXIT to return or exit menu mode Service 1 Service 2 Service 3 Service 4 Service 5 Service 6 Off 3 Press MENU or EXIT...

Page 54: ...d protected items Font Size To set the Font Size value from Large Small and Medium Font Color To set the Font Color value from White Green Blue Red Cyan Yellow Magenta and Black Font Opacity To set the Font Opacity value from Solid Translucent and Transparent Background Color To set the Background Color value from White Green Blue Red Cyan Yellow Magenta and Black Background Opacity To set the Bac...

Page 55: ...2 Press 4 or OK to enter 3 Use 0 9 buttons input the password and the Parental Control menu will appear The Parental menu includes Program Block Change Password and Clear All functions You can use these functions after entering the correct password Entering the password When the password is already stored Press the Number buttons 0 9 to enter the 4 digit password used to change channel blocking se...

Page 56: ...56 If the password you entered is invalid a message will pop up as shown ...

Page 57: ...ord item 2 Press 4 or OK to confirm 3 Use 0 9 buttons input your new password in the New Password blank 4 Use 0 9 buttons input your new password again in the Confirm Password blank 5 When this is complete the previous menu will be displayed Note Please operate Change Password at the first time use this function ...

Page 58: ...ock item 2 Press 4 or OK to enter 3 Press MENU or EXIT to return or exit menu mode Using the Rating Enable item 1 After entering the Program Block menu press 5 or 6 to highlight the Rating Enable item 2 Press 3 or 4 to select On or Off On The rating settings are active Off The rating settings are not active ...

Page 59: ...r entering the Program Block menu press 5 or 6 to highlight a ratings item category options are listed on the following page 2 Press 4 or OK to enter 3 Press 5 6 3 or 4 to select an item then press OK to lock display or unlock display ...

Page 60: ...TV PG and Above TV 14 Language adult language applies toTV PG and Above TV 14 and Above TV MA Sex scenes sexual situations applies toTV PG and Above TV 14 and Above TV MA Violence applies toTV PG and Above TV 14 and Above TV MA F Violence fantasy violence applies only toTV Y7 U S Movie Ratings movies previously shown in theaters G general audience PG parental guidance suggested PG 13 13 years and ...

Page 61: ... If the correct code is entered the program lock mode is released and the normal picture appears Using the Clean All item 1 After entering the Parental menu press 5 or 6 to highlight the Clean All item 2 Press 4 or OK to enter 3 Press MENU or EXIT to return or exit menu mode Precautions When changing the audio from internal to external speakers power off the unit completely The LCD unit has a buil...

Page 62: ...62 4 1 Specifications 4 Specifications ...

Page 63: ... X 900 Maximum Colors 16 2M Dot Pitch 0 285mm H X 0 285mm V Panel Life 50000Hrs OSD Language English French Spanish Tuner Color System ATV NTSC M Digital ATSC Main Dimension Monitor Height 337mm Width 483mm Depth 80mm Audio system Fixed line audio output for external speakers External Speaker Power Output 10 25w x 2 stereo amplifier for external speakers Variable line audio using PC output ...

Page 64: ...put 3 5mm Line out L R Jack for external AC Receptacles 110 240 VAC Receptacle x 1 50 60 Audio Lineout Degson Audio OptimalTemperature Humidity Internal Wall Cavity Only OperatingTemperature 20 60 C StorageTemperature 10 50 C Operating Humidity 10 80 RH Storage Humidity 10 90 RH Accessories 20 ft Low Voltage Power Cord CL2R Standard USA A type plug Power Supply Brick 110 240V 50 60 Hz 0 5A Max Wat...

Page 65: ...65 5 1Troubleshooting 5 Troubleshooting ...

Page 66: ...rom a station network No image Check whether the power cord is properly connected And press the power button Black background only Check whether the mode is set as PC monitor or Video S Video input notTV mode Strips and shaking display It may be interrupted by neighboring radio waves please check any wireless phone hair drier electric drilling machine and etc Execute fine tuning for manual adjustm...

Page 67: ...0 20 minutes LED lamp turns off in red and it shows no image Check whether the graphic cable is connected to theTV and a PC Check whether a computer is in power saving mode and attempt to operate keyboard and mouse Unstable or unfocused image or trembling Check whether the D Sub cable is connected to theTV and a PC If a PC display mode is changed the screen needs readjusting so you need to use Aut...

Page 68: ...SÉURA INCORPORATED www seura com SÉURA 2009 All Rights Reserved SÉURA Inc 1230 Ontario Road Green Bay WI 54311 800 95 SEURA t 920 857 9069 f 920 857 9490 12 1 09 ...

Reviews: