Setup
UltraWave Product Guide
Page 33
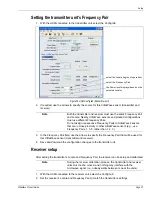
Setting the transmitter unit’s Frequency Pair
1. With the UCM connected to the transmitter unit, select the Config tab.
2. If required, use the arrows to specify the Locale for this UltraWave sensor (transmitter and
receiver).
3. In the Frequency Pair field, use the arrows to specify the Frequency Pair that will be used for
this UltraWave sensor (transmitter and receiver).
4. Save and download the configuration changes to the transmitter unit.
Receiver setup
After setting the transmitter’s Locale and Frequency Pair, the receiver can be setup and calibrated.
1. With the UCM connected to the receiver unit, select the Config tab.
2. Set the receiver’s Locale and Frequency Pair to match the transmitter’s settings.
Figure 30 UCM Config tab (transmitter unit)
Note
Both the transmitter and receiver must use the same Frequency Pair
and Locale. Nearby UltraWave sensors and stacked configurations
must use different Frequency Pairs.
Do not assign consecutive Frequency Pairs to UltraWave sensors
that are in close proximity to other UltraWave sensors (e.g., use
Frequency Pairs 1, 3, 5, rather than 1, 2, 3).
Note
During the receiver calibration process, the transmitter and receiver
units must not be moved, and nothing may interfere with the
microwave signal (i.e., nobody walks between or near the units).
select the Locale (region of operation)
select the Frequency Pair
the Power level displays (based on the
selected Locale)


