background image

3.  Installing Sennheiser  

HeadSetup

 Pro

3.1 Installed by an IT administrator 
The most common way of having Sennheiser HeadSetup™ Pro installed onto an end-user  
PC is via remote installation by the company’s IT administrator. If you have Sennheiser 
HeadSetup™ Pro remotely installed on your computer, you just need to start up the software 
Sennheiser HeadSetup™ Pro (a shortcut to the application will be present on the desktop). 
Sennheiser HeadSetup™ Pro will automatically be started when the PC is booted. 
Note:  If the remote machine already has Sennheiser HeadSetup installed, please ensure to 

uninstall Sennheiser HeadSetupbefore deploying the Sennheiser HeadSetup Pro.

3.2 Manual installation by the end-user  
If you are requested by an IT administrator to manually install Sennheiser’s HeadSetup™ 
Pro, the Sennheiser HeadSetup™ Pro installer and a file named TenantConfiguration.dat 
will be provided to you. The files should be placed in same folder. 
If you are a freeware user then you get the Sennheiser HeadSetup™ Pro installer from the 
Sennheiser website.
Step 1:  Right click on the setup icon and select “Run as administrator.” 
Step 2:  If asked for permission to make changes to your system, accept by clicking “OK.” 
Step 3:  Select your preferred language for Sennheiser HeadSetup™ Pro. 
Step 4:   When the Sennheiser HeadSetup™ Pro Welcome window of the installation  

wizard appears, click “Next.” 

Step 5:   A license agreement page will appear. Read it and if acceptable, Click “Accept” 

and “Next.” 

Step 6:  A ready to install page will appear. Click “Install” to start the installation. 
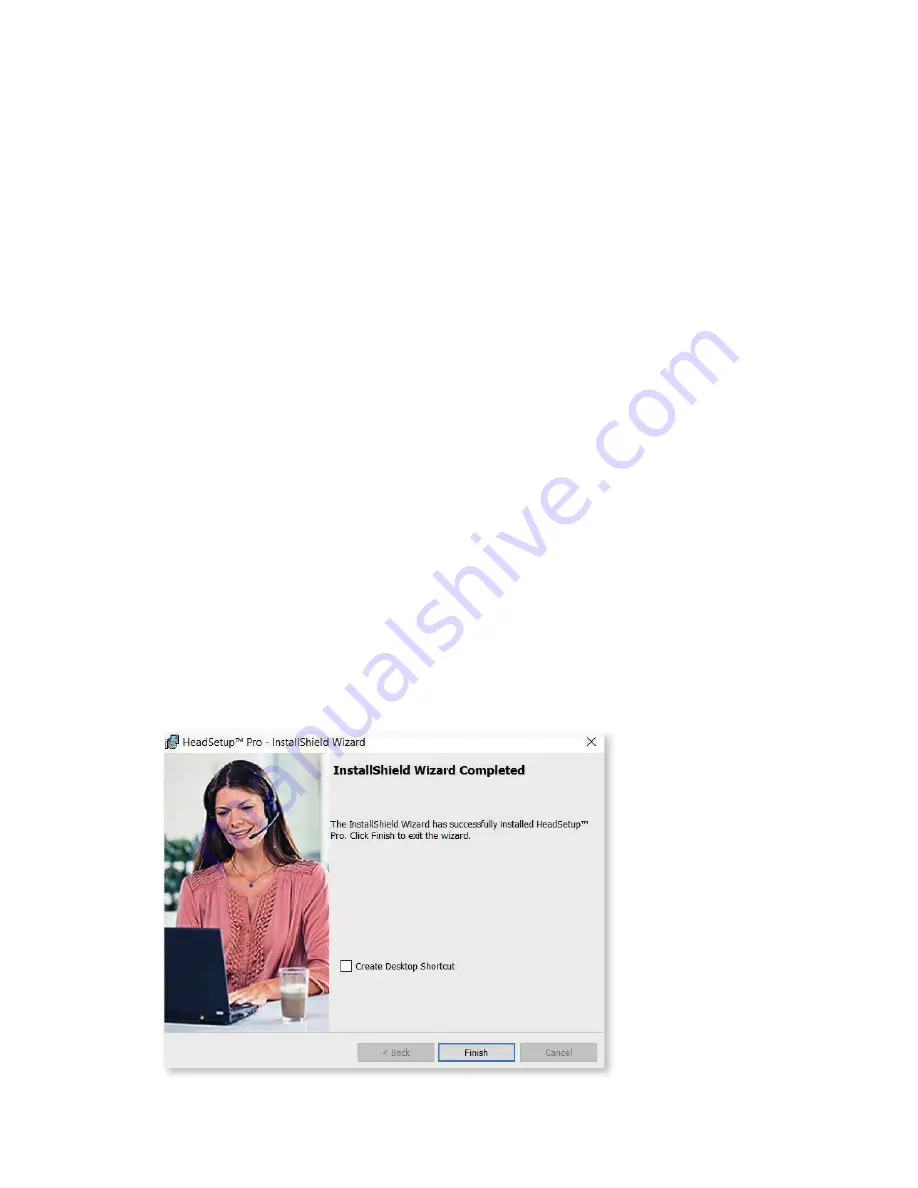
Step 7:   When the “Installation completed” window appears, remember to select the 

create shortcut to create an icon on the desktop. Click “Finish” to close

Step 8:   If asked for uninstall Sennheiser HeadSetup™ in order to proceed with the installation 

of Sennheiser HeadSetup™ Pro, then please uninstall Sennheiser HeadSetup™ and 
try to install Sennheiser HeadSetup™ Pro again.

5

SENNHEISER HEADSETUP™ PRO – END-USER MANUAL

Summary of Contents for HeadSetup Pro

Page 1: ...Sennheiser HeadSetup Pro END USER MANUAL...

Page 2: ......

Page 3: ...4 2 3 Device service 4 3 Installing Sennheiser HeadSetup Pro 5 3 1 Installed by IT administrator 5 3 2 Manual installation by the end user 5 4 Getting started 6 4 1 Home 7 4 2 Details 8 4 3 Updates 8...

Page 4: ...s available in the desktop application Sennheiser HeadSetup Pro 1 3 Intended audience of this document The Sennheiser HeadSetup Pro Guide is intended for end users 2 System requirement 2 1 Hardware re...

Page 5: ...ll be provided to you The files should be placed in same folder If you are a freeware user then you get the Sennheiser HeadSetup Pro installer from the Sennheiser website Step 1 Right click on the set...

Page 6: ...rs and the application itself When Sennheiser HeadSetup Pro is running it can be accessed by right clicking the application icon located in the notification bar Double click on the icon to view the ap...

Page 7: ...view of connected devices will help you to manage updates efficiently The number of shown subjects per page is set to a maximum of four devices If the number exceeds four navigation arrows will help...

Page 8: ...tails page which will access the latest available device information at www sennheiser com cco 4 3 Updates In the menu Updates all connected devices are listed together with a status about the install...

Page 9: ...w will appear if you try to update a Bluetooth device like Sennheiser PRESENCE not connected to an USB port using a USB cable Product Installed Version File Name Select File DW Pro 2 3 1 0 Select Firm...

Page 10: ...ration feature is always disabled and user can t change those features User preference configuration feature is always enabled and end user can change those features according to his her preference an...

Page 11: ...headset call control Check Disable Call Control box and click on the Save button to enable this feature When enabled call control from the default headset will be used only for Microsoft Office Commun...

Page 12: ...Integration This is a support for Busy Light Integration with Softphone status and busy indication in Softphone On Setting Busy light option to enable Busy light integration option is displayed which...

Page 13: ...ce is deployed by your IT administrator the device specific update button will be activated Simply press the Update button to execute the device update If buttons are greyed out no updates are availab...

Page 14: ...department or to Sennheiser support in case that is needed Help User guide Clicking this menu item opens the user guide Check for Updates Clicking the Check for updates menu item will trigger the appl...

Page 15: ...panel window Step 5 In the Programs and Features dialog box click Yes Step 6 A progress bar will track the uninstalling of the application 5 2 Uninstalling using the setup file Step 1 Open Sennheiser...

Page 16: ...857 8 00 17 00 Belgium T 32 28080784 8 00 17 00 Denmark T 45 89882841 8 00 17 00 Finland T 358 942450352 8 00 17 00 France T 33 170610386 8 00 17 00 Germany T 49 3030808045 8 00 17 00 Hungary T 36 140...

Reviews: